
Hi there “Process Automation” fans,
Welcome to a new installment of “Process Automation” tips.
The initial question that started this post: Will a Deletecase service call also delete the business workspace (BWS), AND how do we avoid it?
We learned hard lessons again after deleting a case in runtime where, suddenly, we concluded (a day later) that the business workspace was removed too, including all the important documents in it! #RED_FLAG 🚩
After this eXperience we did a valuable quick lunch-walk in the rain (where the sun came out once we got back) when these practical solutions came up:
- Clear the ‘workspaceId’ first and delete the case after
- Move important BWS documents first and delete the case after (incl. BWS)
- You can do this from a BPM in Process Automation by calling the xECM API to move the document and then calling a ‘Deletecase’ service call of OPA
- You can also do this from a webreport in Content Management (xECM), moving the document internally. After this move you can call the OPA API (via a ‘Deletecase’ SOAP call or via a Typed REST layer delete operation) to delete the case instance (we leave the ‘webreport’ out of scope for this post!)
Great, as with this input we can craft something beautiful again…
Let’s get right into it…
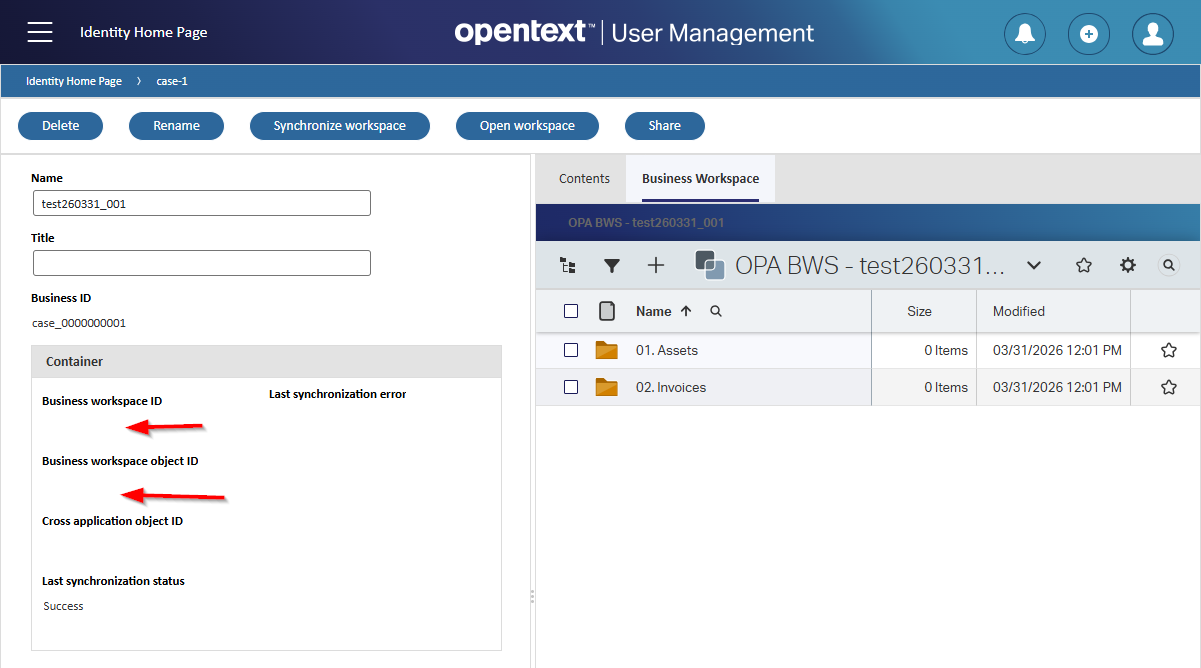
Make sure you first have OPA up and running with xECM. Is everything configured properly with a ‘Case’ entity containing a business workspace building block and all steps in xECM (in Content Management) to create a new business workspace? Then you should have something like this as an end result in OPA runtime for a new ‘Case’ instance:
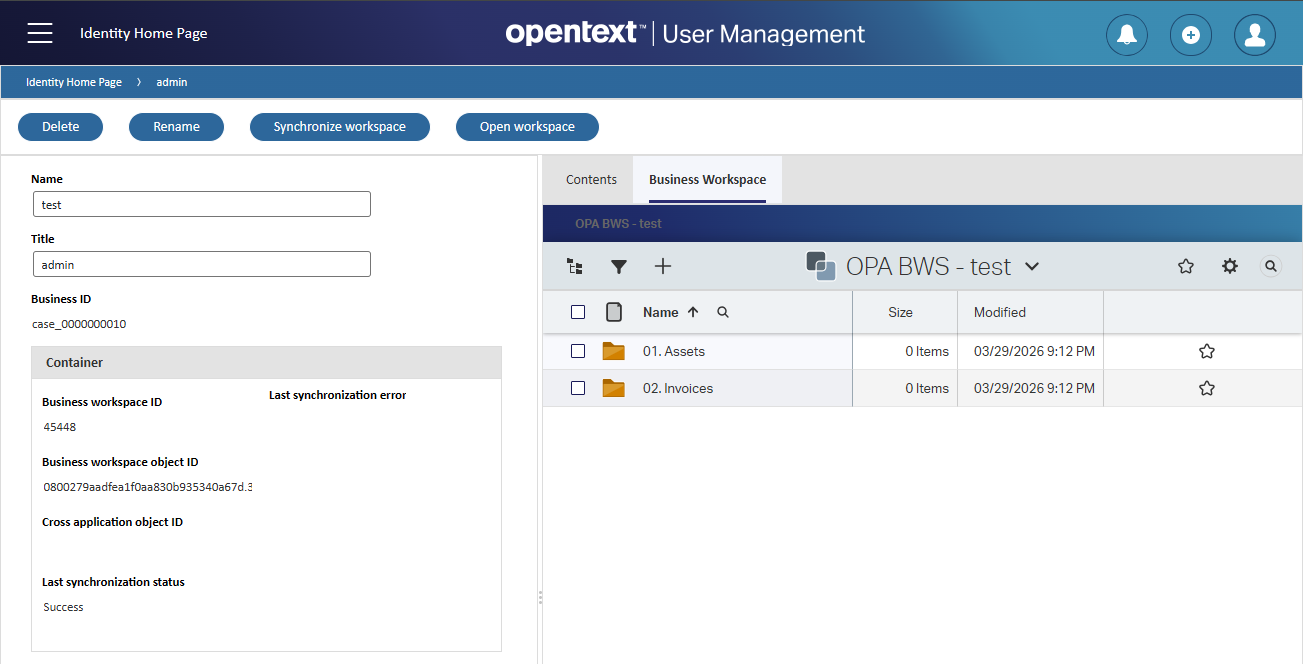
That container on the form shows specific BWS details…Always interesting for administrators; I just stumbled upon it while exploring the BWS properties.
First another question: How do we check where this BWS is created in xECM? Well, open the developer tools of Chrome and watch the state/ping calls to xECM:
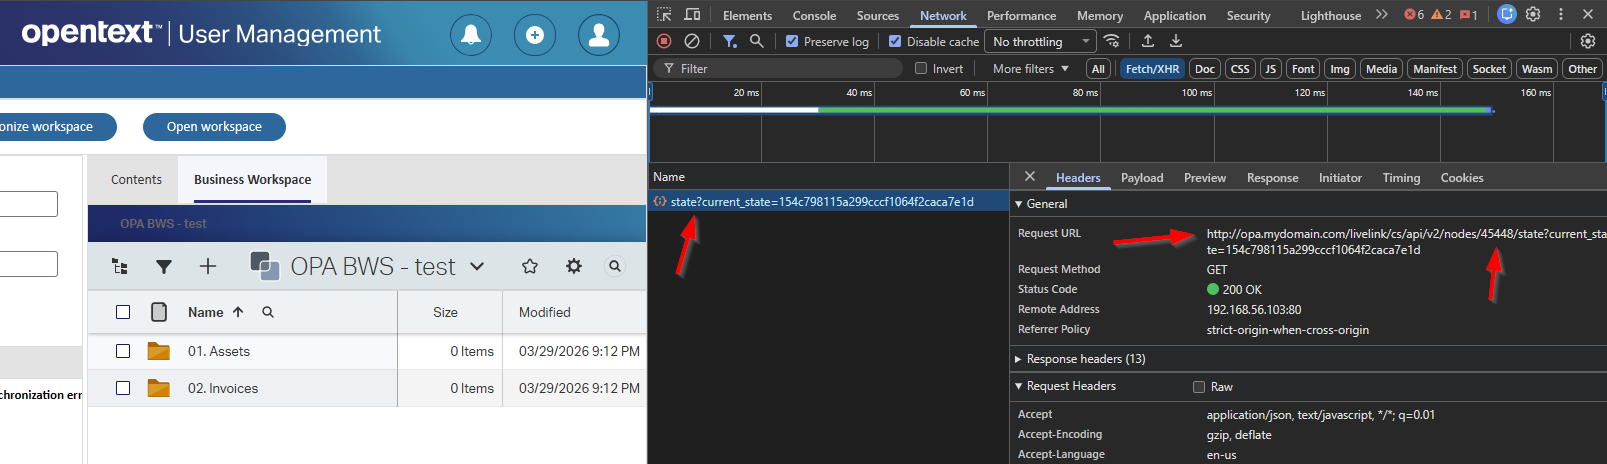
See the ID and navigate to a URL like this (which is SmartView of Content Management): http://192.168.56.107:8081/livelink/cs/app/nodes/{id}
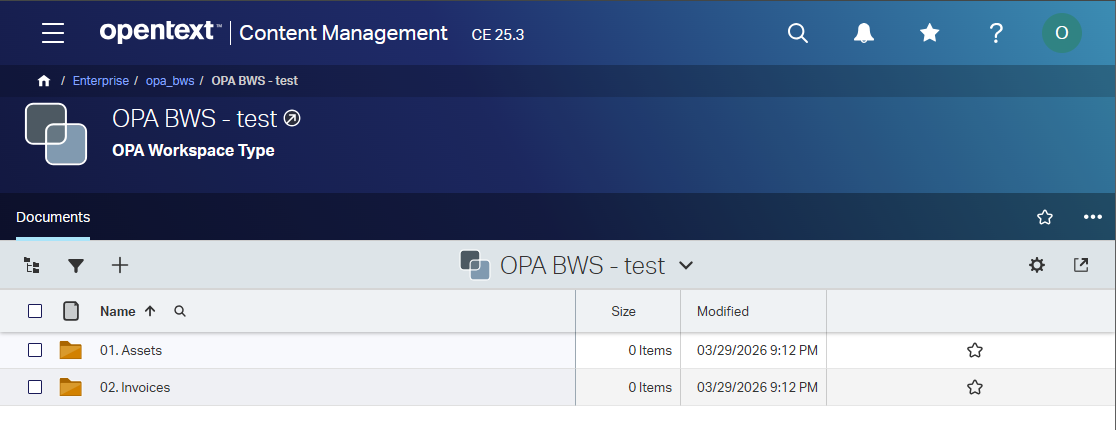
Now delete the case in OPA and refresh the link for Content Management:
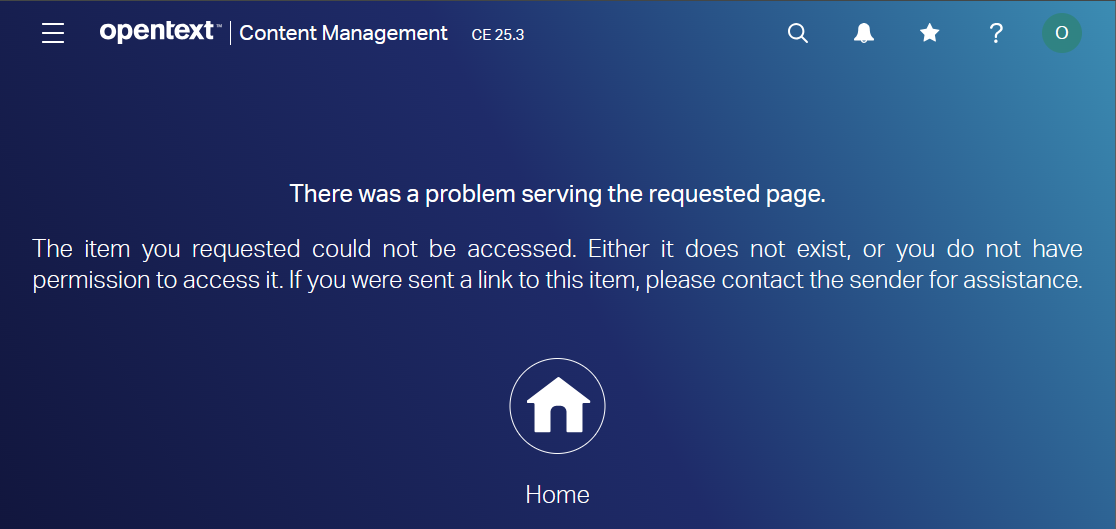
Yes, it’s removed!! #WTF…This is something we need to avoid; or at least make sure to save our data before deletion happens!
…
Before we can avoid the removal, we first need to know how the connection between the two platforms works. For this, I raise the logging level for my databases (the one from OPA and the one from Content Management). Both my databases live in the same Postgres database instance, and I learned a new way to enable logging at database level only (not in postgresql.conf which is for ALL databases):
1 | sudo -u postgres /usr/pgsql-17/bin/psql -d opa_db |
With the logging in place, I create a new case instance in OPA which also creates a related BWS. Watching this action closely in the logging, we see two table updates passing by (with my ‘HeidiSQL’ tool):

1 | SELECT id, s_item_business_id, s_workspaceid, s_workspaceobjectid, case_name |
We also see this table passing by (exposed through DB view ECMLINK_WKSP_LINKED):

1 | SELECT * |
So, now what? Well, let’s just manipulate the data. First I clean the s_workspaceid and s_workspaceobjectid values from my ‘Case’ instance in OPA. After refreshing runtime, I conclude that my case instance still finds the BWS:
AND after hitting my ‘Synchronize workspace’ button the values are restored…fascinating!
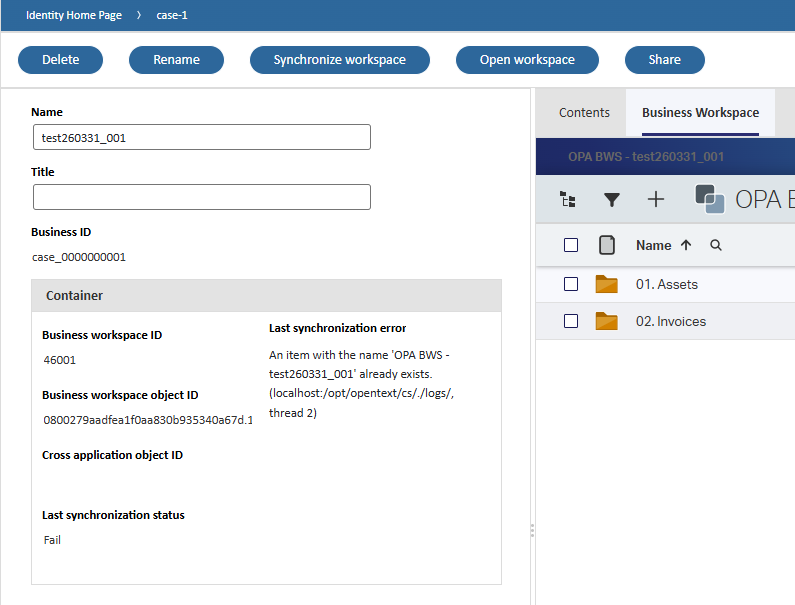
Ok, it’s time to clear the values in otsapxecm_wksp_links for my workspace id! I cleaned the id_bo value and set the dataid to zero (because of an integer value). After another refresh in runtime, I still conclude my case instance finds the BWS…Interesting and not something I expected. However, hitting the sync button gives an error now:
Restoring the row in
otsapxecm_wksp_linksfixes it all again!
Right…How about cleaning both sides of the database tables? Well, now it is starting to move. When I now delete the ‘Case’ instance in OPA, my BWS in xECM is still available! However, is this the way to go? Well, I wouldn’t recommend it, but it provides us with database insights so far!
Ok, we can do better!
Move document in xECM from OPA BPM
Before we delete our case, we need to move our document out of the BWS and into a new location. This is Content Management functionality accessible via its API layer. It’s not that hard as we simply do a PUT-request on the document (which is a node-id in xECM) on this URL: http://192.168.56.107:8282/livelink/cs/api/v1/nodes/{id}. The PUT-request can have a body and according to the specs we need to provide the node-id of its destination in JSON format:
1 | { |
Why
2000? Well, that’s just the first node in Content Management where all the magic starts, which is probably a post in itself (for another time!)
Right…How will this look in real life as it requires authentication? Yes, my friend, and those are details we can find in these two posts (details you need to eXperience on your own!):
- Calling SOAP and ReST via Postman (incl. authentication)
- Beware; The frustrating pitfalls of calling the xECM (ReST) API with the current user session
…
Once you understand both topics (authentication AND the xECM API), you can continue reading! Otherwise, it makes no sense. Make sure you understand these bullet points very well from the OPA platform perspective:
- Receive a current user SAMLart-token from a
Requestservice call - Convert this token into a content server OTDS ticket via the
documentservices - Call xECM to:
- Read a node with a GET-request
- Receive nodes within a node (your document/folders) with a GET-request
- Create a new node with a POST-request
- Move a node to another node with a PUT-request
…
So, with that clear, it’s time to think about the pseudocode for a new BPM which we’ll call with a new ‘Rule’ building block of type action (which is eventually a custom button!):
1 | String archiveNodeId = "50949"; //Can be a solution variable! |
In short: We read the current case with the corresponding workspace id. With this id, we can manipulate xECM nodes to move folders outside the BWS before deleting the case!
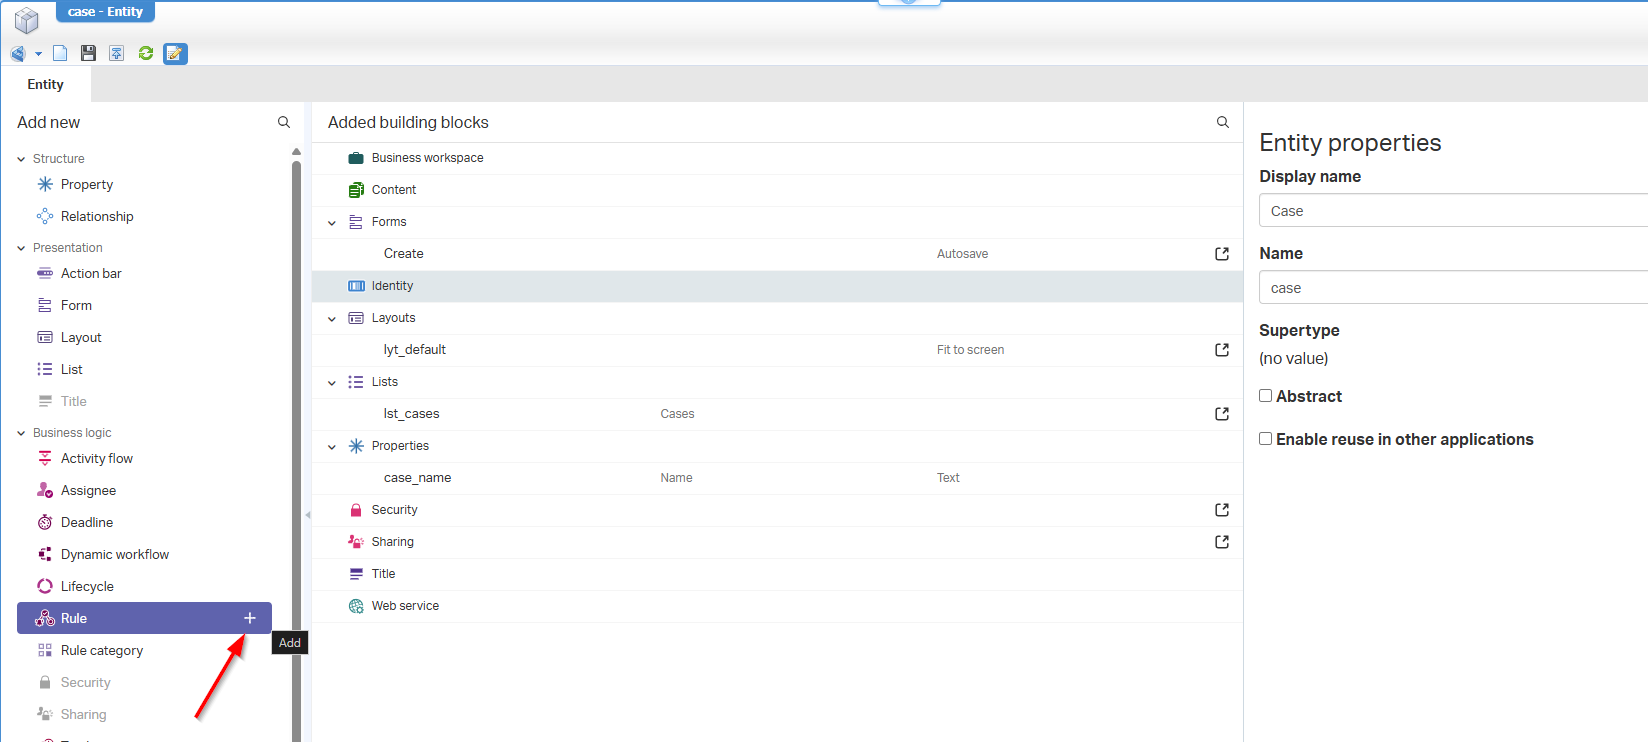
Now it’s time to open our OPA workspace with the corresponding project, open the ‘Case’ entity (the entity with the business workspace building block applied!), and create a new ‘Rule’ BB:
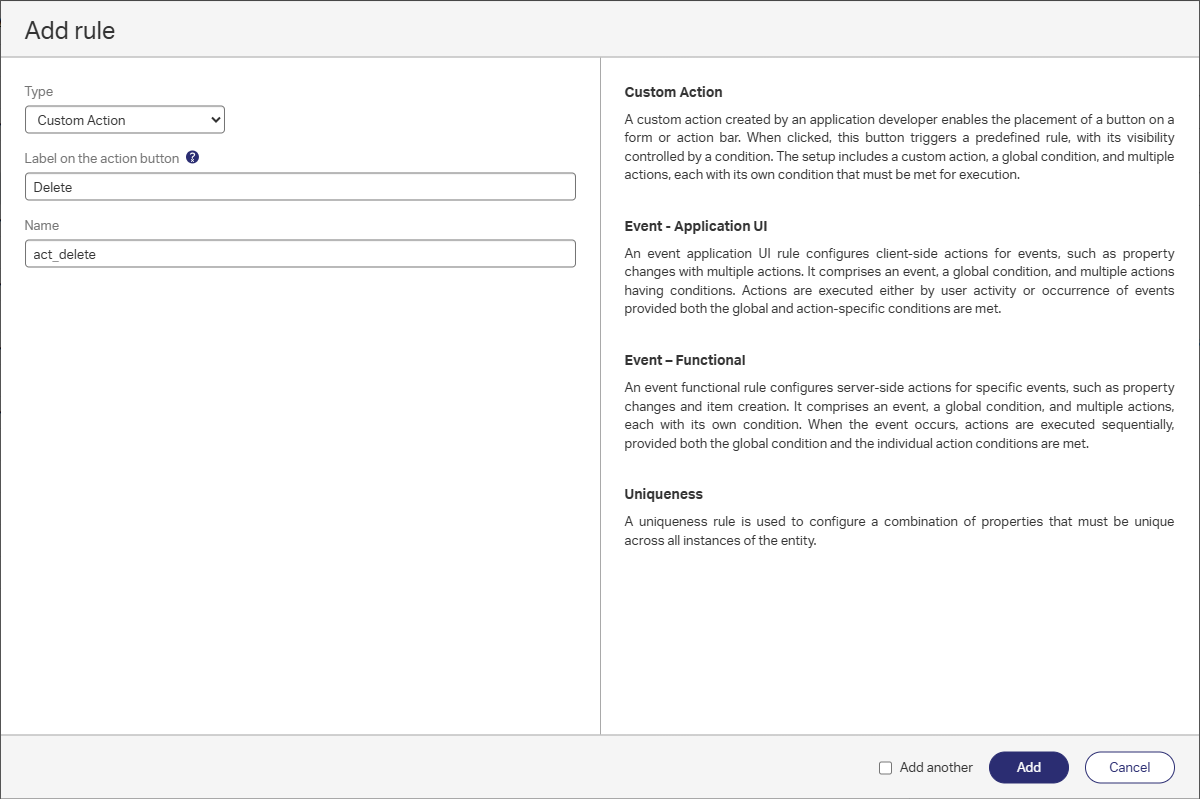
Initialize the rule like this:
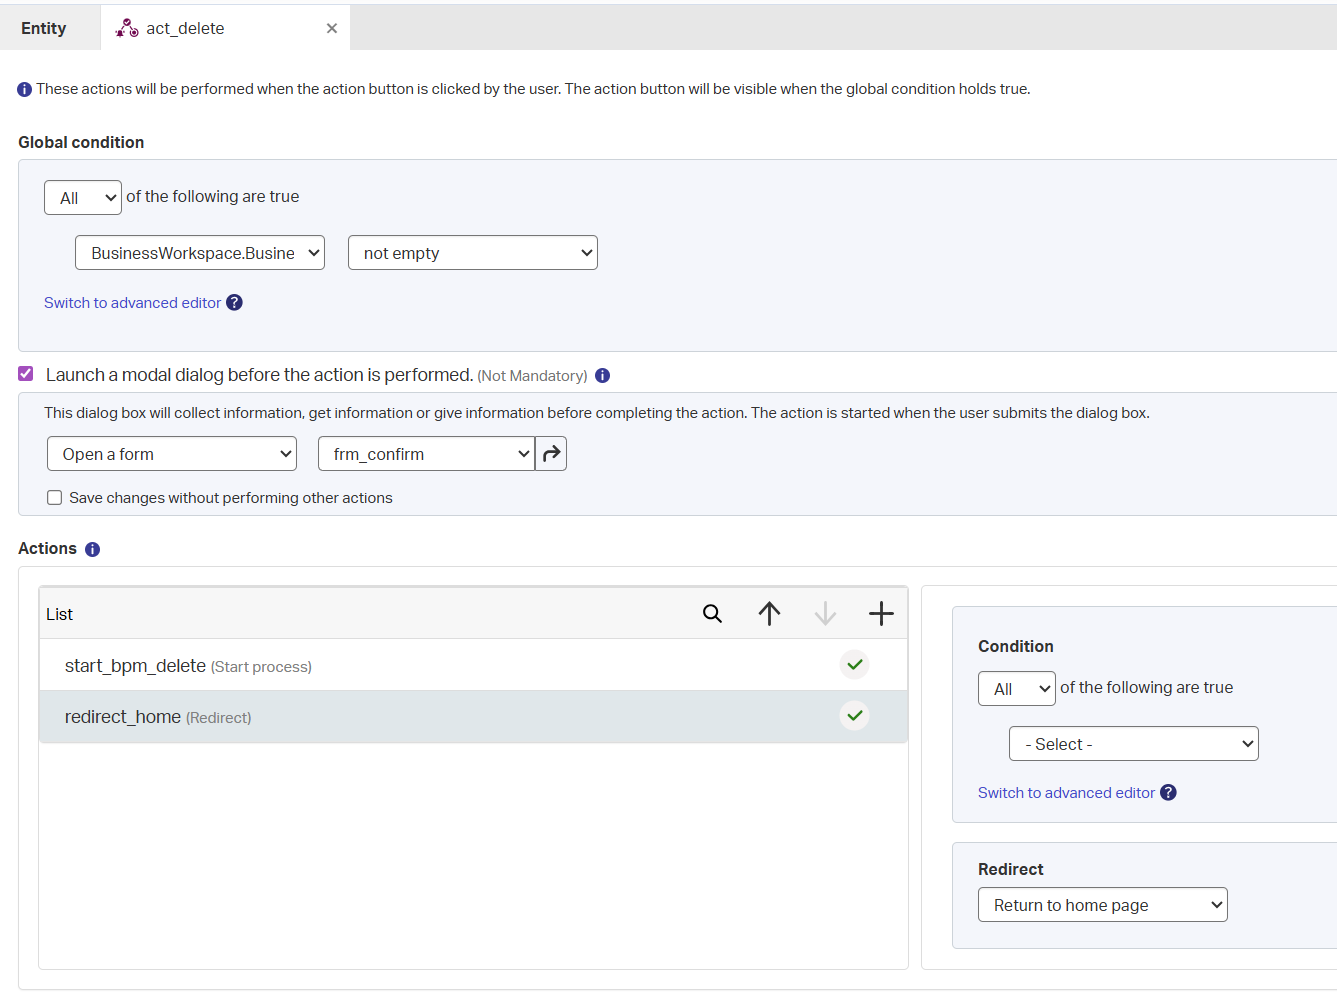
And configure it like this with a simple one-activity bpm_delete BPM template:
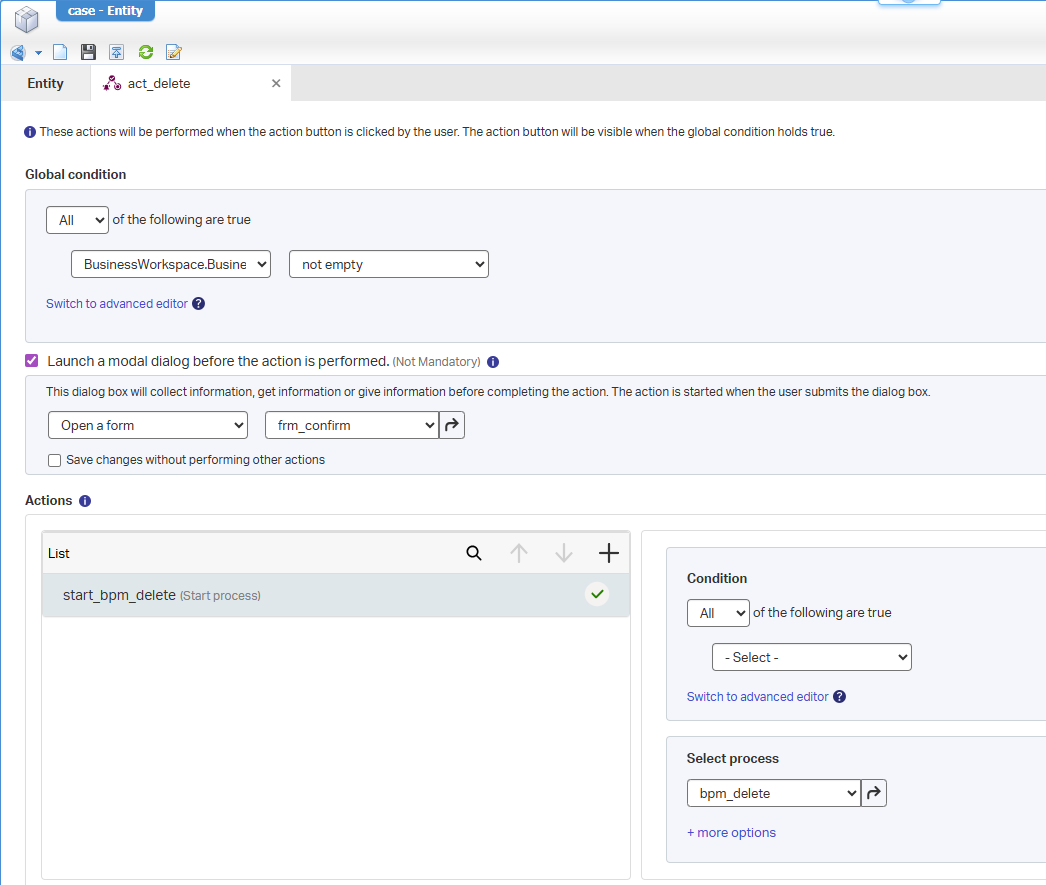
Notes:
- You can optionally show a “Confirm” message as a cancellable form…A task on your own!
- Don’t forget to enable this new action in the ‘Security’ building block (if in place)
- Starting a BPM from a ‘Rule’ can sometimes be painful; In that case, add a condition for that specific action like
1==1ortrue
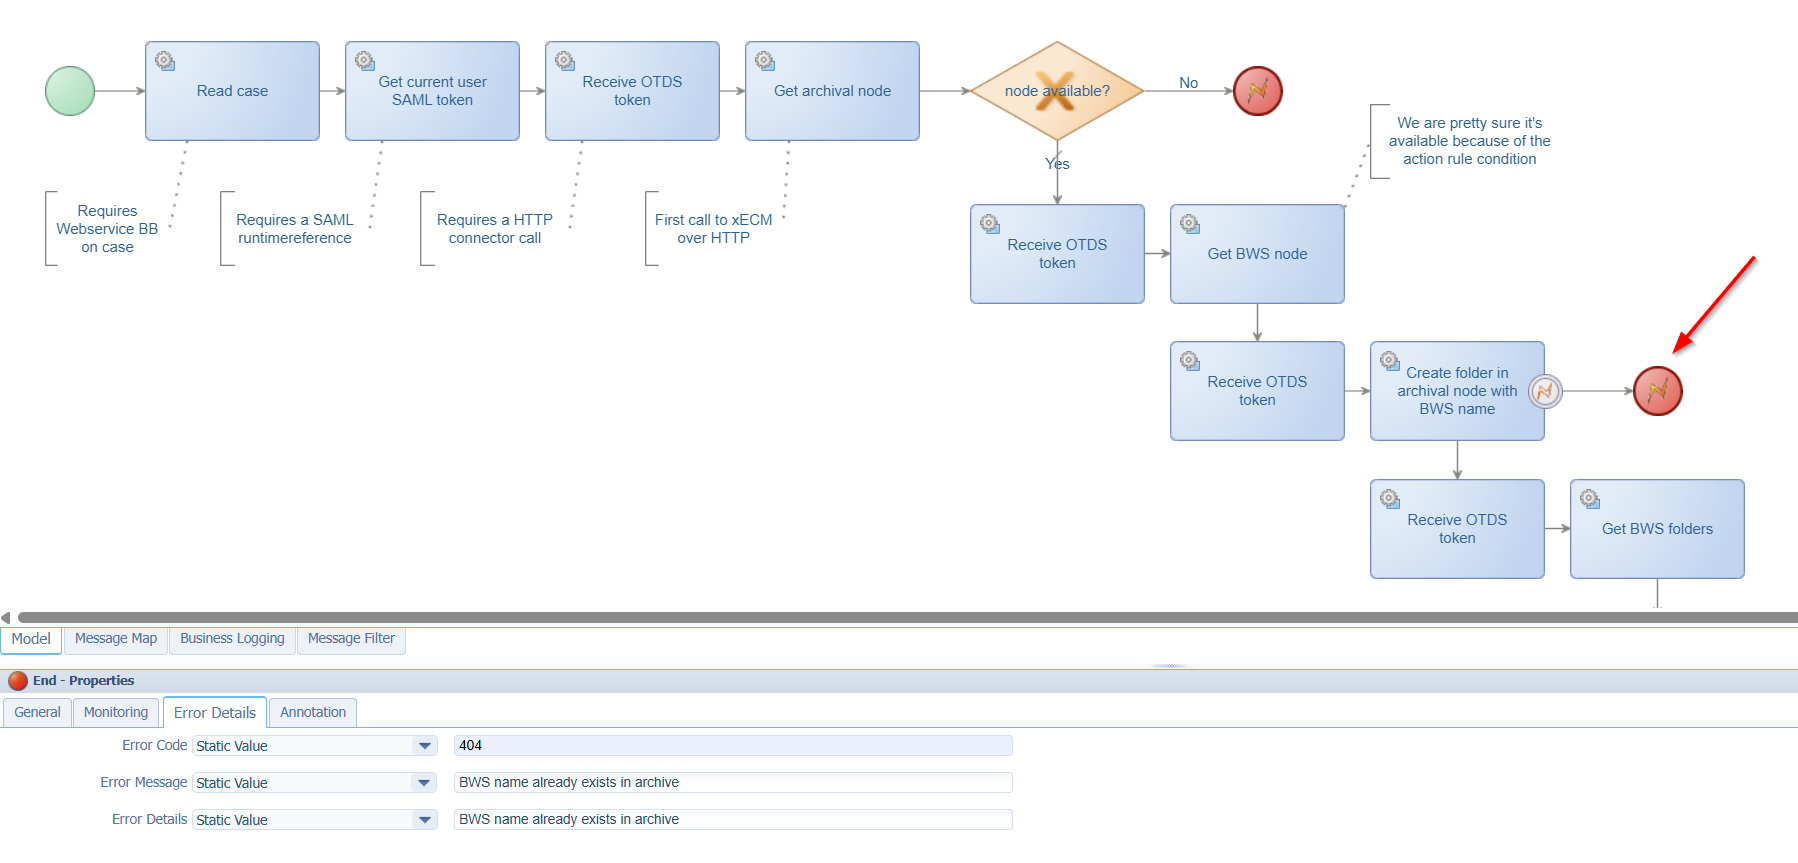
Our next step is the configuration of the bpm_delete BPM; Open it and start with a first implementation like this:
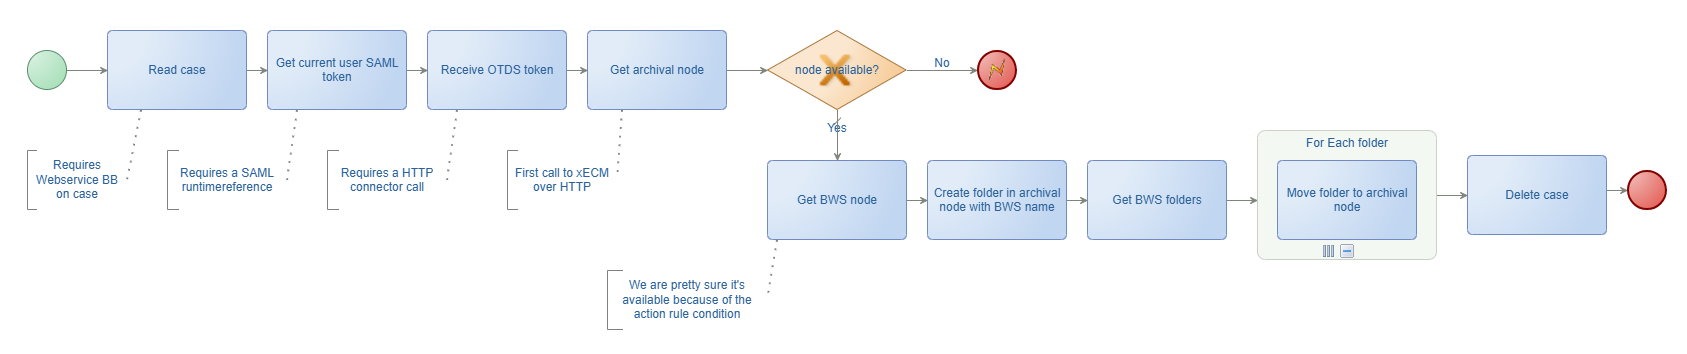
Do not forget this list on any BPM you create:
- Make the BPM short-lived for direct feedback in the UI (for this use-case)
- Think about worst-case scenarios with proper exception handling and runtime errors
- Never forget to set the runtime security for a BPM
- Set a namespace; something like:
http://schemas/opa_tipsprj_generic/bpm(TIP: Have a look at a dynamic Enum BPM!) - Set a proper monitoring level
- Name your for-each iterators
- Make it readable and understandable for others
- Use the proper decision node-type (in our case ‘Exclusive’)
Let’s continue the service implementations for each activity…
👉 Read case
This requires a ‘Web service’ building block on the ‘Case’ entity. The READ operation is needed here:
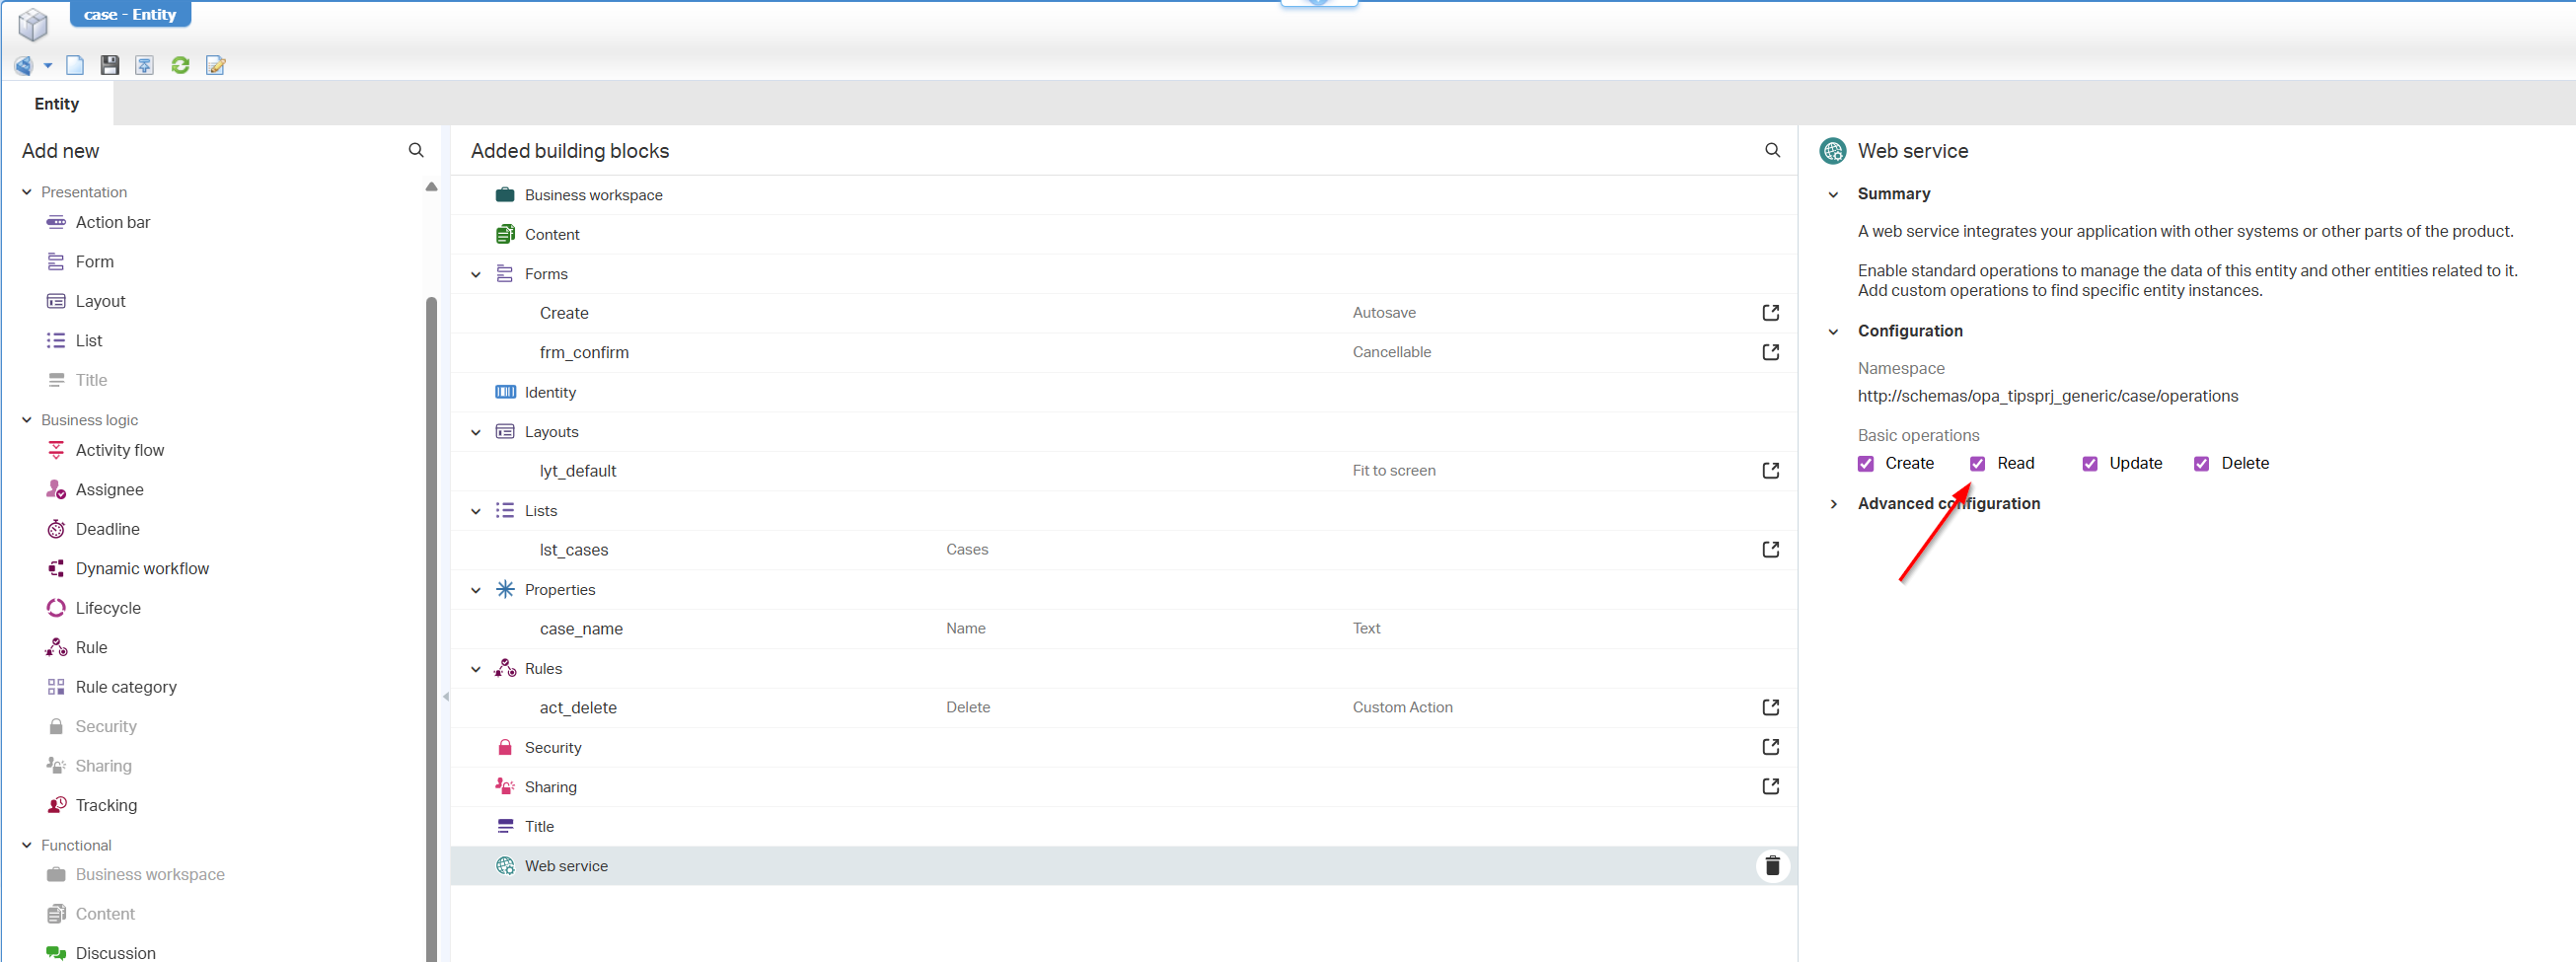
You see all operations enabled, but always think what is minimally required for your solution; I see this going wrong so many times when everything is just enabled because it can!
To support the service operation, we need a new service container of type ‘Application Server’. A topic you can create in the ‘System Resource Manager’ artifact for your organization; I leave the details with you.
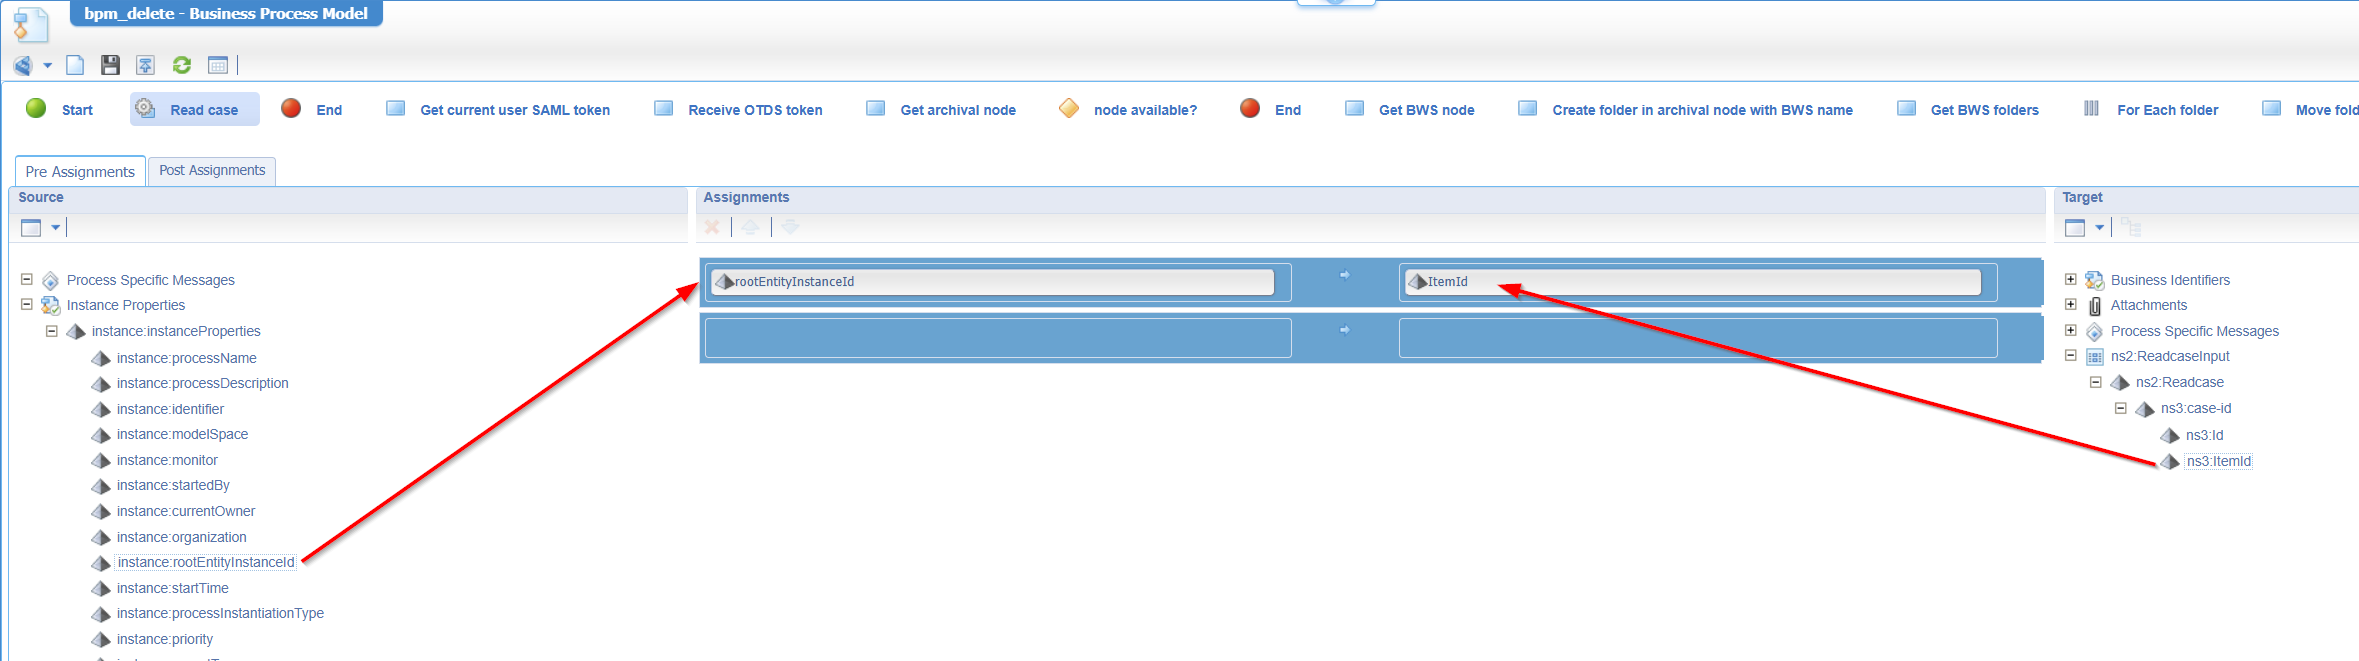
Right-click the ‘Read case’ activity and insert the webservice Readcase. Keep the description of the activity as is and jump into the messagemap tab (at the bottom of the BPM template). Make a first mapping like this:
👉 Get current user SAML token
This one first requires a web service runtime reference from the platform:
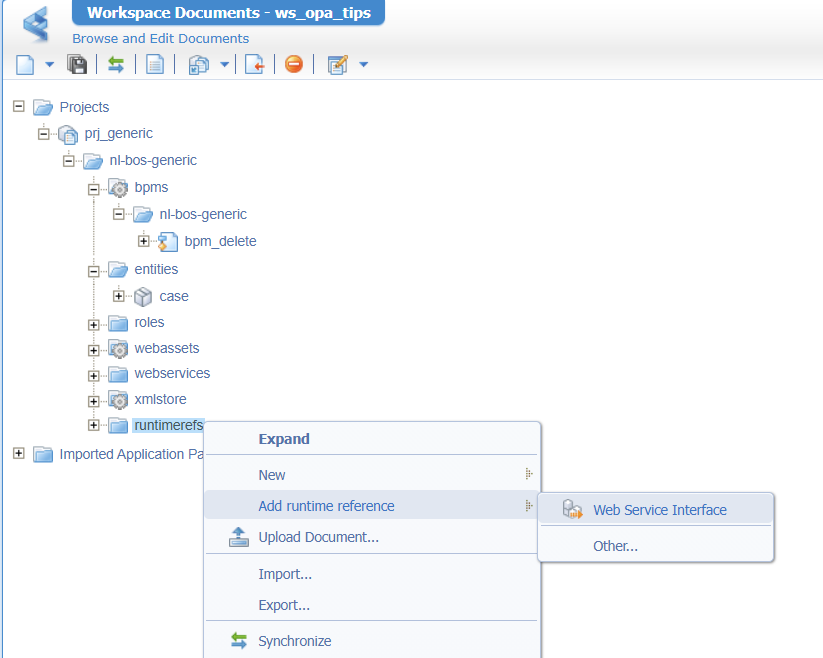
You need to look for the package Cordys Single Sign-On and insert the method set SAMLProtocol as a reference!
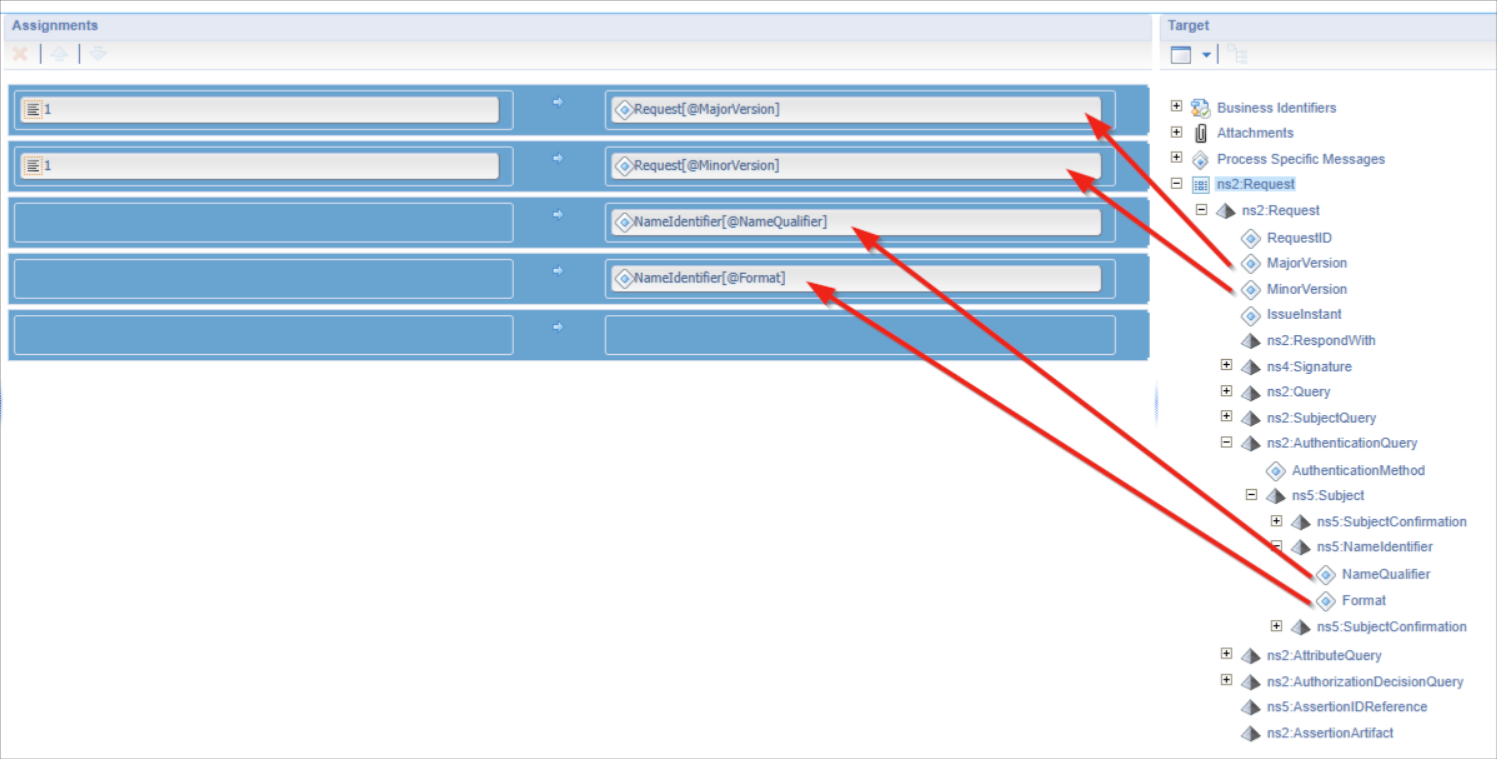
With this new reference, you can insert the Request webservice to the ‘Get current user SAML token’ activity. The message mapping will look like this:
See also here for a splendid example!
👉 Receive OTDS token
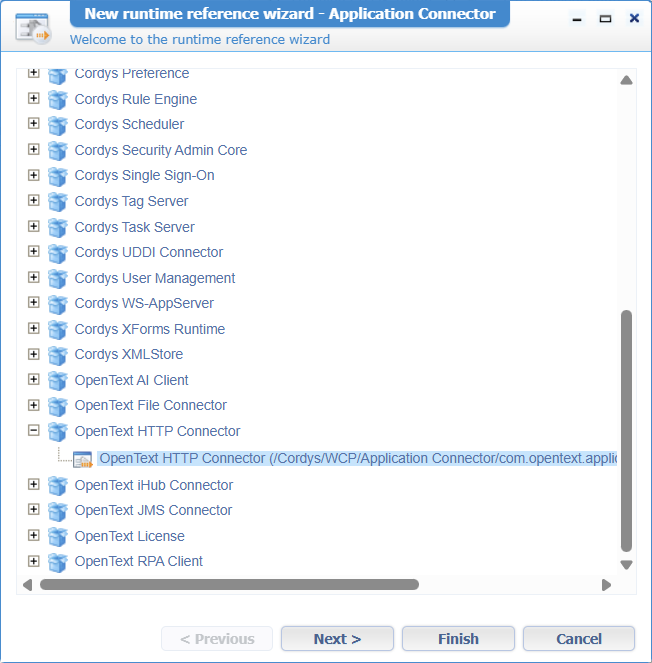
For this one, we need the HTTP connector! That’s again a new runtime reference for your project. This time of type ‘Application Connector’! The package is OpenText HTTP Connector with method set Method Set Http Configuration:
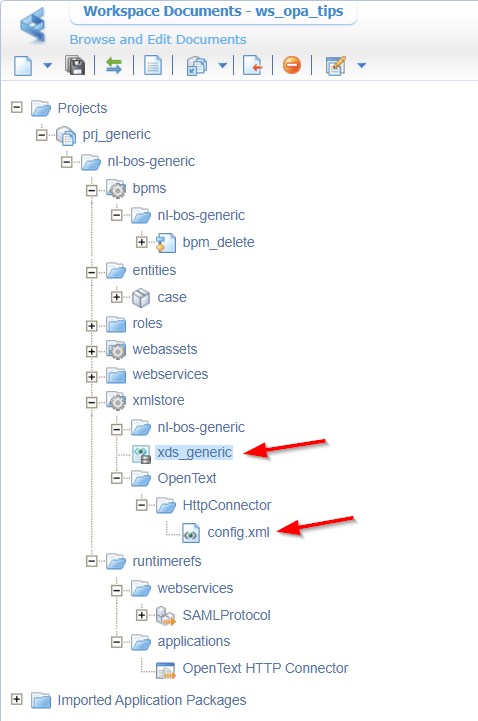
This HTTP connector reference relates to a service container of the same type. You can add it to the ‘System Resource Manager’ again. This service container depends on a config file in the document store location: OpenText/HttpConnector/config.xml
This is the content of this XML file (changed by your own server settings!):
1 | <configurations xmlns="http://httpconnector.opentext.com/1.0/configuration"> |
You can use an ‘XML Store Definition’ type of document to copy it into the XML store (which is also an artifact on its own!)
Next, we need to create three new custom webservices (also for the next activities in our BPM already!). Use this input:
1 | #xECM |
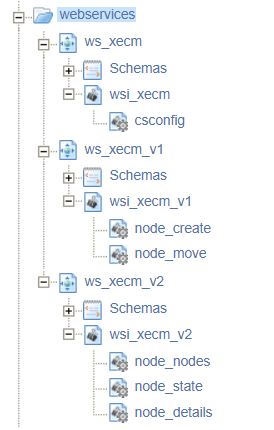
You can make the operations richer with XML schemas; We skip it for now…I leave it for a task on your own!
For our current activity ‘Receive OTDS token’, we will use service csconfig which requires an XML implementation like this:
1 | <implementation |
This looks complex, but it simply gets the connection-id of our previous configured config.xml and puts the <uri>-part behind it with some variables. In my case the final URL will be like this: http://192.168.56.107:8080/home/opa_tips/app/documentservices/rest/xecm/csconfig
It also adds a header element in the final request to pass in the SAMLart token. The SOAP call from our BPM will eventually look like this (which you can assess after publication AND connect the services to the corresponding HTTP service container):
1 | <SOAP:Envelope xmlns:SOAP="http://schemas.xmlsoap.org/soap/envelope/"> |
With a result like this:
1 | <data> |
The HTTP connector is pretty needy on changes; Make sure to restart the service container after any changes to validate!
Ok, back to our BPM activity ‘Receive OTDS token’ and add the webservice csconfig. The messagemap behind this activity is a little more complex:

Notes:
- Read it from right (source) to left (target)…Don’t shoot the messenger here! 🙃
- Watch the correct “Usage” options in the middle!
- You see me using a
bpm:localelement which you can create here (I know…this is the disadvantage of not using XML schemas for your service operations!):![delete_020]()
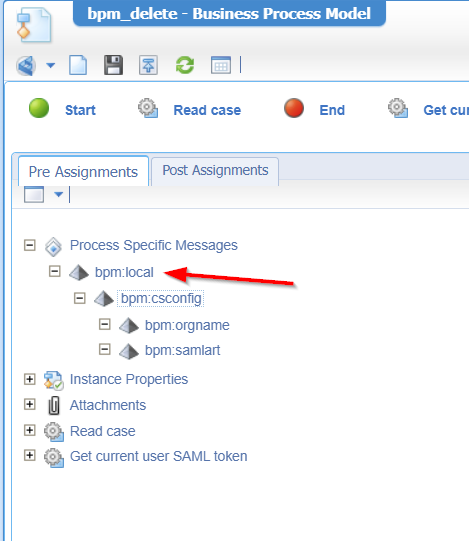
By now, you should have the authentication in place for the BPM. Let’s continue the journey…
👉 Get archival node
This will be our node_state service call which first needs implementation:
1 | <implementation |
In my case the final URL for this request (incl. proper header) will look like this: http://192.168.56.107:8282/otcs/cs/api/v2/nodes/2000/state
The SOAP call from our BPM will eventually look like this:
1 | <SOAP:Envelope xmlns:SOAP="http://schemas.xmlsoap.org/soap/envelope/"> |
With a result like this:
1 | <data> |
It’s time to implement BPM activity ‘Get archival node’ and add the webservice node_state. The messagemap behind this activity looks like this (again with a bpm:local element):

You see node ID 50949 passing by; That’s my node ID of the _ARCHIVE folder in xECM:

This number is now hard-coded in the BPM, but you can also make it a solution variable.
You may also wonder where ns11:csconfigOutput/ns11:csconfigResponse/ns11:ContentServerOtdsTicket/text() comes from, as it’s not part of the output result of our service call (again, because of the missing XML schemas!)? Well, that’s a trick you learn here.
You can try (after publication) your BPM now via the action button in runtime on your case instance; Mine is still running fine on the activities implemented this far! Let’s continue…
👉 Node available?
This is a simple check like this (so, when it has NO value, send a user-friendly error in runtime; otherwise continue):

not(string-length(ns11:node_stateOutput/ns11:node_stateResponse/ns11:links/ns11:data/ns11:self/ns11:href/text()) > 0)
Halfway there…
👉 Get BWS node
You can almost copy this one from node_state where the node_details service call will have this implementation:
1 | <implementation |
The SOAP call from our BPM will look like this:
1 | <SOAP:Envelope xmlns:SOAP="http://schemas.xmlsoap.org/soap/envelope/"> |
You can imagine the result…From our BPM we will send in the workspace ID of our case instance as objectid value; The result will have the name of our business workspace…AHA! 🤗
The activity implementation for ‘Get BWS node’ will use webservice node_details. The messagemap behind this activity looks like this (watch again the bpm:local element):

Ok, it looks almost the same…BUT you see a switch to a bpm:otds_ticket/text() variable! That’s also for a reason…Why? Well, I hit the authentication wall of xECM which results in this error:
1 | <result> |
Apparently, my ticket becomes invalid after the first request against xECM! Interesting…the easy workaround (for now) would be to get a new ticket request before each xECM call and save it in a local variable in the BPM…Yes, that will be bpm:otds_ticket!
This update will change our BPM to this (with additional token-receive calls!):
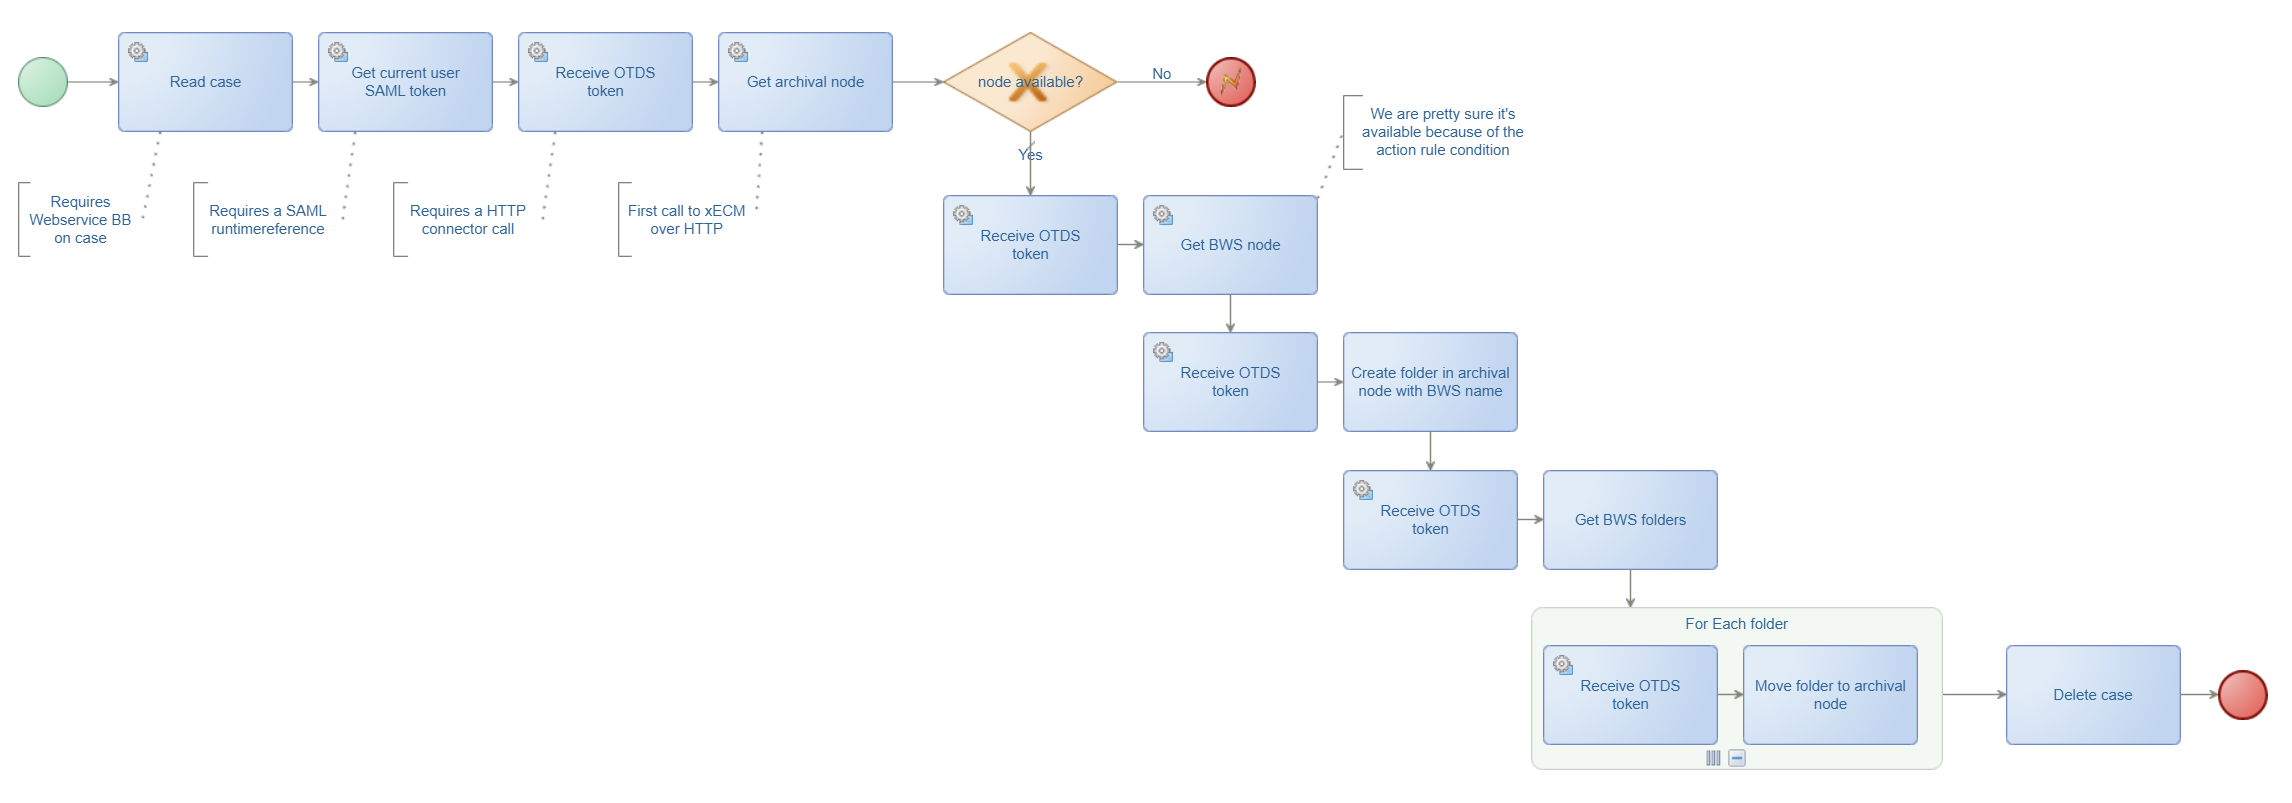
Can we do this smarter? Probably, but not for this post! 😅
It’s working fine now for the current call; Let’s move on…
👉 Create folder in archival node with BWS name
This will be a service call with node_create which first requires this implementation:
1 | <implementation |
Notes:
- This is a POST-request
- The body of the POST-request is in the
data-element of the below request which you define in<root-xpath>./data</root-xpath> - Classes
RestRequestHandlerandRestResponseHandlertranslate from XML to JSON (and vice versa)!
The SOAP call from our BPM will look like this:
1 | <SOAP:Envelope xmlns:SOAP="http://schemas.xmlsoap.org/soap/envelope/"> |
The response is this…the node ID where we want to move to!
1 | <data> |
The activity implementation for ‘Create folder in archival node with BWS name’ will use the webservice node_create. The messagemap behind this activity looks like this (watch again the bpm:local element):

Nice…we’re getting close now! 🤓
👉 Get BWS folders
This is the service call node_nodes with this implementation:
1 | <implementation |
The SOAP call from our BPM will look like this:
1 | <SOAP:Envelope xmlns:SOAP="http://schemas.xmlsoap.org/soap/envelope/"> |
The response will show nicely the folders in our business workspace where we can do a for-loop in the next step!
The activity implementation for ‘Get BWS folders’ will use the webservice node_nodes. The messagemap behind this activity looks like this (watch again the bpm:local element):

We’re almost at the end…
👉 For Each folder
This is as easy as this:

Make sure to name your iterator and make the selection to loop over; that’s the result of our previous call with multiple results-elements!
👉 Move folder to archival node
This will be a service call with node_move which first requires this implementation:
1 | <implementation |
This is a PUT-request (almost the same as a POST-request!)
The SOAP call from our BPM will look like this:
1 | <SOAP:Envelope xmlns:SOAP="http://schemas.xmlsoap.org/soap/envelope/"> |
The response is irrelevant for now.
The activity implementation for ‘Move folder to archival node’ will use the webservice node_move. The messagemap behind this activity looks like this (watch again the bpm:local element):

Great; final call now…
👉 Delete case
This requires an update on the ‘Web service’ building block on the ‘Case’ entity. The DELETE operation is needed here:
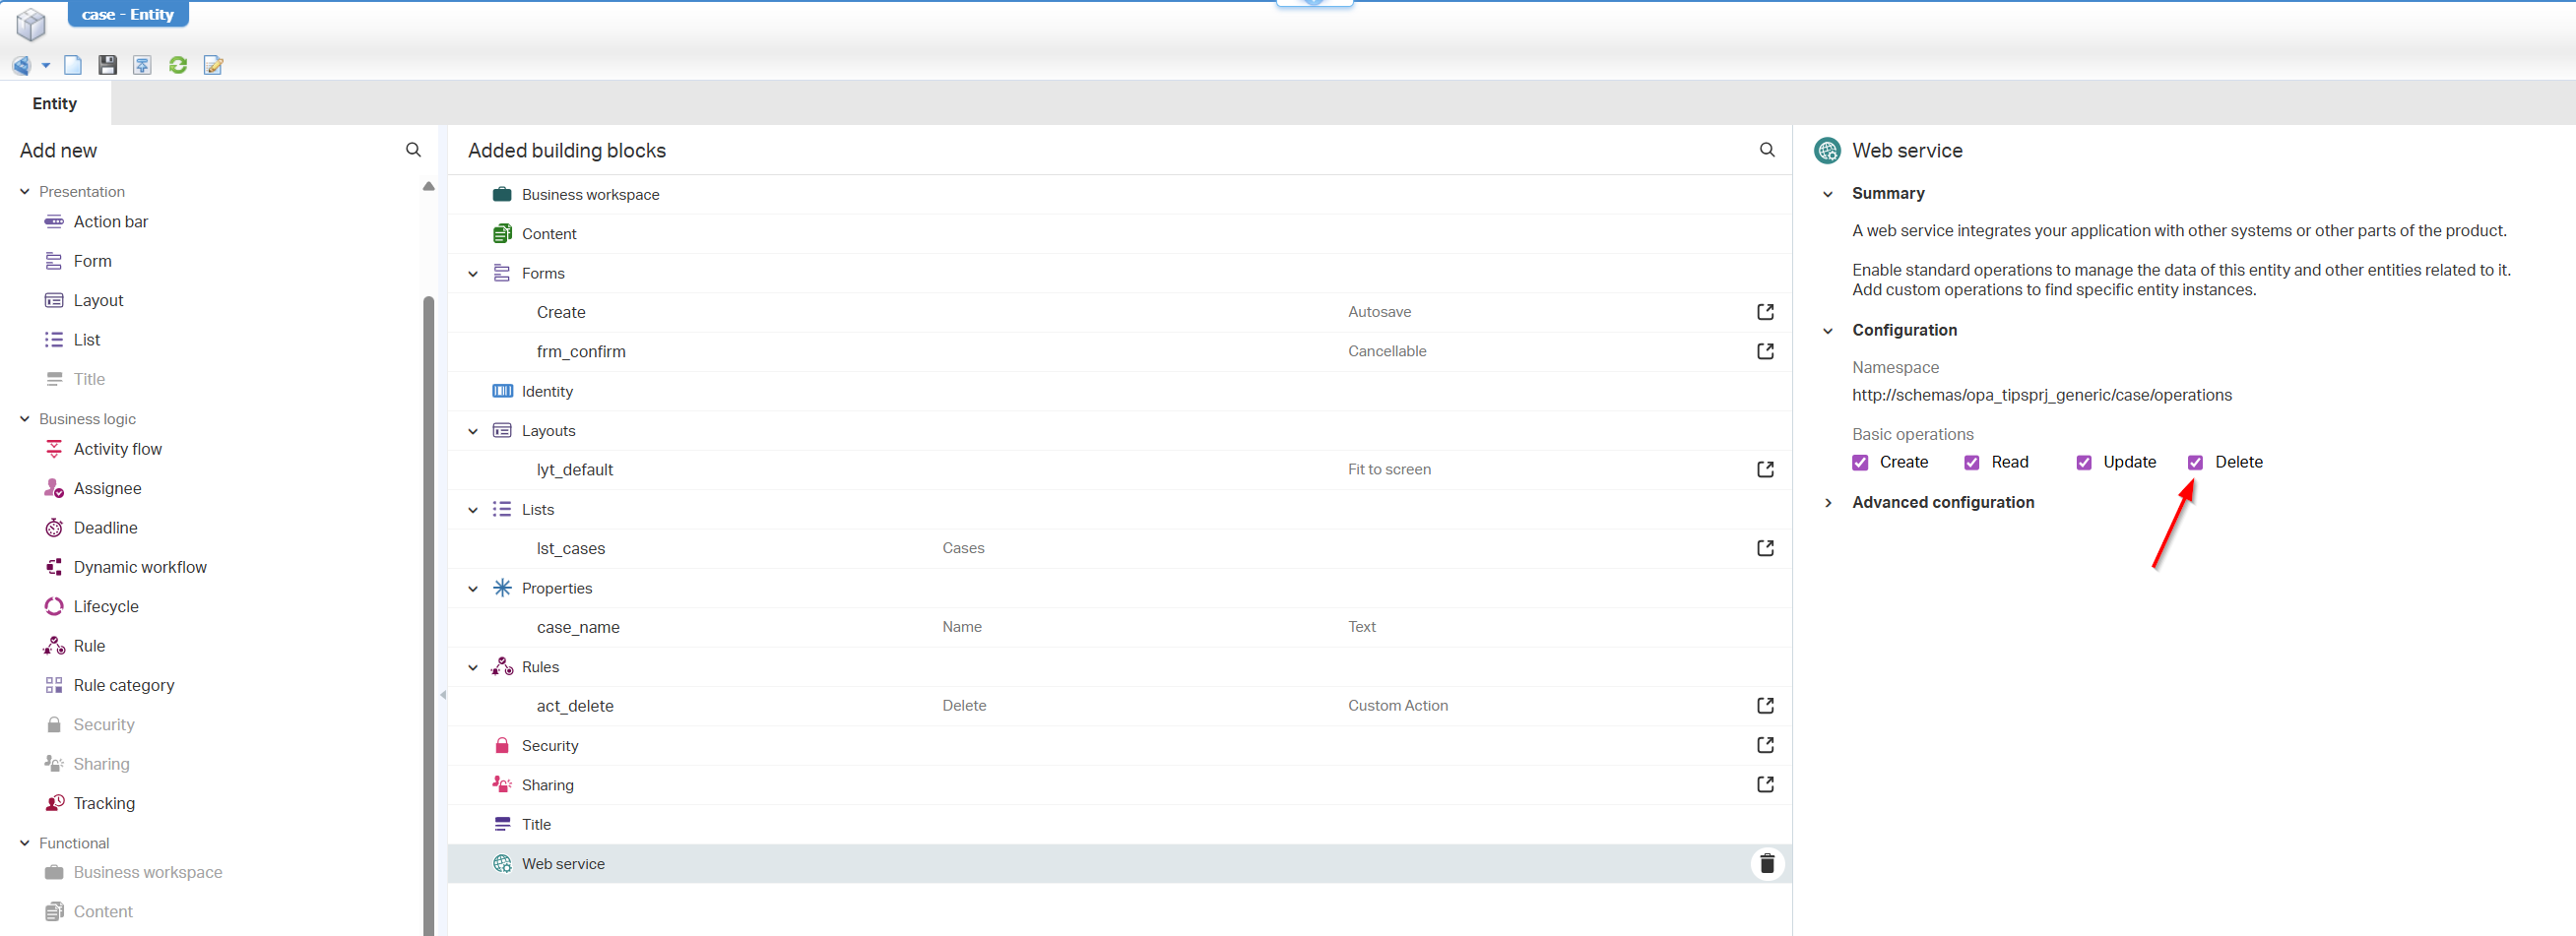
We already have a supportive service container of type ‘Application Server’ for our READ operation on the ‘Case’ entity.
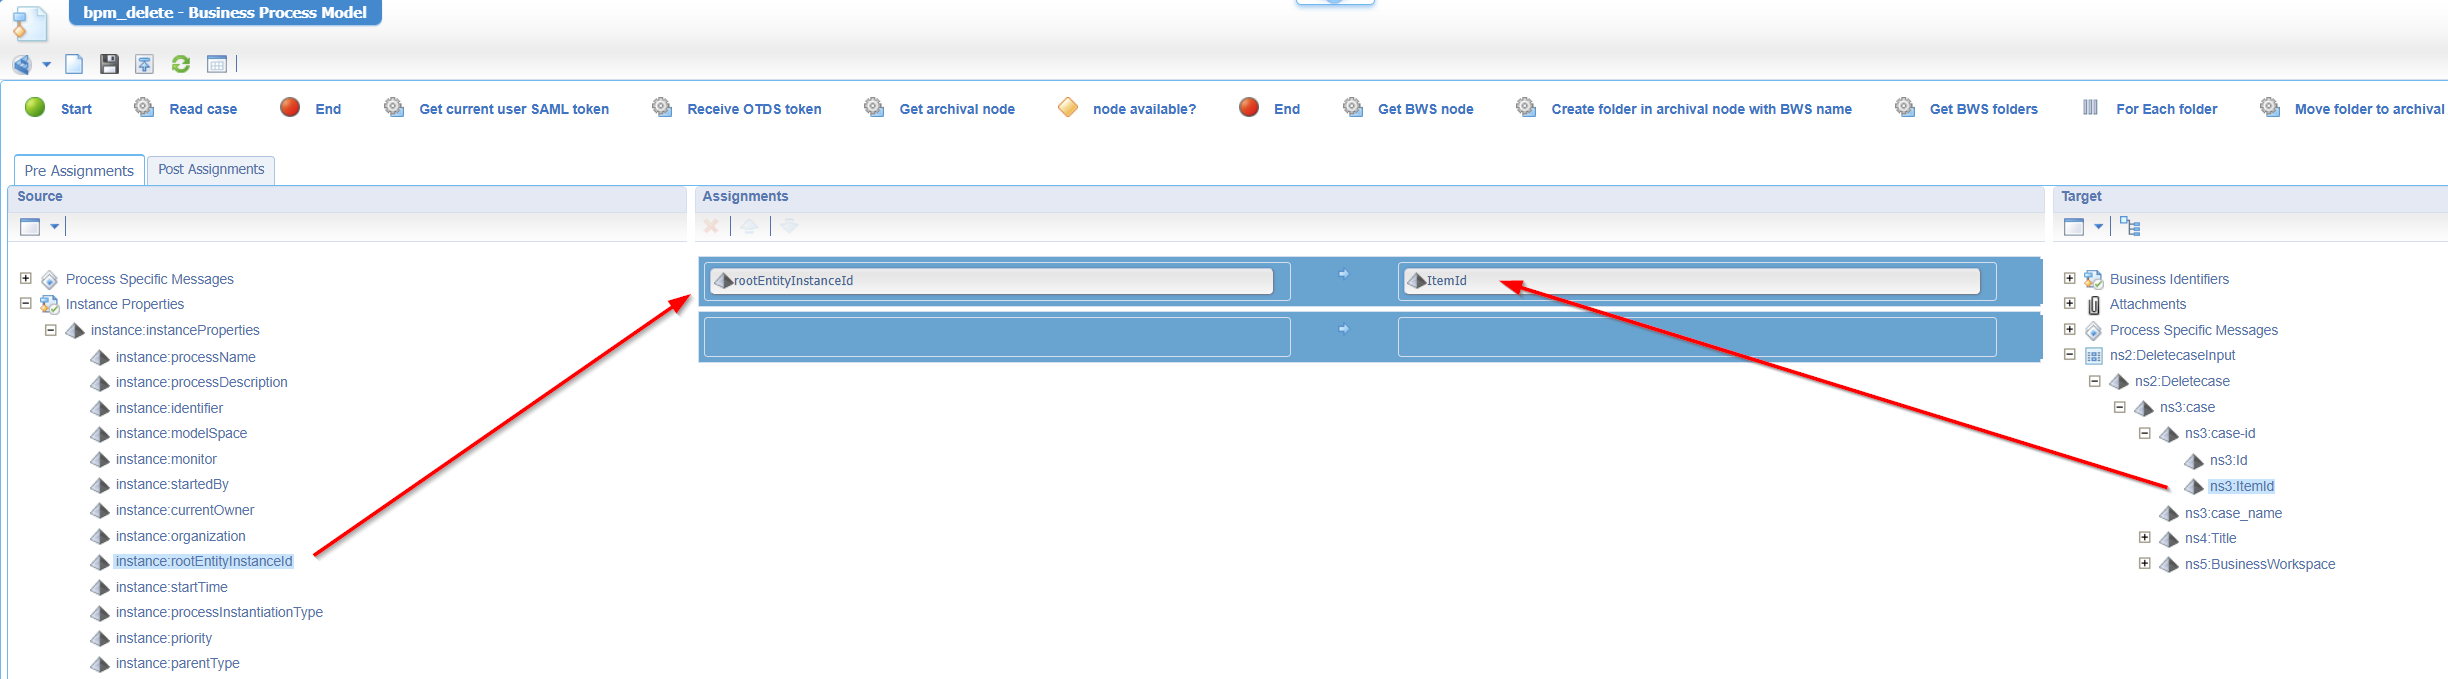
Right-click the ‘Delete case’ activity and insert the webservice Deletecase. Keep the description of the activity as is, and jump into the messagemap. Make the final mapping like this:
We’re done…at least ALMOST done. After the case deletion there is no point staying inside the current instance! So, we extend our custom ‘Delete’ action with an extra redirect action like this:
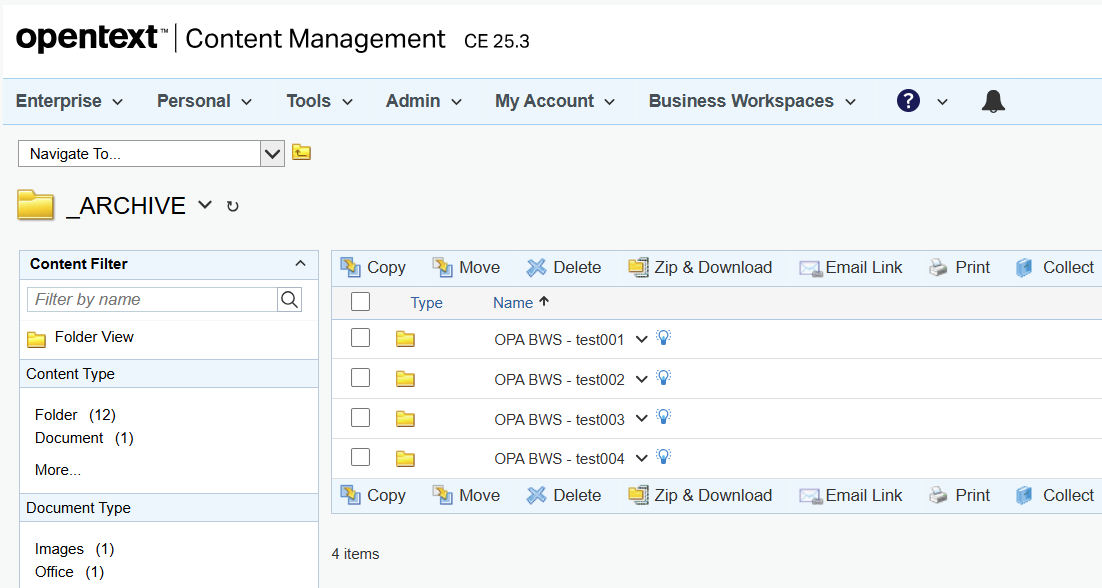
Do your final tests…Mine is working nicely with an archival structure in xECM:
Final suggestions and thoughts
A nice improvement to build on your own would be this: before you create a new folder in the “_ARCHIVE” node, make sure to check if the folder-name already exists. If it exists, you can put a unique value behind it. When can this occur? Well, create a new case with name test001 and move this to the archive via our new delete action. The business workspace with that name is removed, but your user can still create a new case with a similar name creating a business workspace with a similar name (because the old one is destroyed). Once you destroy this new case (with a similar name), it’ll find your duplicate in the archive! OR simply catch the error with a proper response:
Another improvement is adding your own action bar! My entity instance shows all actions (incl. the regular ‘Delete’!)
A workspace-detached “DONE” where we gain insights into the connection between OPA case instances and relevant xECM business workspace instances. The connection itself is not that hard to understand; only the configuration between both platforms is rather complex. Keep it locked here at OpenText Process Automation Tips where installments, thoughts, tricks, and ideas surface during eXplorations of the platform. Have a great weekend…
Don’t forget to subscribe to get updates on the activities happening on this site. Have you noticed the quiz where you find out if you are also “The Process Automation guy”?
