
/ Development  

Bootstrap your testing with Playwright

Hi there “Process Automation” fans,

Welcome to a new installment of “Process Automation” tips.

Last week we had a great testing eXperience on load-testing (via Gatling Java DSL); for this week we’ll continue our journey on UI regression testing (via Playwright). Two great tools, and accessible via Java.

Let’s continue with a head start on working with Playwright on a first setup to run a basic test. After that, we’ll add a next test to (at least) make a login/logout call against the OTDS login screen, and we do some calls against a simple OPA solution!


Let’s get right into it…

My first question (as always) is where to start? Well, you can call Playwright via Java. This means we can simply create a new Java project in our favorite IDE (I use the community edition of IntelliJ) where we create a new Maven-based Java project:
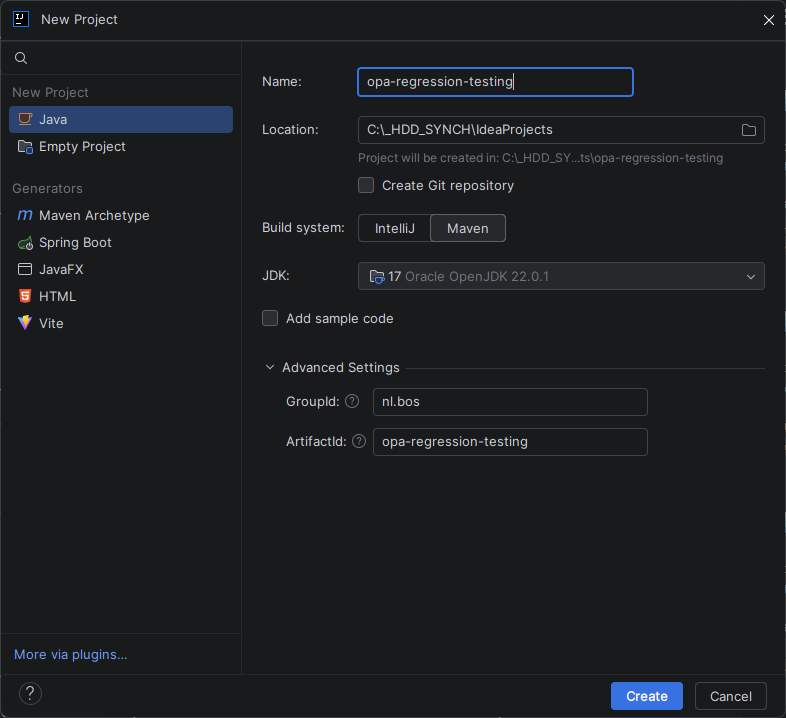
playwright_001

Next step is updating the pom.xml for this project to have the Playwright dependencies available for the project:

1
2
3
4
5
6
7
8
9
10
11
12
13
14
15
16
17
18
19
20
<dependencies>
<dependency>
<groupId>com.microsoft.playwright</groupId>
<artifactId>playwright</artifactId>
<version>1.60.0</version>
<scope>test</scope>
</dependency>
<dependency>
<groupId>org.junit.jupiter</groupId>
<artifactId>junit-jupiter</artifactId>
<version>6.1.0</version>
<scope>test</scope>
</dependency>
<dependency>
<groupId>org.assertj</groupId>
<artifactId>assertj-core</artifactId>
<version>3.27.7</version>
<scope>test</scope>
</dependency>
</dependencies>

This time (compared with Gatling last week), we add two additional dependencies. ‘JUnit’ to test a specific use-case and ‘AssertJ’ for fluent testing assertions, which also improves readability. BUT I also eXperienced something else…

Once this is in place, you can craft a new Java class like below; I’ll craft it in the ‘test’ sources of the Maven project instead of the ‘java’ sources:

1
2
3
4
5
6
7
8
9
10
11
12
13
14
15
16
17
18
19
20
21
22
23
24
25
26
package nl.bos;

import com.microsoft.playwright.Browser;
import com.microsoft.playwright.BrowserType;
import com.microsoft.playwright.Page;
import com.microsoft.playwright.Playwright;
import org.junit.jupiter.api.Test;

import static com.microsoft.playwright.assertions.PlaywrightAssertions.assertThat;
//import static org.assertj.core.api.Assertions.assertThat;

class AppworksTipsRegressionTests {

@Test
void givenAppworksTipsUrl_whenOpenHomePage_thenPageTitleIsShown() {
try (Playwright playwright = Playwright.create();
Browser browser = playwright.chromium().launch(new BrowserType.LaunchOptions().setHeadless(true))) {
Page page = browser.newPage();

page.navigate("https://appworks-tips.com");

assertThat(page).hasTitle("OpenText™ Process Automation Tips | Installments, thoughts, tricks and ideas");
//assertThat(page.title()).isNotBlank(); //This is the AssertJ way
}
}
}

This code will open the browser and validates the title of our favorite blog site. You can play with setHeadless(false) to see a real browser doing all the heavy lifting.

Notes:

  • I switched from org.assertj.core.api.Assertions.assertThat; to com.microsoft.playwright.assertions.PlaywrightAssertions.assertThat; which gets closer to the UI reality.
  • You see me also using a naming convention of ‘GivenWhenThen’.

After this quick implementation, you can run your first test via PowerShell after moving into the directory space of your new Java/Maven project: .\mvnw.cmd test

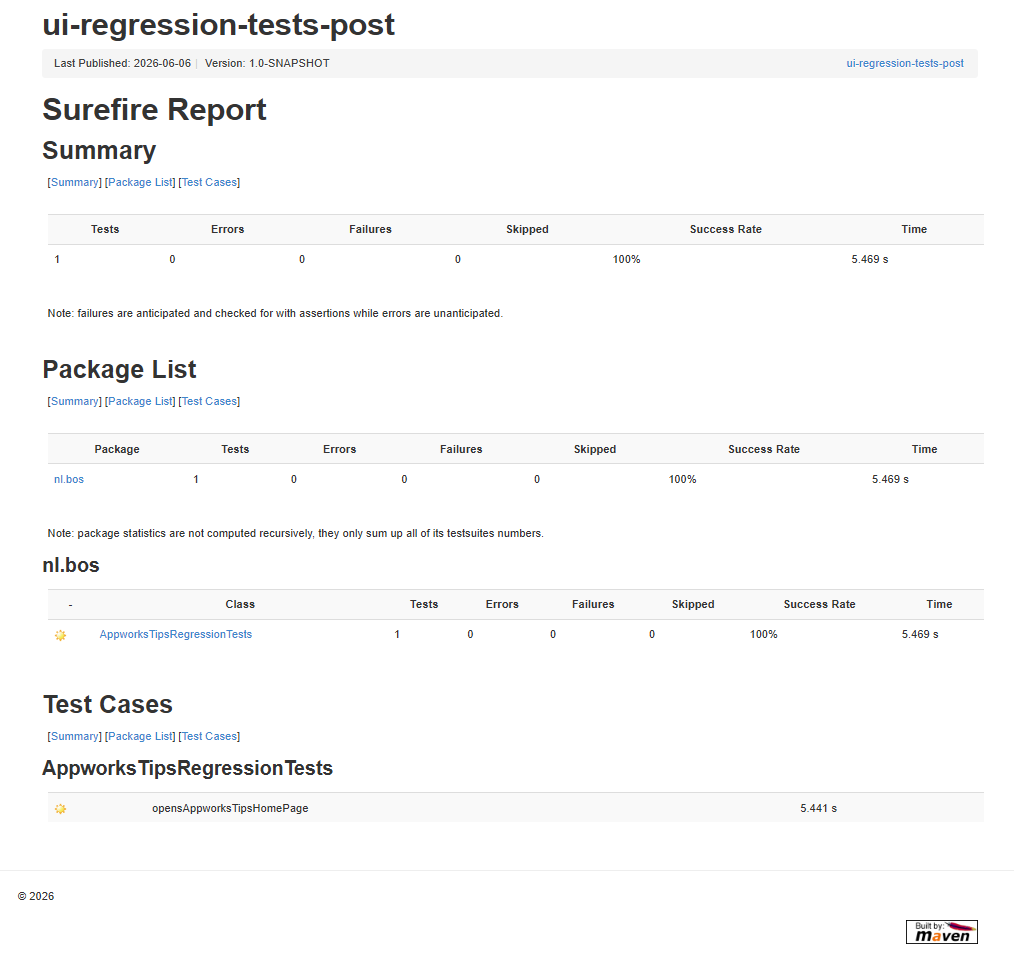
The first step is made! However, I don’t see any reporting of this run (like with Gatling!). That’s Maven to the rescue again with a nice plugin (‘Surefire reporting’) in the pom.xml:

1
2
3
4
5
6
7
8
9
10
11
12
13
14
15
16
17
<build>
<plugins>
<plugin>
<artifactId>maven-surefire-report-plugin</artifactId>
<version>3.5.4</version>
<executions>
<execution>
<id>ui-test-report</id>
<phase>verify</phase>
<goals>
<goal>report-only</goal>
</goals>
</execution>
</executions>
</plugin>
</plugins>
</build>

We can run it now like this: .\mvnw.cmd verify

Why verify? Because during testing, Maven runs the tests and writes raw result files; the HTML (surefire) report plugin reads those files and generates the report (see target/reports/surefire.html).

playwright_002

NICEEEEEE! 😍

Time to continue our journey…


The authentication call against OTDS

Now that Playwright is working, we can also do a similar call to our OPA environment. So, boot up your VM and make a small project with a ‘Case’ entity to play with; just a one-prop entity is enough!

We just want to follow the UI flow of the user, so when we go to our regular URL http://192.168.56.107:8080/home/opa_tips, we first need to login via an OTDS login screen (which is the case for most customers). The URL for this is: http://192.168.56.107:8181/otdsws/login

See the difference where OTDS is running on a Tomcat instance over port 8181!

The steps the user will take in this UI are:

  1. Open the OTDS login URL
  2. Fill in the username
  3. Fill in the password
  4. Click the ‘Sign in’ button
  5. Check if you’re a valid user; we can do this by checking the ‘Logged in as’ text
  6. Eventually, we click the ‘Sign out’ button
  7. And check if we see the message ‘You have been logged out.’

See this test-case in the same AppworksTipsRegressionTests class:

1
2
3
4
5
6
7
8
9
10
11
12
13
14
15
16
17
18
19
20
21
22
@Test
void givenValidOtdsCredentials_whenSignInAndSignOut_thenLogoutConfirmationIsShown() {
String loginUrl = "http://192.168.56.102:8181/otdsws/login";

BrowserType.LaunchOptions launchOptions = new BrowserType.LaunchOptions().setHeadless(true);
try (Playwright playwright = Playwright.create();
Browser browser = playwright.chromium().launch(launchOptions);
BrowserContext context = browser.newContext(new Browser.NewContextOptions().setIgnoreHTTPSErrors(true))) {
Page page = context.newPage();

page.navigate(loginUrl);
page.locator("#otds_username").fill("opatest"); //Read this from an environment variable!
page.locator("#otds_password").fill("admin"); //Read this from an environment variable!
page.getByRole(AriaRole.BUTTON, new Page.GetByRoleOptions().setName("Sign in")).click();

assertThat(page.getByText("Logged in as")).isVisible();

page.getByText("Sign out").click();

assertThat(page.getByText("You have been logged out.")).isVisible();
}
}

Notes:

  • Credentials are now hard-coded for a quick demo for this post; you can do better with (for example) environment variables!
  • Use credentials of a test-account with the proper roles applied for your solution.

After another .\mvnw.cmd clean verify run, you should see a valid build with correct (and green) output (incl. a new report to check out):

1
2
3
4
5
6
[INFO] ------------------------------------------------------------------------
[INFO] BUILD SUCCESS
[INFO] ------------------------------------------------------------------------
[INFO] Total time: 26.257 s
[INFO] Finished at: 2026-06-08T22:04:23+02:00
[INFO] ------------------------------------------------------------------------

Mine is green (on the two tests), so let’s move on…


Create a new case

Now that we can login, we can also move our browser into the runtime UI of OPA (/app/start), and create a new case instance. The regression test for this scenario looks like this (for my simple ‘Case’ solution!):

  1. Login with credentials against OTDS; AND validate ‘Logged in as’
  2. Forward to the runtime UI; AND validate the ‘Create’ icon
  3. Click the ‘Create’ menu (top-right icon); AND validate the ‘All items’ menu-item
  4. Click on ‘All items’; AND validate the ‘Case’ menu-item
  5. Click on ‘Case’; AND validate the modal popup
  6. Fill in a name for the case; AND validate the ‘Create’ button
  7. Click the ‘Create’ button; AND validate the instance in the list
  8. Click the ‘Profile’ menu (top-right icon); AND validate the ‘Sign out’ menu-item
  9. Click ‘Sign out’; AND validate the OTDS login screen

Let’s convert this regression test into a new JUnit test case like this:

1
2
3
4
5
6
7
8
9
10
11
12
13
14
15
16
17
18
19
20
21
22
23
24
25
26
27
28
29
30
31
32
33
34
35
36
37
38
39
40
41
42
43
44
45
46
47
48
49
50
51
52
53
54
55
56
57
58
59
60
61
62
63
64
65
66
67
68
69
70
71
72
73
74
75
76
77
78
79
@Test
void givenAuthenticatedUser_whenCreateAndDeleteCaseFromRuntimeUi_thenCaseIsRemovedAndUserCanSignOut() {
String loginUrl = "http://192.168.56.102:8181/otdsws/login";
String runtimeUrl = "http://192.168.56.102:8080/home/opa_tips/app/start/web";
String caseName = "test" + System.currentTimeMillis();

BrowserType.LaunchOptions launchOptions = new BrowserType.LaunchOptions().setHeadless(false);
try (Playwright playwright = Playwright.create();
Browser browser = playwright.chromium().launch(launchOptions);
BrowserContext context = browser.newContext(new Browser.NewContextOptions().setIgnoreHTTPSErrors(true))) {
Page page = context.newPage();

// Login with credentials against OTDS; AND validate 'Logged in as'
page.navigate(loginUrl);
page.locator("#otds_username").fill("opadev"); //Read this from an environment variable!
page.locator("#otds_password").fill("admin"); //Read this from an environment variable!
page.getByRole(AriaRole.BUTTON, new Page.GetByRoleOptions().setName("Sign in")).click();
assertThat(page.getByText("Logged in as")).isVisible();

// Forward to the runtime UI; AND validate the 'Create' icon
page.navigate(runtimeUrl);
page.waitForLoadState(LoadState.DOMCONTENTLOADED);
Locator createMenu = page.locator("createables-menu")
.getByRole(AriaRole.BUTTON, new Locator.GetByRoleOptions().setName("Create a new item"));
assertThat(createMenu).isVisible(new LocatorAssertions.IsVisibleOptions().setTimeout(UI_TIMEOUT_MILLIS));

// Click the 'Create' menu (top-right icon); AND validate the 'All items' menu-item
createMenu.click();
Locator createablesMenu = page.locator("createables-menu");
Locator allItemsMenuItem = createablesMenu.locator("#all-header")
.filter(new Locator.FilterOptions().setVisible(true));
assertThat(allItemsMenuItem).isVisible(new LocatorAssertions.IsVisibleOptions().setTimeout(UI_TIMEOUT_MILLIS));

// Click on 'All items'; AND validate the 'Case' menu-item
allItemsMenuItem.click();
Locator caseMenuItem = createablesMenu.locator("#all-group")
.getByRole(AriaRole.MENUITEM, new Locator.GetByRoleOptions().setName("Case"))
.filter(new Locator.FilterOptions().setVisible(true));
assertThat(caseMenuItem).isVisible(new LocatorAssertions.IsVisibleOptions().setTimeout(UI_TIMEOUT_MILLIS));

// Click on 'Case'; AND validate the modal popup
caseMenuItem.click();
Locator createCaseDialog = page.locator("ux-dialog-container.active");
assertThat(createCaseDialog).isVisible();

// Fill in a name for the case; AND validate the 'Create' button
Locator caseNameInput = createCaseDialog.getByLabel("Name");
caseNameInput.click();
caseNameInput.pressSequentially(caseName);
assertThat(caseNameInput).hasValue(caseName);
caseNameInput.press("Tab");
Locator createButton = createCaseDialog.locator("bs-drop-button")
.filter(new Locator.FilterOptions().setHasText("Create"))
.locator(".drop-button");
assertThat(createButton).isVisible();

// Click the 'Create' button; AND validate the instance in the list
Locator createButtonLabel = createButton.locator(".ot-drop-button-label");
createButtonLabel.scrollIntoViewIfNeeded();
BoundingBox createButtonBox = createButtonLabel.boundingBox();
page.mouse().click(
createButtonBox.x + createButtonBox.width / 2,
createButtonBox.y + createButtonBox.height / 2
);
assertThat(createCaseDialog).isHidden();
assertThat(page.getByText(caseName)).isVisible();

// Click the 'Profile' menu (top-right icon); AND validate the 'Sign out' menu-item
Locator profileMenu = page.locator("[aria-label*='Profile'], [aria-label*='profile'], [aria-label*='User'], [aria-label*='user']").first();
assertThat(profileMenu).isVisible();
profileMenu.click();
Locator signOutMenuItem = page.getByText("Sign out");
assertThat(signOutMenuItem).isVisible();

// Click 'Sign out'; AND validate the OTDS login screen
signOutMenuItem.click();
assertThat(page.locator("#otds_username")).isVisible();
}
}

Notes:

  • I use this global variable in the code: private static final double UI_TIMEOUT_MILLIS = 30_000;
  • The complexity here is to find the correct elements in the UI with those page locators. Use the developer tools of your browser to figure them out. You get the ones in the code for free!
  • Run this test with setHeadless(false) and see exactly what happens. Also be amazed (and question yourself!) why your team never started this way of testing before!?

After this run, it’s all green for the tests! However, have a look in runtime now at all the created case instances! Great, but after testing you also want to clean up the mess…


Clean up the mess

Finally, we’ll extend the previous JUnit test by selecting the instance in the list, clicking the ‘Delete’ button, and confirm the deletion:

1
2
3
4
5
6
7
8
9
10
11
12
13
14
15
16
// Select the created instance; AND validate the 'Delete' button in the action bar
createdCase.click();
Locator deleteButton = page.locator("button[aria-label='Delete']")
.filter(new Locator.FilterOptions().setVisible(true))
.first();
assertThat(deleteButton).isVisible(new LocatorAssertions.IsVisibleOptions().setTimeout(UI_TIMEOUT_MILLIS));

// Click the 'Delete' button; AND confirm the deletion in the modal popup
deleteButton.click();
Locator deleteCaseDialog = page.locator("ux-dialog-container.active");
Locator confirmDeleteButton = deleteCaseDialog.getByRole(AriaRole.BUTTON, new Locator.GetByRoleOptions().setName("Delete"))
.filter(new Locator.FilterOptions().setVisible(true))
.first();
assertThat(confirmDeleteButton).isVisible(new LocatorAssertions.IsVisibleOptions().setTimeout(UI_TIMEOUT_MILLIS));
confirmDeleteButton.click();
assertThat(createdCase).isHidden(new LocatorAssertions.IsHiddenOptions().setTimeout(UI_TIMEOUT_MILLIS));

Notes:

  • This part happens just before the logout procedure.
  • Our extended last test gets pretty large; it would be good to split it up so you can reuse functions for other tests as well. I leave that task with you!

We’re still green:

playwright_003

That’s it…This last action depends, of course, on your situation. My solution is small and easy where we are allowed to delete instances. It might happen that you don’t have a ‘Delete’ button available, or you’re not even granted to delete entries! Well, that’s use-case management and collaboration with the DEV team on how to solve this situation. If it’s not possible from the UI, it might be possible from a REST call. In that case, you can use REST Assured for API regression tests (not for this post!)

You’ll find the full class here
You’ll find my latest report run here


Another well-earned DONE on testing. This time with a great head start on using Playwright for your first regression-test requirements. Again, the power of a simple example that boosts your confidence to trigger creativity on these testing tools. Play with it, fail on it, but most of all…have fun with it! We’ll chat about a new topic, next week! 🍻

Don’t forget to subscribe to get updates on the activities happening on this site. Have you noticed the quiz where you can find out if you are also “The Process Automation guy”?