
Hi there AppWorks fans,
Welcome to a new installment of AppWorks tips.
Today we start with a more advanced topic and that’s the creation of a brand-new Enterprise Information System connector. Is it important to know? Yes it is! As it makes it possible to represent external data via entity modeling to our beloved platform users…Huh?…What!?
Let me explain the use-case: We have our new AppWorks platform available in our organization, but we also have some an external legacy system we still want to manipulate or even keep in synch with our new platform. Let’s say that our external system is an invoice system with an old user interface. Would it not be great that our AppWorks users can create new invoice documents in the AppWorks runtime and that our external invoice system is updated with all the relative information?…That is what an EIS connector can do for you!!
We already saw something similar with the post about ‘Simple steps on importing entities from database table’ where we could create new instances from a ‘linked’ entity where the data is directly updated in the linked database location…Also great stuff!
With an EIS connector we do a bit the same, but now the entity is called an ‘external’ entity and as we are more in control on what is happening we also need to custom code some things (in Java) to make it all happen…Not hard to do, but it’s always difficult if you don’t have a good example…
Let’s get right into it…
Spin up your machine, login to your workspace and make sure you are logged in with a user that has a developer role applied as well as the administrator role. This last role is needed to see the EIS connector when using it…You’ll see that later…Trust me!
Let’s take a look in the ‘Low-Code Design Guide’ in the section ‘Building a custom EIS connector’ which gives us a head start, but you’ll see that more will be covered in this post to get you better knowledge and a proper example.
The creation of the EIS connector
We do this in a total separate workspace with also a separate project. The result will be a .CAP file package that will be deployed in the organizations where you need the functionalities of this connector. And yes…This creates a dependency to your project that needs to be deployed before you install your own solution!
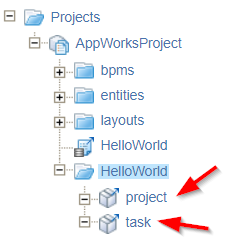
This will be my workspace with corresponding project:

On that project we get to the right-click context menu to create a new document of type ‘EIS Connector’

The new screen makes it possible to setup your connector settings. Make it for example like this:

Take a note of the ‘class’ definition as in my environment I see its’s jumping back to ‘com.opentext’ after a change…Something to notice as we want to use our own namespace. Later we’ll see that logging is much easier to filter down with our own namespace!
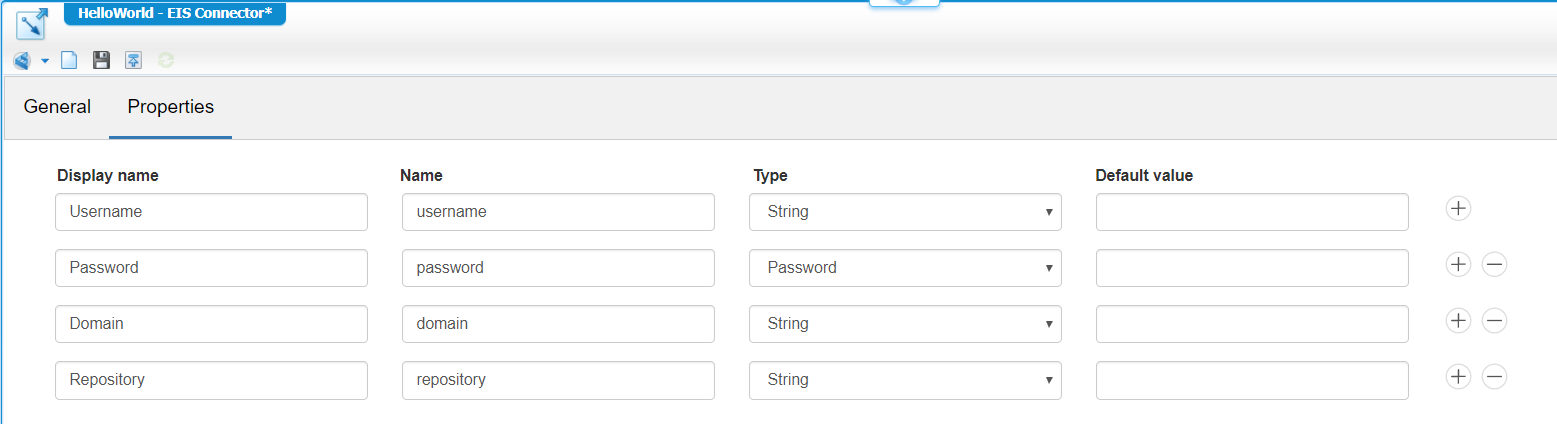
For the properties tab I use these lines (it contains data to connect to an external system…if required!)
Now, save the document, jump back to the ‘General’ tab, and hit that blue ‘Generate API’ button to get some magic going on! You get some notification where you just click ‘Yes’ and ‘Close’ to and now you can also close this document so you get back to your project overview.
And there you have it…The basics for our EIS entity!
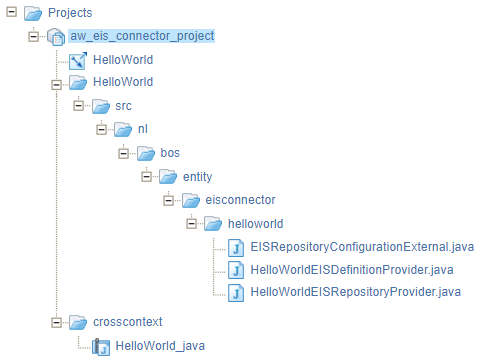
What do we see from top to bottom?
- HelloWorld (with that arrows icon): that’s our just crafted EIS connector document
- HelloWorld folder (with all the subfolders): that’s our start framework for building the EIS connector with some Java files in it; We’ll get back on those later!
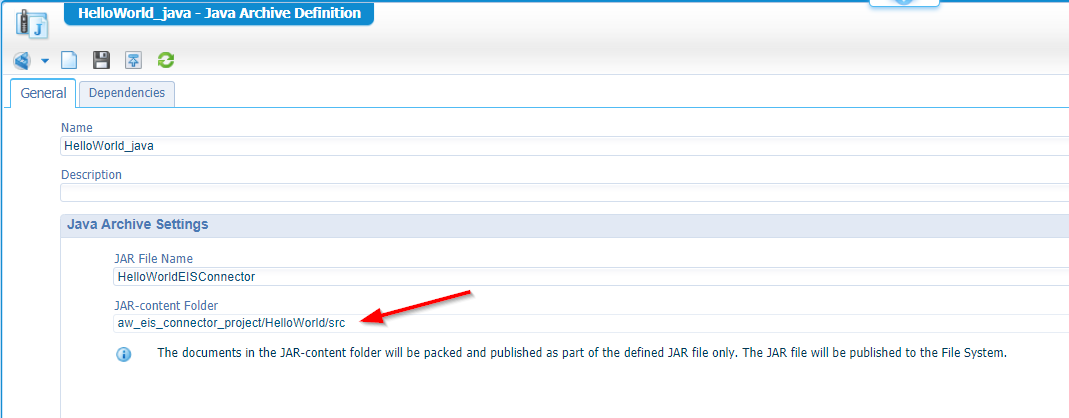
- HelloWorld_java (in that ‘crosscontext’ folder): that’s a ‘Java archive definition’ which is used when we start packaging the solution. It contains the information where our source files can be found (The Java files!) and the dependent libraries that our required for our source files
These are the default dependencies for a EIS connector. These .jar files can be found on the server in these locations:
/opt/opentext/AppWorksPlatform/defaultInst/components/cws/lib/com.cordys.entity.services.eisconnector.jar/opt/opentext/AppWorksPlatform/defaultInst/crosscontext/entityruntime-bean-interface.jar/opt/opentext/AppWorksPlatform/defaultInst/components/basicutil/basicutil.jar
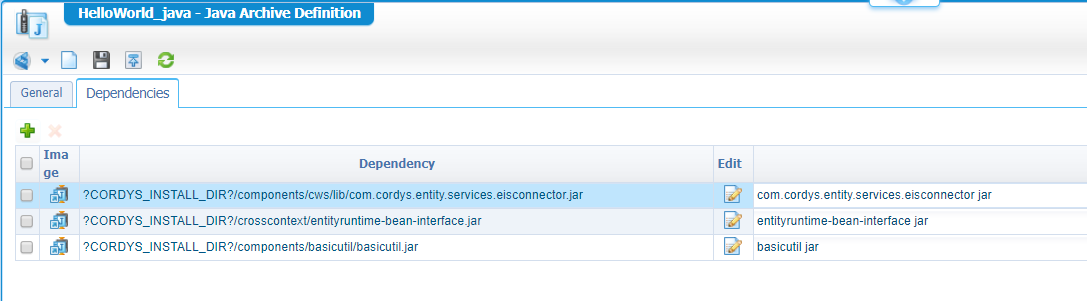
We (as good developers!) also add another good (External Java Archive) dependency with this location:
/opt/opentext/AppWorksPlatform/defaultInst/components/managementlib/managementlib.jar
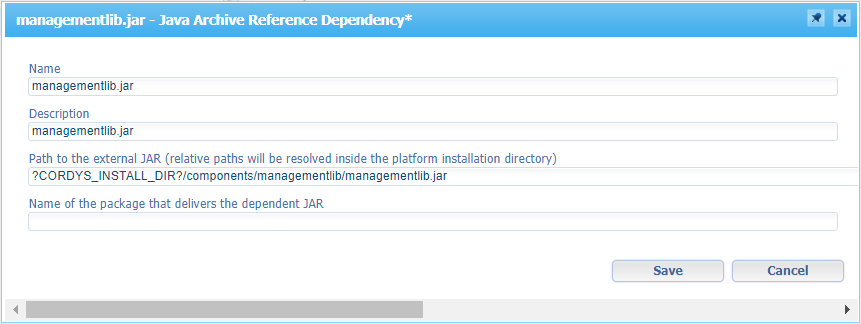
Why?…Because it contains classes to do proper logging (the Cordys-way of logging!)…You’ll see that later too!
Now is the time to save it all and validate the project…There is no need to publish anything as we’ll only need to generate a .CAP package in the end.
Next step?
The implementation of those Java files
First thing we need to do now is making those Java files (in our AppWorks project) available in our favorite IDE. For this to happen we need to do a synchronize action on our project folder!
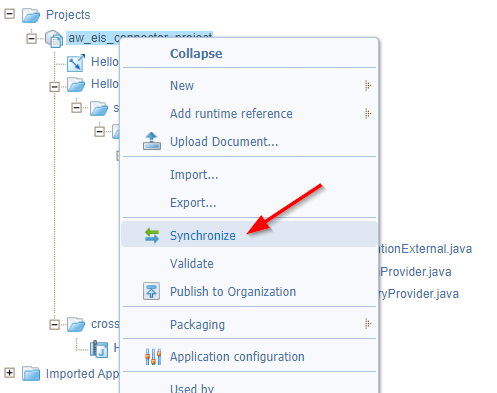
With this action we make the content of our project available on the storage of our AppWorks platform server.
Location: /opt/opentext/AppWorksPlatform/defaultInst/cws/sync/appworks_tips/aw_eis_connector_ws/aw_eis_connector_project/HelloWorld/src
Download this src-folder (with that folder structure and the Java files) somewhere locally on your local workstation. I use MobaXTerm for this job, but maybe you need to ask your administrator to download it…Or you can also open those files from the AppWorks project and copy the content from there!
Now I open my favorite IDE ‘IntelliJ’ to start a new Java project with the fancy name ‘HelloWorldEISConnector’ and copy & paste that downloaded ‘src’ folder into that new project…Now it looks like this:
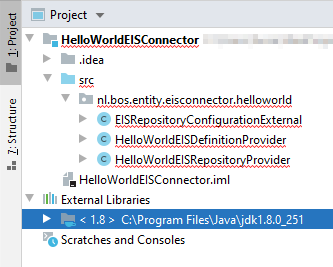
You see it detects all kinds of errors, but that is because of the missing dependencies…Remember those dependent JAR files!? Also these need to be downloaded to your local workstation and placed in the class path of your project as external library!
This is your end-result with all the ‘red’ stuff gone…

Now for the ‘real’ implementation!
To start with EISRepositoryConfigurationExternal. You can leave this class as is. When you open it you will see that all your configured properties are in here. This class just converts these properties (with the provided values when we start to use the EIS connector) into a map object. And this map object is passed into the other 2 classes in both their init(Map<String,String> map) methods.
Check out the result of that (unchanged) configuration code here
To get the values of the properties (of the passed map object) we can do something like this in those init() methods…You’ll see a sample later in the real code!:
1 | String userName = map.get("username"); |
And yes…that password contains the decoded value!!
Now jump to the HelloWorldEISDefinitionProvider as reading those properties is (for us now) only useful for the ‘real’ connection to an external system which is implemented in HelloWorldEISRepositoryProvider. And we even don’t use it in that class either (for now) as we just want to play around with the connector. An ‘in memory’ serializable list already gives us a good impressions of the capabilities!
HelloWorldEISDefinitionProvider
You see that this class implements the interface IEISDefinitionProvider which comes with a set of methods that require some implementation. This is how it looks like when it’s empty:
1 |
|
- We leave the init() empty as we don’t need to do anything in it. That map object contains the variables we defined, but we don’t need them for the entity ‘definition’ code!
- We make sure that the getEntity() can give back a new entity definition based on a provided name
- We use 2 entities names that we support: ‘project’ and ‘task’
- Both will have 2 properties:
- ‘id’ of type ‘Integer’ that has a reference id to the ID of the instance in our external system!
- The ‘id’ can also of type ‘String’, but make sure to set the length and pass also the correct value type in the rest of your code (a thing I ran into!)
- ‘subject’ is just a field to play with
- ‘id’ of type ‘Integer’ that has a reference id to the ID of the instance in our external system!
- Make sure to use the setPrimaryKey() on the property that makes it unique…In our case that ‘id’ property!
- The getEntities() method should return all supported entities by default, so we just build a list of accepted entities to return.
Check out the result of the ‘definition’ code here
In the ‘Low-code Design Guide’ you can find many more implementation examples of other type of fields to use on your entity!
HelloWorldEISRepositoryProvider
You see that this class implements the interface IEISRepositoryProvider which also comes with a set of methods that require some implementation. This is how it looks like when empty:
1 |
|
First a small part about the logging. We can define a new LOGGER object like this:
private static final CordysLogger LOGGER = CordysLogger.getCordysLogger(HelloWorldEISRepositoryProvider.class);
With this statement we can make calls to the AppWorks log file /opt/opentext/AppWorksPlatform/defaultInst/Logs/Application_Server.xml
We can do this by making a statement like this: LOGGER.debug("");
And (as good developer) you want to check if the log level is set to debug before you use the above statement:
1 | if (LOGGER.isDebugEnabled()) { |
- In the init() we can read the map object like this
map.get("username");. This information can be used in other methods to make a ‘real’ connection to an external system (as described before). - The testConnection() can (for now) just return
trueas we create an ‘in memory’ database that is always available. Normally you would use the credentials from the init() map object to make a test connection to your external system.
We also have the CreateReadUpdateDelete methods to implement:
- create(): our external system will get a new entry created here and with that we generate a unique ID to use. This ID is also used in the reference back to the AppWorks platform. That is why we pass it back in the ‘eisEntityRow’ object!
- get(): also our ‘Read’ method where we get the entry from our external system (based on that saved unique ID that is also referenced in AppWorks). The ID is part of the ‘eisEntityRow’ object.
- update(): As we already saw we can get the ID from the ‘eisEntityRow’ object; retrieve the entry from our external system with that ID; update it and send it back to our external system again
- delete(): All the same info; you might wondering why (this time) it’s a list of ‘EISEntityRow’ objects?…Well, you can select multiple entities in runtime and delete them…that’s why! 👍
Then we have the doQuery() which is triggered when we click to ‘AllProjects’ list building block that we’ll create later.
And as last part we have 2 helper methods to reduce duplicate code in buildEntityRow() and to generate that ID in ‘generateUniqueId()’
Check out the result of the ‘repository’ code here
A simple to use ‘in memory’ synchronized Data Access Object
ProjectDAOis created for now for the ‘project’ entity so we have something nice to test with. The next step off course is to implement a real connection to some other external system with the provided configuration values in that ‘map’ object!Also in the ‘Low-code Design Guide’ you can find many more implementation examples for the methods in this class.
The full package of sources can be found in this .zip file
As final step for this section we need to make the updated sources available again within our AppWorks project (created in the beginning of this post!). How?…Well, I thought to be smart and upload it all to the server in: /opt/opentext/AppWorksPlatform/defaultInst/cws/sync/appworks_tips/aw_eis_connector_ws/aw_eis_connector_project/HelloWorld/src
And do a ‘synchronize’ again, but that will failed as there is no link available yet for those new ‘DAO’ files!
Solution? Just upload them by hand with the ‘upload document’ functionality on your project!
I didn’t try it out, but you should also be able to create a JAR file of the compiled classes, upload it to the server (
/opt/opentext/AppWorksPlatform/defaultInst/crosscontext/) and put it as dependency to the Java Library Definition (like the other libraries)!
This should be the result for now:

Generating a package
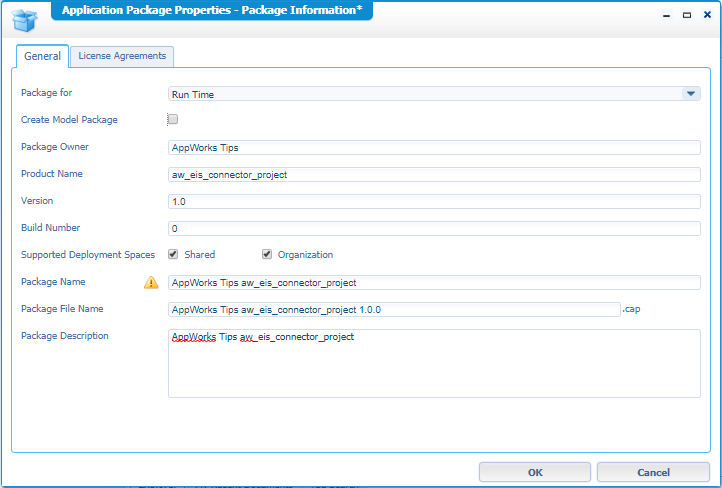
The first thing we want to do here is changing the default packaging options!

Let’s change the setting of the ‘Supported Deployment Spaces’ so the ‘Organization’ option is also marked.
It’s the most common way of packaging!
Let’s generate that package now and download the CAP file!
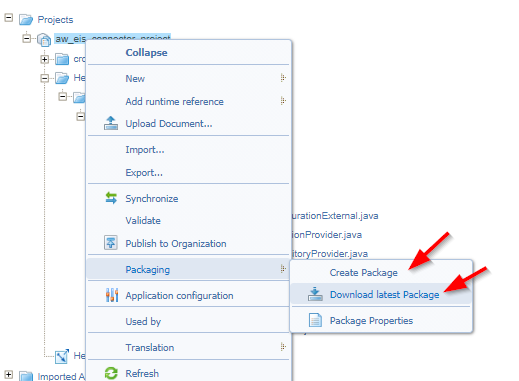
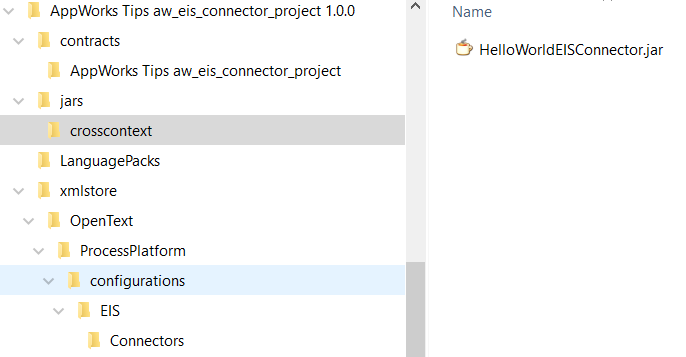
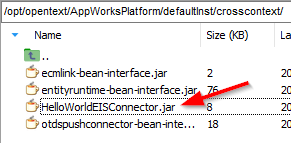
When you extract that CAP file you will see this folder tree with a new generated JAR! So the packaging feature compiles our sources nicely and makes it a re-usable JAR file that will be uploaded in the ‘crosscontext’ folder on the server…nice!
The package deployment
Now it’s time to make our EIS entities available in our solution!
For this we switch to the ‘System’ organization with our ‘sysadmin’ account as this is the place where we do deployments in a specific organization or in the shared space. We’ll deploy it in the shared space so all organization can use our brand-new entities…Hooray!
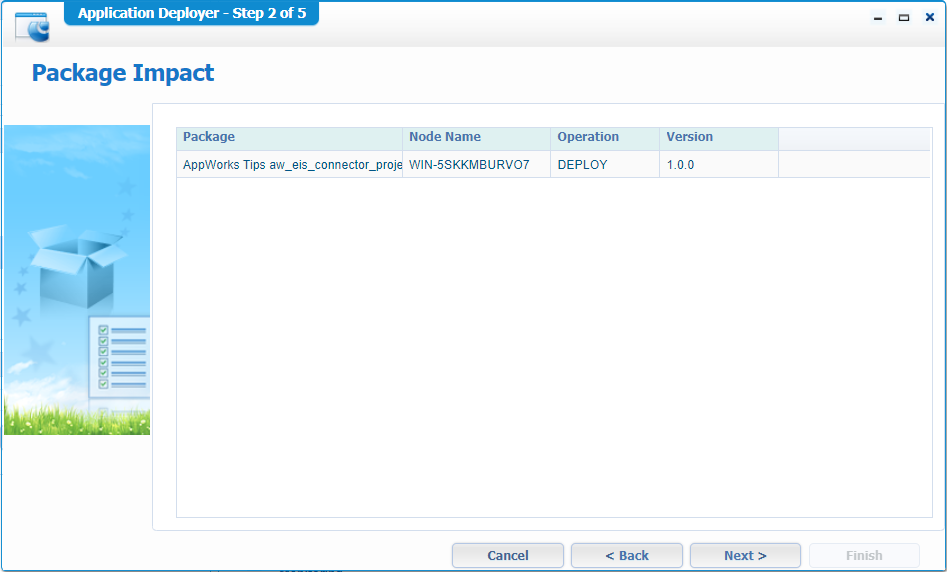
Browse to your CAP file and ‘Upload and Deploy’ it to the platform…

…and we just follow the screens for the deployment.

Click ‘Next >’
Click ‘Next >’

Click ‘Next >’
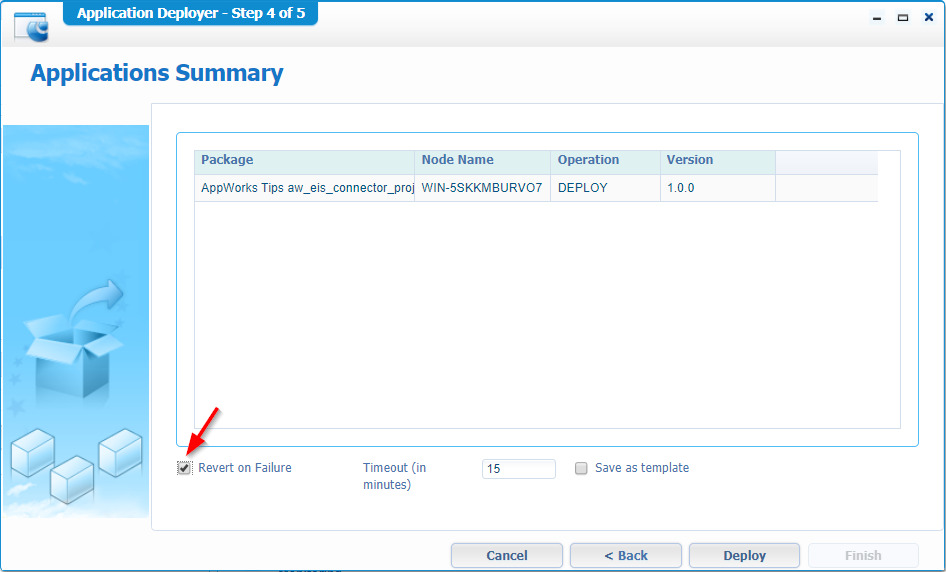
Mark the ‘Revert on Failure’ option and click ‘Deploy’
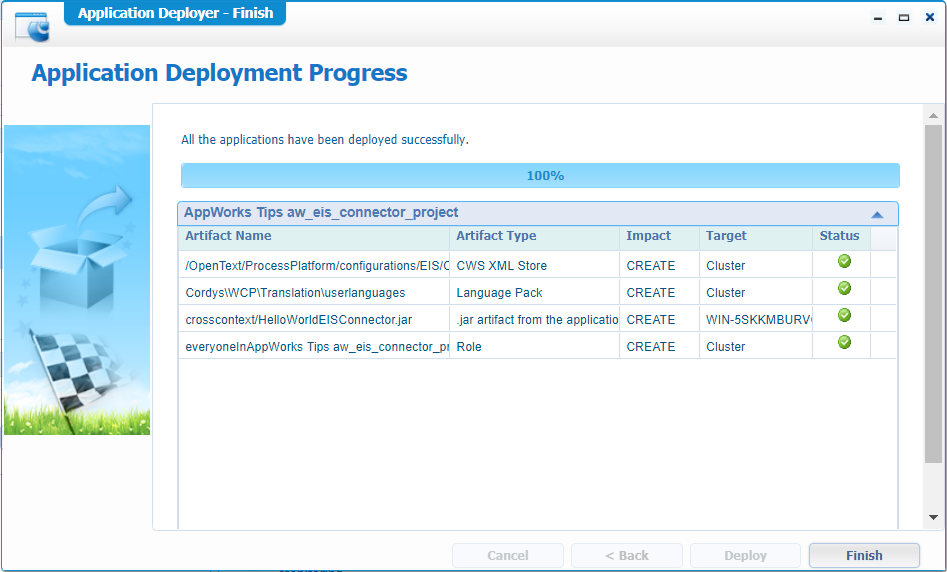
And ‘Finish’ it.
There you have it…Our new package nicely deployed in the ‘shared’ space

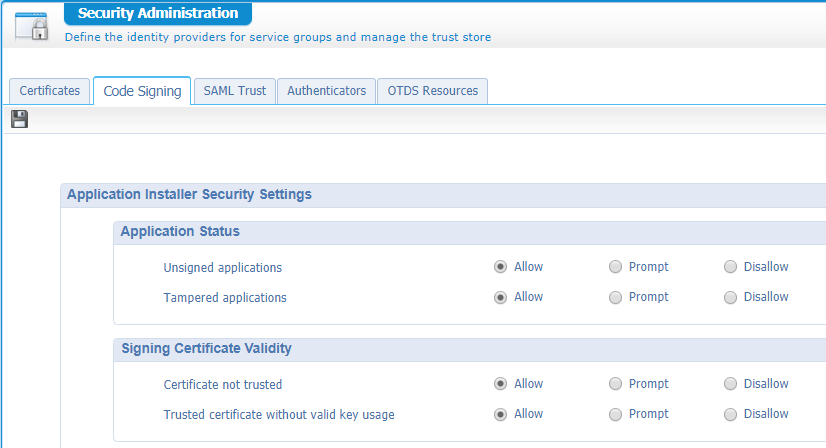
Maybe you got into the issue that you CAP file is not a valid signed package to install!?
You can choose the hard way and make it signed (search for ‘Package Signer’ on this site) so it’s accepted, but for our development way of working it’s easier to loosen up the restriction for signed packages. This can be done in the ‘Security Administration’ artifact where you need to change the ‘Code Signing’ settings:
After this deployment we also need to do a last post step! And that is making the deployed JAR files on the server available on the class path for the ‘CWS’ service container.
And yes…they are uploaded:
In that same ‘System’ organization open the ‘System Resource Manager’ artifact and update the class path in the JRE configuration tab. You can use this value ?CORDYS_INSTALL_DIR?/crosscontext/*.jar
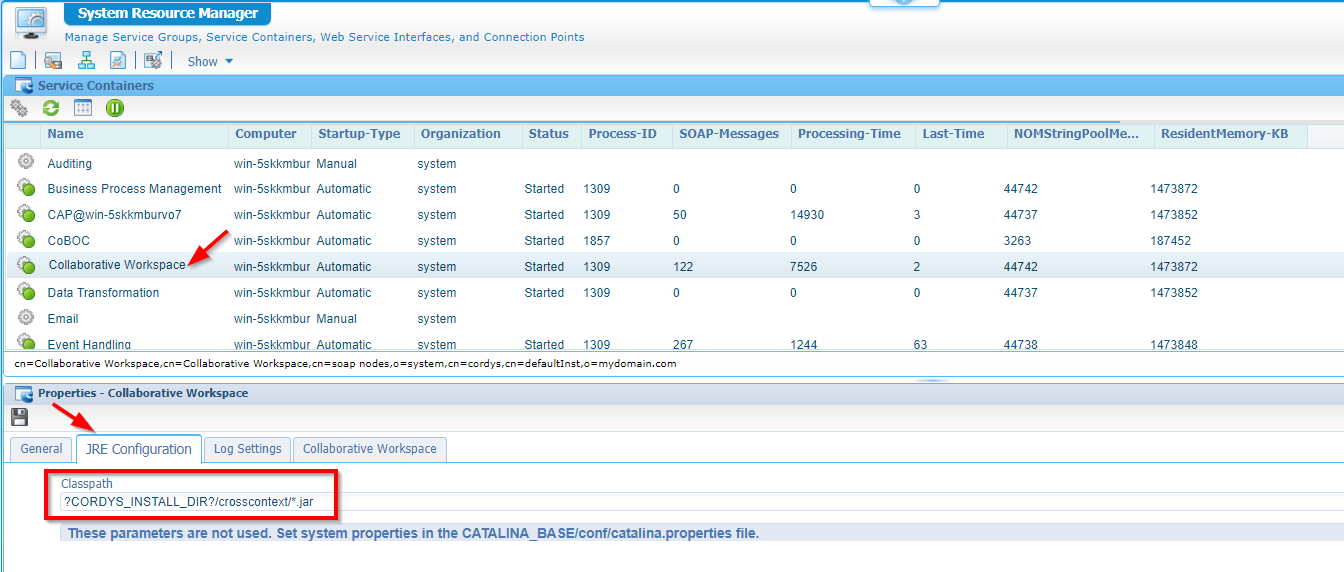
Restart the container…And as the documentation is telling us….Restart the TomEE instance!
Configure the connection properties
TomEE restarted and back in design-time?
Our EIS connector will have a connection to an external system and the connection details need to be provided somewhere…We will do this in our own (non-system) organization.
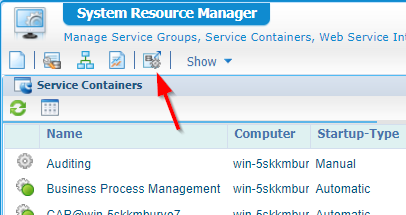
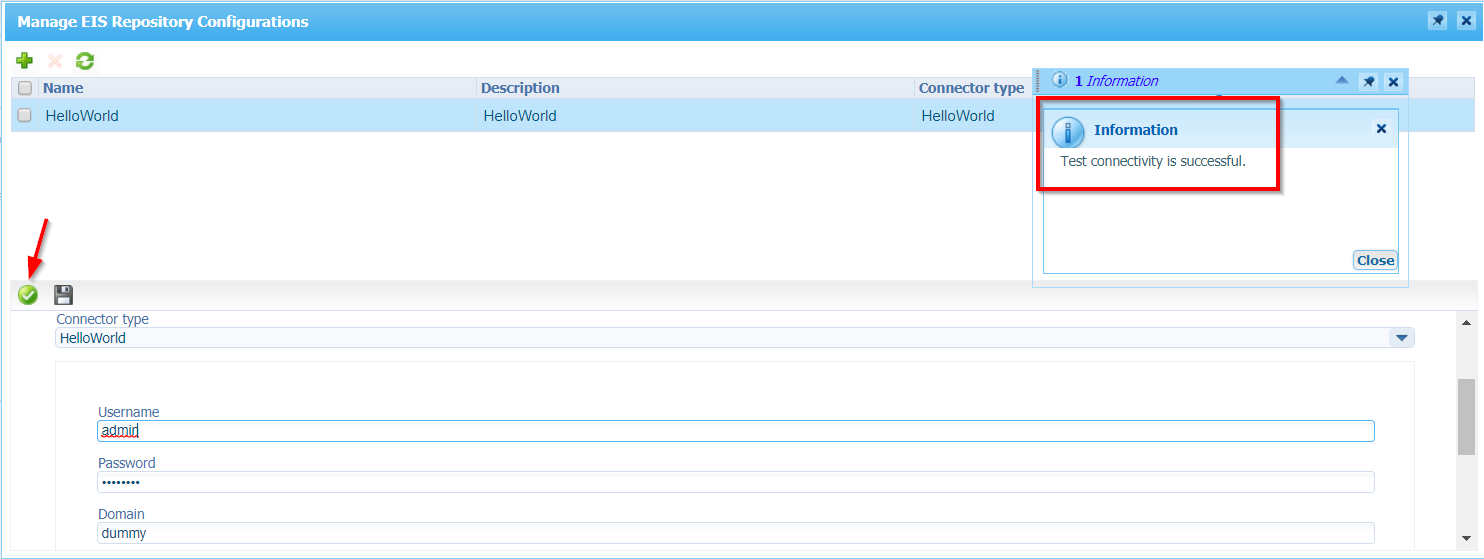
Make sure you are an ‘Administrator’ and open the ‘System Resource Manager’ artifact where you can click on the secret button called the ‘Manage EIS Repository Configurations’…Even I needed to look for that one!
In that new screen you should be able add a new ‘EIS Repository configuration’ with these settings
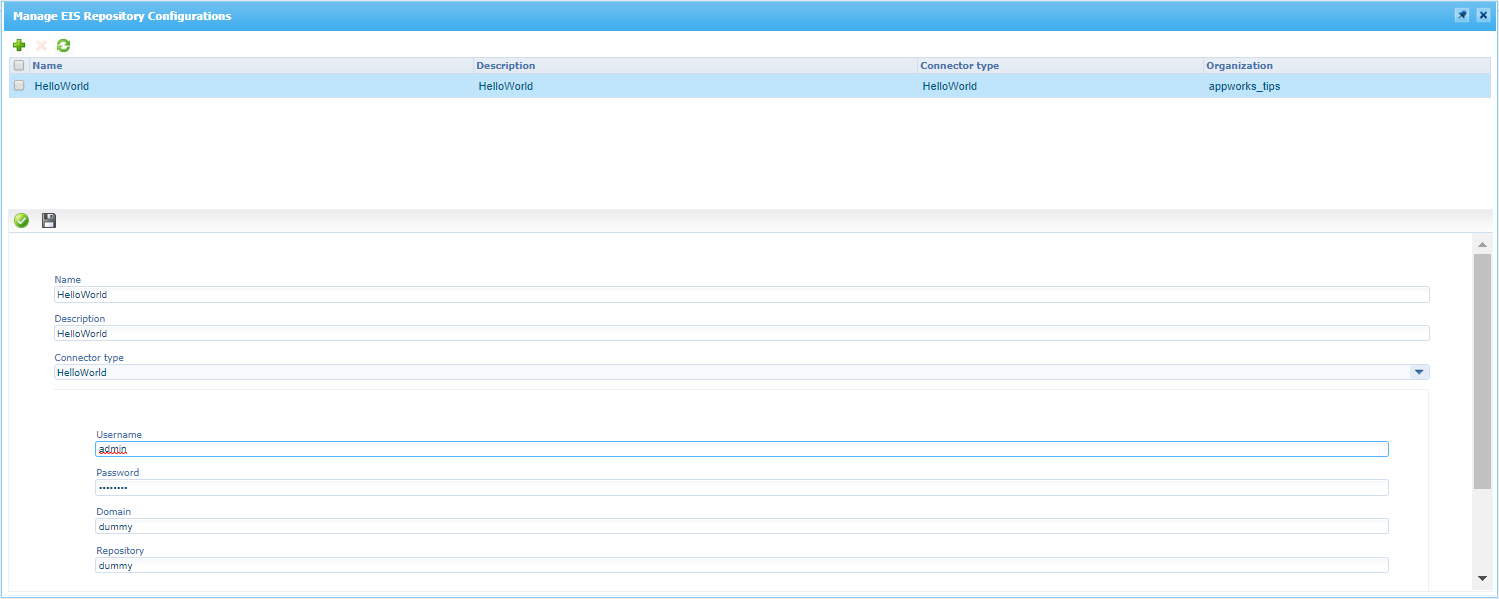
If that green plus-sign is grayed out it can’t find your deployed EIS connector. Make sure it’s valid and indeed deployed.
When done, there is no need to hit that green ‘test’ button as it will fail at this moment (I don’t no way)! We need something extra to configure later to pass this test (I guess…because later it works for some strange reason!).

Let’s just continue the job…
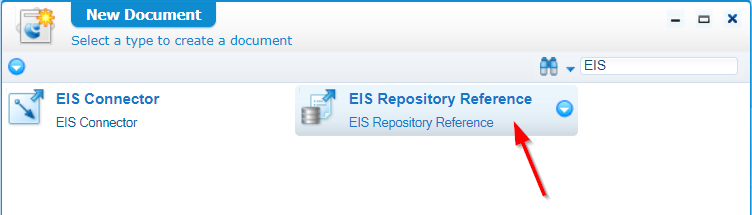
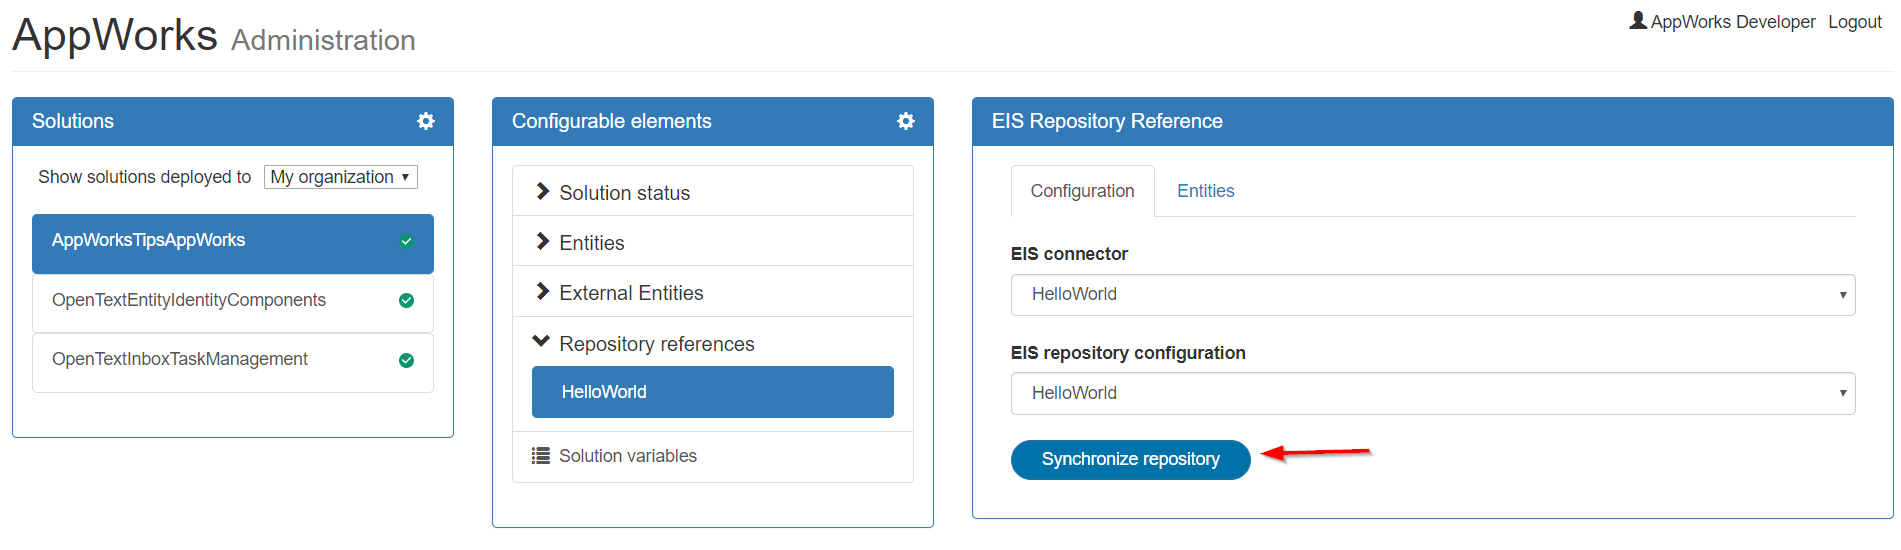
Create the EIS repository reference
In your favorite organization (where you EIS connector is available now) you need to open your favorite workspace and corresponding project. From here (with our developer role) we create a new document of type ‘EIS Repository Reference’
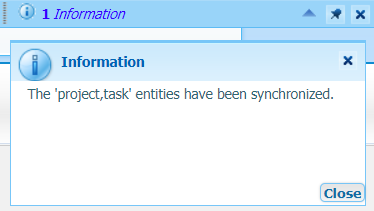
Fill in ‘HelloWorld’ for the ‘Display name’, ‘Name’ and ‘Description’ and jump to the next tab ‘Entities’ where you should be able to select you EIS connector so the entities can be retrieved with that ‘Load entities’ button…That’s nice stuff what’s happening here…right?

Save the reference and hit that ‘Synchronize’ button as a pro for some more ‘magician stuff’!!
And there it is…
Let’s open the project ‘external’ entity and check out the available building blocks:
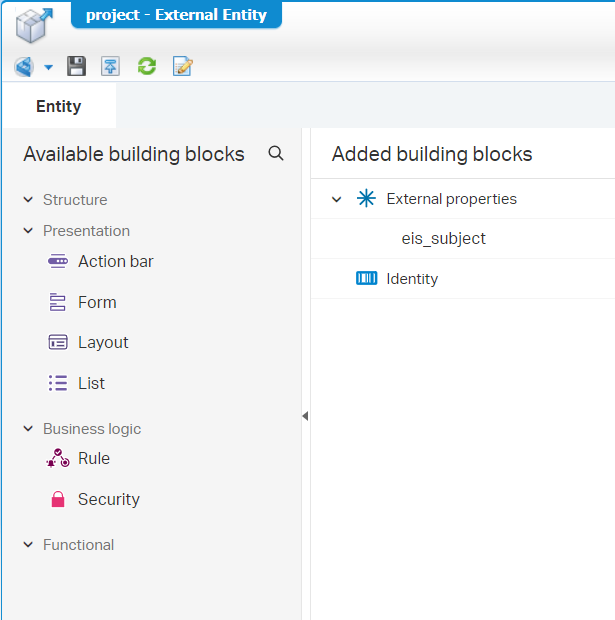
So, you see that it’s not a full-blown entity with all building blocks available! But we are now in full control as when we create a new instance of this entity (in runtime) our custom code is triggered where we can also update our external system (for us now an ‘in memory’ data object!)
Great!…Do a validation, publish your project, and go to the next step…
Back to that ‘test’ button to make it work
I was just wondering if that ‘test’ button from the ‘Configure the connection properties’ section is willing to work now…
And that’s a success…I don’t know what the trigger was, but I only created the ‘EIS repository reference’ document with a synch in the meantime!
OK…Don’t blame a winning team!…Next step…
Adding some building blocks
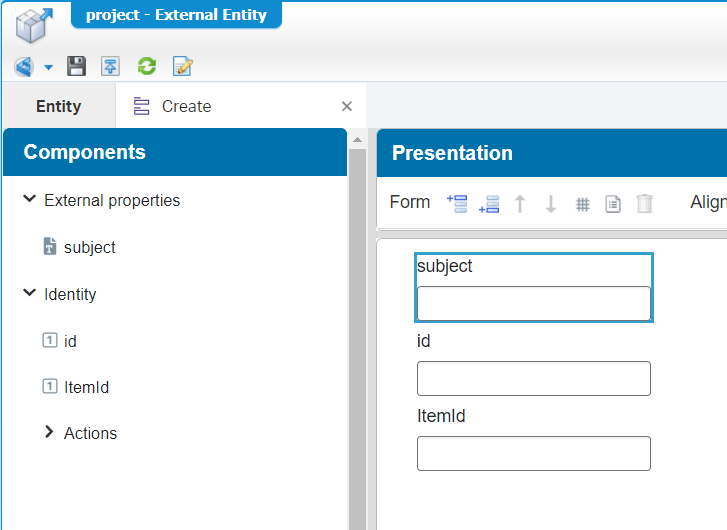
Now, let’s open the ‘project’ entity and craft these building blocks:
- ‘Create’ form
- ‘Default’ form (that shows the create form)
- ‘AllProjects’ list
When done, you can publish and test it out in runtime.
If you don’t see things in runtime you probably are not a user with ‘Entity runtime’ roll.
Another setting might also not in place yet in the ‘/app/admin’ panel where you also have a bright and shining ‘Synchronize repository’ button to make some ‘magic’ runtime updates!!
But after some time…you also…will be able to create an instance of your first ‘external’ project entity in runtime!…You get yourself a beer now…cheers!

Hit that ‘Create and open’ and see if we failed or where we can improve things!? 😜
Time to run TomEE in debug mode (when ^%$^$ hits the fan!)
Stop you TomEE instance systemctl stop tomee
Now set a JPDA_ADDRESS variable with export JPDA_ADDRESS="192.168.56.107:8000"
To make it smooth we’ll add it to the bash profile of the user too So, edit the ~/.bash_profile of the ‘otadmin’ user:
vi ~/.bash_profileWhen done reload your profile via the command:
source ~/.bash_profileHere is more information about JPDA
And run TomEE via this command: sudo JPDA_ADDRESS=$JPDA_ADDRESS sh /opt/tomee/apache-tomee-plus-8.0.1/bin/catalina.sh jpda run
Now your TomEE is listening for incoming debug request that we can start with our IDE!
In IntelliJ (locally on your workstation) you create a ‘Remote’ run configuration like this:
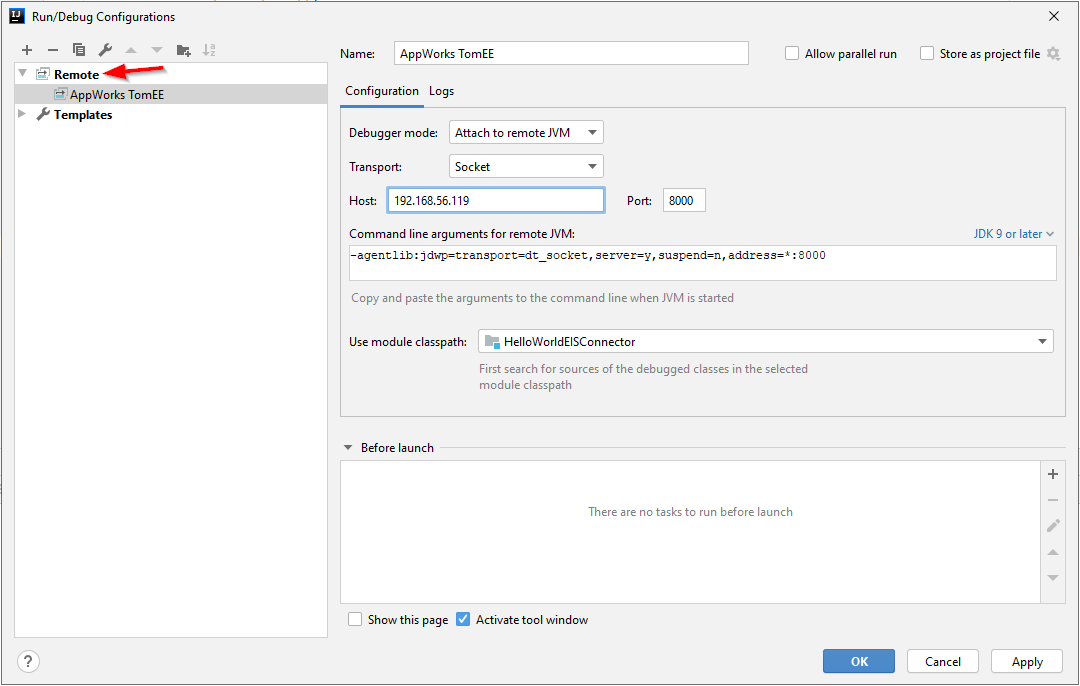
Just pass in your host name and the port where your TomEE (or better the JVM in that TomEE) is listening on. Apply the correct module to use during this connection so we can start debugging the correct code!
Start that new ‘Run configuration’ and you should see this message passing by: Connected to the target VM, address: '192.168.56.119:8000', transport: 'socket'
This is the string to use (if you have another IDE):
-agentlib:jdwp=transport=dt_socket,server=y,suspend=n,address=8000
Now it is the time to place some breakpoints in the code, create a project instance in runtime and see the debugger doing its job!
AppWorks platform log level
Now that we can debug things it would also be a great thing to adjust to logging of our platform. And especially the logging of the code in our namespace ‘nl.bos’ as you might have seen in the downloaded src.zip file!
In those sources you see these lines of code:
1 | if (LOGGER.isDebugEnabled()) { |
Well, would it not be great to spit out these debug messages in the logfile?
Edit the log configuration file on the server: sudo vi /opt/opentext/AppWorksPlatform/defaultInst/config/Log4jConfiguration.xml
And a new ‘category’ tag before the ‘root’ tag!
1 | <category name="nl.bos"> |
That ‘root’ tag is for all the platform logging…You can also put that on ‘debug’ level, but that might be some overkill off logging statements!
After this change (no restart needed!) you will see your messages via: sudo tail -f /opt/opentext/AppWorksPlatform/defaultInst/Logs/Application_Server.xml
Steps for updating the EIS connector (When you change things)
It depends also a bit on what is changed (when you only changed the ‘repository’ code) we can use the fast development way:
- Change the code in your IDE
- Generate your own JAR out of it (with the same name ‘HelloWorldEISConnector.jar’)
- Upload the JAR to the server in
/opt/opentext/AppWorksPlatform/defaultInst/crosscontext/ - Restart TomEE
- Retest in runtime
If the entity ‘definition’ code is changed you also need to do some extra in design-time
- Open the ‘EIS Repository Reference’ from you project and do a re-‘Synchronize’ on the entities.
- And do a publish of the project to see results in the front-end
Another way of working would be:
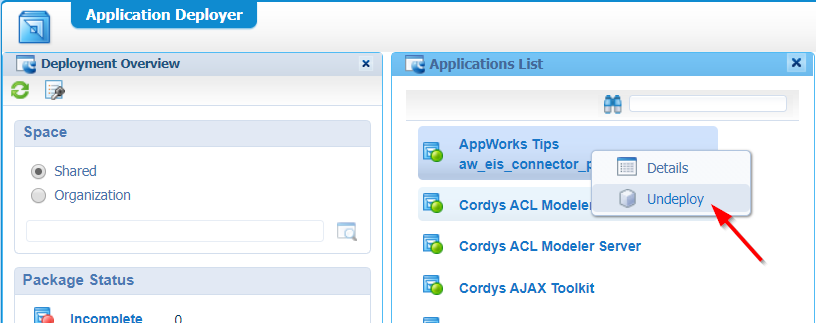
Change the code in your IDE
Upload the code in the EIS connector project
Create and download a new package (with maybe a new version?)
Un-deploy the old package
![eis_040]()
Deploy the new CAP file
Open the ‘EIS Repository Reference’ document and hit that ‘Synchronize’ again to get the last stuff again!
For all the ways of working you can also go to the ‘/app/admin’ panel and use the ‘Synchronize’ button again to update the changes in runtime (if you see strange things happening)!
And yessssss…That’s a “DONE”…It was hard work, but we made it till the end. I think again a great post where we learned more about the platform capabilities and several hidden buttons and settings you would not think off! Now it’s your turn to something far more fancy for your feature (or maybe start by implementing the ‘task’ entity!), but for sure this post will help you on the progress of your EIS connector. I see you in the next post where we talk more about another great topic in a new AppWorks Tips installment…Cheers and have a great weekend!
Don’t forget to subscribe to get updates on the activities happening on this site. Have you noticed the quiz where you find out if you are also “The AppWorks guy”?
