
Hi there AppWorks fans,
Welcome to a new installment of AppWorks tips.
With this post we start a series of posts where we want to learn about Continuous Deployment and Continuous Integration (CD/CI) on our AppWorks platform. It’s a hot topic these days so it’s almost required to have some knowledge about it. In the ‘Advanced Development Guide’ we can find a short section on this topic in ‘Setting up continuous integration for AppWorks Platform applications’, but we all know that when we are in the front-line we have to overcome hordes that maybe less hard to take after these series posts.
What will we cover in the next couple of weeks?
- We start with this post where we dive into the CLI of the AppWorks platform. We build a project from SVN resources and spit out a .CAP file for further deployment
- After generating that CAP file we continue with the deployment via ANT tasks (based on a build.xml). You’ll see that the platform contains a set of ANT tasks for deployment.
- And finally we automate the deployment using Jenkins by starting a deployment pipeline (based on a Jenkinsfile)
I never done this so we’ll see how far we get with it…But if I can do it…for sure you can too!! 💪
Let’s get right into it…
I assume you have your environment up and running and that you have crafted something nice…and…also tested it in runtime.
Another assumption is that the project you crafted is connected to an SVN source. But we as good developers make sure our sources are always saved in a source control system to keep track of things…am I correct?
My project is called ‘AW_CD_CI_PROJECT’ and in this project is just an ‘hello_world’ entity with the default building blocks so we can create new instances and check out if they are created correctly (you’re with me right?)…Nothings fancy…nothing special!
What we don’t want to forget is changing a setting in the packaging properties. Let’s right click the project and go to the packaging properties.

In the new screen we’ll update the ‘Supported Deployment Spaces’ so we can deploy to an ‘Organization’. This is required otherwise you can’t build a new project from SVN in our “BUILD” organization that we will create.

After all the hard craftsmanship it’s time to package things…We would right-click to project and generate the package from design time…STOP! This is where we break in as we want to start automating this step!
But before we will start automate things it’s a good choice to start making a second organization!…A second?…Yes…And we call it ‘_BUILD’ or whatever fancy name you want to have as long as it’s a separate organization!
Create a build organization (and the deploy organization)
Go to the ‘system’ organization with the ‘sysadmin’ account and open the ‘Organizations Management’ artifact. Here you create 2 new organization that may look a bit like this:
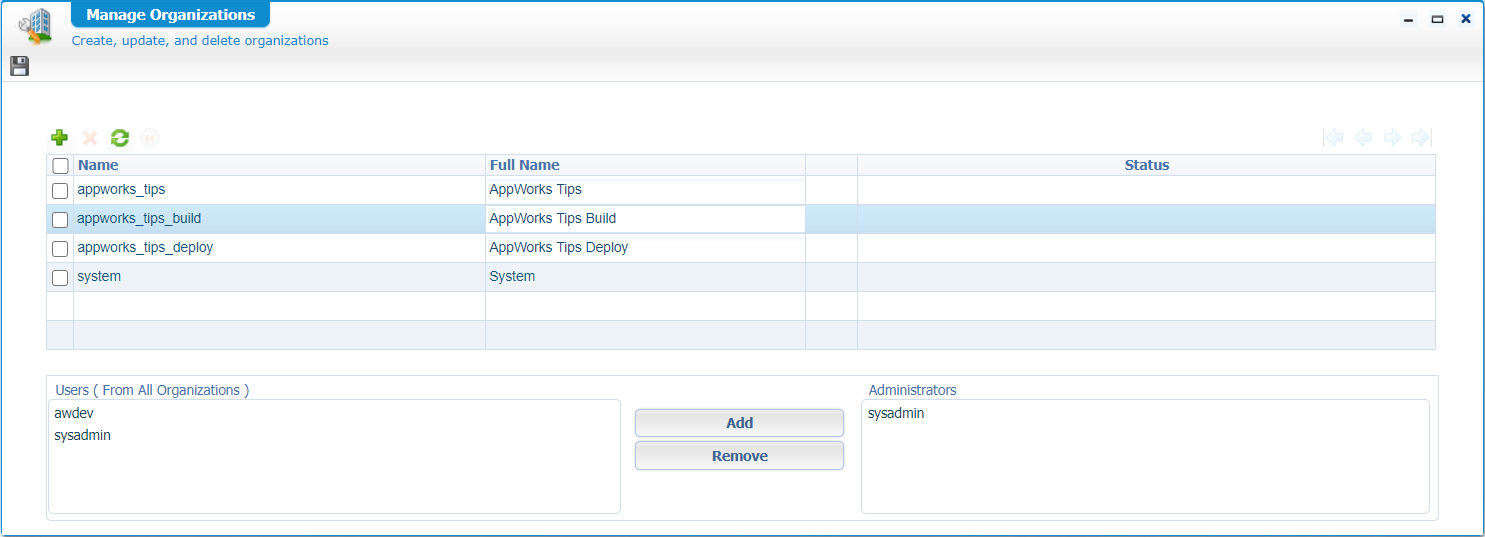
The ‘Build’ organization is used in this post and that ‘Deploy’ organization will be used in the next post, but as we are already in this artifact we can just create both.
Make sure you add some administrator like the ‘sysadmin’ account for both. Save it all and jump to the ‘build’ organization via that top-right dropdown:
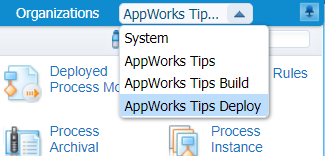
In both (just created) organizations you make sure that our ‘awdev’ account is also inserted so we can check things out after the CLI commands are done…just a double check to do…better safe than sorry!
This user can be added in the ‘User manager’ artifact for that organization. Make sure you add the user with the same user ID from the other organization so you get this message:
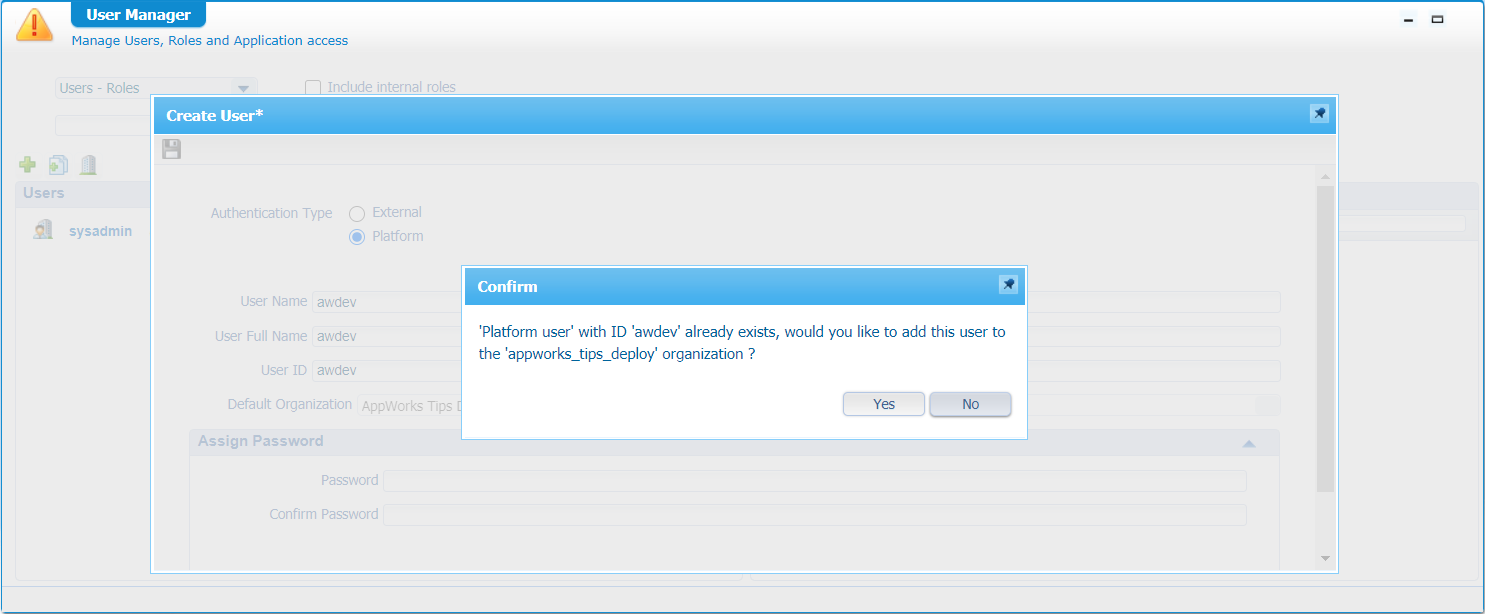
I know we have platform users now and don’t use OTDS for authentication, but it’s fine for our environment!
Also make sure this user is applied to the ‘Administrator’ and ‘Developer’ role!
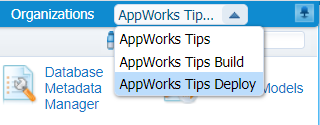
Now login as ‘awdev’ and you should be able to switch quite easy with the top-right dropdown:
Next step…
Build our solution with CLI
Time to start MobaXTerm and login to the server with our ‘otadmin’ account.
From there we go to cd /opt/opentext/AppWorksPlatform/defaultInst/bin/
And we want to start with this command: sudo ./cws.sh help
Well….’wanted’ to start as I first get these errors for some strange reason?
1 | /opt/opentext/AppWorksPlatform/defaultInst/bin/cws.sh: fork: retry: No child processes |
I tried to find out what causes these messages and from what I understand is that we just want to start too many processes on our account. It all has to do with these commands:
2
3
4
ulimit -a #where you see the 'max user processes' for a user
sudo vi /etc/security/limits.conf #where you can set these limits
otadmin soft nproc 35868But it still not gave me the result I wanted…So, I just continued with the ‘root’ account!
Even
sudo -iu rootdid not solve the problem!?
So give it a su
Go again to cd /opt/opentext/AppWorksPlatform/defaultInst/bin/
And give the magic command ./cws.sh help
Output will be:
1 | Usage: cws <subcommand> [options] [args] |
Very interesting…let’s start with a command like ./cws.sh help CreateSVNWorkspace
Here we can read that we can craft ourselves a command like this one:
./cws.sh CreateSVNWorkspace -organization appworks_tips_build -workspace AW_CD_CI_WS -description AW_CD_CI_WS -svnurl https://192.168.56.1/svn/AppWorks/ -svnusername awdev001 -svnpassword admin
Output (with some warnings that we skip for now!):
1 | The 'CreateSVNWorkspace' command has started... |
Let’s check out our organization ‘home/appworks_tips_build’

It really works…niceeeee! 😅
Next…let’s just validate!?
./cws.sh validate -organization appworks_tips_build -workspace AW_CD_CI_WS -d AW_CD_CI_PROJECT
1 | Starting local CWS client... |
Hell yeah…also working!!
Well….next step…It’s not always going this smooth…I can tell you that!
Package with CLI
Let’s just do this: ./cws.sh package -o appworks_tips_build -w AW_CD_CI_WS -p AW_CD_CI_PROJECT
1 | Starting local CWS client... |
It’s my day today…!
And I can even find the package here: cd /opt/opentext/AppWorksPlatform/defaultInst/cws/build/appworks_tips_build/AW_CD_CI_WS/package/My\ Company\ AW_CD_CI_PROJECT\ 1.0.0.cap
Let’s save it already to a save location for later use…
cp /opt/opentext/AppWorksPlatform/defaultInst/cws/build/appworks_tips_build/AW_CD_CI_WS/package/My\ Company\ AW_CD_CI_PROJECT\ 1.0.0.cap /home/otadmin
And make tomcat owner again chown tomcat:tomcat /home/otadmin/My\ Company\ AW_CD_CI_PROJECT\ 1.0.0.cap
It’s going all too smooth…time for coffee as we’re pretty done already because the package it created now! ☕
Let’s check out some other interesting CLI commands
You also see that I use ‘appworks_tips_build’ for my organization name, but these commands can off-course also be used for you current project so you can script your steps of development.
Let’s do a synchronize: ./cws.sh synchronize -organization appworks_tips_build -workspace AW_CD_CI_WS
Output can be found here: cd /opt/opentext/AppWorksPlatform/defaultInst/cws/sync/appworks_tips_build/AW_CD_CI_WS/AW_CD_CI_PROJECT/
Or a publish: ./cws.sh publish -organization appworks_tips_build -workspace AW_CD_CI_WS -d AW_CD_CI_PROJECT
And yes…I see it all back in runtime…great stuff we’re learning here!
Normally we don’t need to publish our build in the ‘build’ organization. This ‘build’ organization is only to grab the latest data from SVN, generate a .CAP package out of it, move this .CAP package away from the generate location and remove the auto generated workspace in the end so the ‘build’ organization is clean again!
Also nice…the validation of all entities: ./cws.sh validate -organization appworks_tips_build -workspace AW_CD_CI_WS -d AW_CD_CI_PROJECT/nl-bos/entities
Finally, when our build it done, we can clean up the mess with: ./cws.sh removeworkspace -o appworks_tips_build -w AW_CD_CI_WS -x
And don’t forget that last ‘-x’ for execution!
Well…that’s it for some playtime! More is described in the ‘Advanced Development Guide’ in the section ‘Using the CWS command-line tools’
Logging CLI
For some logging on all your CLI commands you can tail this file:
tail -f /opt/opentext/AppWorksPlatform/defaultInst/Logs/CWSCli.xml
In this directory you will find more XML logfiles per separate command that you executed:
/opt/opentext/AppWorksPlatform/defaultInst/Logs/cws
And that’s a “DONE” for our first step on CD/CI where we learned more about the Command Line Interface of our AppWorks platform. Easy to use and simple to find if you know where to look. Also nice to know that these commands can also benefit you in your current project for executing manual actions in development. Well, I see you in the next post where we start playing with ANT tasks for our (.CAP) package deployment! Have a good day and a nice weekend.
Don’t forget to subscribe to get updates on the activities happening on this site. Have you noticed the quiz where you find out if you are also “The AppWorks guy”?
