
Hi there AppWorks fans,
Welcome to a new installment of AppWorks tips.
For this post we’ll have an interesting use-case to cover. Long ago I already covered a post about abstraction/generalization on entities. We also learned about separating/managing ‘Projects’ within a solution the correct way. What we never covered on this blog site is pulling it one step higher where the whole solution is separating into several workspaces! This is where it gets interesting because we need to think upfront which parts of the solution are “generic” and what parts will be “specific”! We build this post based on a real live project where we are in the front line for deciding what our approach will be. So, let’s see what darkness will fall over our “new way of working”…Or will it only be a shining sun with green hills? 🤠
Let’s get right into it…
So, the post has an introduction…Now what? Well, what about a plan? Let’s first describe my scenario we’ll build for this post. It all has to do with a system where we create multiple ‘Request’ items on published/open ‘Publication’ items. A ‘Publication’ can be of a certain type and based on this type a certain flow/lifecycle is followed. So, some publications will follow the same/generic flow and others require a more specific flow. The type of publication can be a ‘Journal article’, a ‘Handbook’, or a ‘Research report’ (or whatever you can produce!); The publication for that ‘type’ will also be of a certain ‘kind’ like ‘Paper’ or ‘Digital’, or both. As said, the publication will follow a certain flow, but is eventually “Open” to make requests on. See a request like getting a copy of the “open” publication, but we can only manage the maximum requests for the maximum number of publications possible…How nice! 😵
Let’s also introduce the following information in a new ‘Request’:
- User specific information
- Optional organization data
- Some project related data
- The “Area” where we need the received publication for (like ‘Research’, ‘Development’, or ‘Other’)
- The “Space” where the received publication will live in (like ‘Internal’, ‘Global’, or ‘Variable’)…Or whatever!?
- All the “Categories” where the request applies to (like ‘Diversity’, ‘Improvement’, ‘Social’, or ‘Talent’)
It’s all fake data but gives an interesting input to the solution we try to create here. Keep in mind that you can only make a request to an ‘Open’ publication and that the request will also follow a certain flow/lifecycle before receiving the publication.
Our ‘Plot’ is in place…What’s next?
Entity identification and ERD
Before we start building features it’s always an excellent choice to start with an Entity Relation Diagram. Why? Well, it provides an overview for the team, you can collaborate around it (make sure you do!), and all team members understand the intention and have a point on the horizon to work to! So, it is particularly important to keep this ERD up to date when you build new features for the solution.
Based on the description, we can draw a minimal viable ERD like this (just to start the collaboration among team members!):

Notes on the drawing:
- I use draw.io for these types of drawings, but you can use your own tool too
{A}is an indication for ‘Abstraction’; You can use other indicators like{ID}for ‘Identity package’ (when you relate to a ‘User’ entity for example!)- The reason for the abstraction is that we know upfront each publication will follow its own lifecycle/flow; Otherwise, it was a simple solution to introduce a “type” property!
- Also watch the small indicators on the lines; they tell you if a relation is ‘toOne’, ‘toMany’, or if it’s a required/optional relation…take a close look and “ReThink”!
- The solution will be as configurable as possible; That’s why we have a lot of entities introduced which we can use as dynamic Enum properties…Think about flexibility! Have a look in this post for the ‘why?’ answer!
After a WhatsApp collaboration with a college on the ERD, we came to an interesting conclusion that the ‘Publication’ entity doesn’t need to be ‘Abstract’! Why? When you don’t make it abstract, you don’t need to create additional workspaces, projects, and subtypes for those publication types that follow the “generic” path…YES! That’s exactly why collaboration is important…Thank you for the input; You know who you are!
Describing a flow per publication type
Our ERD introduces us to an abstraction with subtype entities. This is for a reason! We know each “specific” subtype will follow a certain flow. With these flows in place, you make sure to recognize matching patterns which we can move to the generic abstraction entity! Nice…now it’s getting interesting as thinking in patterns is always a challenging thing to do. Especially when you know that in a ‘real’ project the specific flows are not always clear to the project members…Even not for your analyst guy/gal!? You even need to watch out for changes in the future; Flows will change and can fall suddenly under the generic flow! Hmmm…So, how to start thinking when things are uncertain/unclear in the future? Well, just start with the information you have for now and evaluate the solution based on added information! Yes, that’s a great thought, but what if the foundational ERD model gets an update based on new information?…Great question! And that’s exactly why it is a challenging task to think in patterns! For now, we just start with the information we have…To keep the post simple, we make sure the ‘States’ are equal and what is happening in the states is equal for that same state-name. So, we have a choice of this list of states for each specific publication type:
- “In draft”; When you create the publication, the lifecycle starts, and this is the first state where we enter an activity to create content and index it with correct metadata.
- “For review”; After publication creation, it’s time for a peer review task.
- “Prepare for publication”; After review, we do some magic back-office BPM stuff…We just run a dummy BPM!
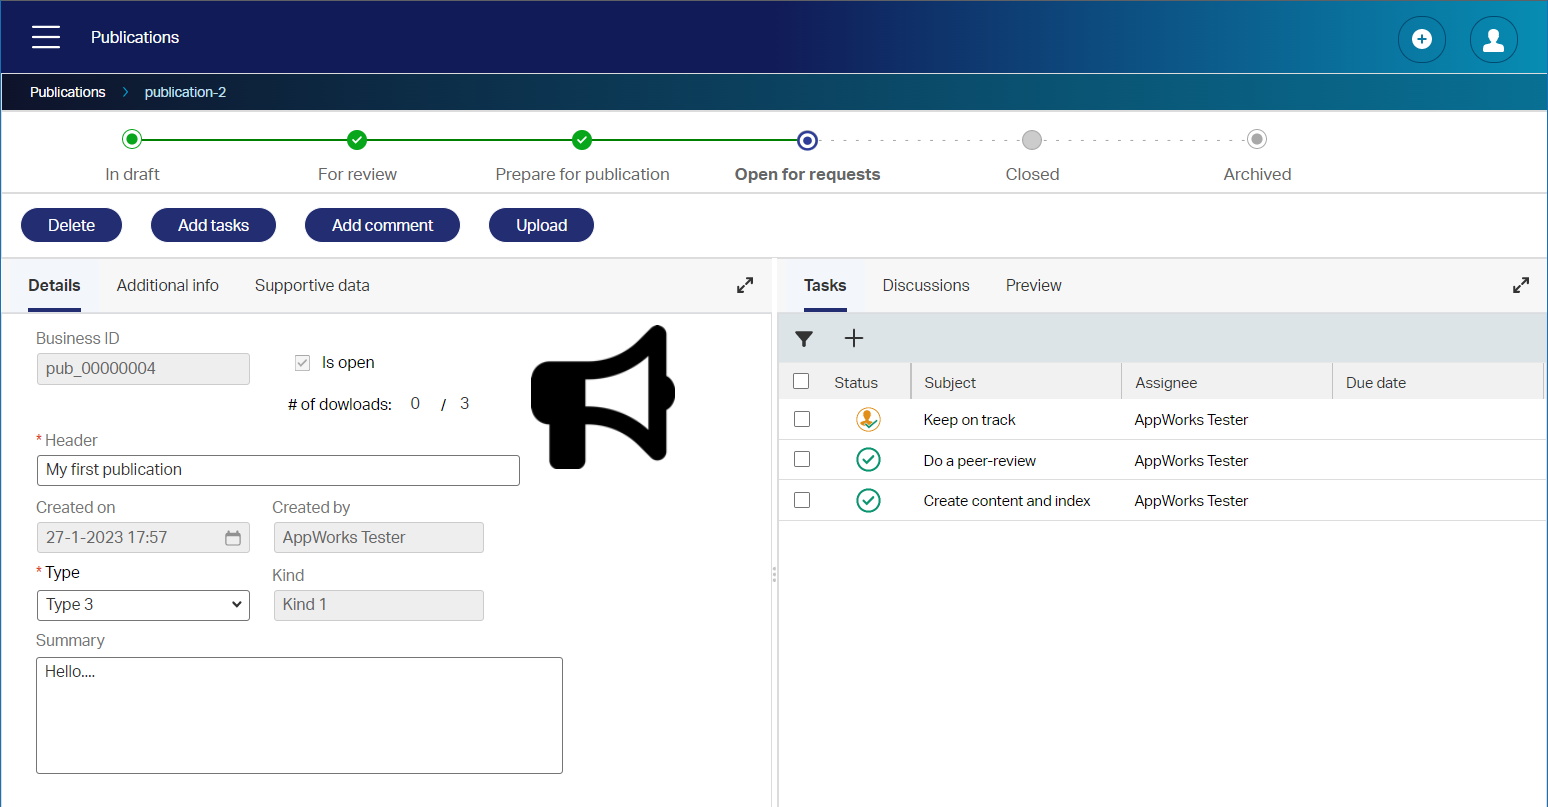
- “Open for requests”; Once done on the preparation, we get ourselves a task to keep track on all the requests coming in (so we see when we reach the max!…remember!?)
- “Closed”; On max. reach, we automatically move to the ‘Closed’ state with a final task before archiving.
- “Archived”; This state will put the publication to sleep for a GDPA-related retention period…
Nice, now for the flows we think each specific publication will follow:
Journal article
“In draft” -> “For review” -> “Prepare for publication” -> “Open for requests” -> “Closed” -> “Archived”
Handbook
“For review” -> “Prepare for publication” -> “Open for requests” -> “Closed” -> “Archived”
Research report
“In draft” -> “For review” -> “Prepare for publication” -> “Open for requests” -> “Closed” -> “Archived”
Conference proceeding
“For review” -> “Open for requests” -> “Closed” -> “Archived”
…
Do you see the pattern? Do you see where we can ‘Abstract’ things or reuse the same path!? It looks to me like “Journal article” and “Research report” follow the “generic” path here…Keep this in mind for later craftsmanship!
For now, we only focus on the Lifecycle BB, but an entity will have a full set of building blocks that can follow this same mindset…Now you see how hard it is, but it’s still fun to think in these patterns! 😉
Describing the ‘Request’ flow
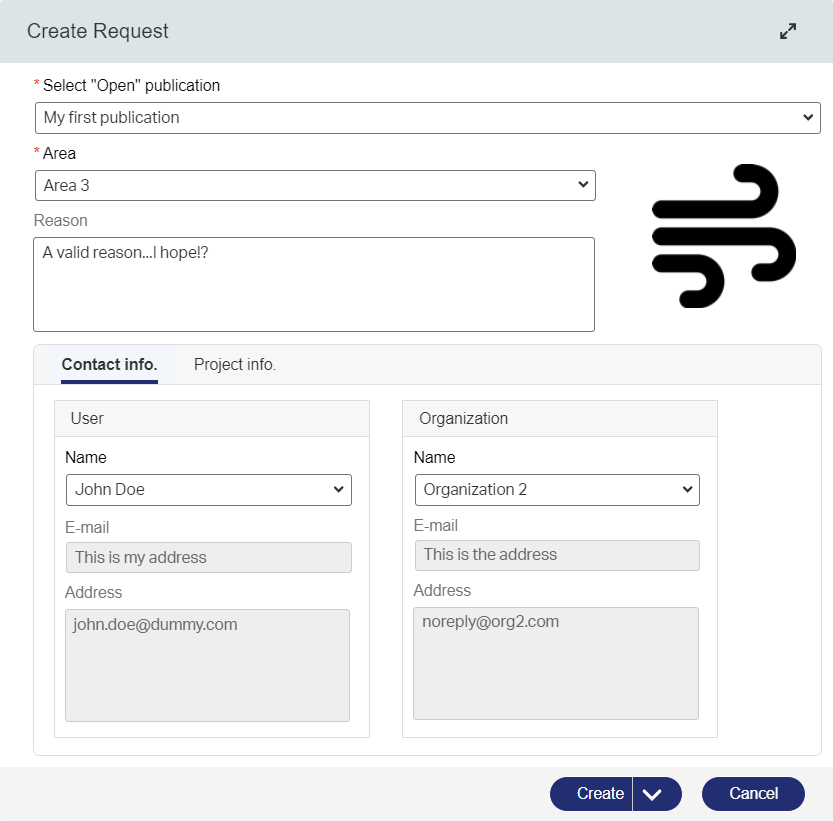
Our ‘Request’ flow starts when we have an “Open for requests” publication! Let’s make it simple again and create a flow like this:
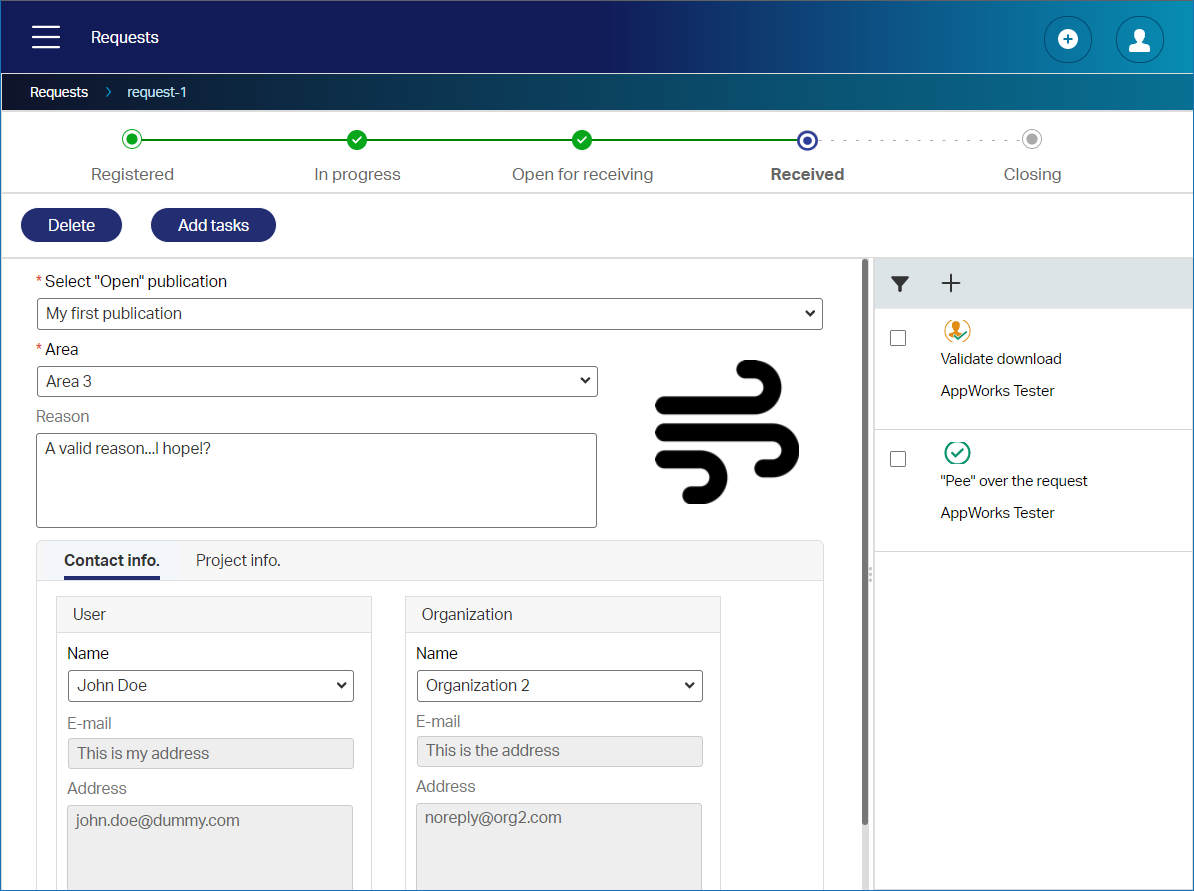
“Registered” -> “In progress” -> “Open for receiving” -> “Received” -> “Closing”
- “Registered”; When we drop the request for an open publication into our solution; For now, manually, but we can make some fancy API around it (or use the ReST API of the platform itself…in the end of that post)!
- “In progress”; Some “Manager” most “pee” over the request…Why do we otherwise need managers!? 🤣
- “Open for receiving”; Finally, the outside user will receive a link to download the content
- “Received”; Once we download the content, we move to this stage where we follow up on a correct download…Just verification
- “Closing”; After the verification, it’s closing time for the request itself where we increase the number of downloads on the publication.
Our solution is starting to get some “balls”…Let’s go to the next step!
Planning out the build
How are we going to build the solution as described in the previous sections? Well, for this we make a plan! If we just start building something, I know from experience that will be a mess! So, where to start planning? What do we need? Well, we need entities! Of-course the main entities (‘Publication’ and ‘Request’), but we also need configuration entities in some ‘Administration’ sections (not visible to a normal end-user)! Right, so we’re talking “security” here. Let’s do something with 2 roles; the solution_user and the solution_admin…Ohw!…Don’t forget the solution_manager role to make that “pee”; So, 3 roles! Always keep security in place, but I leave a full security model out of scope for this post!
Now for the entities…What properties? Yes, what properties?…Let’s put some tables in place for specific details per entity:
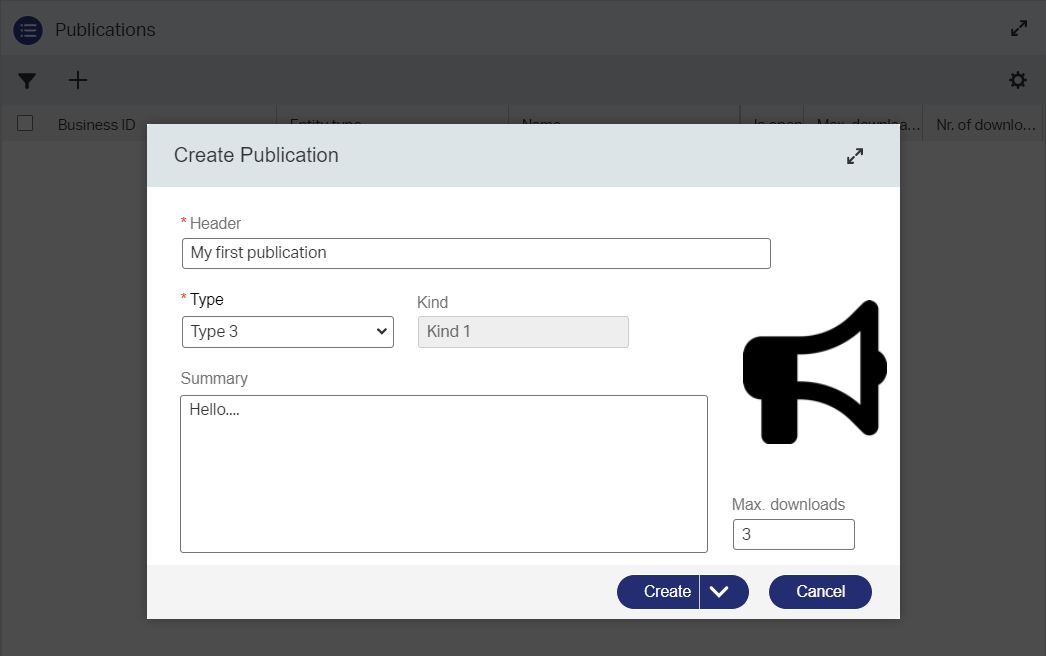
Publication
| Name | Label | Type | Length | Default value |
|---|---|---|---|---|
| pub_name | Name | Text | 32 | |
| pub_summary | Summary | Long text | ||
| pub_is_open | Is open | Boolean | ||
| pub_download_max | Max. downloads | Integer | 50 | |
| pub_download_nr | Nr. of downloads | Integer | 0 |
The ‘type’ and ‘kind’ are ‘toOne’ relations from configuration entities…In case you ask yourself the question!?
Request
| Name | Label | Type | Length | Default value |
|---|---|---|---|---|
| req_name | Name | Text | 64 | |
| req_reason | Reason | Long Text | ||
| req_prj_name | Project name | Text | 16 | |
| req_prj_summary | Project summary | Long Text | ||
| req_prj_start_date | Project start date | Date | now() | |
| req_prj_end_date | Project end date | Date | {req_prj_start_date} + 1 month |
We select the ‘publication’ via a ‘toOne’ relation on a ‘Ready for open’ publication…You’re still with me…correct!?
Also, other details will derive from the other related ‘Config’ entities described in the ERD.
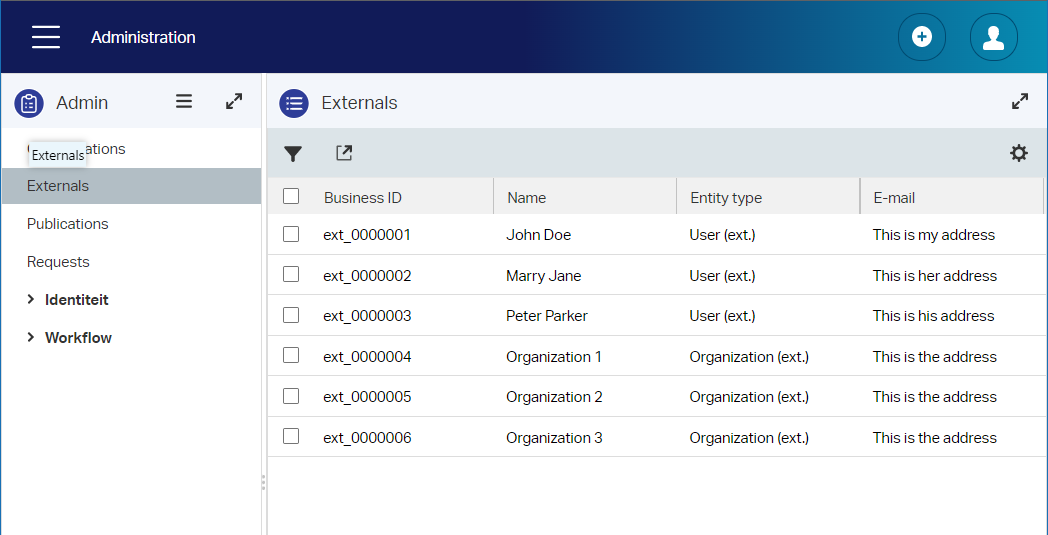
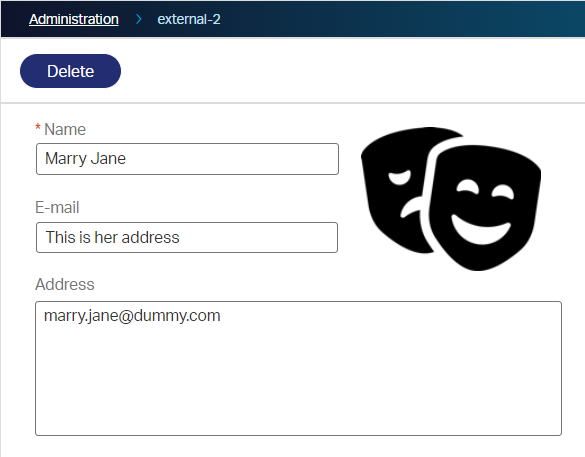
External
| Name | Label | Type | Length |
|---|---|---|---|
| ext_name | Name | Text | 32 |
| ext_address | Address | Text | 256 |
| ext_email | Text | 32 |
This abstraction feels cumbersome, but ‘organization’ and ‘user’ are the same based on my first feeling…We can always change it to one entity with a Boolean flag
ext_is_orgproperty my-Agile-friend! 😉
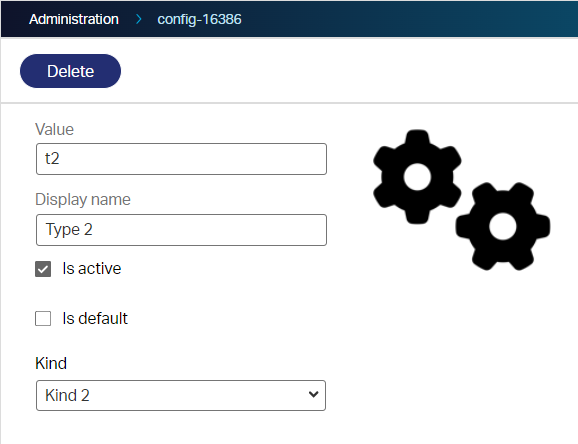
area, space, category, type, and kind
| Name | Label | Type | Length |
|---|---|---|---|
| {3_char_code}_key | Value | Text | 16 |
| {3_char_code}_value | Display name | Text | 16 |
| {3_char_code}_is_default | Is default | Boolean | |
| {3_char_code}_is_active | Is active | Boolean |
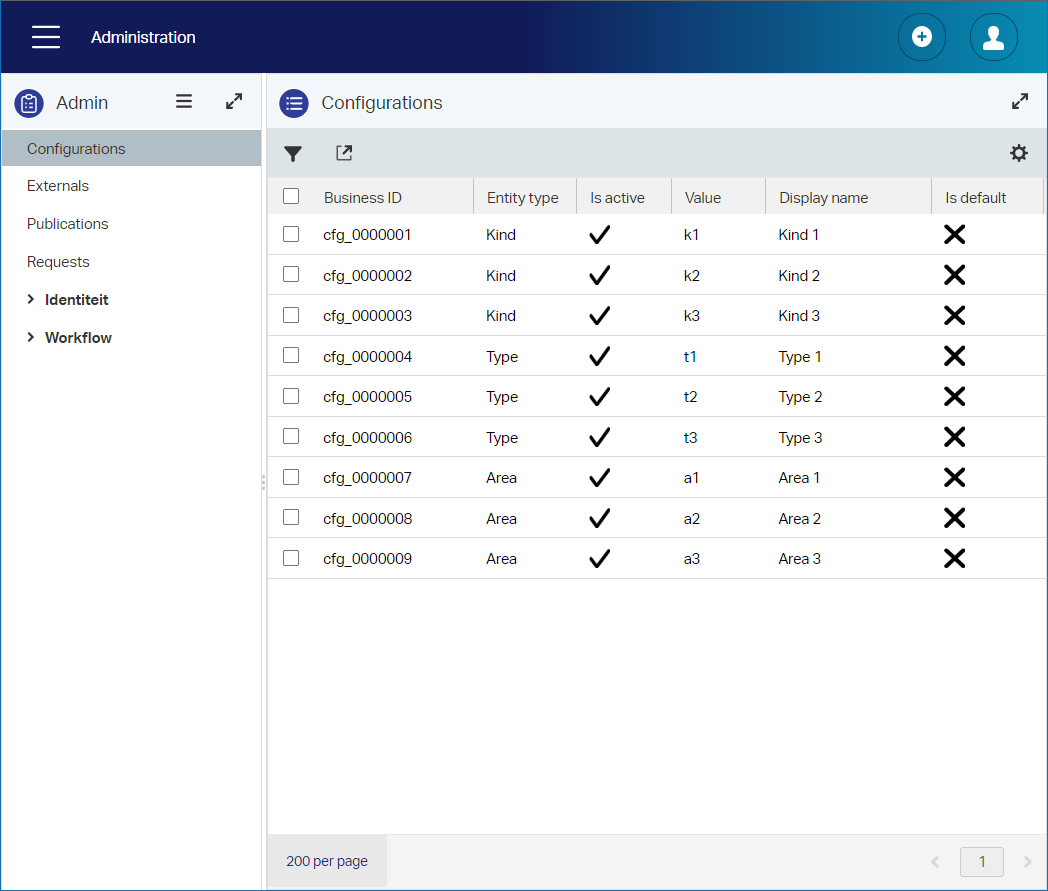
Aha, 5 entities will have the same properties here! This “smells” like a “Config” abstraction to me! One to keep in mind!…Now you see (again!) the importance of putting things on paper first before you start building things! The more you collaborate with the team, the more fine-tuning will happen in the model…This will benefit a steady solution and a happy end-user! Hooray!! 🎉
You see me also using 16, 32, 64 as ‘Text’ length…This is just a habit of mine, learned from my Documentum time! There is no real reason behind it…It looks well-thought! 😀 I’m from the 8-bit Nintendo generation (with “Duck Hunt”!)…Does it have to do with that mindset!?
…
Let’s do a quick recap this far:
- ✅ ERD…
- ✅ Basic security model…Well, we have the roles defined!
- ✅ Entity properties…
- ✅ Basic flows on what should happen for the main entities…
- ❌ Workspace/Project structure…
Workspace/Project structure
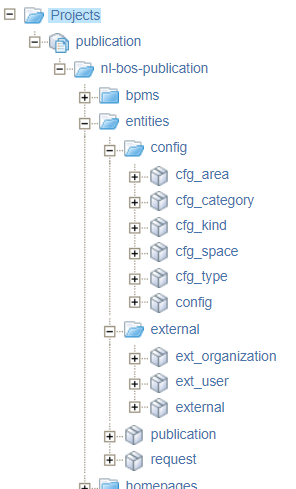
Now it comes to your own imagination on how to build your solution…I already see some generic implementations, but also specific implementations! Let’s put it on paper where to place what…A tree view should be sufficient indicating also our first folder structure to start with:
ws_svn_dev_publicationprj_publicationnl-bos-publicationentitiesbpmsthemeroles...
ws_svn_dev_handbookprj_handbooknl-bos-handbookentitieswebservices...
ws_svn_dev_conference_proceedingprj_conference_proceedingnl-bos-conference-proceedingentitiesbpms...
You don’t need the other workspaces because they reuse data from ‘Publication’! Time to build something now…
…WAIT
Damn…one thing I always forget, but very, very important…
UI sketches
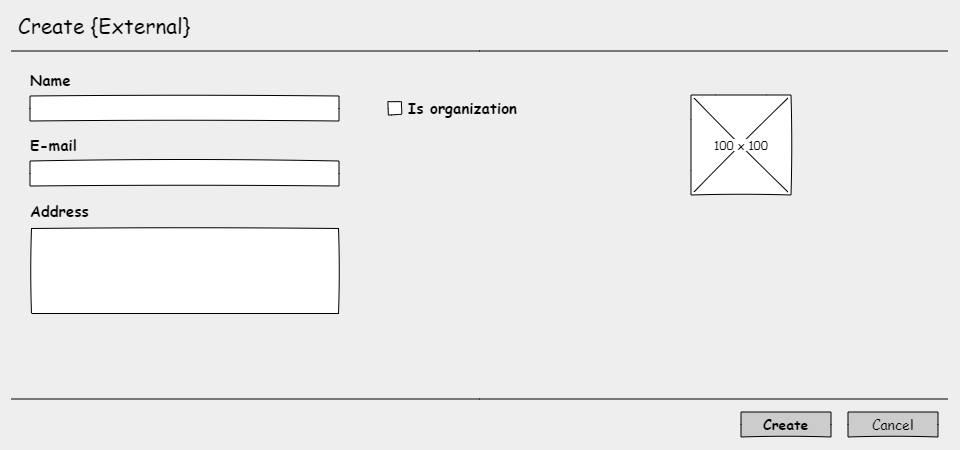
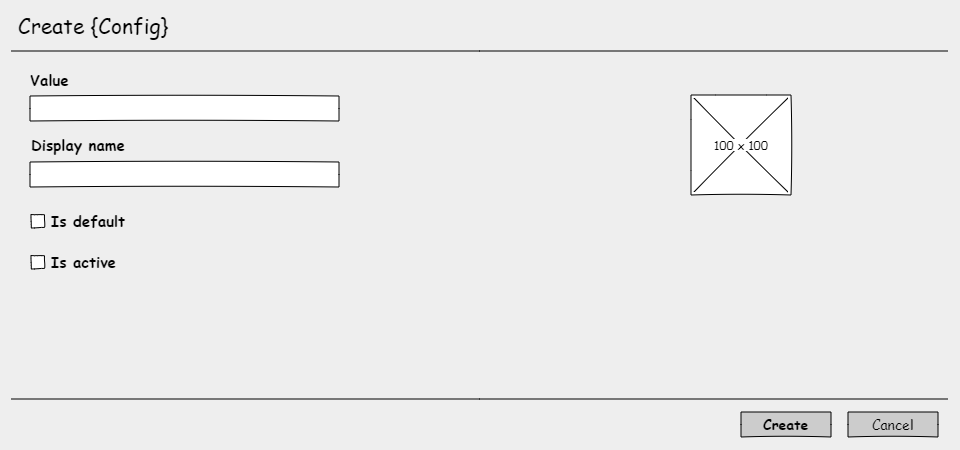
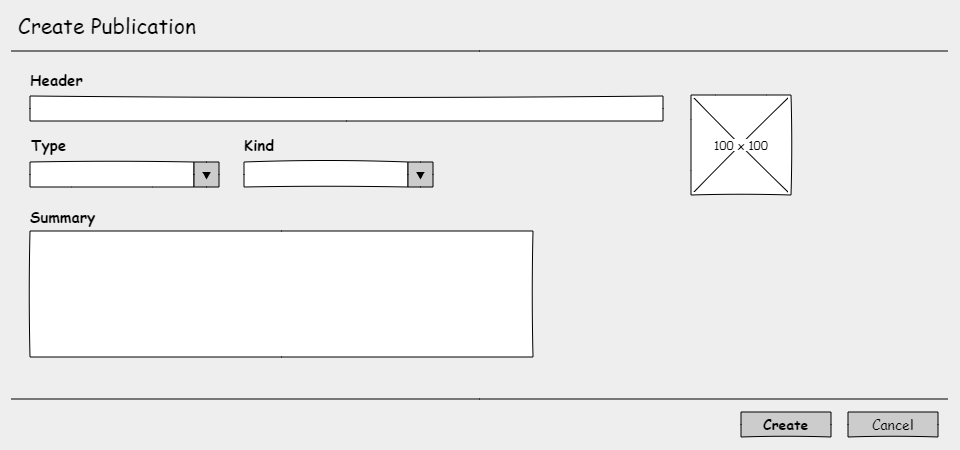
As a developer, you can create the fanciest UI, but between a developer and an end-user is a big gap in technical insights. So, my advice is always to make sure you have a UI-expert in the team thinking of sketches; Instead of thinking of technical stuff. Leave the correct work to the correct people! For this post I’m on my own and to give you an impression, we can build something based on this input:
Create {External}
Create {config}
Create publication
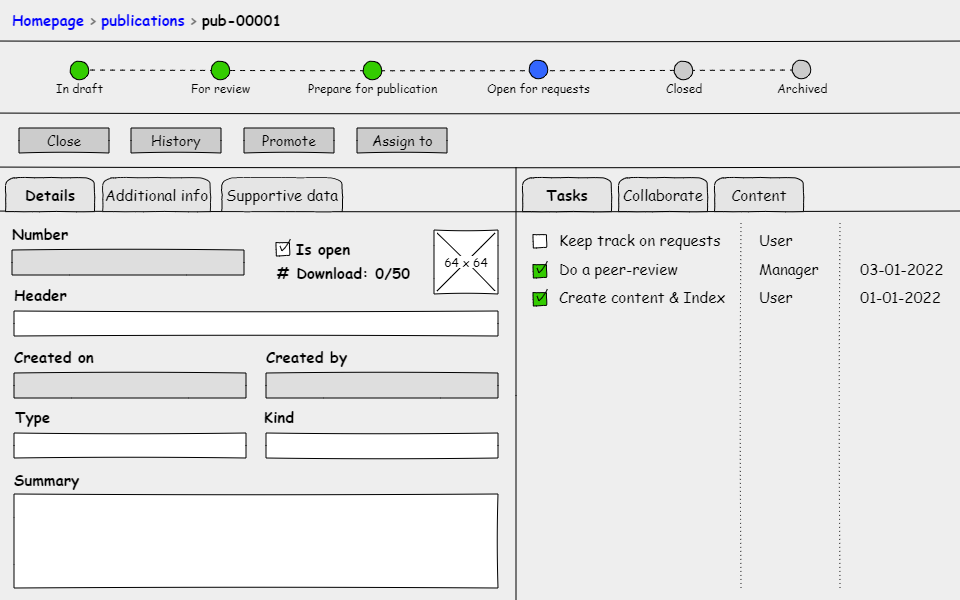
View/Edit publication
Create Request
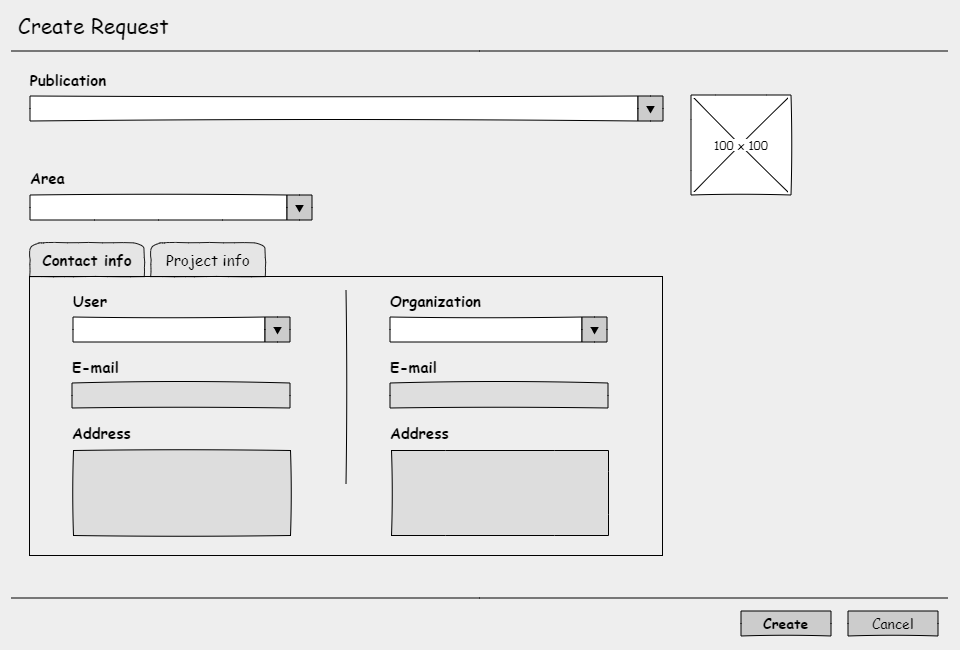
The ‘View/Edit’ on the request will have that same “smell” as the publication! Yes, I was “DONE” with all the drawing misery! 😁 What I say…Hire a UI expert!
…
I create the sketches with a tool called Pencil
Time for some craftsmanship
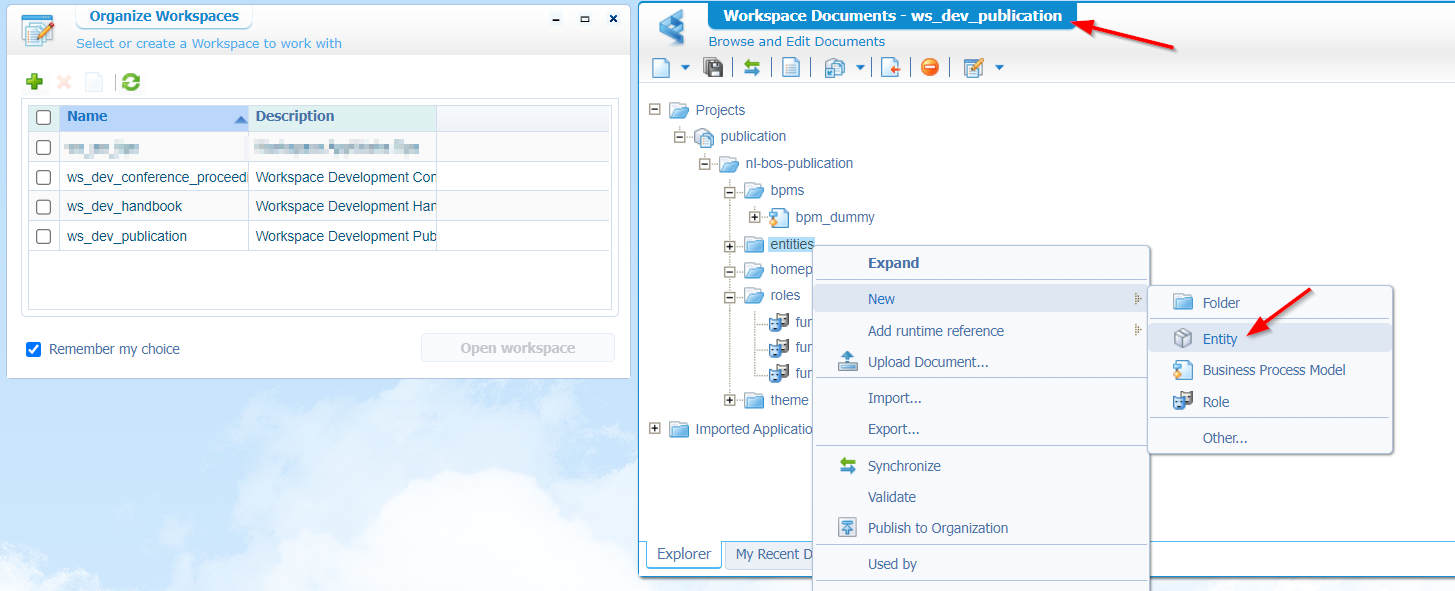
Finally! Now it’s our turn to put something in place based on the analyses from previous sections! So, spin up your AppWorks machine, dive into your most favorite organization and move yourself into the ‘Workspace Documents’ artifact. My ‘Workspace Documents’ always starts with my favorite workspace, but in this case we will start with new workspaces! So, if you’re lucky, you’re already on the ‘Organize Workspaces’ panel; If not you can use the ‘Manage Workspaces’ switch option in the top bar (most right icon) to create a new one. When ready, we start the creation of a new workspace with this input:
- Workspace name:
ws_dev_publication - Description:
Workspace Development Publication - Source Control Management type: none
- Project Name:
publication - Package Owner:
aw_tips - Product Name:
aw_publication
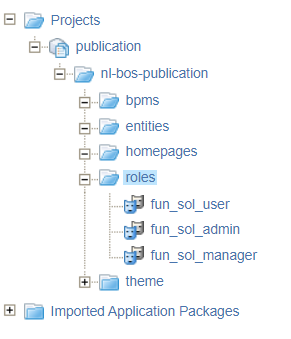
After the wizard, you get a forward into the new workspace and project. Here we start with a namespace folder and a basic folder structure:
nl-bos-publicationentitiesbpmsrolesthemehomepages
Next step is to create a second workspace…Same task, but different input:
- Workspace name:
ws_dev_conference_proceeding - Description:
Workspace Development Conference Proceeding - Source Control Management type: none
- Project Name:
conference_proceeding - Package Owner:
aw_tips - Product Name:
aw_conference_proceeding
Same for the subfolders; it’s just a first start…:
nl-bos-conference-proceedingentitiesbpmswebservices
Notes:
- I don’t use SVN, so no
_svnprefix.- We can discuss on the namespace hyphen here:
...conference-proceeding; Why not an underscore…I feel you! 😐
Create the other ‘handbook’ workspace on your own; It has that same ‘smell’ as the last one!
…
Now what? Well, what about preparation work! We already exposed some roles to create for further security, and I also prefer to have a dummy BPM available which we can use as placeholder before we do any real implementation. Let’s start with those roles (in the ‘Publication’ workspace!)…fun_sol_user, fun_sol_admin, and fun_sol_manager…remember? We have a roles folder in place already, so let’s right-click it and create those functional ‘Role’ documents directly:
After publishing the roles, you can assign your test account (in my case awtest) to the fun_sol_user role from the ‘User Manager’ artifact:

You see my test account is already a member of the internal role
Entity Runtime User. I do this for each normal account by default; this provides the end-user access to our entity modelling solution!
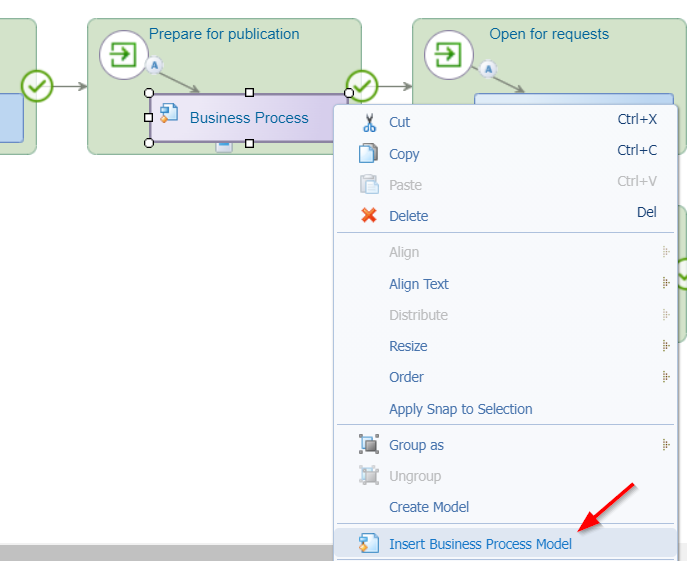
Now for that bpm_dummy BPM…right-click the bpms folder and create a new ‘Business Process Model’ type of document. The BPM creation looks just like this:
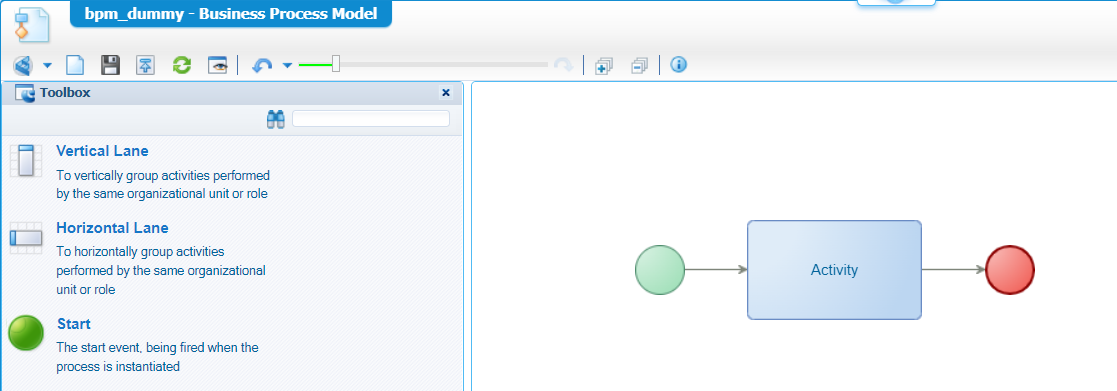
Save it nicely in the bpms folder of the project. One thing not to forget! Always set the runtime security for a BPM. So, right-click the bpm_dummy from the project perspective and set it with the correct role(s):
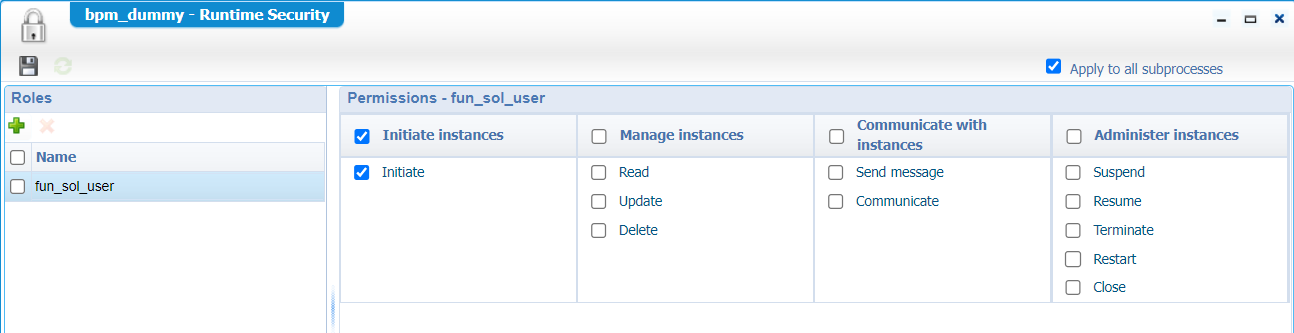
After this change, you can publish this new dummy model into runtime!
…
Next step will be our first entity ‘Publication’ in the generic workspace. Finally! So, back to the publication workspace and create a new entity based on our analysis!
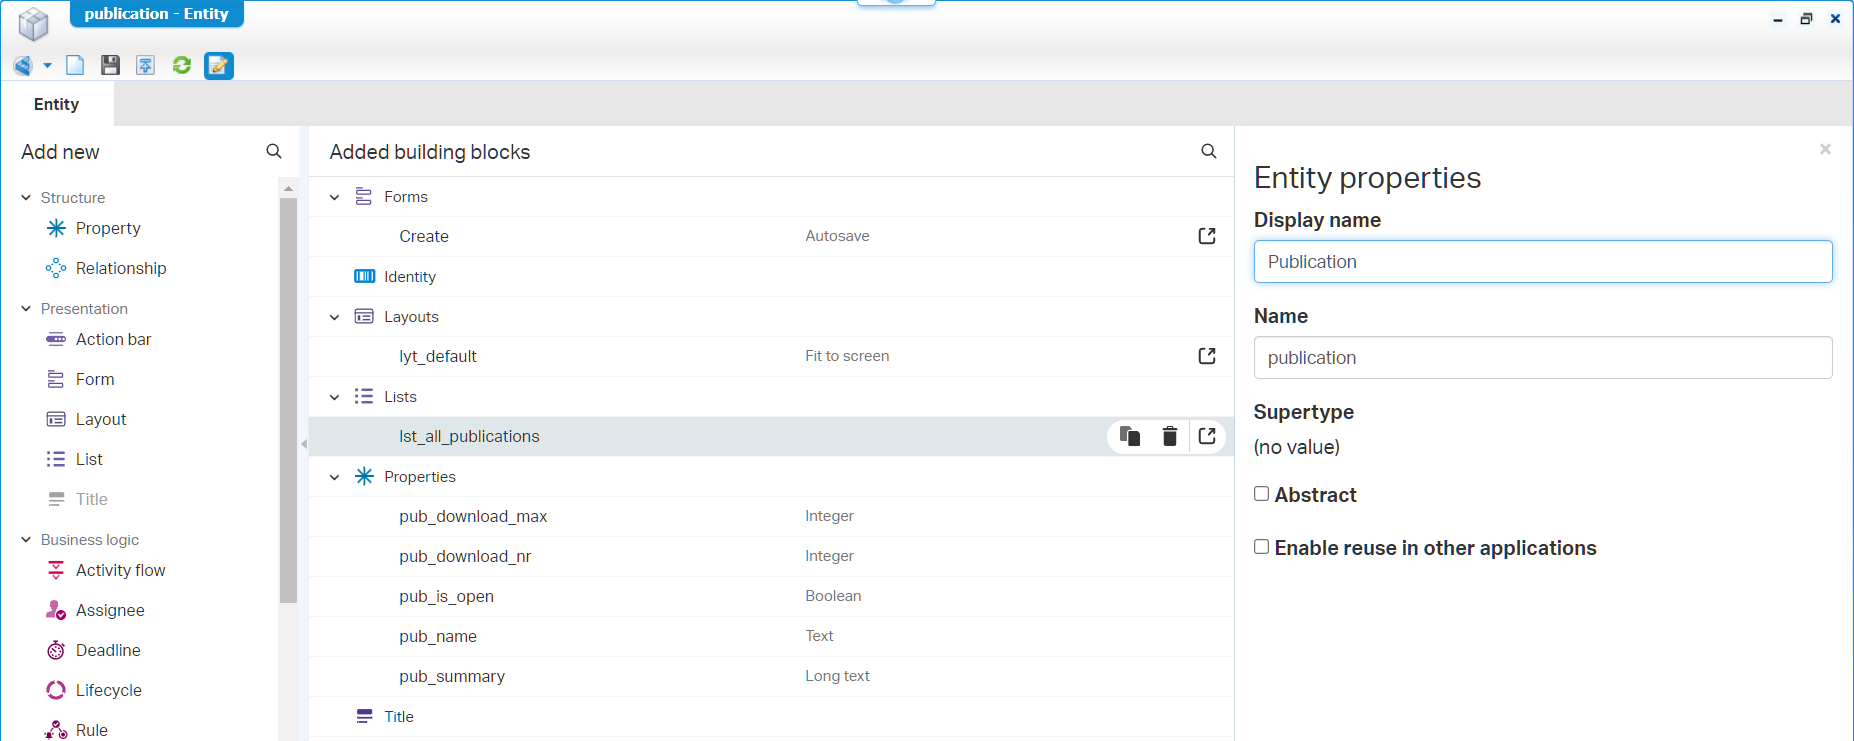
Fill in the properties screen, make the default building BBs nice and shiny; Have something like this:
These are the things you don’t want to forget:
- Settings on the ‘Integer’ type of properties; min, max, and default values
- Remove the ‘None’ option for that ‘Boolean’ and add proper labels to it
- Update the field length for ‘Text’ fields
- Set a display name in the entity properties (top bar icon…most right one!)
- Make a nice ‘All publications’ label for the initial list BB
- We do NOT make the entity abstract (I know; In the ERD it is!); We already explained the reason behind it!
Nice, save it all and close it; There is no need for a publication at this moment. We directly dive on the other entities. First the ‘Request’ entity…Smoothly like this:
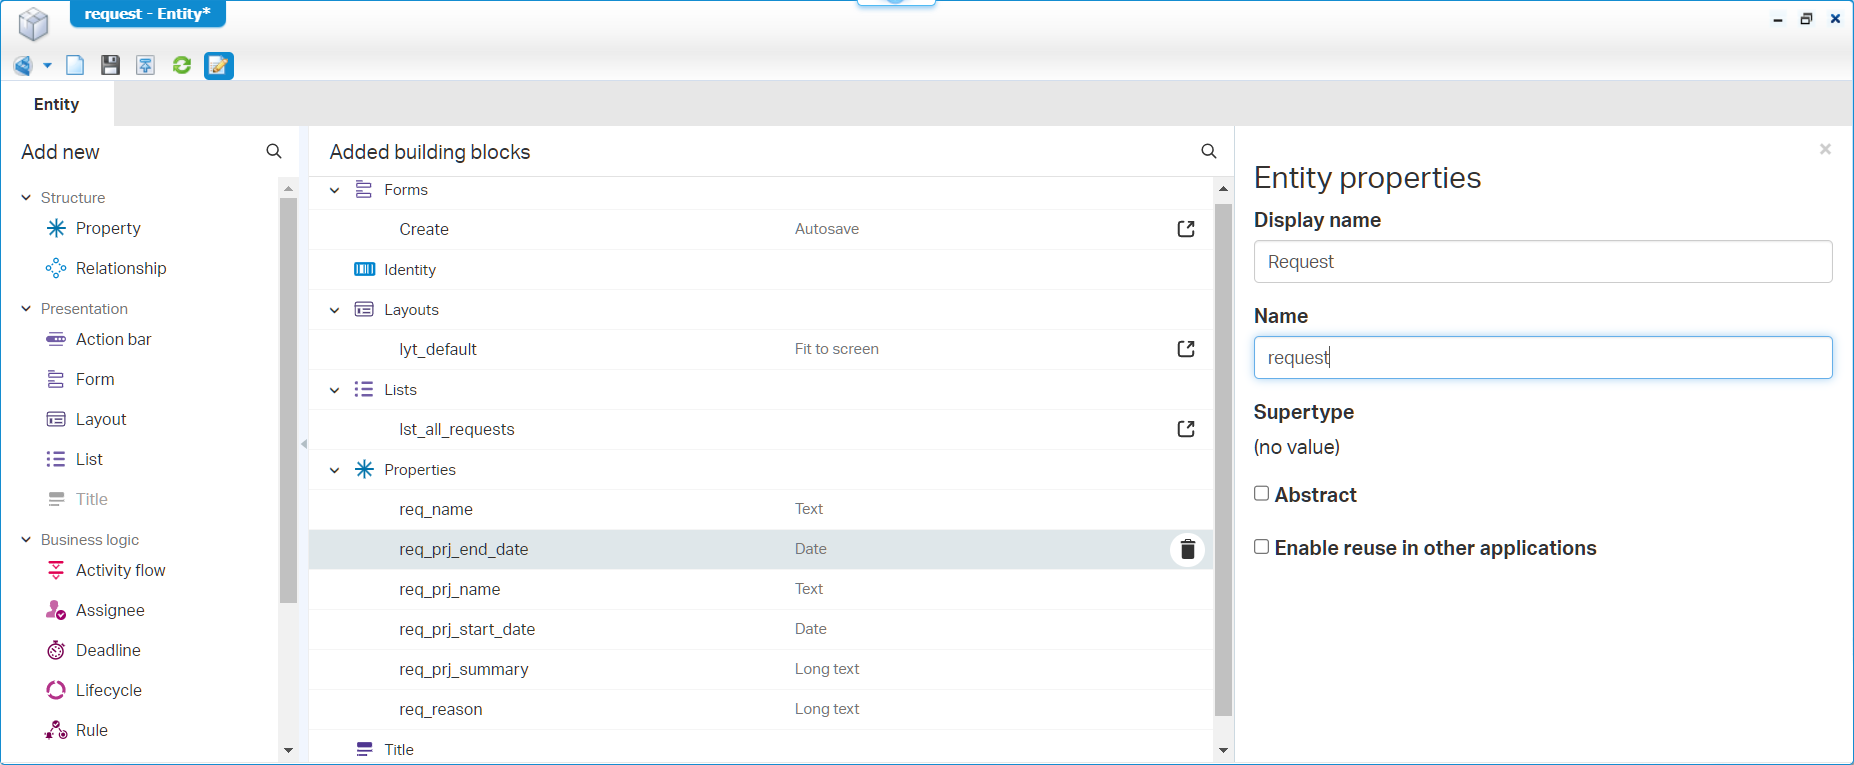
These are the things you don’t want to forget:
- Update the field length for ‘Text’ fields
- Set a display name in the entity properties
- Make a nice ‘All requests’ label for the list
- Also, this one is not an ‘Abstract’ entity!
Progressive insight could give you a reason to make the ‘project’ specific properties a new entity; it’s choice to make…I leave it with you.
Again, save it, no publish, and the next one…Our ‘External’ entity:

These are the things you don’t want to forget:
- Update the field length for ‘Text’ fields
- Set a display name in the entity properties
- Make a nice ‘All externals’ label for the initial list BB
- This will be an ‘Abstract’ entity!…The choice is made! 😊
Save it, no publish…Next one; the abstract ‘Config’ entity:
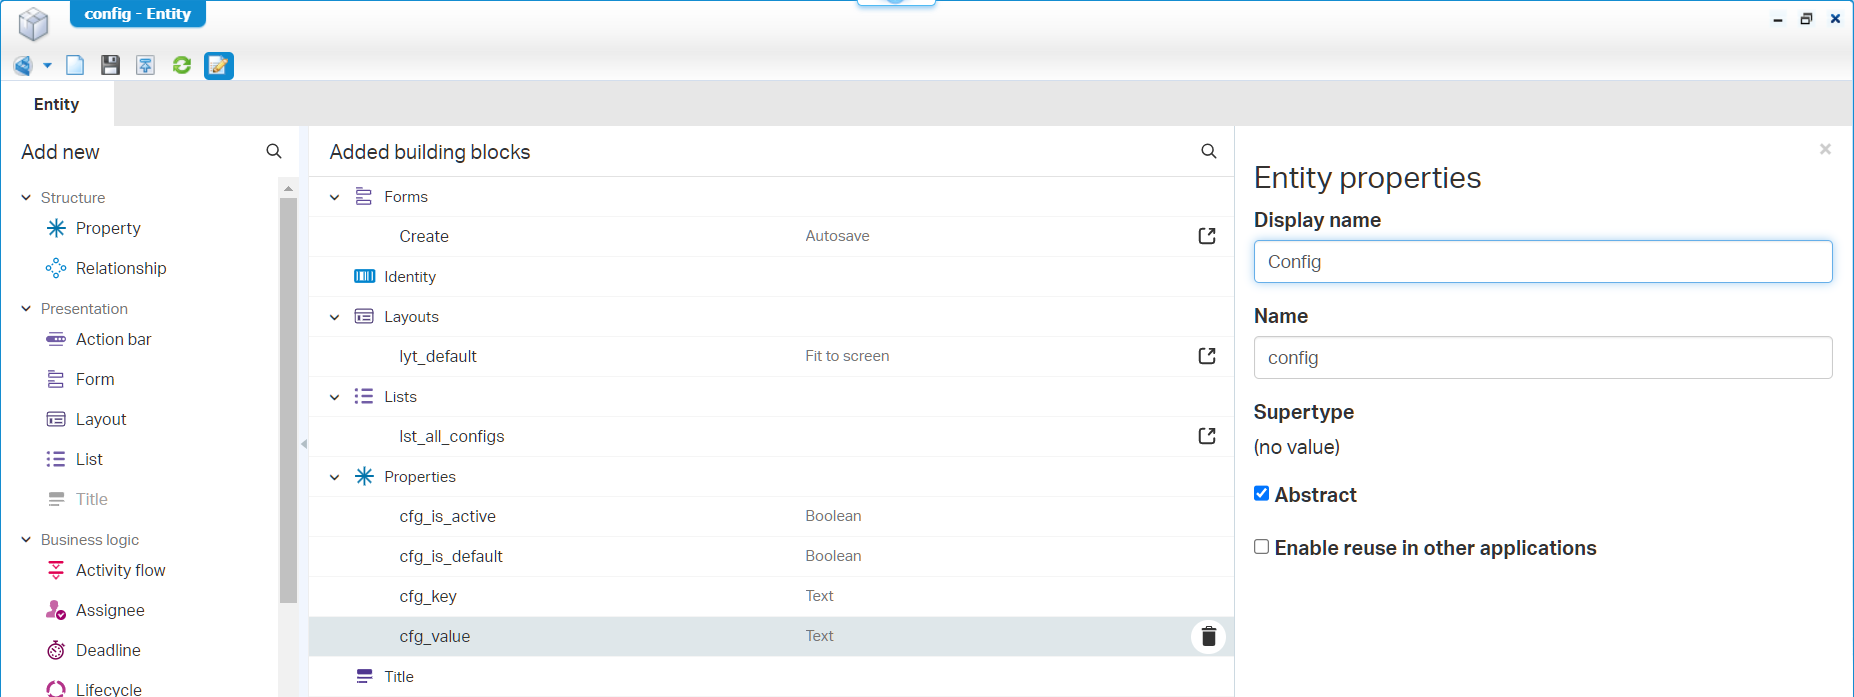
These are the things you don’t want to forget:
- Remove the ‘None’ option for that ‘Boolean’ and add proper labels to it; I make the ‘Is active’ property by default TRUE!
- Update the field length for ‘Text’ fields
- Set a display name in the entity properties
- Make a nice ‘All configs’ label for the initial list BB
- Make this entity also ‘Abstract’
Save it, still no publish…Now it’s time to grab a soda! 🥤
Just to make sure…You created all the stuff from above in the ‘Publication’ workspace/project…correct?
…
Now what? Well, let’s create all the specific ‘Config’ entities and specific ‘External’ entities. How? Well, simple! Just right-click the corresponding entity and create a new subtype from it! This can be your end-result after some structuring.
I thought a subtype was placed as child under its parent, but it looks like this party-feature is broken again…I’m on version
22.3…Comment me if I was dreaming!?…Or was this only available for a ‘hasChild’ relation!? Let me know…
It’s publication time on project level and see how our update looks like in runtime…Have a look yourself (as test account nicely in an incognito tab of your browser); It looks like crap…We can’t create anything! Why? Well, how about security? A good start to implement this as fast as possible as it will bring “pain” to the solution…Trust me! We have the roles already in place and connected role fun_sol_user to the test-user. So, the next step is adding the security BBs to your entities? A task to do on your own. Every security will get at least the fun_sol_user as accessor and for now I also mark all the permission for this role…We can fine tune later! This is a sample of one entity:
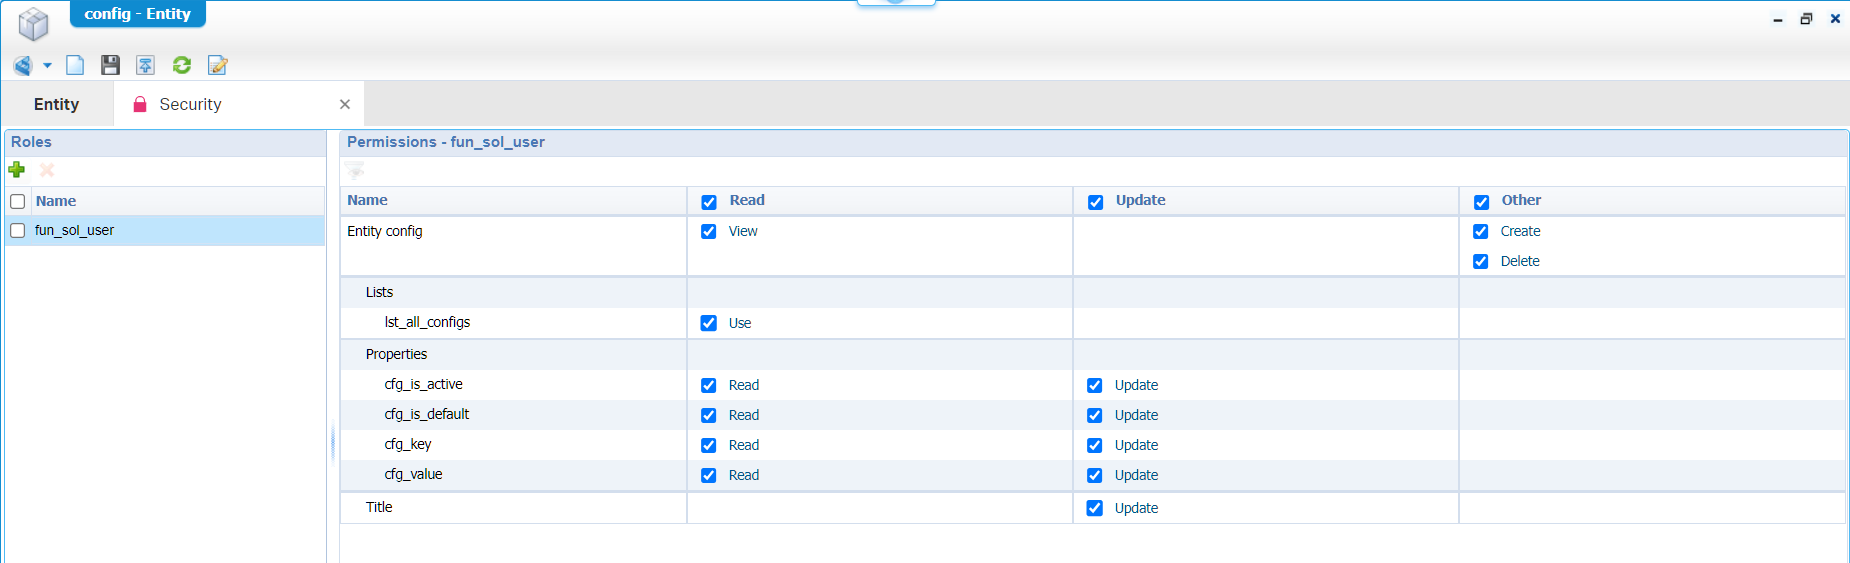
The other entities look the same…Have also a look on the subtype entities!…Yes, that’s the power of inheritance!
Time to republish and double check into runtime:
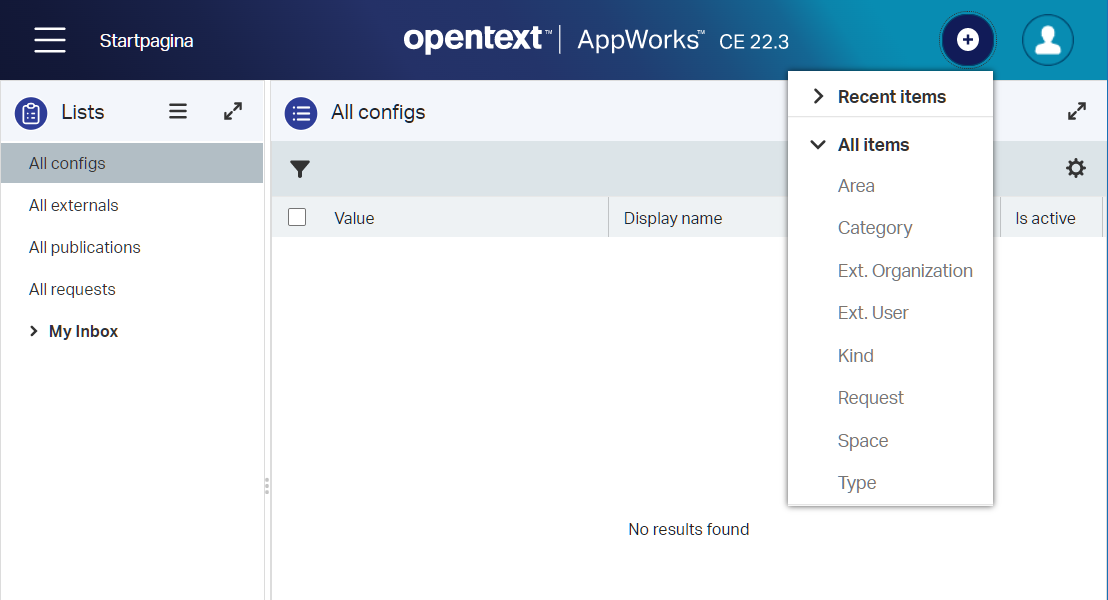
Much better…Why do you think we can’t create any config and external entity instances? Yes, because they are “Abstract” and therefore non-instantiable! 😅 Also, the ‘Publication’ is missing in the above screenshot, but that’s because it was ‘Abstract’ at that time…Yes, I also embrace the agility way of working!
…
After a quick break, we continue with our ‘generic’ lifecycle! Have a look again at the lifecycles defined before and pick the one with the most matching pattern for our ‘Publication’ entity! I choose this one as a generic implementation:
“In draft” -> “For review” -> “Prepare for publication” -> “Open for requests” -> “Closed” -> “Archived”
Open the ‘Publication’ entity and add the ‘Lifecycle’ building block. The lifecycle editor starts with a clean screen, and you can start creating a flow like this:
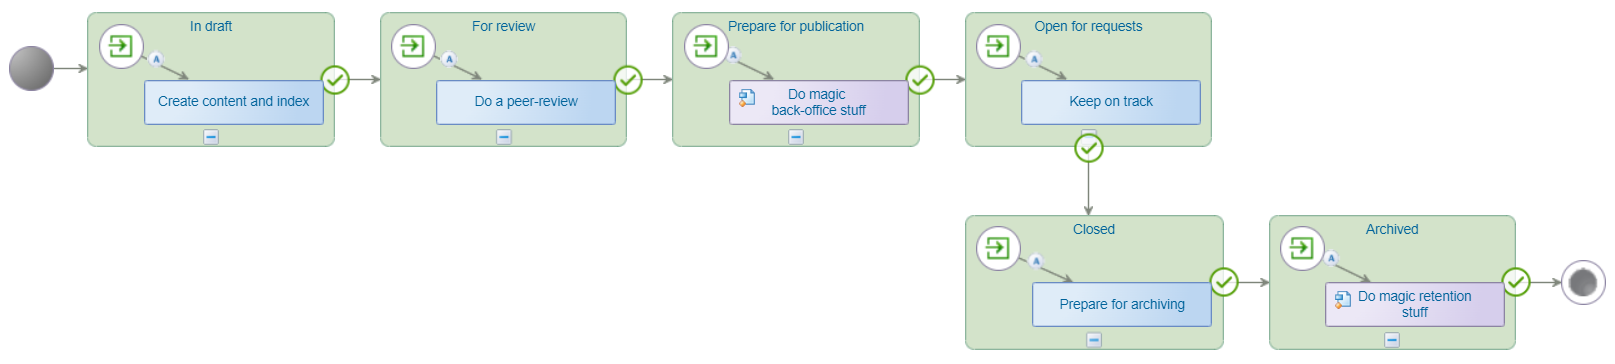
Make sure to set the ‘Primary transition’ for each flow…This gives a nice overview in the Lifecycle panel for a layout in a later moment.
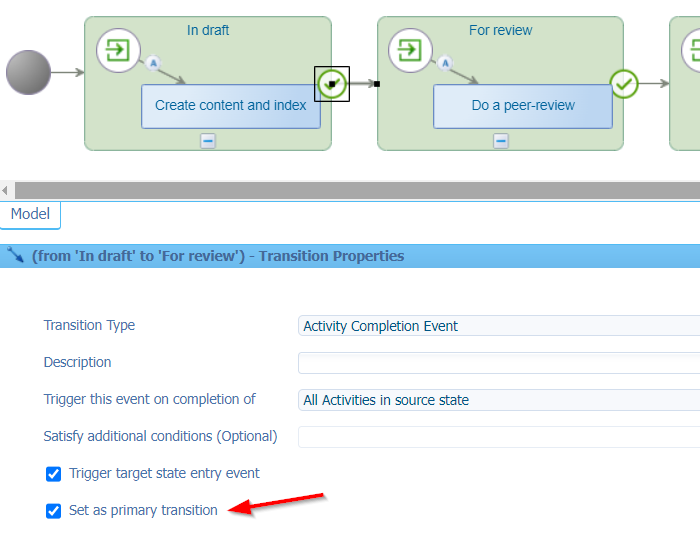
It’s not possible yet to publish this lifecycle as the BPM-activities have no model attached! In these situations, you can insert the available bpm_dummy BPM which we created for this situation!
After this change, always check your ‘Security’ BB for any related updates! In this case the ‘Add tasks’ execution permission. When done, it’s time for a publication on this entity. Now, when we create a new instance of the entity (which is not possible because of abstraction), this lifecycle would start, and a task will land in our own inbox! Continue the read to see how this lifecycle will get a trigger…
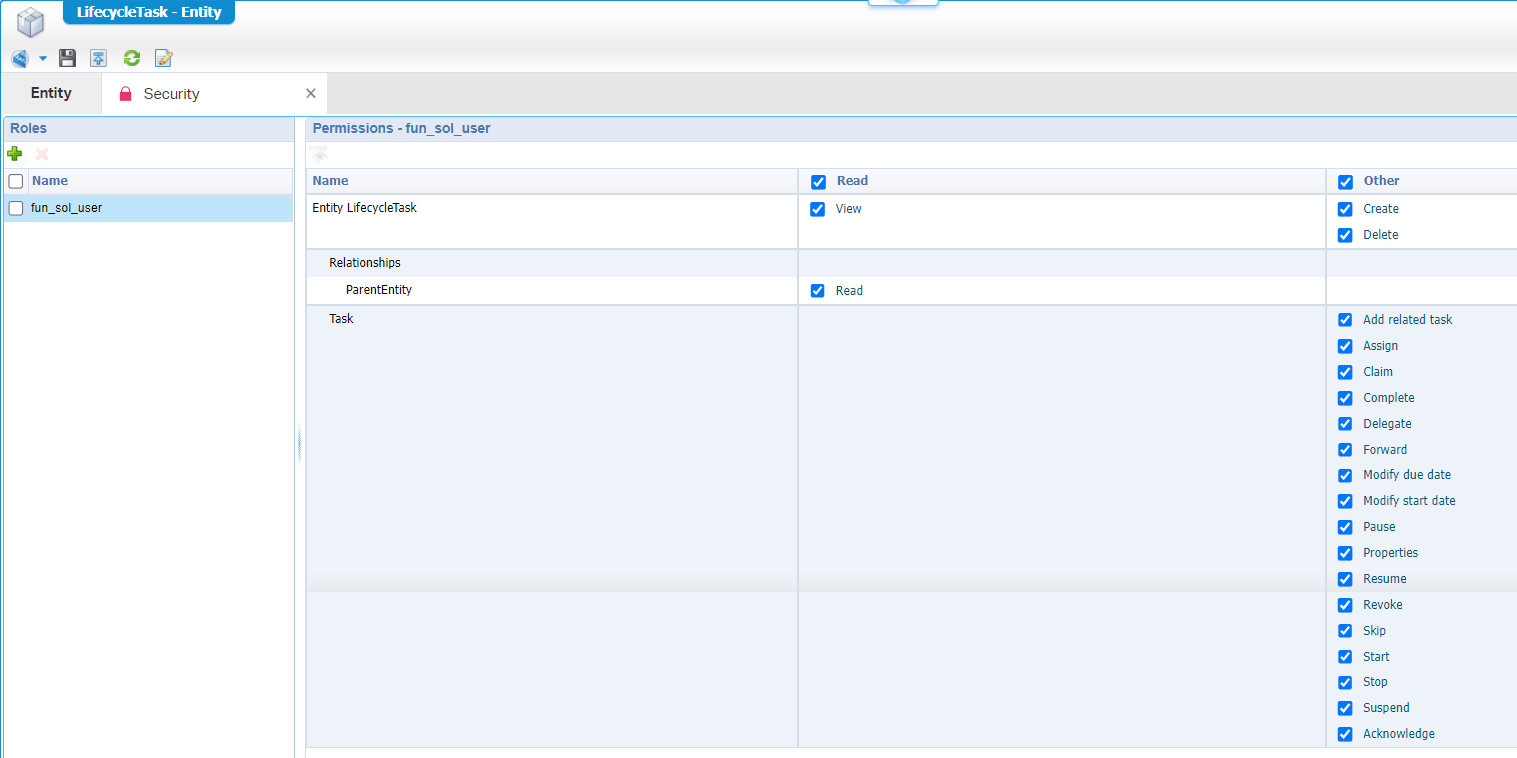
HOLD…STOP…Adding a lifecycle, will also add a related ‘LifecycleTask’ entity! Make sure to also add a ‘Security’ BB with the correct permissions for our role!
…
For the ‘Request’ entity, we do a similar task on the lifecycle and the ‘Security’ BB. It will be a result like this:

Notes:
- Don’t forget the ‘Primary transaction’ option for the flows
- Use the
bpm_dummyBPM as placeholder for the related activities - Don’t forget to update the ‘Security’ BB…As I did! 😅…It’s a common mistake!…Also, for the related ‘LifecycleTask’ entity!
When done, you can publish this entity as well! Great, we’re getting somewhere now…Do a quick review in runtime with your test account (without creating new requests; which is possible!…We do it later!), and have a quick candy-break before we continue…
…
We’re getting close to our end-goal now! This section will create subtypes from the ‘Publication’, but this time from our other workspaces! Yes, remember the header of this post…This will teach you the magic stuff of project model teleportation! With our ‘Publication’ project ready, it’s time to create a package out of it; including a model package…How? Well, right-click the project and go the package properties where we change two options:
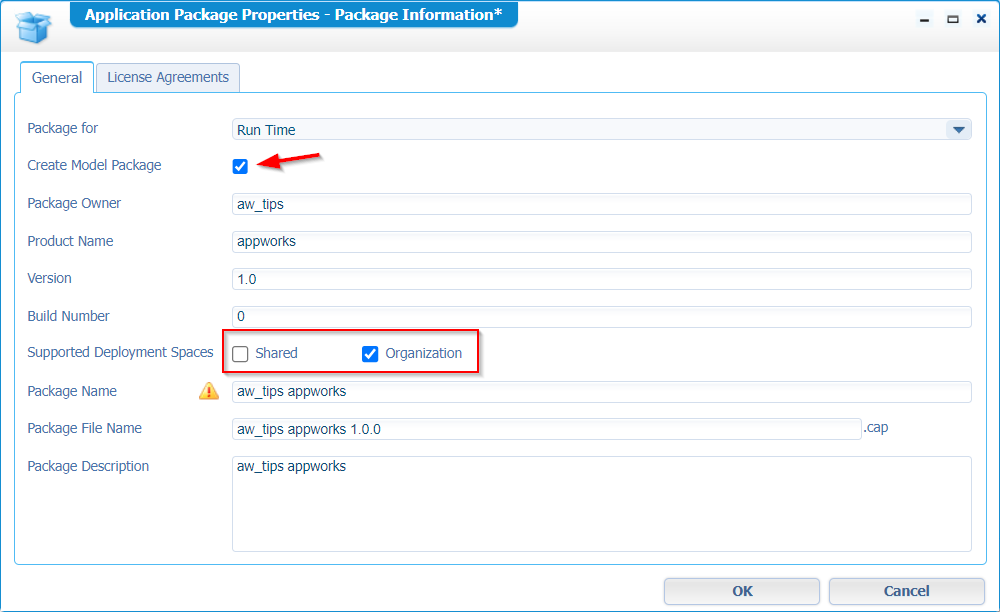
The first option (‘Create Model Package’) exports a second file after package creation and downloading it. The second option enables deployment only to a specific organization; This last one is mostly the correct option. The ‘Shared’ option is only when you want to deliver functionality across organizations; Like utilities!
Hit OK, right-click the project again, and create a package now. After creation, you can hit the download option which downloads 2 files! A .CAP file, but also a ‘.MPK’ file. You can find more information on a CAP file in this post. Only, what is in the MPK file? Well, have a quick view with 7-Zip. This is the structure I see:
- ‘ModelPackage’ file in the root containing the package version information, its dependencies which (for our parent solution) will only have platform specific dependencies; So, when you use a ‘Property’ BB on your entity, it’s dependent on a ‘PropertyBase’ of the platform; The same for all other BBs!
- Subfolders where I recognize my
entities,homepages, androlesfolders. Mybpmsfolder is not available so not part of the model…I guess!? The files in these folders seem to be my sources; like I normally also see passing by in SVN. In a CAP file these are more in a compiled/reduced version.
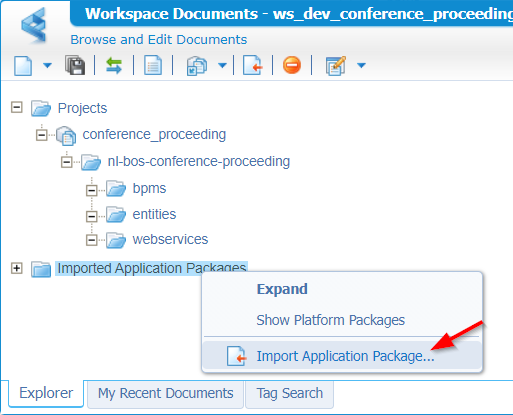
Great…Now what? What can we do with our MPK file!? Well, let’s jump into the other workspace; Like ws_dev_conference_proceeding. From this workspace we would like to reuse our exported model…right? So, we can create a subtype from the ‘Publication’ entity! To do this, right-click that lower magic folder named Imported Application Packages in your workspace. If you ever wondered what this folder does!?…continue reading…
It’s time to import an application package; Guess what package this will be?
Yes, my friend…Select your MPK-file here…
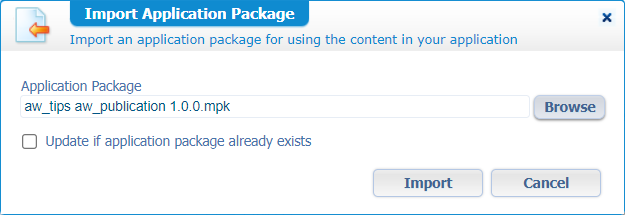
…And hit ‘Import’…In this import you can also select CAP-files, but only when items are marked with ‘Enable reuse in other applications’. Read about this option in the section “A final clarification note” below!
After this import, we see directly our hard work passing by; And guess what…Right clicking the ‘Publication’ will let you create a subtype out of it with a new name.
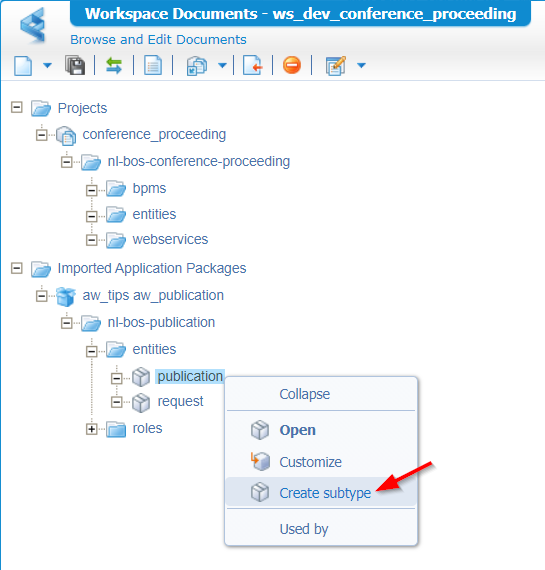
For this workspace that will be our entity conference_proceeding which we save in the entities folder of the related project:
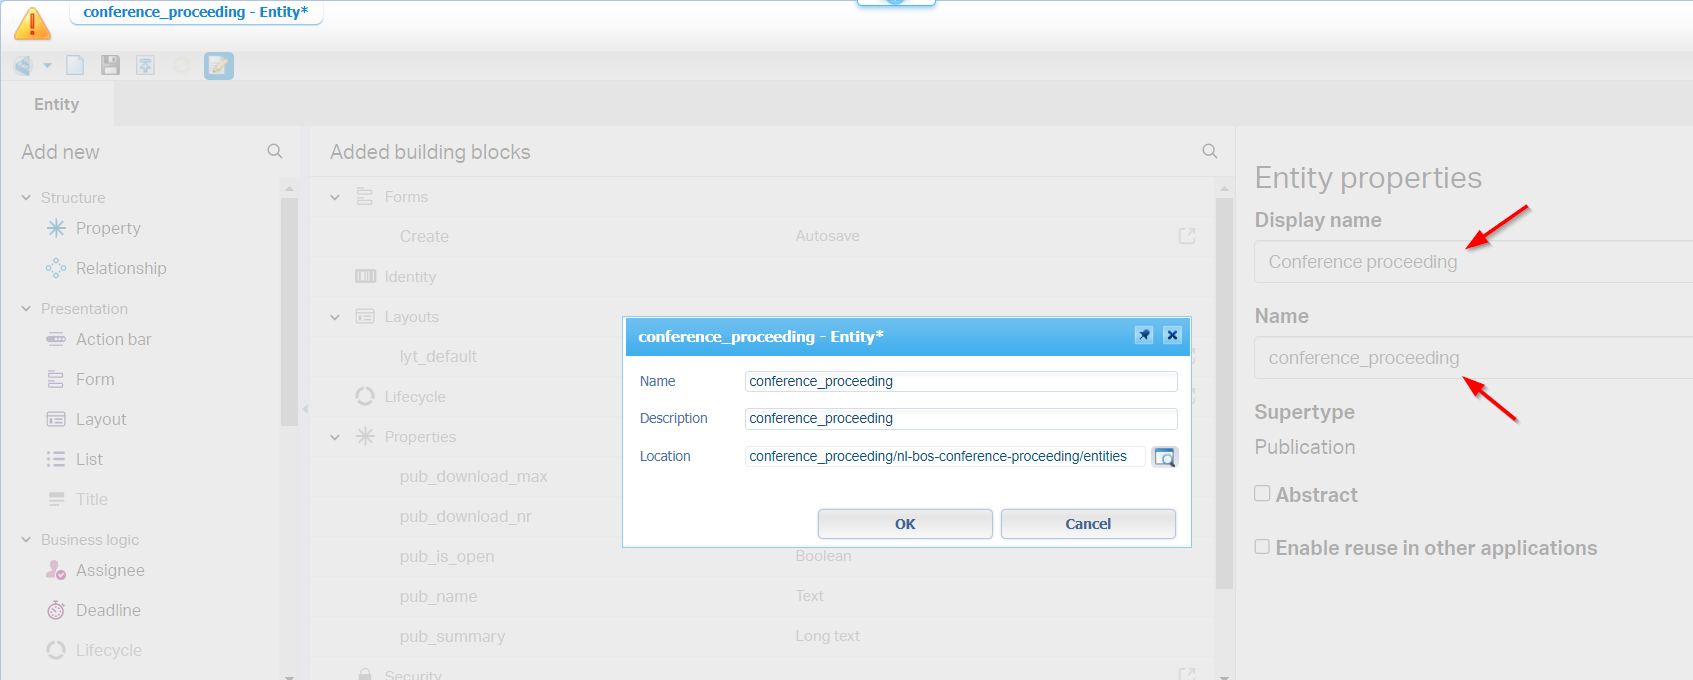
Now lay back and double-check on what is already available in this entity!?…It’s magic! 😎 WAIT for a publication on this entity! Why? We are dependent on another CAP package (the generic publication!) which requires a deployment! Let’s give it a go with the ‘Application Deployer’ artifact from within the ‘system’ space! If you’ve never done this task, have a look at this post; Make sure to deploy it to a specific organization; Not the ‘Shared’ space (which is also not possible when you fully follow the post on your platform!)
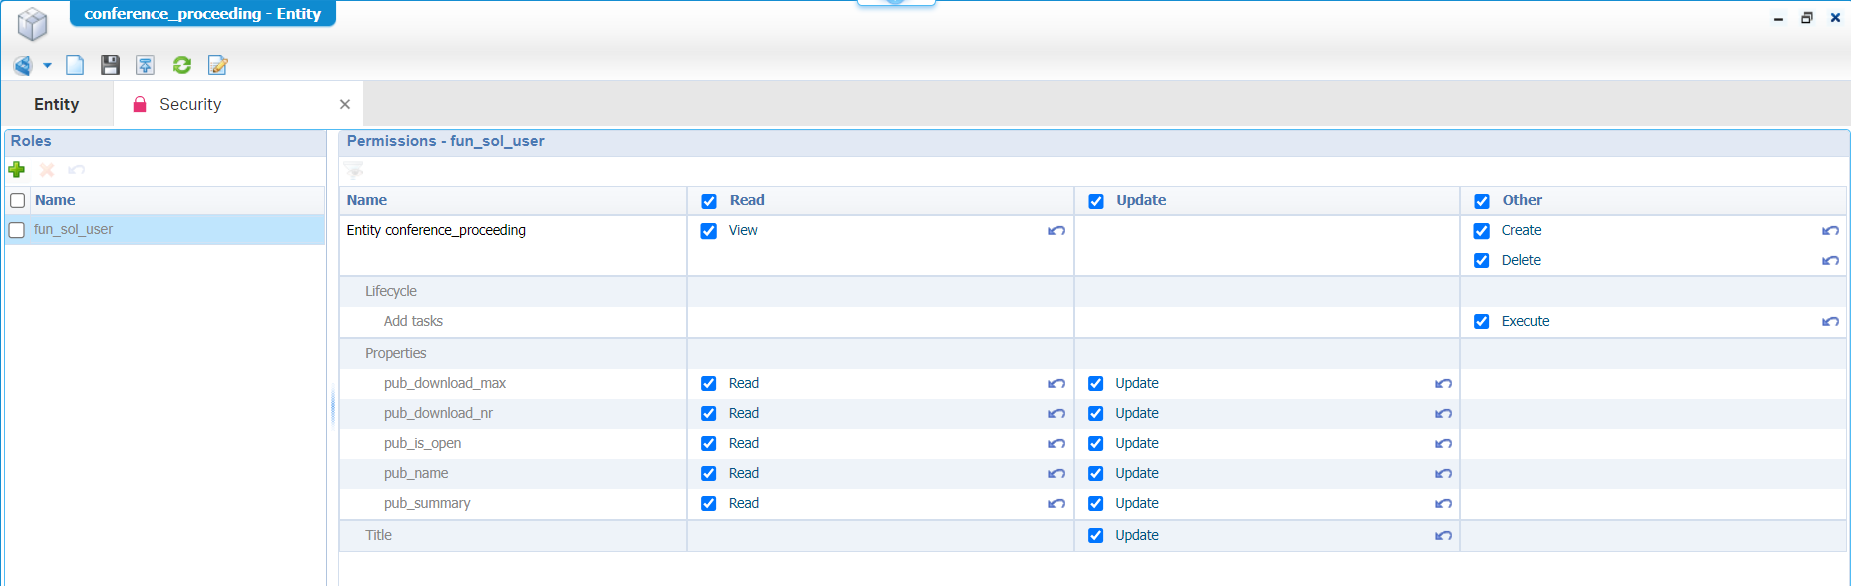
After deployment, move back to your own organization, in the correct workspace ws_dev_conference_proceeding, and do the publication action on the subtype entity…It should be a success! 🤗 So, in runtime, we can now create a new ‘Conference proceeding’…correct? Well, Nope! There is one special trick to be done before we can do this. It’s a trick to replacing the ‘Security’ BB with a new one. Don’t ask me why? A bug? An unclear feature? It is, what it is…
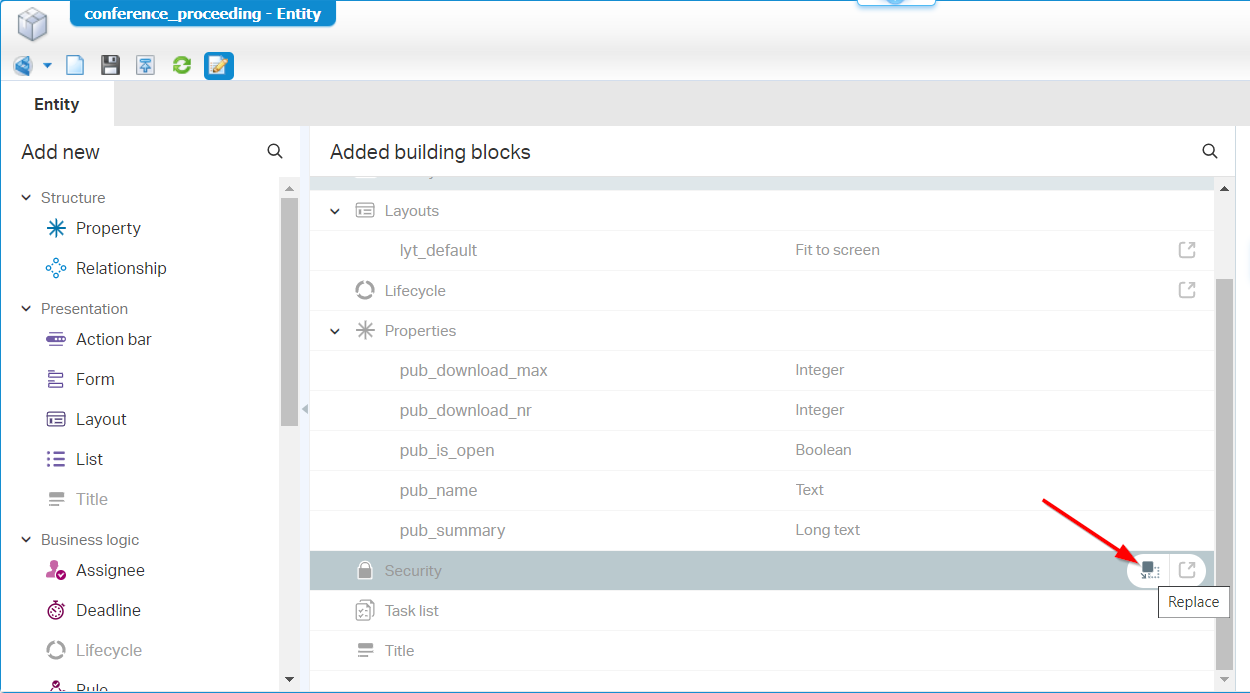
I even need to open the ‘Security’ BB and remark the set of permission on my generic configured role, so it looks like this (with those curly arrows):
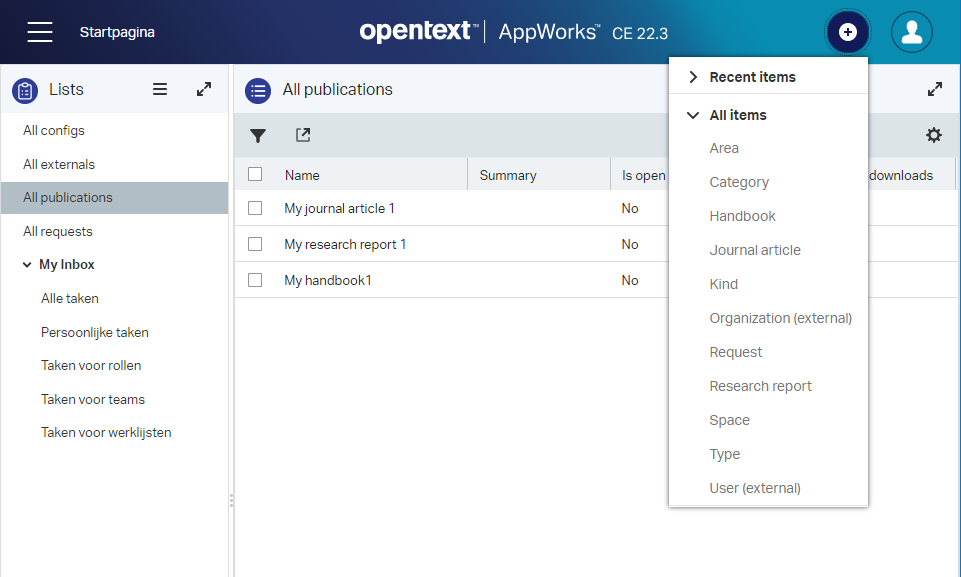
Right…Time for a republication on the project and in runtime, we finally start to see some results for our test user. We can now create a new ‘Conference proceeding’ entity instance! During creation, the lifecycle will start with a first task delivered in the inbox of the current user!
Time for a party! 🎉
Now what? Well, what about the other workspaces? We can do this same trick for ws_dev_handbook! A task for you to do. After you’re done, and a publication for all projects, we can start running our first tests in runtime for our specific entities.
Notes on the tests you execute:
- Keep a view on the Case Instance Manager artifact for started lifecycles
- Keep a view on the Process Instance Manager artifact for started BPMs
- Keep a view on the inbox of your test user!…Your lifecycle instances will drop of tasks based on the activities in the current lifecycle stage!
Keep in mind that when you don’t “see” the proper thing in runtime; that’s probably a ‘Security’ BB issue on your side!
I have green flags all over the place! ✅ Not at once (I’ll admit!), but finally it works as intended which is great!
…
What is beyond all this craftsmanship? Well, how about making it all nice like your UI expert told you!? 😉 I continued crafting already on my own; here are some screenshots:
If you want to have a closer look, this file contains the zipped source exports from my projects to continue with…Have fun!
I create this file via a workspace synchronization to the server (right-click on the projects!). If you follow this post you can have the same workspaces and projects already; Give it a sync on your side and copy the extracted ZIP content over that sync. on the server. After that last copy, you can re-sync it again, so your projects are filled with my data…Let me know if you don’t have a clue!? I can show it in a future post if you like…
These are the packages I deliver into the world to have a deployment in your own environment to play with:
- Publication CAP and Publication MPK
- Publication testdata CAP and Publication testdata MPK
- Conference proceeding
- Handbook
These are the post-actions after deployment of those packages:
- Connect your users to the correct solution roles (you know which we used by now)
- Create the ‘Application Server’ and ‘BPM’ service containers and relate the solution interfaces
- You will have a service available with name
bpm_test_datato start the BPM with inputtrueto generate the config entity instance in runtime- In ‘/app/admin’ disable the “normal” homepage as described in this blog (below!); The solution has its own homepages.
- Make sure your simple test-account is member of the internal ‘Entity runtime user’
The list of implementations I did from my side
Just to get a nice overview of what I changed…specially for you! Because of the new year…Three months ago! 🤣
- Replacing the 2 specific entities with their own Lifecycle BB and follow the flows analyzed in the top of this post.
- The only thing I see going wrong is that
bpm_dummyBPM isn’t found anymore; You can solve this via a BPM runtime reference to our generic package where we have this BPM available! Comment me if you only see question marks!?
- The only thing I see going wrong is that
- Add relations like our ERD and update the forms to use them
- Don’t forget to update the ‘Security’ BB for the relations!
- Update the layouts so they “look & feel” nice
- Update the ‘Create’ forms matching the UI sketches
- Add rules to set values on creation (like date
now()for the project start date) - Add a ‘Homepage’ publications as new homepage (with runtime security for my role) and disable to default homepage from
app/admin
- Adding a ‘Theme’ document…Always do this for any demo/customer; They like to see their branding passing by
- Update the lists to show the correct information by default
- Adding assets (like icons and images) to make the solution “smell” nice
- Make fields required where applicable
- Add task specific layouts to show when you open a task from the inbox/layout panel
- Hide the inbox with CSS; I want to manage tasks in the “Case”
- Add webservice operations to make our life easier; This includes a service container of type ‘Application Server’
- Building logic to only request on “Open” publications
- Building the max. download logic; It will move the publication to the next lifecycle stage when max. download is reached
- Make configurations modifications only possible for the
fun_sol_adminrole - Add a ‘Rule’ BB to set the request name magically
- Adding uniqueness check for publication name
- Generating config data via a BPM over XML data; This includes a service container of type ‘Business Process Management’. A trick learned here!
The quick bugs to be improved by you 😅 (which I found after a review of my own implementation):
- The specific entities are not created through the
bpm_test_dataBPM/service call (this must be a BPM in the specific workspace; as separate project). Or make the parent smart enough to understand the difference!- Requests don’t get a name via the
bpm_test_dateflow; Strange…Looks like an ‘onInit’ event is something else then a service ‘Create’ call (which probably triggers the ‘onCreate’ event!)- Updating a configuration entity instance will be visible on all the related entities; See here for a solution!
- ‘External’ entity instances can have duplicate names; Just to keep in mind.
- It’s not possible (yet!) to create a new request for a selected publication…Can be an action rule!
- After a task is completed, the UI is not always updated. My first gut-feeling is that it has to do with the long-lived BPM template!?
- When a publication/request is eventually archived, you can still update fields!? Well, that’s part of the security model (not for this post!)
- Comment me if you find others…
Update our generic package
Are you that smart person asking what to do when the parent ‘Publication’ workspace gets an update over time? Then you’re my guy (or gal)…These are the steps you need to do after that precious update:
- Update the package properties to a new next version. You can skip numbers, but NEVER decrease numbers (trust me…that’s my experience!)
- Create the new package (CAP + MPK)
- Install the upgrade package into the organization; from the ‘System’ space into your specific organization!
- Switch to the specific workspace
- Import the new MPK file (with the update checkbox enabled)
That’s it…I also do a clean build on that project and do a full publication again (just to be sure).
Final clarification notes
During craftsmanship, we saw an interesting option passing by to create a Model PacKage file. From my point of view, I only have one important question to answer: I know it’s an option to also import entities into another application by marking the entity (and other BBs) with ‘Enable reuse in other applications’, but how is this option related to this MPK? Well, it looks like a simple answer too! You can export your entity models in two ways:
- Over a CAP file; Injects external application entities purely for reusability. You must explicitly mark the entities (and BBs) as “Enable reuse in other applications”.
- Over a MPK file; Injects external application entities for subtyping and customization. The option ‘Enable reuse in other applications’ has nothing to do with it!
Some extra notes for clarification (as it took me some time to digest):
- “Application” in the above text equals the “Project” within a workspace (So, the “solution” you’re building in that project!). On this application/solution/project we can extract an application package!
- An “Application package” equals the CAP file with (optionally the MPK file)!
- Finally, the application package is deployable in a specific organization space and/or the shared space.
- Get yourself also informed on the low-code guide on section “Importing entities from other applications”…Interesting stuff!
Comment on me when things are still unclear as I also read those things over and over again to understand what the documentation means sometimes! So, it’s not just you…😉
Just one extra final, final note
Does this way (of working with multiple workspaces) really benefit our implementation needs? Well, YES and NO! O-boy…there we go again! 😁 Will I recommend it for any type of solution? For sure not…It all depends on the size of the total solution, the way you want to implement, the number of developers you work together with, and the way you want to depend on other projects! This last one is especially important to keep in mind as you don’t want to end up with a large solution where project documents have a direct connection with other project documents! Working with separated workspaces will avoid this problem! On the other hand, it also introduces a complex way of working; when the parent project gets an update, you need to import the latest version of that parent package into the other workspaces (this is true also for each developer organization…If you did a split on that level). So, interesting! For smaller solutions I would just go for the one-workspace approach with multiple projects and watch out for your dependencies.
A roller coaster “DONE” if I may say so and what a learning ride where we see again the power of the AppWorks platform and its abstraction techniques. I gave you a little insight on how to think first before you act. Pick the fruits of this mindset as it will help you in a steady extendable future on any low-code platform; Trust me on that one! 😉 Cheers, and see you next week.
Don’t forget to subscribe to get updates on the activities happening on this site. Have you noticed the quiz where you find out if you are also “The AppWorks guy”?
