
Hi there AppWorks fans,
Welcome to a new installment of AppWorks tips.
I learn every day and this time I saw again something interesting that is pretty useful (also for us developers). It all about the generation/creation of test data. We work on a daily basis on our solutions on the platform, and we create a lot of test entity instances in runtime (most of the time manually). Another use-case is things that can go really wrong (especially on development), and you need to clean things up. We can do this in the /app/admin URL of our platform where we can delete our full solution or sometimes we even to create a new organization and built-up things from scratch. The final use-case is a set of equal data for all developers (and also the testers). Lucky for you as we share some interesting things on the platform which makes it really easy to generate this kind of test data in runtime based on the entities we’ve crafted.
Let’s get right into it…
…and start with an overview in small steps on what we try to accomplish in this post:
- Create some basic entities which are related to each other and make it all fancy nice based on the generated BBs
- Expose the webservices of these entities (depends on what you want; Just Read/Update or maybe also Delete them!?)
- When we expose webservices; we also need an application server connector
- We want to save an XML file (our test data) in the XML Data Store
- Use a webservice runtime reference that can read this XML file
- Craft a BPM that will execute it all together in one call (and a BPM that can remove all the data)
Create 2 basic entities (with webservices BB)
Our first step…We can generate most of the information with that mark ‘Generate a default user interface using these properties’ during creation of a new entity. Below are tables available for 2 entities, and a short description of the more specific steps I executed to update the standard generated building blocks. Oh yeah!…Don’t forget to save these entities in a nicely created ‘entities’ folder in your project…As always! 🤔
The cart entity:
| Name | Label | Type |
|---|---|---|
| cart_is_occupied | Is occupied | Boolean |
| cart_has_mobile_holder | Has mobile holder | Boolean |
| cart_avatar | Avatar | Image |
| cart_name | Name | Text |
| cart_start_time | Start time | Date and time |
| cart_end_time | End time | Date and time |
| cart_total_value | Total value | Currency (EUR) |
Updates I also did:
Set display name: Cart
Add business ID: cart_{2 digits}
Set the currency for the ‘cart_total_value’
Update list to ‘All cards’
Update the ‘DefaultLayout’ to something like ‘view_layout’
Update the ‘Create’ form, so it shines like a diamond
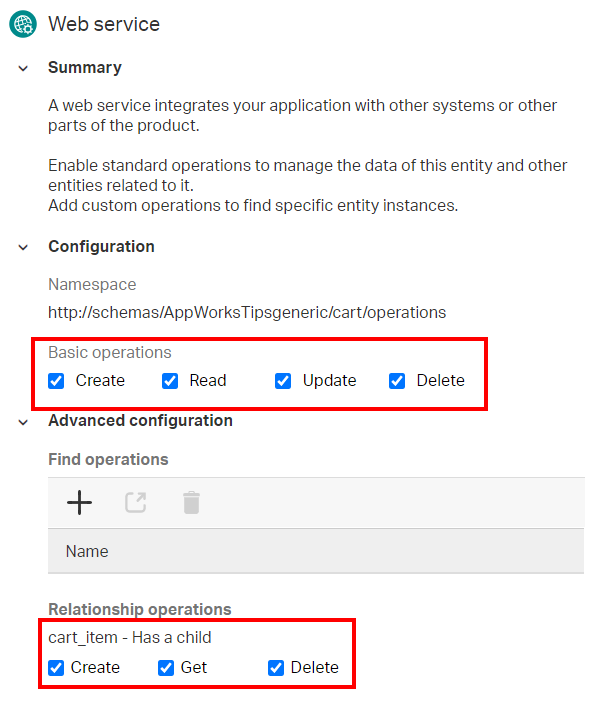
Don’t forget to add all the CRUD operations of the webservice BB (we will use them later in the BPMs)
![xml_data_000]()
Those related operation will be available after you’ve created the ‘cart_item’ entity!
Next will be a second child related entity. You need to create this one from the ‘cart’ entity relations BB. Not hard to find, but otherwise you might create it from the project overview which is not needed…
The cart_item entity (as ‘has child’ relation)
| Name | Label | Type |
|---|---|---|
| cart_item_name | Name | Text |
| cart_item_value | Value | Currency (EUR) |
| cart_item_type | Type | Enumerated text |
| cart_item_size | Size | Float |
| cart_item_barcode | Barcode | Text |
Updates I also did:
Set display name: Cart item
Add business ID: cart_item_{3 digits}
Set the currency for the ‘cart_item_value’
Set some values to the ‘cart_item_type’ like ‘Fruit’, ‘Vegetable’, ‘Meat’, ‘Kitchenware’, ‘Pharmacy’, ‘Pet supply’
Update list to ‘All card items’, and I also removed the mark ‘Show this list in Lists panel’. This makes sure I only see the ‘Cart’ entities in the list panel.
Update the ‘DefaultLayout’ to something like ‘view_layout’
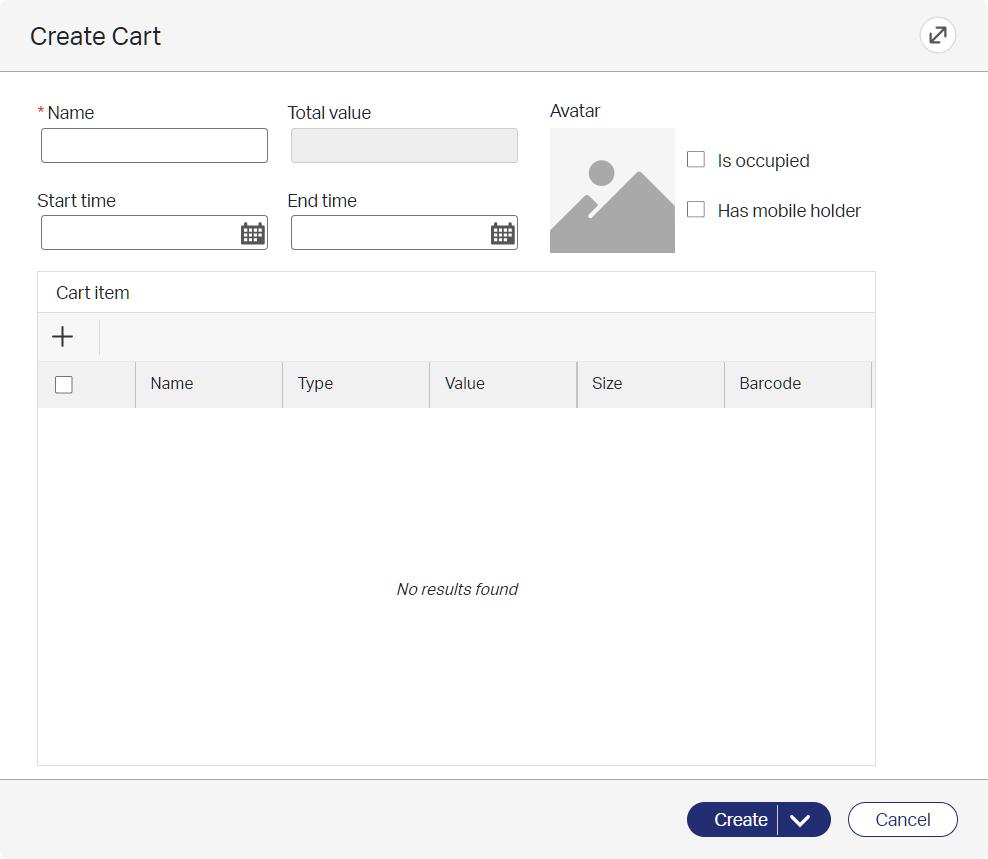
Update the ‘Create’ form, so it also shines like a diamond
Re-update the ‘Create’ form of the ‘cart’ entity, so we can create new ‘cart_item’ instances from a connected grid component like this screenshot in runtime:
![xml_data_001]()
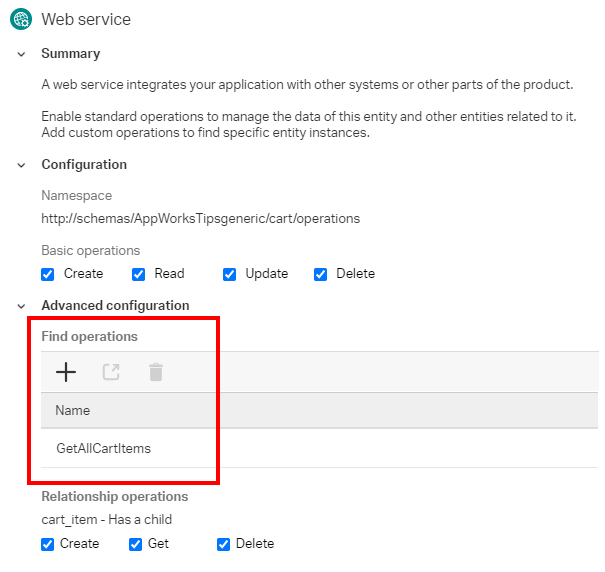
Don’t forget to add all the CRUD operations of the webservice BB
![xml_data_002]()
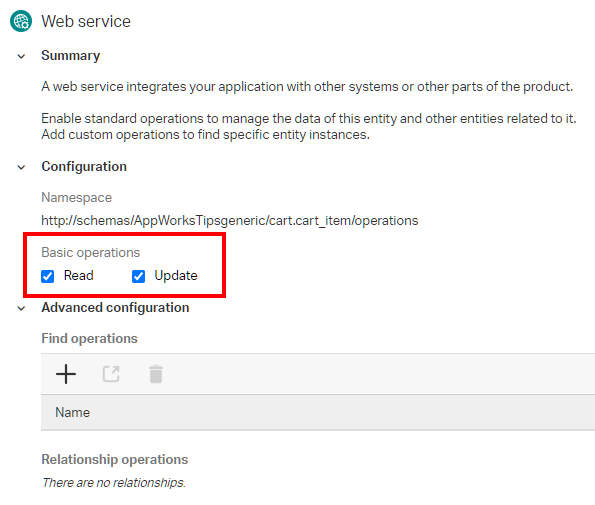
Let me know in the comments if you require more guidance, but I guess you can figure out those entities yourself….right? When done we publish our project to runtime, so we are able to create our first ‘Cart’ entity and on the entity we will be able to create new child entities of type ‘cart_item’.
Application server service container
We did it a thousand times by now…Why do we need it? So our gateway ‘knows’ who is responsible for handling the just exposed webservices on our entity ‘Webservice’ BB.
Quick steps:
- Open the ‘System Resource Manager’ artifact (in your own organization)
- Create a new ‘Service group’ and make it of type ‘Application Server Connector’
- Give it a name like for example ‘AppServer’
- Add the web service interfaces of our 2 entities ‘cart’ and ‘cart_item’
- Make sure it starts automatically
- Assign to the OS Process ‘Application Server’ as our TomEE is the only one who can handle SOAP messages for now
Save XML file in XDS (XML Data Store)
Now we jump into something we did already a long time ago. That is saving XML data in the XDS. To make it happen we will create a new document of type ‘XML Store Definition’…Don’t worry…Let’s jump into the steps:
Create a new folder ‘xml_store’ in your project…Like the ‘entities’ folder
Make this folder ‘Start Point Of Qualified Name’…You can do this from the context (right-click) menu on this folder. We also saw this feature during the creation of a document of type ‘Web Library Definition’…Have a search on this site for more information and examples.
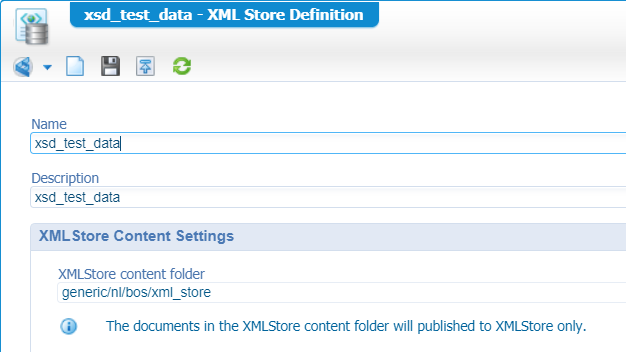
Add a new document of type ‘XML Store Definition’. Nicely saved in the ‘xml_store’ folder!
![xml_data_003]()
Finally…Add a small structure like this with that XML document in place: /nl/bos/test_data.xml
![xml_data_004]()

The XML data we use for this post looks like this (or maybe some input of your own if you created something even more fancy!):
1 |
|
Point of notice with this XML file:
- “true | false” must be non-capitalized values
- Watch the ‘T’ in the time notation for the date-time values
After publication, you will see this happening in your XSD (via the ‘XML Store Explorer’ artifact)

Here you see the TRUE and FALSE in capital values, but that’s not working!! The ‘TRUE’ will eventually be a ‘false’ in runtime…trust me…I tried it out for you! 😎
Add the ‘Method Set XMLStore’ runtime reference
Again a nice new feature we’ve not yet used on this blogsite…”Runtime references”!
Start by creating a new folder called ‘runtimerefs’ in your project and add a new runtime reference of type ‘Web Service Interface’
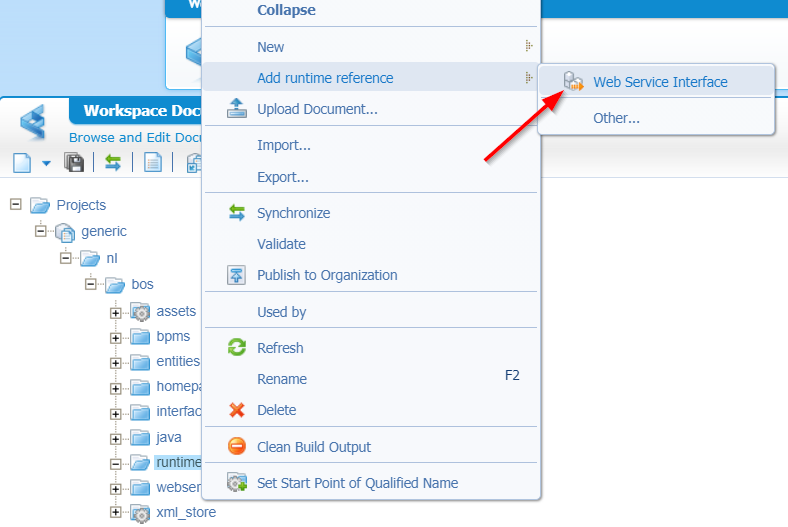
A runtime reference is just a platform component (created by OpenText) that we would like to reuse in runtime (but also in design-time)!
In the next modal popup we select the ‘Method Set XMLStore’ in the ‘Cordys XMLStore’ folder
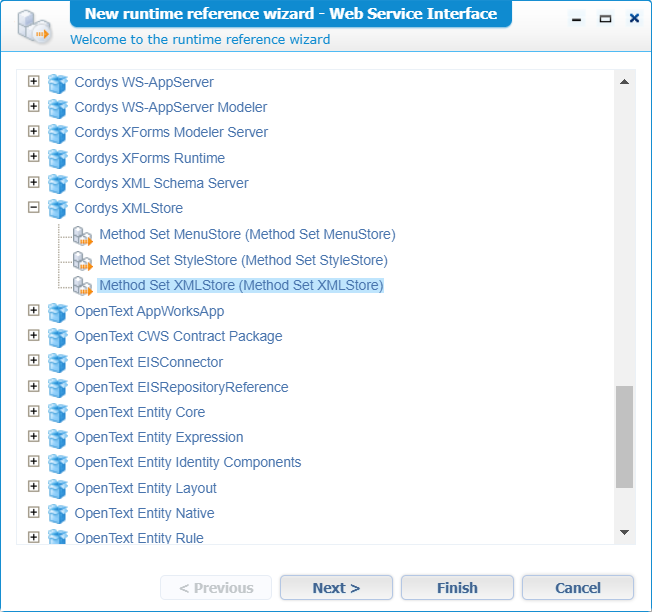
Click ‘Next >’
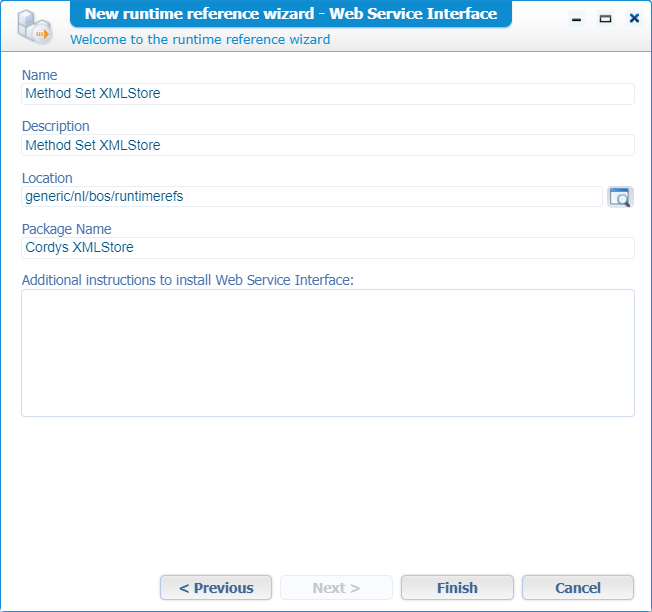
Make it a save in the ‘runtimerefs’ folder and click ‘Finish’
Now we have a set of methods available as runtime reference in our project that we can also consume in our project!
Let’s do a first test on the ‘GetXMLObject’:
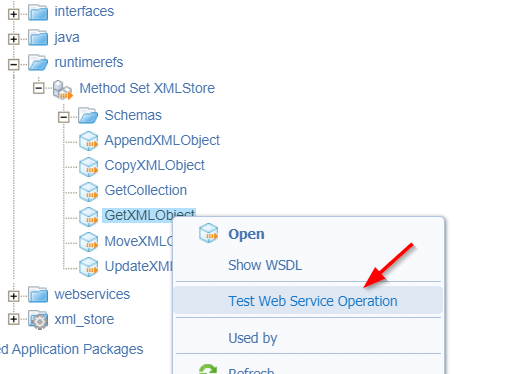
You get a clean SOAP request which can be manipulated like this (do you recognize that key-path!?):
1 | <SOAP:Envelope xmlns:SOAP="http://schemas.xmlsoap.org/soap/envelope/"> |
Let’s invoke the request with an interesting result…We can do something with this (I made it smaller in the below example)!!
1 | <data> |
So far…So good…Next step where we’re going to consume all the nicely crafted services in one test generation BPM.
But first…A coffee break ☕
Build the test data generation BPM
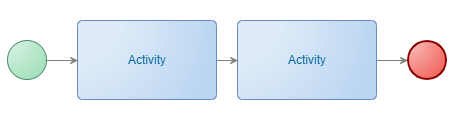
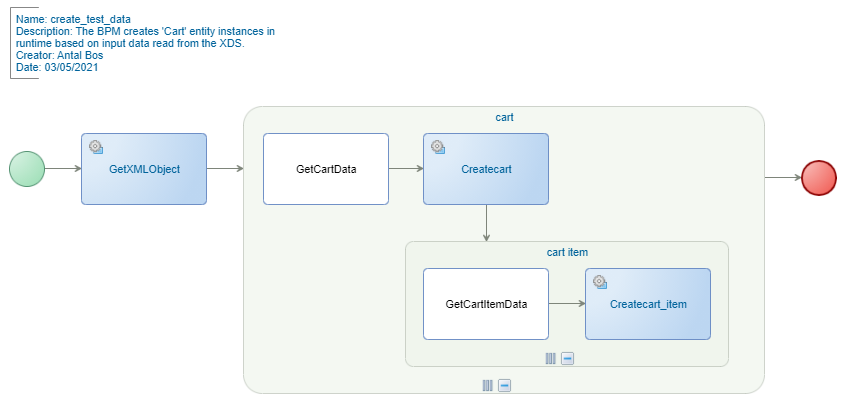
Are you ready?…Let’s jump into our ‘bpms’ folder of the project and create a document of type ‘Business Process Model’. You get a new panel where we can drag & drop all kind of constructs. Start simple by creating this start BPM and just save it with a name ‘bpm_test_data’:
Right-click the second activity and group it as a for-loop…

The end-result should look like this:
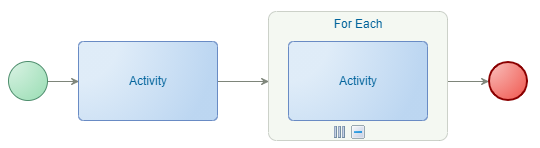
Take note of the updated input/output flows which are connected to the for-loop group itself and not to the activity in it!!
Ok, one step back and write some pseudo-code on what we try to accomplish with our BPM!?
1 | var xmlData = getXMLObject("/nl/bos/test_data.xml"); //Webservice call |
As you see we’ll create a nested for-loop which reads all of our XML content and creates instances of our entities via the exposed webservices…Isn’t that nice!?
It’s also a good habit to write these types of BPMs in pseudo-code, so you get a nice overview on what you try to build.
Next? Let’s build this pseudo-code into our BPM and start with that read on our XML data in the first activity!
Right-click it and insert a new ‘Web Service Operation’
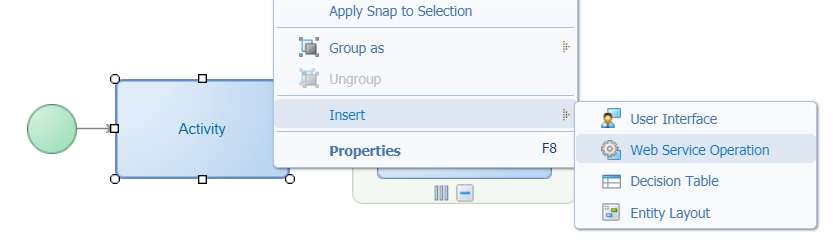
In the modal popup for the selection of an operation you should be able to select ‘GetXMLObject’…why? Because we referenced it as runtime…Remember?
Let’s jump into the ‘Message Map’ tab at the bottom and make sure our service call is injected with the correct ‘key’ value
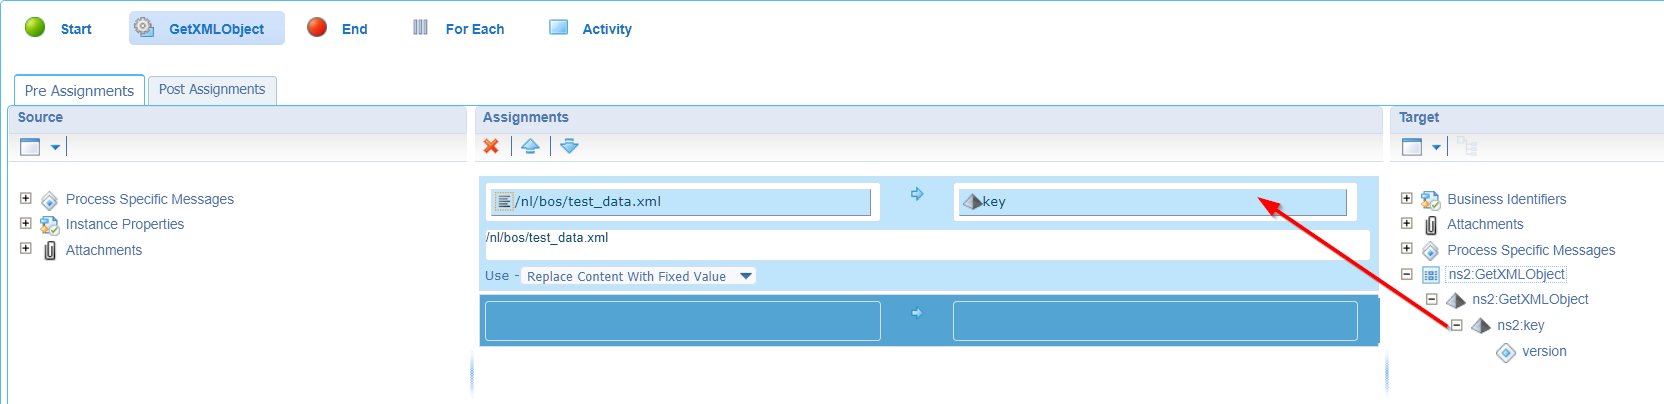
Let do a save, and a publication. After this we can do a first execution run from the context menu on the BPM:

Do a double check in the Process Instance Manager (PIM) artifact for the last hour and have a check on the result message for this activity…You should be fine (although the BPM is aborted on the next step, but we’ll fix this in the next steps!)
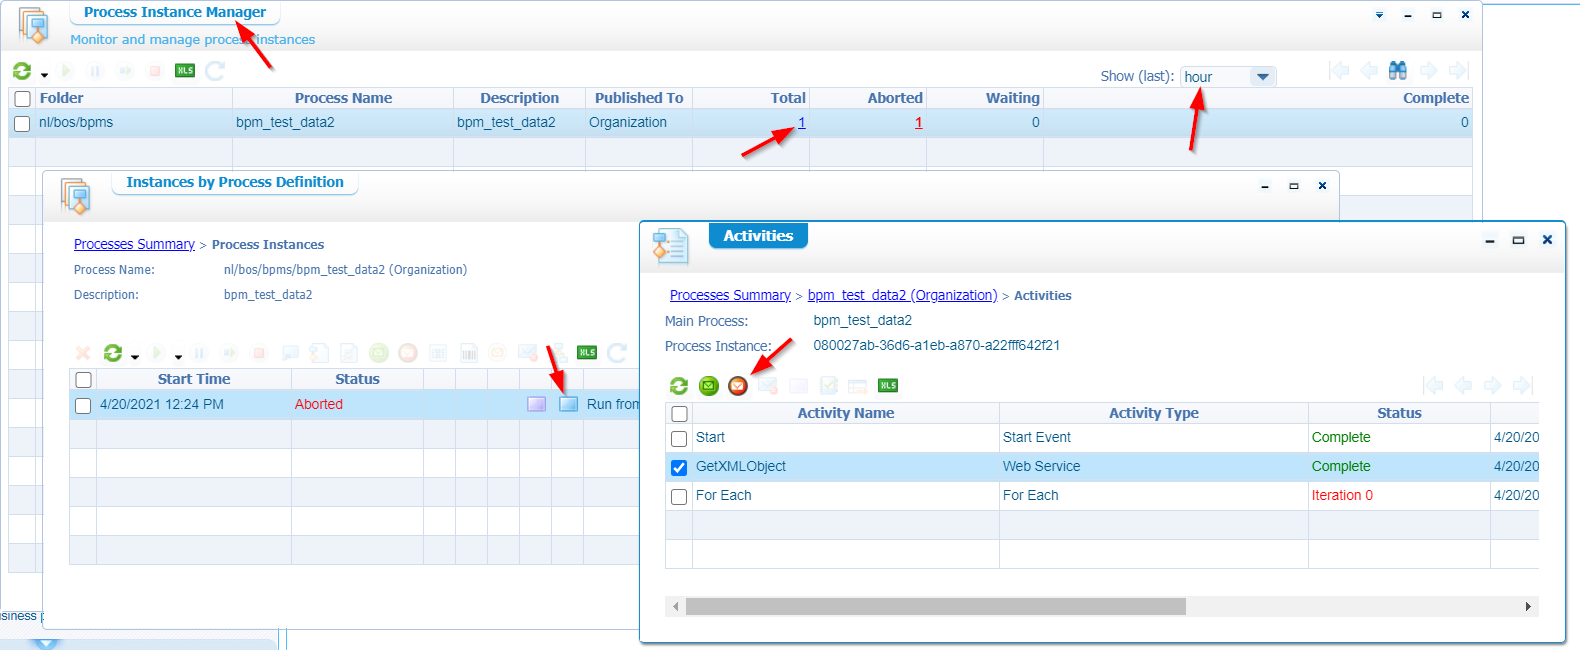
My BPM is called bpm_test_data2 because I already prepared this post with a nicely looking and workable BPM flow!😉 But no worries…Let’s continue the grind and learn as we ‘flow’
Next step…
The extension of the BPM with a nested for-loop. Nothing special if you created the previous for-loop…Let’s see if you also can craft something like this? Simple and easy without any configured logic behind it:
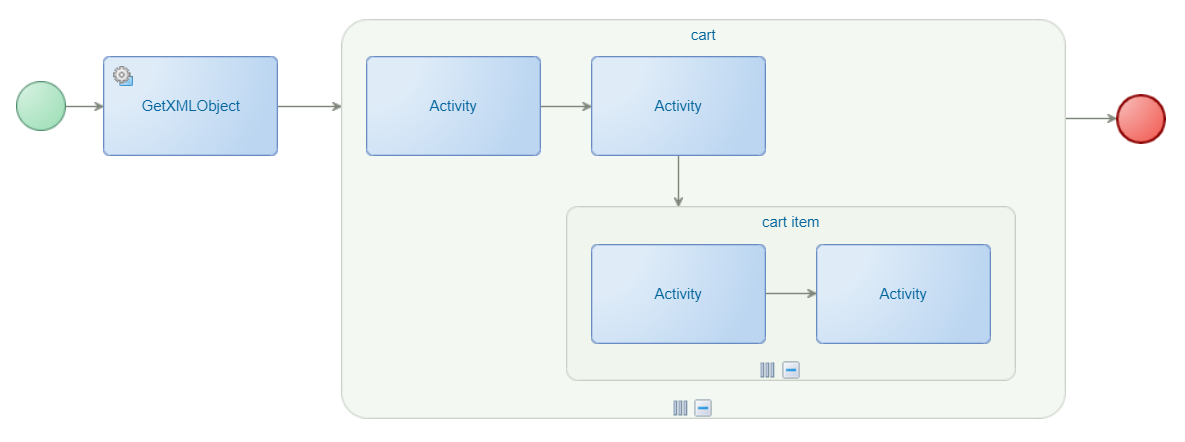
Let’s do some first configurations in the BPM and those 2 for-loops.
Get the properties of the BPM itself and make it ‘Short lived’. We have a non-manual activity BPM, so this setting would be appropriate. It makes the BPM execute faster in a stateless way (or in “memory” as you will)
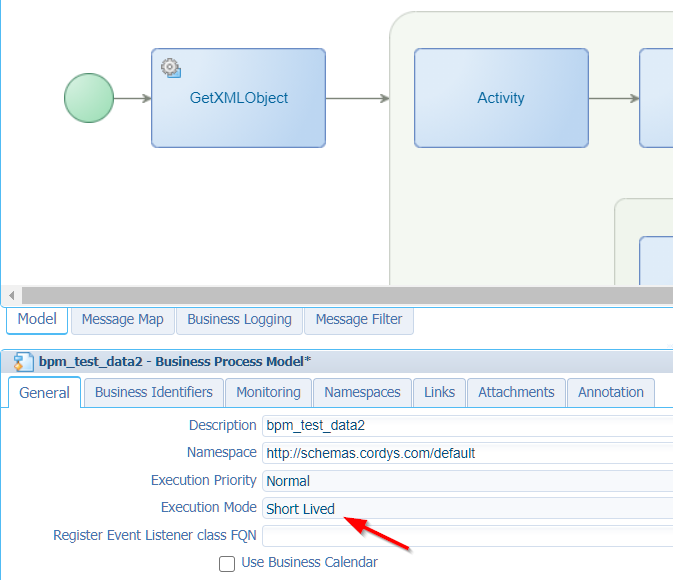
The only disadvantage is the monitoring…It’s drastically increased, but you can update this in the ‘monitoring’ tab…Just play with it if the PIM doesn’t provide sufficient information.
Another good habit is an update of the namespace URL…For this post we keep it as is, but we could also update it to something like:
http://schemas.appworks-tips.com/bpm
Now those for-loops…Get the properties on each of them and give a more descriptive name to the iterator:

Ok…still happy?
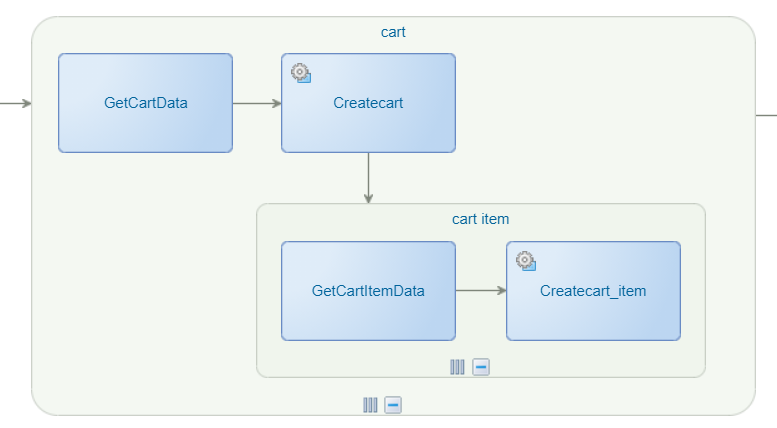
Next step…Insert 2 activities with a webservice call (like we did for that first activity in the BPM). Make sure to call these two services from the last 2 activities in each loop (‘Createcart’ and ‘Createcart_item’)…Check the ‘service’ icons in the screenshot below…You get the point! Also update the labels for the other 2 activities:
Back to the 2 iterators as they need input data to iterate over…Well, lucky for us, we have that input data already from our initial activity. So our ‘cart’ iterator can grab data from that response message!

For you to copy from:
ns2:GetXMLObjectResponse/ns2:GetXMLObjectResponse/ns2:tuple/ns2:old/carts/cart
And our cart_item iterator? Well, we have our cart iterator which contains our items: instance:iterator_cart/items/item
…
Finally…We need to jump into the message mapping for all the activities, so we pass in the correct values into the correct activities.
So, at the bottom of the screen of the BPM panel hit the ‘Message Map’ tab. We already configure the ‘GetXMLObject’ activity, but this time we continue with the other activities, but first things first…
The creation of some helping global process variables…
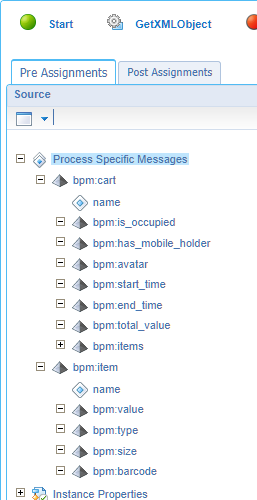
We would like to have 2 global variables. A ‘cart’, and a ‘cart_item’. For this we copy some parts of our initial data XML (the one we saved in the XDS!). For the ‘cart’ variable we copy the <cart> element (incl. all the elements in it). Once copied you can right-click on the ‘Process Specific Messages’ and paste the XML part as ‘Element’

Paste in the XML part and do the same trick from the ‘item’ variable where we can copy an <item> element from our initial data XML. The end-result should be something like this:
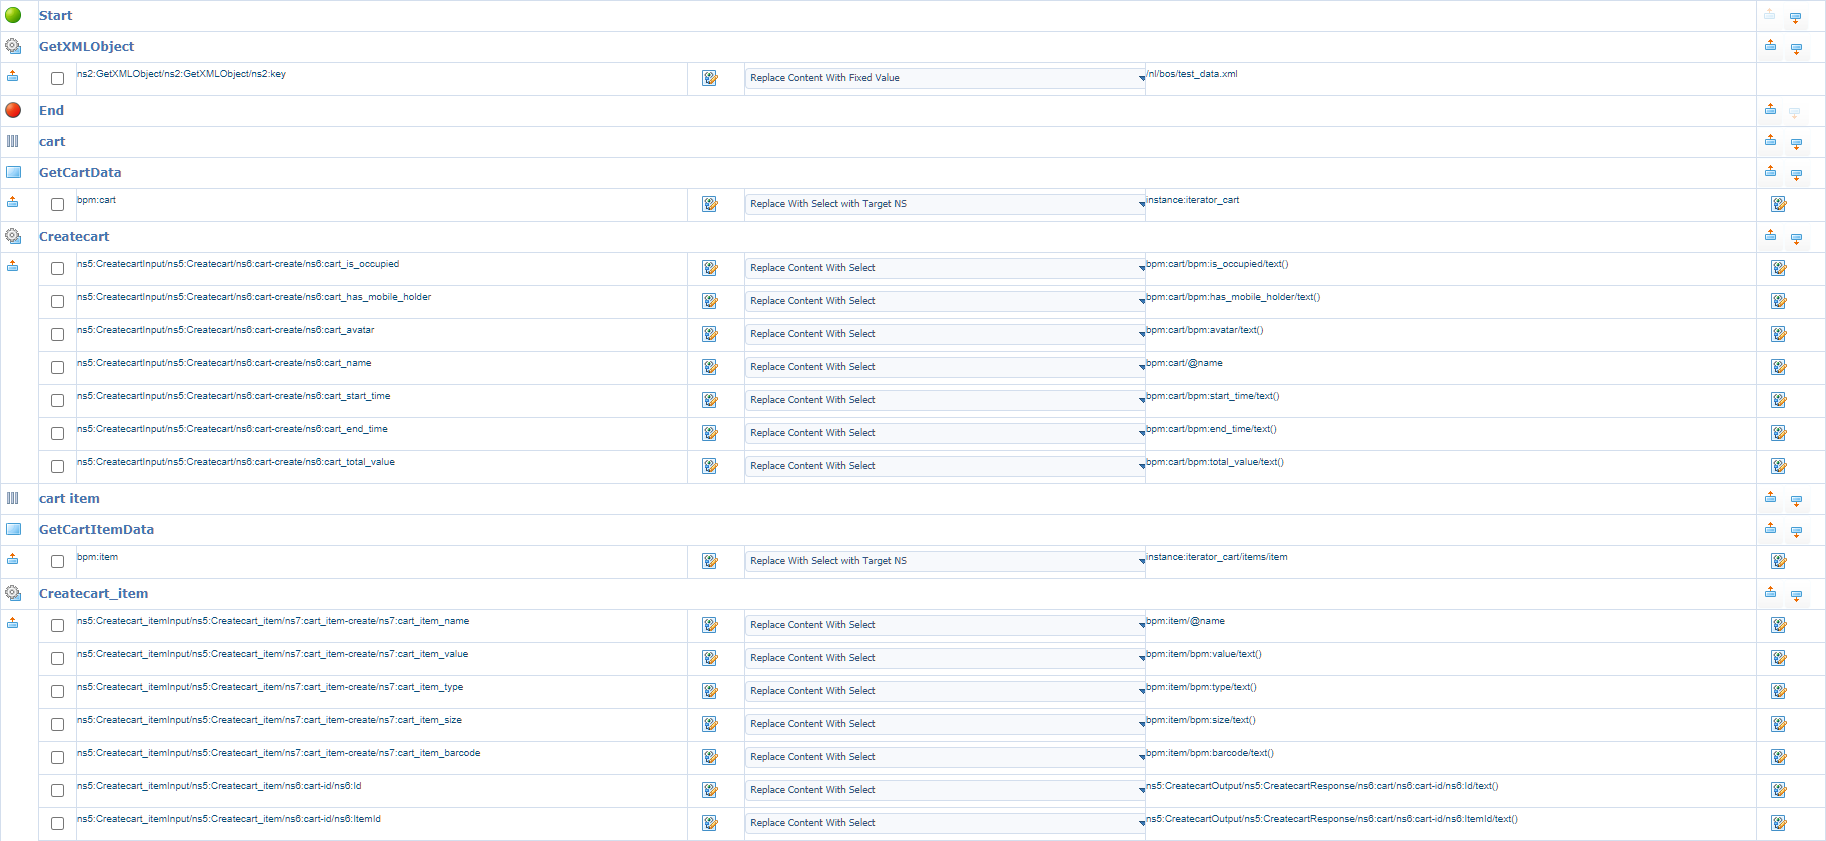
OK…Everything ready and pre-configured!…Now the mappings for the activities…
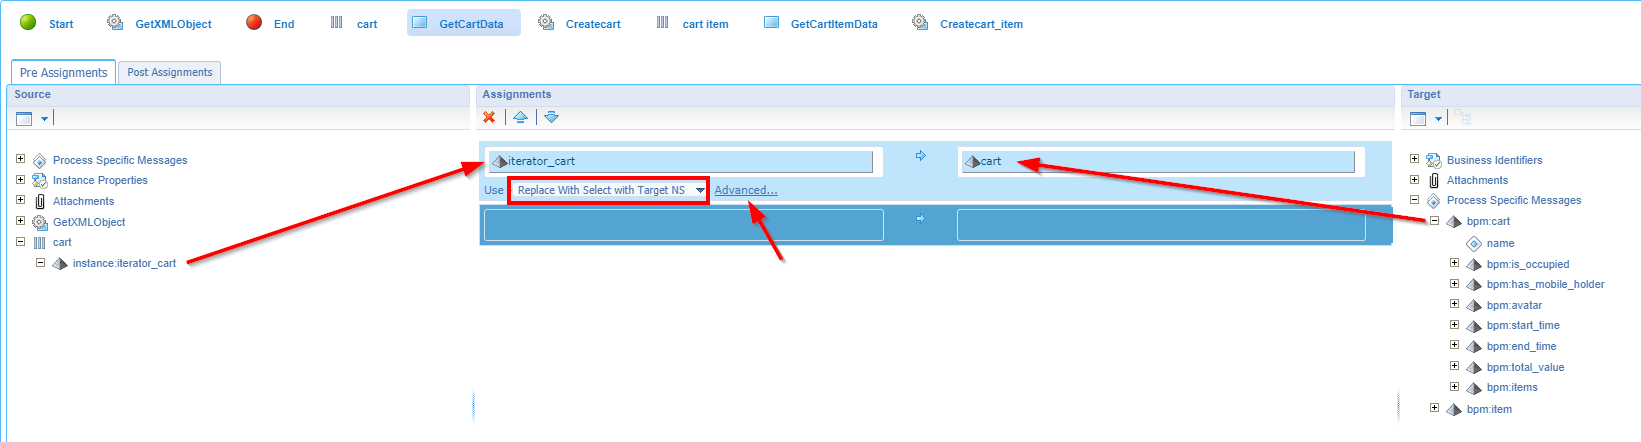
Activity GetCartData
![xml_data_024]()
Comments:
- In the ‘Advanced’ editor make sure to update the expression to
instance:iterator_cartas we want to retrieve the elements and not only the values of the elements which is retrieved via the added/text()…So, remove that last part! - As we update this first comment we also want to update the ‘Replace Content With Select’ to a ‘Replace With Select’ and more specific a ‘Replace With Select with Target NS’. This ‘Target NS’ part makes sure you get a cleaner XML as we retrieve XML data from a different namespace here! Check the messages in the PIM once you start testing the flow to see the difference…Just play with it!
- What did we create here? Each iteration over the ‘carts’ elements will save a copy to our ‘cart’ global variable…which we can use in the next step.
- In the ‘Advanced’ editor make sure to update the expression to
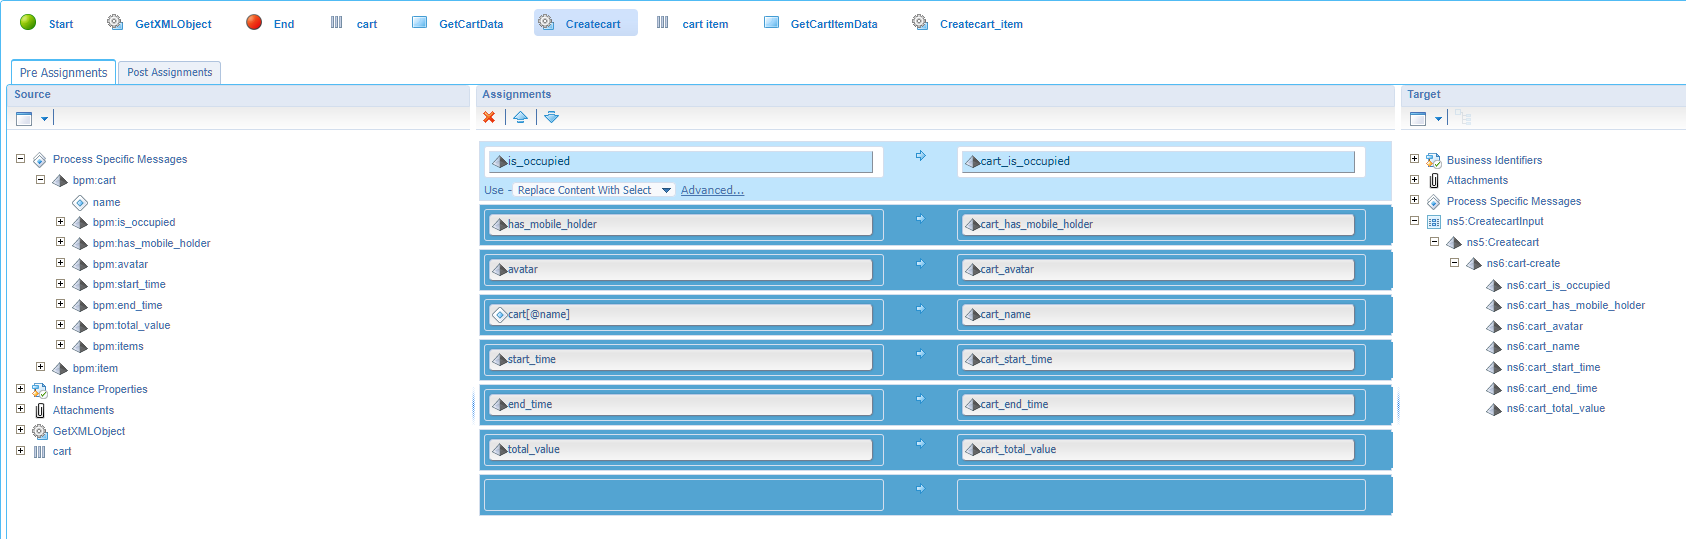
Activity Createcart
![xml_data_025]()
Comments:
- Use the
<Ctrl>key to quickly connect two elements. First click the left element; hold<Ctrl>; and click the right element…See the magic “Under his eye”….Yes, I’m following the “The Handmaid’s Tale”! 🤗 - All assignments can use ‘Replace Content With Select’…Why not with ‘Target NS’? That’s because our process variable is already clean from name spaces.
- Use the
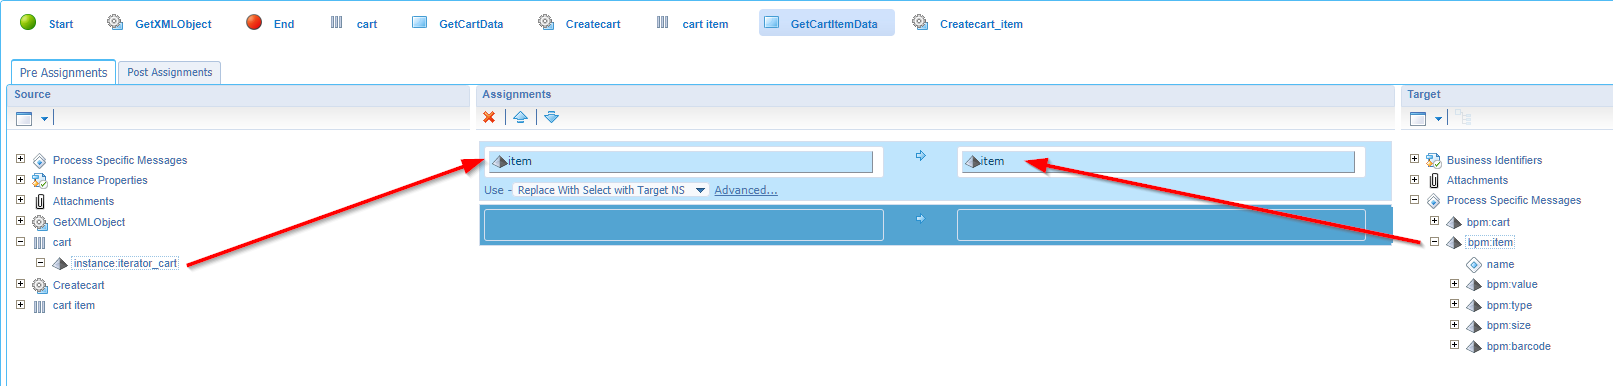
Activity GetCartItemData
![xml_data_026]()
Comments:
- Update the ‘Replace With Select with Target NS’…You know why!
- In the ‘Advanced’ editor we update the expression to this:
instance:iterator_cart/items/item
Activity Createcart_item
![xml_data_027]()
Comments:
- The first 5 assignments are retrieved from the ‘item’ global process variable and matched to ‘ns7:cart_item-create’ element on the right
- The ‘Id’, and ‘ItemId’ are retrieved from the earlier response of the creation of our ‘Cart’. Why is this mapping required? Well, because of the relation between ‘cart’ and ‘cart_item’

This is the consolidated view of my configuration:
…
Time for our first test, but after a save and a publication of our BPM (or the full project!)
You can run the BPM from design-time in 2 ways:
- Right-click somewhere in the white space of the BPM model and choose ‘Execution’ -> ‘Run’
- Right-click on the BPM itself from your project perspective (where you see your folder structure) with the same option
2 interesting comments:
- You can also choose to ‘Run Interactively’ as well to run in ‘Debug’ mode. In my experience (or when I get stuck) you will probably want to use the ‘Debug’ mode…We already have a post available we explain more about this type of execution.
- Sometimes you expect other results than expected (and you know for sure it is crafted correctly). This is your time to choose for the ‘Validate and Build’ action. See it as the ‘Clean built output’ action on your project, but now specifically for the BPM.
Did you do your run? Time to double-check our PIM artifact…
Blazing fast…Don’t forget that next screen!
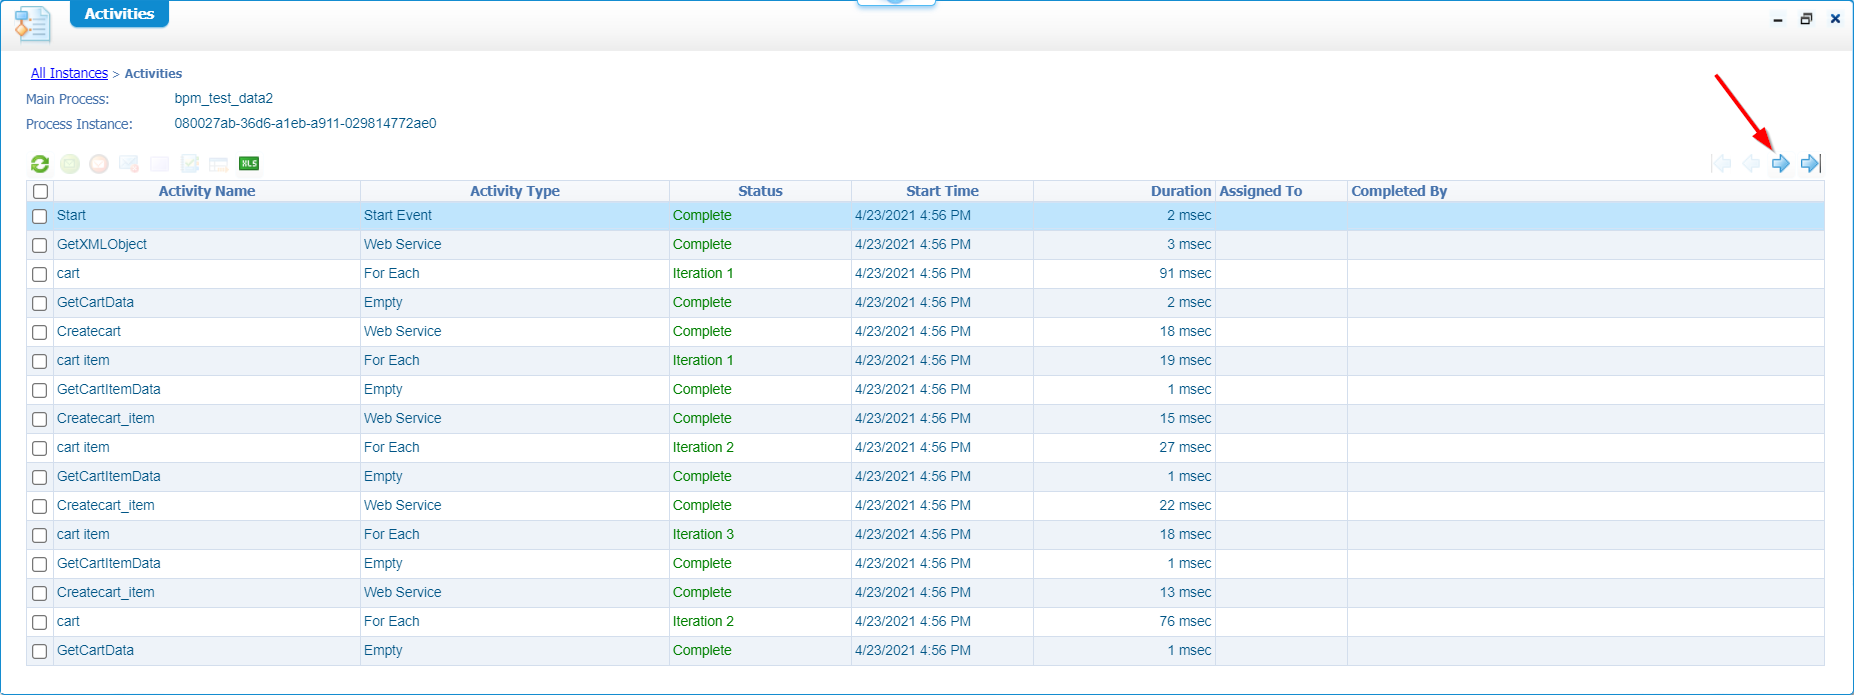
If you don’t see all this information, you probably made the BPM ‘short-lived’ and did forget to enable the monitoring information in the corresponding tab in the properties of the BPM itself!
In runtime?
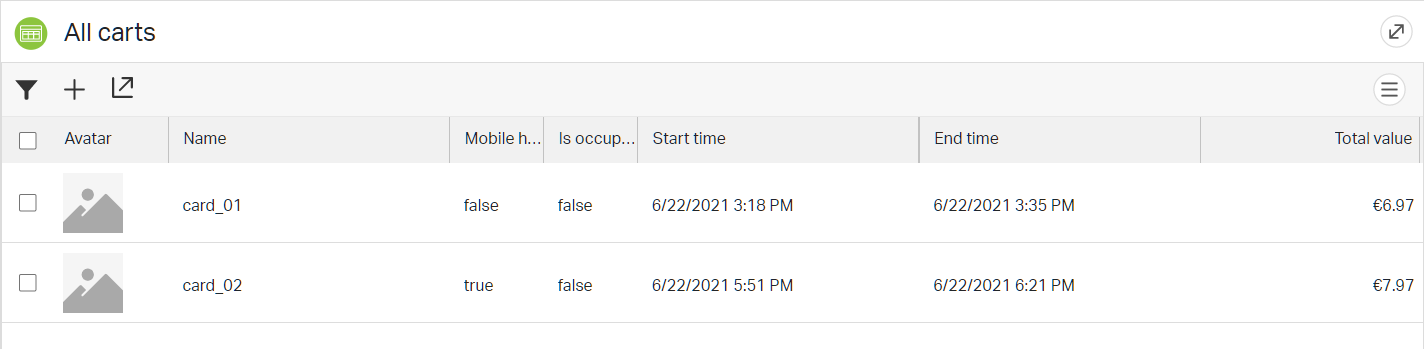
NICE…believe me…Those ‘card_item’ entity instances are there when you open the card! 😎
A PRO-tip…
…Just because I love you all and share what I also learn from others!
During your BPM craftsmanship and especially when you play with expressions in the XPath editor you probably noticed that result data (in the ‘test’) is always validated against this kind of value ValueOf_{property_name}:

That’s nice, but not very helpful!? When you start to use functions and operators (from the bottom-left panel), you want to validate and test the XPath expression against a real value!
Well, jump to the ‘XML’ tab (next to that ‘Tree’ tab)…Now you see where those ‘dummy’ values are retrieved from! More interesting is the edit feature for this XML tab. For example, we could copy & paste our test XML data into the correct element….OR, even better…..Grab the real-life messages of the half-running and under development BPMs which can be viewed from the PIM. Even the messages of a BPM ‘debug’ session can be used as input for the ‘XML’ tab. The only thing you need to watch is pasting the correct XML data into the correct element to play along.
…
A “not to forget” hint…
…comment your BPM and make it readable with colors (see the properties of an activity)! Also, a nice habit to implement…
This is a mapping you could use:
- Mapping activity: WHITE
- Sub process activity: PURPLE
- Service activity (default): BLUE
- Manual activity: ORANGE
What else?
Well, what about a ‘delete’ BPM which cleans all your development test entity instances for a fresh start!? Check this consolidated view of a sample BPM.

For our example this is really easy as we only are required to get all instances (= SOAP call) of the ‘Cart’ entity; loop over the items and invoke a deletion (=SOAP call) based on the current ‘ItemId’ in the loop. You can call the bpm something like clean_test_data. You also see we don’t need an extra activity to map the current data in the loop (like we did before!). We can directly retrieve information from the iterator!

We already exposed all the CRUD operations on the ‘Cart’ entity, but for this BPM I also created a new ‘find’ operations with the name ‘GetAllCartItems’
That’s it for this post…again a “DONE” where we learned about generating equal test data for all our developers and also for the people who executing all the testing work. Valuable lessons are learned again that we will for sure reuse in any future project. Have a great BPM creation week-end, and I CU in the next post about a nicely crafted AppWorks Tips topic.
Don’t forget to subscribe to get updates on the activities happening on this site. Have you noticed the quiz where you find out if you are also “The AppWorks guy”?
