
Hi there AppWorks fans,
Welcome to a new installment of AppWorks tips.
This time a programming blog about extending the AppWorks RestRequestHandler.class…Yes people, we’re writing code again! I also learned new development stuff during my own journey on the platform by watching and asking how others do their tricks! This post will share all that knowledge…It will be great, and an experience to learn for every development change you want to do on the AppWorks platform…See it as a stepping-stone on how to start development on the AppWorks platform.
Let’s get right into it…
Everything starts with a plan, so let’s see what plan we can get up with for our requirement. What do we want to accomplish? Well, for this post we want to call an external ReST service, but the basic configuration for this service is just not fitting into our requirements or can be made much nicer! Your next step for meeting the requirement is extending that piece of functionality with your own code. There are several entrances to extend any functionality, and we even already posted about one called the ‘UDDI interceptor’. That was back then, we learned new things, and now we extend the RestRequestHandler class. This is also a well-known class as it handles the external ReST calls of the HTTP service container. It makes sure XML-based platform with SOAP messages can communicate with HTTP request in JSON format…Isn’t that a nice feature? Read all about it in this post, but back to the plan!
The plan: extend the ‘RestRequestHandler’ class
Hereby the how-to overview based some questions/notes:
- How can we see the RestRequestHandler is even being called?
- We first need to know where this class lives in the system?
- Our new extended class has probably some AppWorks dependencies, and we need to figure out a nice way to keep track of them!
- Then we would like to develop our extension in an IDE (like for example IntelliJ)
- When development is ready, we want to deploy it the ‘AppWorks’ way; with a ‘Utilities’ project…
- Our code is deployed…Time to call it from the webservice XML implementation (and make sure our JAR is found by the HTTP service container!)
- When stuff is called, you want to know where to find logging
- Start with remote debugging, once it starts to fail…^$%&^$
- A bonus question: How to read property files the ‘Cordys’ way?
What a list of question and notes, but we’ll figure it out as we start playing around…section, by section!
It will be great…as always! 😍
Where is RestRequestHandler being called?
First of all…spin up your VM and login to your favorite space with your developer account. To see where this class is being called, we start with my own blog ‘Your final destination on consuming JSON data via ReST’. I followed the post based on this public available ReST end-point: https://jsonplaceholder.typicode.com/posts
After following that blog post you will have these bullets in place:
- An HTTP service connector (in your own organization) with a XMLStore ‘config.xml’ pointing to https://jsonplaceholder.typicode.com
- An XML Store Definition to store that ‘config.xml’ file in the correct location
- A new webservice which calls the /posts of the base URL and is connected to the HTTP service container
- A first test request with a valid response.
This is my view of the project so far…

Now the answer to our first question! Let’s double-click the ‘hello’ operation of the ‘HelloService’. You see an implementation XML which looks like this:
1 | <implementation xmlns="http://httpconnector.opentext.com/1.0/implementation" xmlns:c="http://schemas.cordys.com/cws/1.0" xmlns:SOAP="http://schemas.xmlsoap.org/soap/envelope/" type="HTTP"> |
There you have an answer to our first question: <request-handler class="com.opentext.applicationconnector.httpconnector.impl.RestRequestHandler">
Where is our class living in the system?
A great question, with (on CentOS!) a great search command:
1 | sudo find /opt/opentext/AppWorksPlatform/defaultInst/ -type f -name '*.jar' -print0 | xargs -0 -I '{}' sh -c 'jar tf {} | grep RestRequestHandler.class && echo {}' |
This is my result for this command:
1 | com/opentext/applicationconnector/httpconnector/impl/RestRequestHandler.class |
So, now we also have an answer to the question for this section!
For windows people!? I didn’t try them out, but these tools can help you search JAR files too:
- http://www.jdotsoft.com/JarSearch.php
- https://www.softpedia.com/get/System/System-Miscellaneous/JAR-Finder.shtml
AppWorks dependencies with Maven
One thing I learned from previous development projects is to make the dependencies work out the best way we can. With projects; I mean Java projects, as we are going to extend some default behavior of the platform! There are several approached but let me explain my approach which worked for every project so far. For my Java projects I always use a Maven project as it has a great dependency system, and because the AppWorks platform is our dependency in this case, I highly recommend to also use Maven for your Java projects.
Read more about Apache Maven here and check the download section for the software. Just follow the installation steps…It’s not that hard! In the end you should be able to open your Windows (Yes, that’s where I develop!) command prompt, and call the command: mvn --version. I’m currently running Apache Maven 3.6.3…fine!
When we work with Maven, we also work with a repository (can be local, but also remote with Nexus). We keep it locally for now, and if you’re curious where all our dependencies are saved make a call with this command: mvn help:evaluate -Dexpression=settings.localRepository. It will return the local Maven repository path like for example: C:\Users\myaccount\.m2\repository. Have a look in that location and see what is stored.
Now that we have a ‘dependencies feeling’, it’s time to make some default AppWorks dependencies available in our local Maven repository! In bigger projects (with multiple developers) it might be a better choice to use a remote location like Nexus to share the dependencies. The next step will expose the dependent AppWorks libraries into our local repository. With our approach every developer needs to do maintain its own dependencies, and with Nexus you only need to do it once for all developers.
Later on you’ll see that a Maven project works with a pom.xml file where dependencies can be declared. On the interwebs I see also examples where an external JAR library is directly declared with a ‘systemPath’ like this: <systemPath>${basedir}\src\lib\ldapjdk.jar</systemPath>. A valid approach, but I still recommend familiarizing yourself with the installation of an external library into a Maven repository (locally/remotely).
…
Ok…let’s continue after all that theory and background information.
What AppWorks dependencies are we talking about? Where can we find them? How can we install them in our local Maven repository?
Great questions!
What AppWorks dependencies are we talking about?
Dependencies for logging, OTDS, BPM, audit, security, connection, storage, XML, SOAP, identity…You will see it all passing by when browsing through the libraries we find in the next section.
Where can we find them?
Well, we found already one: httpconnector.jar, but when you again go to that same location and browse a bit around, you will see much more libraries passing by. What I always do is making a copy of the most important libraries and place them on a fixed location on my local laptop. Just the C-drive like C:\Users\myaccount\appworks_libs. I create a ‘version’ folder under it, so I always have the correct dependencies available for the correct project. What to copy depends on your needs, but I always copy these folders/files from the server to have it steady structured folder per AppWorks version:
1 | /opt/opentext/AppWorksPlatform/defaultInst/certificates |
What you do need to look out for are the .so files (Shared Object) in the ‘lib’; these are Linux dependent where Windows is using .dll (Direct Link Library). This post shows a trick how to find the same libraries for Windows!
How can we install them in our local Maven repository?
Now that we have our AppWorks dependencies locally available in a nice folder (with version) it’s time to install them in our local Maven repository. Let’s pick the so called ‘basicutil’ dependency to try it out. This dependent JAR can be found in this location of your copies folders: C:\Users\myaccount\appworks_libs\21.2\components\basicutil\basicutil.jar
Why this one? Because it’s a great “utilities” dependency which can be used in any AppWorks related Java project!
Now for the magic command to install this file in the local Maven repo:
1 | mvn install:install-file -Dfile=C:\Users\myaccount\appworks_libs\21.2\components\basicutil\basicutil.jar -DgroupId=com.cordys -DartifactId=basicutil -Dversion=21.2 -Dpackaging=jar |
After this command you will find it back in this location: C:\Users\myaccount\.m2\repository\com\cordys\basicutil\21.2
When you compare the command with the location, you can see exactly the matches, and the choices we made for certain values, but you are totally free to use your own structures! Sometimes it will help when you have a ‘look’ into the JAR with for example 7-Zip and see how the package structure is build up for the JAR and choose the values in the command based on that input.
Well, now you also know this trick for installing an external dependency into your own repository, and you probably get the trick how to install other dependencies too. Time to do this for all the other libraries in your folder structure… 🤣🤣
NOOOOO…Don’t…It’s a JOKE! We only install the dependency required for our project at that moment in time. Maybe you’re the lucky one who already installed some libraries this way from other previous projects…Yeah!…Then you don’t install them again (duh!), but just point to them from the pom.xml in the ‘dependencies’ section (see also the next step!)
IDE setup (and some coding)
Now that we have more insight on the required dependencies, it’s time to start a brand-new maven project! As I normally develop in a tool call ‘IntelliJ’, I just show you how to start from this standpoint. Other IDEs are available like ‘Eclipse’ and ‘VSCode (with Java Extension Pack)’. We could even start from the command line to create a new Maven project, but eventually you want to build your project as easy as possible, and an IDE is a great help for it.
So, let’s download IntelliJ IDEA (for this post you can just use the free ‘Community’ edition). Once installed and started, you have the option on the start screen to create a new project. Hit the button which start a new wizard:

Make sure you select ‘Maven’, and also make sure you use a project Java SDK which is equal to the Java version used by our AppWorks platform!
Always develop with the same Java version which is used by de AppWorks platform! On our VM we can do a double check with
java --version. If it does not match, make sure to first install the correct Java version on your local machine with the IDE is running for your coding.
When ready, we can click the ‘Next’ button.

Fill-in the fields like this (you can use your own ‘GroupId’) and click ‘Finish’. You will end up with something like this:
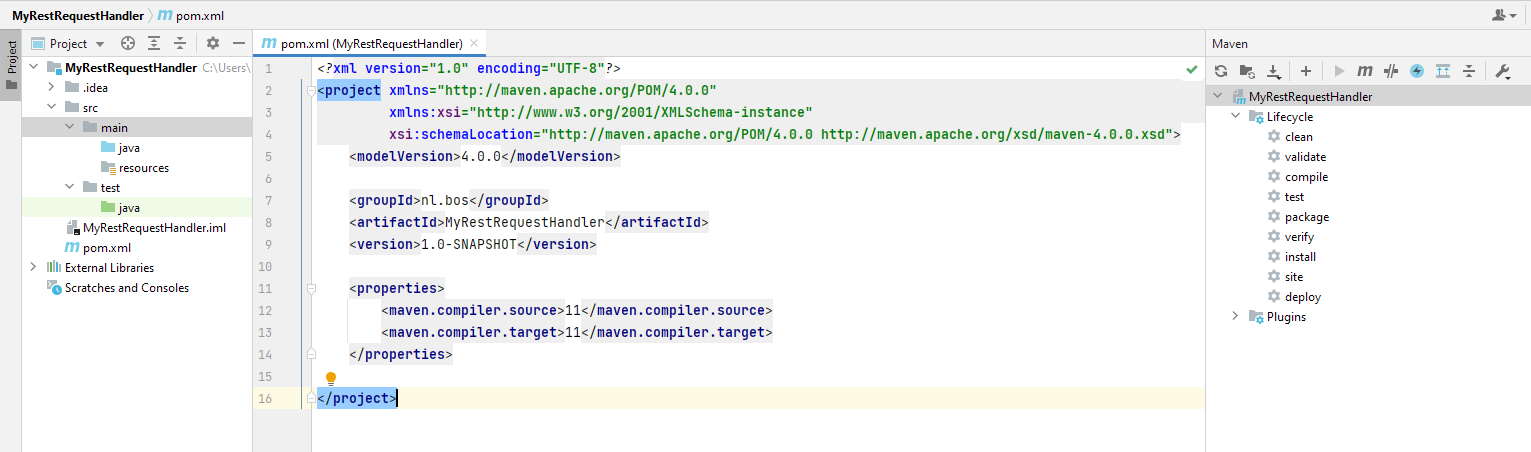
The ‘pom.xml’ file is opened by default and as we learned, this is the place to add our AppWorks specific dependencies for the Maven project! So, let’s add the previous installed basicutils dependency. Just copy the XML sniped below the ‘properties’ element:
1 | <dependencies> |
Now, reload your Maven project, and you should see our first dependency made available for this project:

We can do the same trick for some other dependencies…The one we want to extend from! The httpconnector and two other most common dependencies: managementlib and esbclient…Like this:
1 | <dependency> |
Reload Maven again, and you’ll be fine (if the dependencies are installed with the maven command as described before!).
Time for our first class…
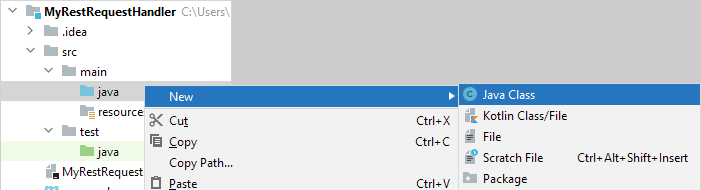
Give it the name MyRestRequestHandler and hit <Enter>. You end up with a new Java class where we add the package package nl.bos.http;, so we are in line with all our other logic. You might get a red error for the ‘package’, but the power of IntelliJ can solve this with <Alt>+<Enter> where we can select to move the class in the correct package structure:
Before:
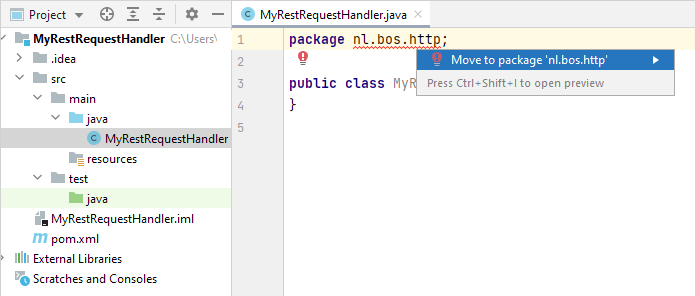
After:

Add some extension to our class…
The below example code does an extension of the RestRequestHandler object which is part of the httpconnector dependency. We add a logging object for later usage, and we override the process() method, so we can do our own thing in it! In IntelliJ, you can use the <Alt>+<Insert> while standing on the correct line number to insert ‘override’ methods from the extended class. The 1.0 version will look like this:
1 | package nl.bos.http; |
Notes:
The
Identityobject in the method parameter is retrieved from theesbclientdependencyThe
CordysLoggerobject in the field constant ‘LOG’ is retrieved from themanagementlibdependency. Or is it not a constant field?
Some implementation in the ‘process’ method…
1 |
|
For this 1.0 extension, we just log some more parameter information at debug level…
Version 1.1 however goes 1 step further by also manipulating the returning HttpObject of the process method…Check this piece of code:
1 | HttpObject process = super.process(requestNode, connection, identity); |
This replaces line:
return super.process(requestNode, connection, identity);
Version 1.1 is ready for a deployment. Download my project from here.
From an IntelliJ standpoint, we can trigger a so-called Maven ‘clean & package’. This converts our code into a JAR file and will also trigger (optional) unit tests (if written), but that’s another story! Later on, we will upload our Java code into AppWorks, and we will generate that same JAR from our beloved project on the AppWorks platform…Keep on reading! 😁
Craftsmanship of the Utilities project
Back to our workspace in AppWorks. We already have one project available (in my case with name ‘generic’), but we’ll create another one called ‘utils’ with a nice folder structure like this:

Two things to watch out for:
- The ‘java’ folder has the option applied called ‘Start Point of Qualified name’. This makes sure our generated JAR file from the platform will land in the correct location on the server. In this case:
/opt/opentext/AppWorksPlatform/defaultInst/nl/bos/ - Also, make sure the package structure in the ‘src’ folder equals the package structure of our just written Java classes.
Now, we upload our Java class into the ‘http’ folder. Just right-click the folder and upload a document from the menu…Can’t be that hard!
After this we’ll create a new ‘Java Archive Definition’ document in the /java/nl/bos folder:
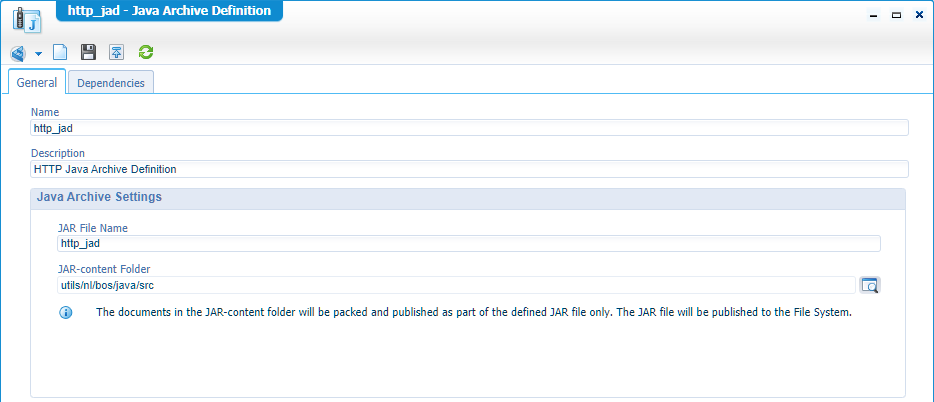
Make sure to point to the correct location of the content folder (our ‘src’). Next step is to go to the ‘Dependencies’ tab where we add the same dependencies as we provided in the POM file of our Maven-project within IntelliJ. You saw each dependency had an XML element called <scope>provided</scope> which tells us the dependency is already available outside Maven. That’s indeed correct and from this ‘Dependencies’ tab, we can just point directly to the “provided” JAR’s on the platform itself…How? Well, like this:
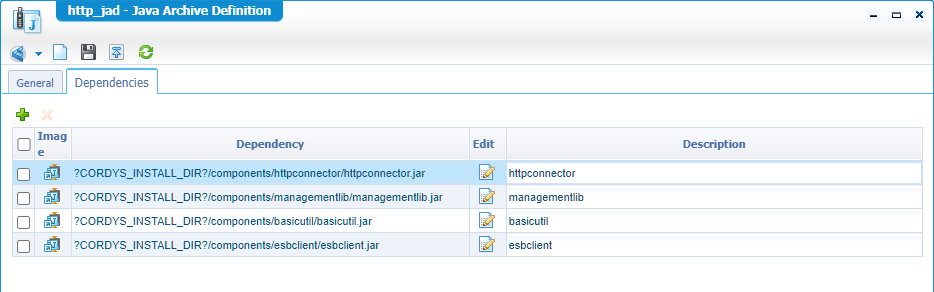
Time to save and have yourself a first publication of the JAD document. The result? Check the server on this location file: /opt/opentext/AppWorksPlatform/defaultInst/nl/bos/http_jad.jar
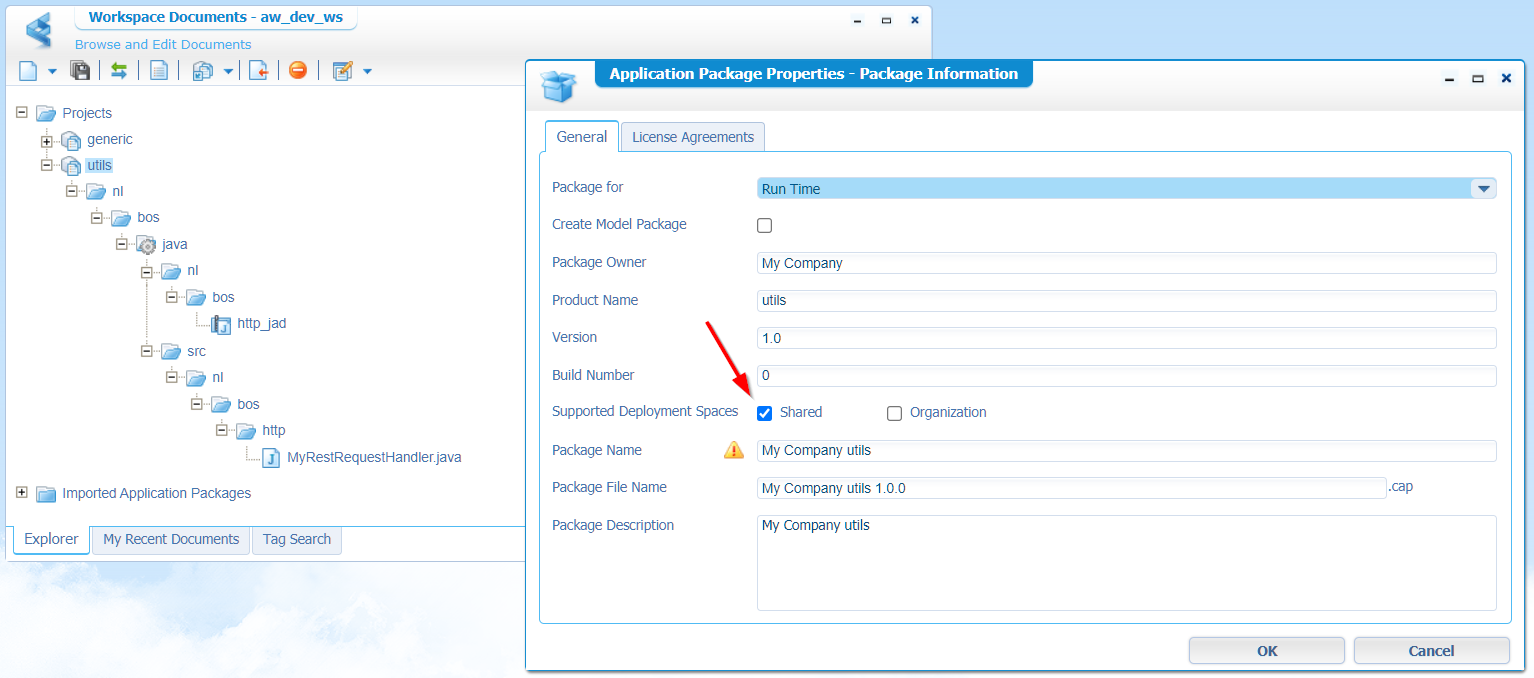
To get an answer to the greatest question of all!…Why do you create a separate “utils” project for just this JAR? Well, these kinds of JARS, but also other ‘shared’ content like specific “util” webservices for example, can now separately be deployed. By “deployed”, I mean deployed in the ‘Shared’ space of the platform, so all other projects and organizations can make use of it. This was a value TIP! from OT professional services and that’s why I also share this knowledge with you.
Another tip: Keep “entity” projects in the ‘organization’ space because customizing “Identity” entities can only be done in the ‘organization’ space!
How to deploy it in ‘Shared’? Well, that’s an option in the package properties (to be found in the context menu of any project):
Update the webservice and HTTP service container
Our ‘utils’ project is ready to be consumed! Let’s get back to our webservice in the ‘generic’ project and just double-click the ‘hello’ service, so we can update the implementation XML with a change in the ‘request-handler’ element:
This line:
<request-handler class="com.opentext.applicationconnector.httpconnector.impl.RestRequestHandler">Will be this:
<request-handler class="nl.bos.http.MyRestRequestHandler">
Save the service and republish it. Now test it again…
Sometimes I also need to do a “clean build output” on the project and republish again to find the latest changes (just for you to know!)
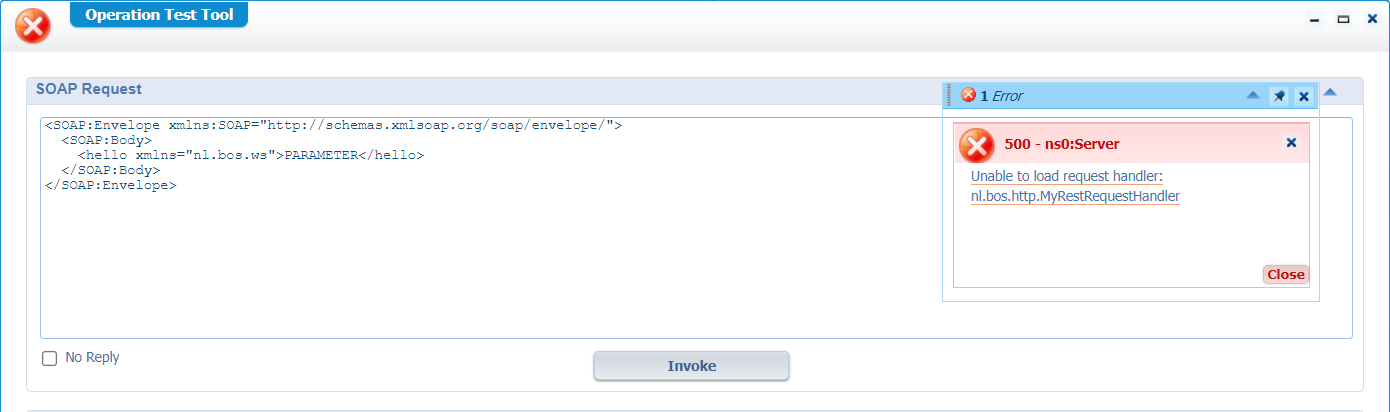
Exactly…Our new class cannot be found!
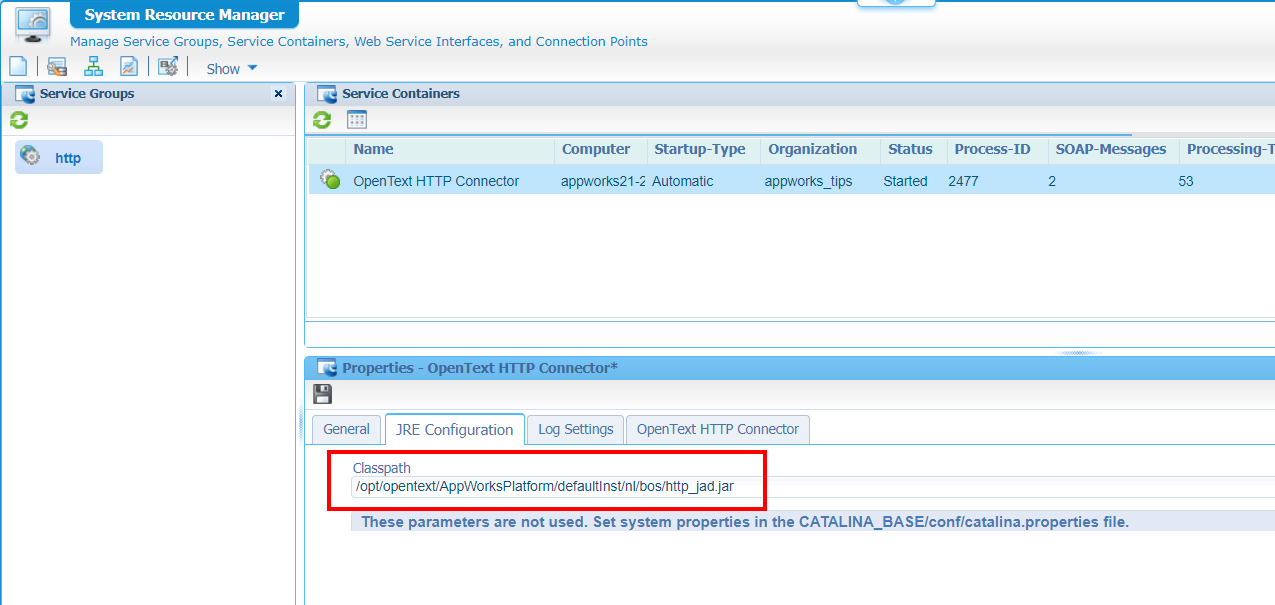
Let’s fix this issue by adding our ‘http_jad.jar’ to the classpath of our HTTP service container. This service container is responsible for executing the call, and we have the possibility to add our own code on the classpath of this container:
Notes:
For you to copy:
/opt/opentext/AppWorksPlatform/defaultInst/nl/bos/http_jad.jarI also tried this, but for some reason it’s not picking up the variable:
?CORDYS_INSTALL_DIR?/nl/bos/http_jad.jarYou also see a red flag ‘These parameters are not used…’. This message is shown when the service container is related to the TomEE appserver in the general tab. Keep in mind that the ‘classpath’ option is still a valid option to use in this case. I also assumed only the classpath of the TomEE appserver was leading here, and we were supposed to place it on the classpath of TomEE directly. This is NOT a valid conclusion. The classpath of the service container is a kind of extension of the TomEE classpath, so place your custom jars on the classpath of the service container. I guess internally, a service container will run in some separate thread on TomEE with an internal classloader, but I talk a bit out of my scope on this conclusion! Let me know in the comments if I completely miss the mark here. In other words: Those parameters-not-being-used-flag is just for the parameters below the that message!
Save the service container and restart TomEE systemctl restart tomee on the VM (because it’s connected to it!)
Time for a retest…This should give you a green flag again. ✅
In the code we do some fancy stuff with ‘Authorization’, but for our end-point it doesn’t matter as it’s a public available API, but if your end-point requires some kind of authentication header in the request; you now know how to pass it through…
Remote debug your customization
When &^*%$# starts to happen, it’s also great to know how we can debug our custom code. As our HTTP service container is responsible for the request and because it’s running under the hood of our TomEE webserver, we need to make sure our TomEE is running in “Debug” mode. Execute these steps on the VM:
systemctl stop tomeeexport JPDA_ADDRESS="192.168.56.107:8000"sudo JPDA_ADDRESS=$JPDA_ADDRESS sh /opt/tomee/apache-tomee-plus-8.0.6/bin/catalina.sh jpda run
When it’s up and running again we can create a new ‘remote debugging’ connection from within IntelliJ:

This is an overview of what I currently see when I start my remote debug configuration, with that breakpoint in the ‘process’ method:

So, we’re listening here…Time to trigger our webservice again, and you will see your IntelliJ breaks in on your breakpoint! Use <F8> to jump through the code.
Find your logging
OK, if you made it this far you probably noticed, our code jump-through during remote debugging, isn’t picking up the ‘debug’ statements…correct? Well, this is because we need to raise the log-level for the platform, more specific our HTTP service connector, and even more specific our nl.bos.http package! So, 2 ways (where we’ll use the second most specific way!)
First approach: Log level on the HTTP service container.

Enable debug on ‘Root severity’ and set the rest back to ‘Fatal’ (otherwise a lot is logged, and the logfile is getting bigger; incl. the database logging…if still enabled!…check this in the ‘Logger Consumers’ part in the screenshot!)
When DONE…Remove the ‘Debug’ level again!!
After this change, we can directly monitor the HTTP logfile:
sudo tail -999f /opt/opentext/AppWorksPlatform/defaultInst/Logs/appworks_tips#http#opentext_http_connector.xml | grep -A 3 -B 3 nl.bos.http
Where we’ll start to see this kind of output:
1 | <log4j:event logger="nl.bos.http.MyRestRequestHandler" timestamp="1624618530327" level="DEBUG" thread="http-nio-8080-exec-1"> |
Second approach: Log level in the config file: /config/Log4JConfiguration.xml
If you would like to be more specific, and only log debug statement in the ‘nl.bos’ package/namespace, we make sure to place an entry in the log configuration file:
sudo vi /opt/opentext/AppWorksPlatform/defaultInst/config/Log4jConfiguration.xml
Add this category element after all the other elements:
1 | <category name="nl.bos"> |
After this change, we can directly monitor the application server logfile:
sudo tail -999f /opt/opentext/AppWorksPlatform/defaultInst/Logs/Application_Server.xml
Where we’ll start to see this kind of output:
1 | <log4j:event logger="nl.bos.http.MyRestRequestHandler" timestamp="1624619143740" time="2021-06-25T13:05:43.74+02:00" level="DEBUG" thread="http-nio-8080-exec-5"> |
Almost the same, but another logfile. Only the advantage with this last approach is that all the other future customization will also be logged as long as the ‘live’ in the same ‘nl.bos’ package/namespace! 😍
…
For the smart people who paid attention might have notices that our for-loop in the code (on the ‘parameters’) isn’t sending anything into the logging!…Well, that’s because we didn’t apply any parameters in the connection configuration XML on the HTTP service container…Remember? The one saved in the XML store!
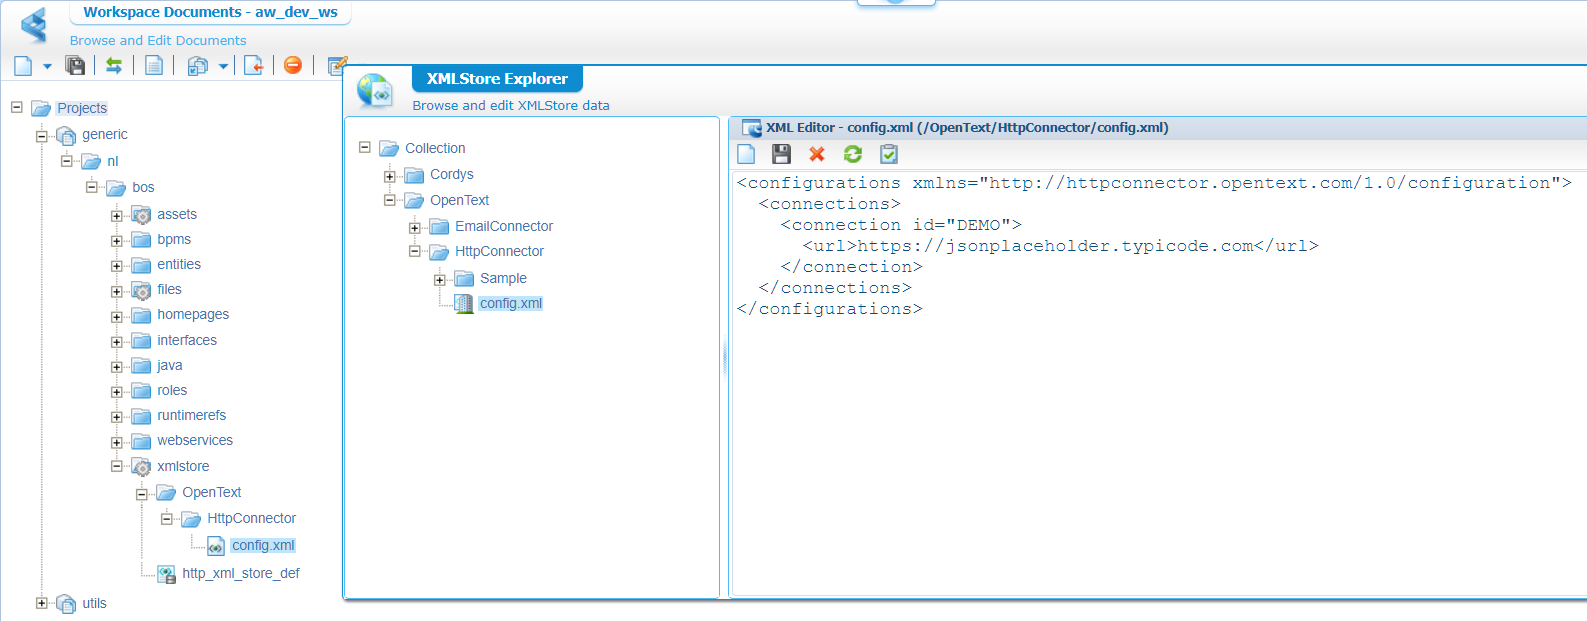
Let’s do a small update on the config XML in the connection element:
1 | <configurations xmlns="http://httpconnector.opentext.com/1.0/configuration"> |
After saving the config XML, we need to publish it, so it’s available again in the XML store.
Once ready, we should be able to test the service again. This time we should see our parameters passing by in the logging:
1 | <log4j:event logger="nl.bos.http.MyRestRequestHandler" level="DEBUG" thread="http-nio-8080-exec-5"> |
I didn’t try it out, but it should also be possible to do a “parameters” implementation like this. Which makes it more flexible:
2
3
4
5
6
7
8
9
10
11
12
13
14
15
16
17
<parameter>
<name>title</name>
<type>xpath</type>
<value>./title</value>
</parameter>
<parameter>
<name>body</name>
<type>xpath</type>
<value>./body</value>
</parameter>
<parameter>
<name>userId</name>
<type>xpath</type>
<value>./userId</value>
</parameter>
</parameters>To pass in the values you need to update the SOAP request with the correct elements like this:
2
3
4
5
6
7
8
9
<SOAP:Body>
<hello xmlns="nl.bos.ws">
<title>my_title</title>
<body>my_body</body>
<userId>my_user_id</userId>
</hello>
</SOAP:Body>
</SOAP:Envelope>
Bonus section: Read property files
Now that we’ve made it this far it might be an interesting thing to find out how we are able to read property files from within our extended code!? You can do this the ‘normal’ Java way, but what if I tell you there is a nice AppWorks way of doing it!?
Let’s update our class with a nice static block where we implement a property file read action (I just place it below the LOG field):
1 | static { |
The
EIBPropertiesobject in the method parameter is retrieved from thebasicutildependency
You can already see; we try to read a file called config.properties from this location on our VM /opt/opentext/AppWorksPlatform/defaultInst/nl/bos/config/
Alrighty then! How do we get that property file on that specific location? Well, the same way we upload that previously crafted JAR file from our workspace with a publication of the project. So, what we need to do is creating a new file config.properties and upload the document into our project. The location is pretty specific (like our JAR file was too):

My property file has this content:
1 | nl.bos.http.prop1=prop1_value |
After a publication it should land again on that server location…remember!?
Back to our code, as we would also like to read the real property value from our process() method:
1 | String prop1 = props.getProperty("nl.bos.http.prop1"); |
Now that our code is updated, we also need to upload it to our project again (in the ‘src’ directory structure). Once done, we can do a publication again, so our JAR gets regenerated and replaced on the server…Like before!
After this change we are required to restart the TomEE instance: systemctl restart tomee. Time to try it out (for yourself!)
Version 1.2 is ready for a deployment. Download my project from here.
There we go…A well-earned “DONE” I would say. We learned all about extending the default ReST request handler of our beloved platform. This information will for sure help you somewhere in the future when you have a specific requirement which doesn’t fit in the regular functionality. As a bonus, we even introduced you to the property file reading like the platform would like you to do it! So, great stuff again, and now you’re also prepared for these kinds of implementations in your own projects. Have a great development week-end, and I see you next week with another topic on AppWorks Tips.
Don’t forget to subscribe to get updates on the activities happening on this site. Have you noticed the quiz where you find out if you are also “The AppWorks guy”?
