
Hi there AppWorks fans,
Welcome to a new installment of AppWorks tips.
Today we (again) are going to create something nice! It all has to do with the UDDI connector and the SOAP calls to external systems it can handle for us. Why do we want to know this? Well because I faced an issue during my current job with the UDDI connector and wanted to fix it so I could continue with my life. The issue? Well, the UDDI connector can handle SOAP calls to external systems, but in some cases the default request is not sufficient (like a custom ‘Header’ element in my case)! To fix this there is a nice interface available that lets you implement/overrule your own peace of code. For UDDI this interface is called ‘Interceptor’. Let’s play with it…
But first the outline that we will create in this post
- Have a workspace and project available…duh! (and an account!…we have our ‘awdev’ account)
- Create some default folders in the project
- Make a Java class that implements the Interceptor
- Craft a ‘Java Archive Definition’ to compile the code to a class file and into a JAR file during publication
- Create the UDDI service group and service container
- With in the classpath our published JAR!
- Generate webservice from external WSDL file (that is our SOAP URL)
Simple steps and I walk you through it…
Let’s get right into it…
As always…spin up the machine with our AppWorks platform and enter your favorite workspace with your preferred user (with the developer role)
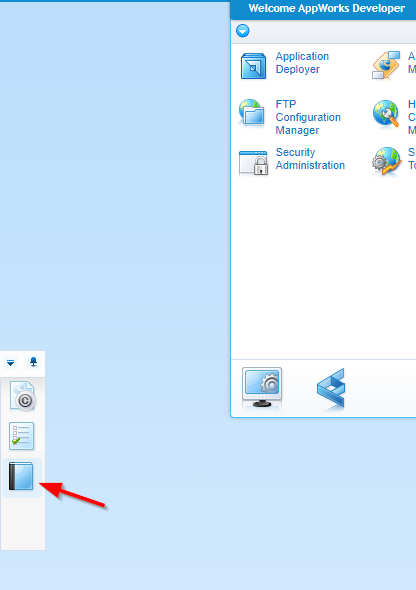
Let me first point you to some more documentation on this topic. From your AppWorks design time explorer take a look at the left small panel and click on the ‘documentation’ artifact.
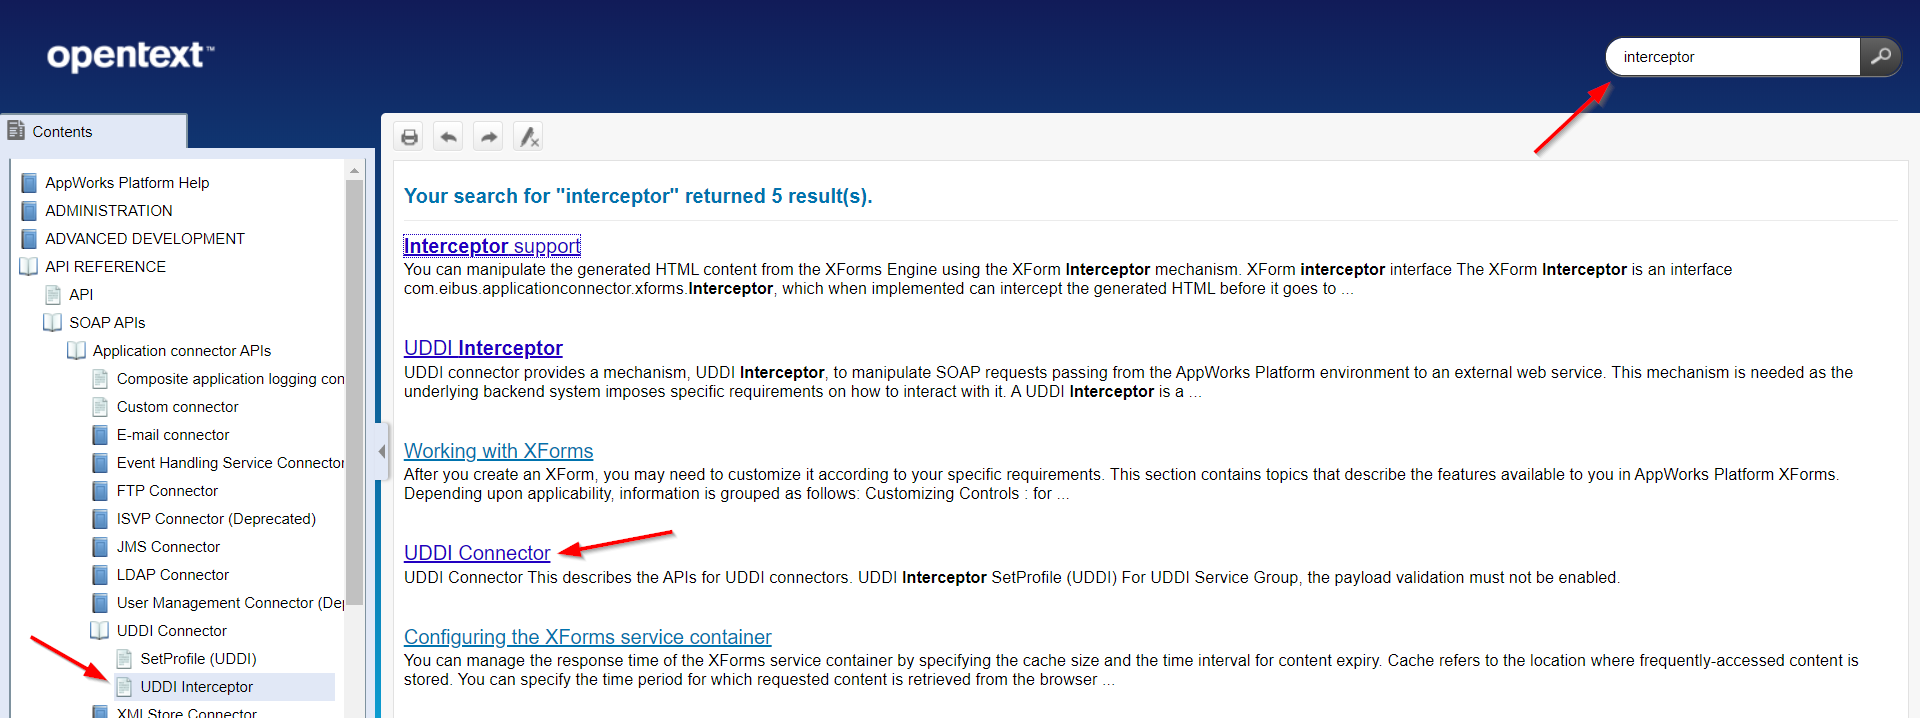
You get a new tab with the ‘User Help’ for the platform that is also fully searchable…great stuff, because when you search for ‘interceptor’ you get some more information about this topic (in theory). We’ll do a deep dive in practice! 😏
Let’s start with a basic folder structure for our project…
This is my starting point
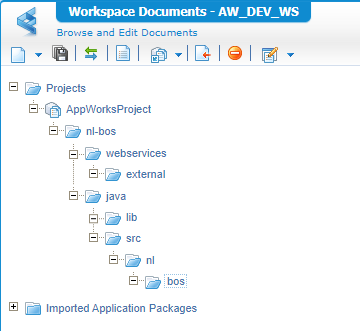
The ‘java’ folder should have the same layout with also the same folder names! This is because our code (in the next section) also uses the package ‘nl.bos’ for the class (keep that structure the same!)
Also the ‘lib’ directory is chosen wisely as it maps a directory on the server…you will see later on.
Next step…
Java implementation for the Interceptor interface
Now for some Java implementation…This is where we start with our favorite IDE. In my case IntelliJ, but also Eclipse is a great IDE. As long as you can scratch some code and compile it to a class file you’re fine.
Create a new Java project in that IDE and create a new Java source file in the package ‘nl.bos’. The start will look like this:
1 | package nl.bos; |
You will get an error that the interface can’t be found, but that is because we need some JAR library dependencies from the platform. For my project I added these dependent JAR files to the classpath of the project (some are extra for the functionality we use in our final result):
/opt/opentext/AppWorksPlatform/defaultInst/components/uddiconn/uddiconn.jar/opt/opentext/AppWorksPlatform/defaultInst/components/eibxml/eibxml.jar/opt/opentext/AppWorksPlatform/defaultInst/components/basicutil/basicutil.jar/opt/opentext/AppWorksPlatform/defaultInst/components/managementlib/managementlib.jar
The implementation of that Interceptor interface requires us to implement some required methods. In your IDE you can generate these methods with this end-result:
1 | package nl.bos; |
The final Java source file can be found here
We use some debug statements so we can later on do a remote debug session on this piece of code. We also played a bit with the header elements of the SOAP request as an example for the possibilities. When the ‘real call’ is done in the end of this post you’ll see that this is the order of method calls:
- initialize()
- onRequest()
- onHttpRequest()
- onHttpResponse()
- onResponse()
- onSOAPFault() - only when failed!
OK…code is ready…next step…
Let’s check the magic behind the “Java Archive Definition”
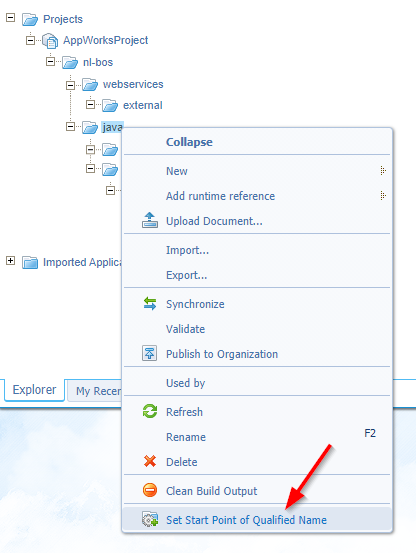
First things first…upload that crafted Java file as into the ‘src’ folder of our AppWorks project. Just right-click the ‘bos’ folder (deepest level in the package structure) and upload a new document; that’s our “MyInterceptor.java” file

Now make sure the ‘java’ folder is set as ‘Start Point of Qualified Name’
What does this setting do?…A valid question!…With a real simple answer!
Further in this post we’ll generate a brand-new JAR library that we want to deploy somewhere and…
…without that setting it’s deployed in this location on the server: /opt/opentext/AppWorksPlatform/defaultInst/nl-bos/java/lib/Test Java Archive Definition.jar
…with that setting it’s deployed in this location on the server: /opt/opentext/AppWorksPlatform/defaultInst/lib/Test Java Archive Definition.jar
Both are valid locations, but the second one is nicer as that ‘lib’ directory is already available on the server which keeps your server clean and steady!
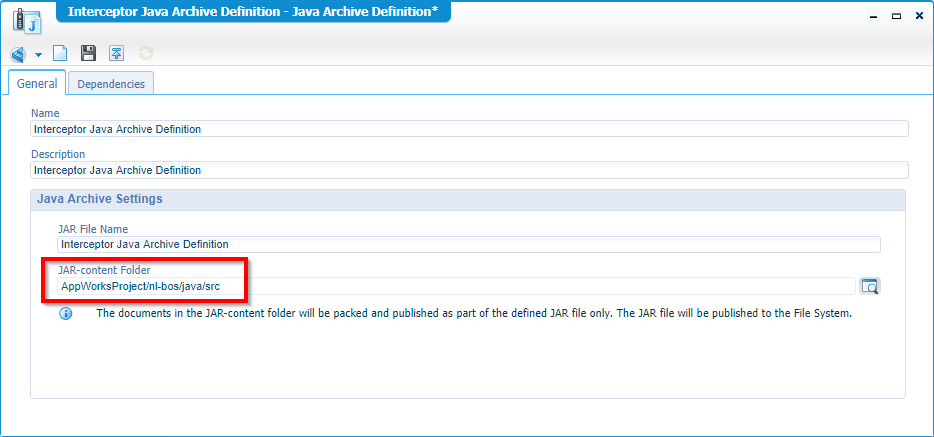
Next is the creation of our ‘Java Archive Definition’. We create that type of document in the ‘lib’ folder of our project! We’ll give it a name ‘Interceptor Java Archive Definition’ and we point the JAR-content Folder to that src folder: ‘AppWorksProject/nl-bos/java/src’
Open the ‘Dependencies’ tab as we are required to add the ‘uddicon.jar’ as dependent library. For that to happen we hit that green plus-sign where we can add a new ‘External java Archive’ with these settings:
- Name: uddiconn Java Archive Reference Dependency
- Path: ?CORDYS_INSTALL_DIR?/components/uddiconn/uddiconn.jar
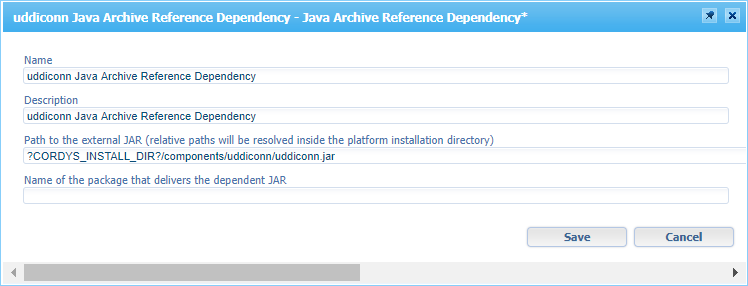
That ?CORDYS_INSTALL_DIR? is a variable you can use that point to the server location of the AppWorks platform
/opt/opentext/AppWorksPlatform/defaultInst(in my case)
Save this ‘Java Archive Definition’ and publish it. You can check the server for this location: /opt/opentext/AppWorksPlatform/defaultInst/lib/Interceptor Java Archive Definition.jar
Next…
Building the UDDI service group with corresponding service container
Real simple section…Open the ‘System Resource Manager’ artifact and create a new ‘Service Group’ that will start a new wizard you can follow…
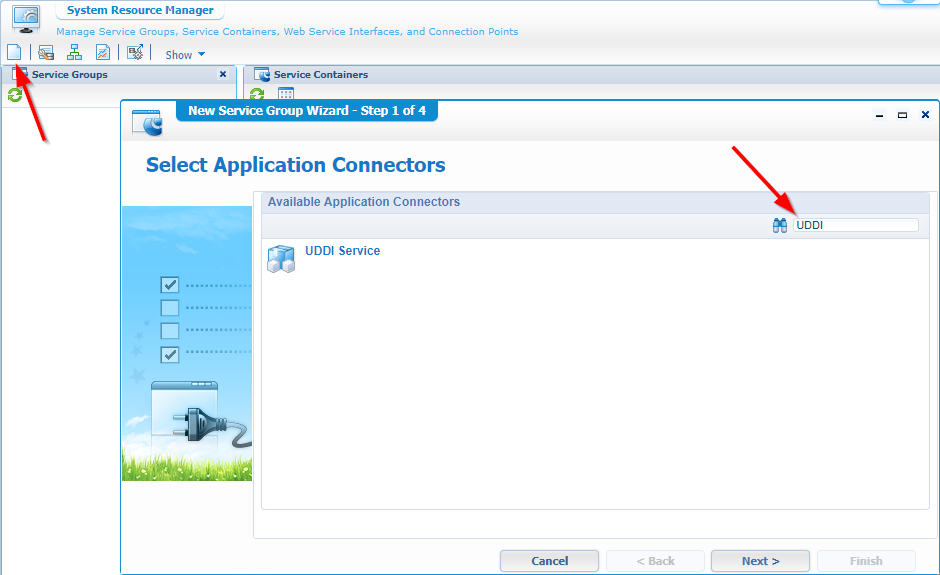
Select the ‘UDDI’ Service and hit ‘Next >’
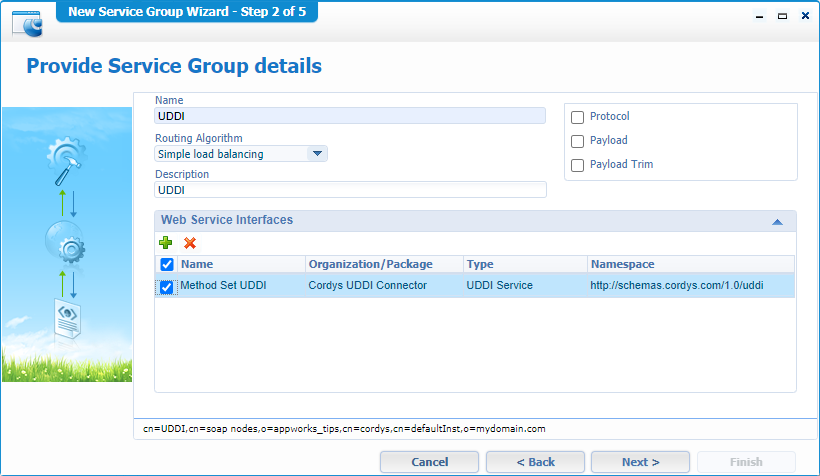
Give it a name like for example ‘UDDI’ and select at least one service interface…Click ‘Next >’
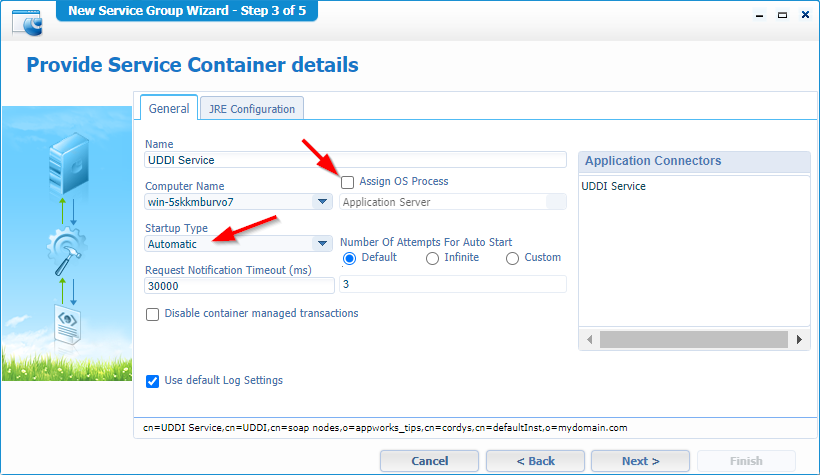
We make sure it’s starting up automatically and we let it run in its own JVM container (detached from the TomEE). It costs more resources, but I want you to show that also these JVM containers can be remotely debugged (like we debugged the EIS connector on TomEE with JPDA…remember that one?)
Click ‘Next >’ to continue that wizard
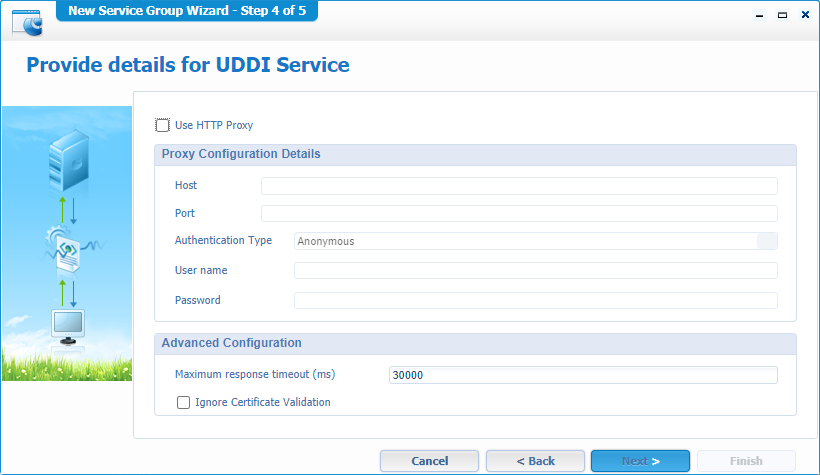
No need for a proxy…’Next >’

And just ‘Finish’ the job!
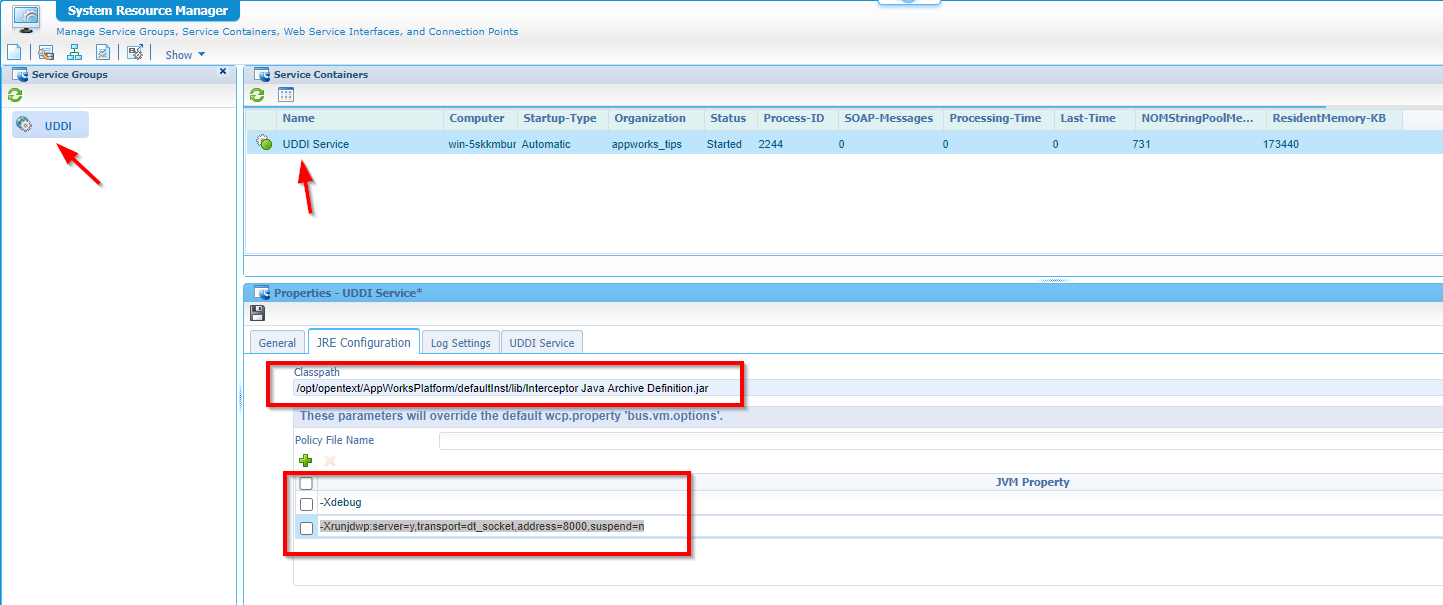
Now you have a new UDDI service group with also a corresponding ‘UDDI Service’ container…Get the properties of that service container and open the ‘JRE Configuration’ tab where you need to fill in our JAR location in the classpath variable /opt/opentext/AppWorksPlatform/defaultInst/lib/Interceptor Java Archive Definition.jar
I also tried
?CORDYS_INSTALL_DIR?/lib/Interceptor Java Archive Definition.jar, but was not working for some reason!?
And because we are already in this JRE tab…Let’s also add the remote debugging options for a separate JRE instance:
-Xdebug-Xrunjdwp:server=y,transport=dt_socket,address=8000,suspend=n
Maybe in your case you also need to add an IP address to that ‘address’ parameter. So, you get this:
192.168.56.107:8000
Your end result that you can save (and restarts the service so it shines that green light again!)
Ok, our platform can handle SOAP calls now and we can intercept them also…great!
Next…
Generate webservice from external WSDL
Make sure you have an external WSDL available somewhere in your network or in the world wide web (if accessible from your server!)
Some free sample services online:
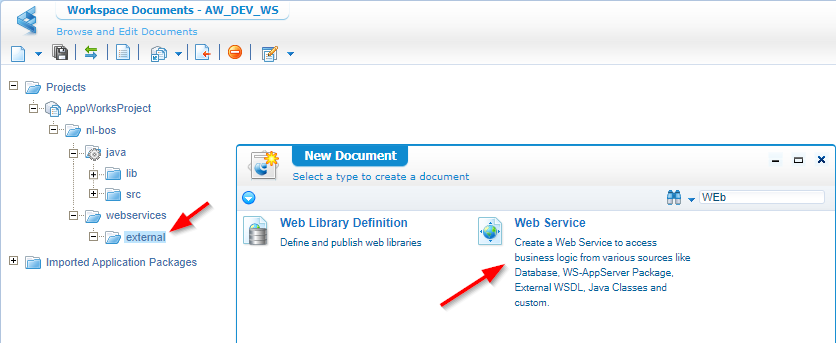
Right-click the ‘external’ subfolder for our webservice and create a new document of type ‘Web Service’
A small wizard starts with this start screen:
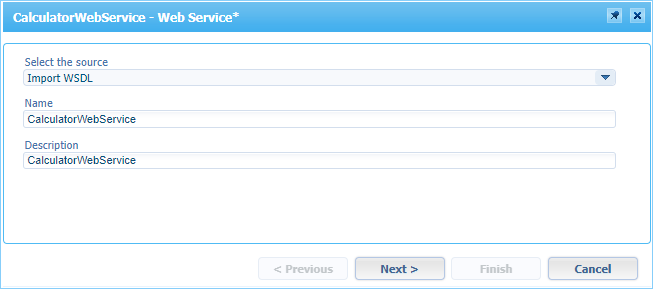
For the source choose ‘Import WSDL’ and give a nice name. We use the calculator WSDL from http://www.dneonline.com/calculator.asmx?wsdl
Hit ‘Next >’
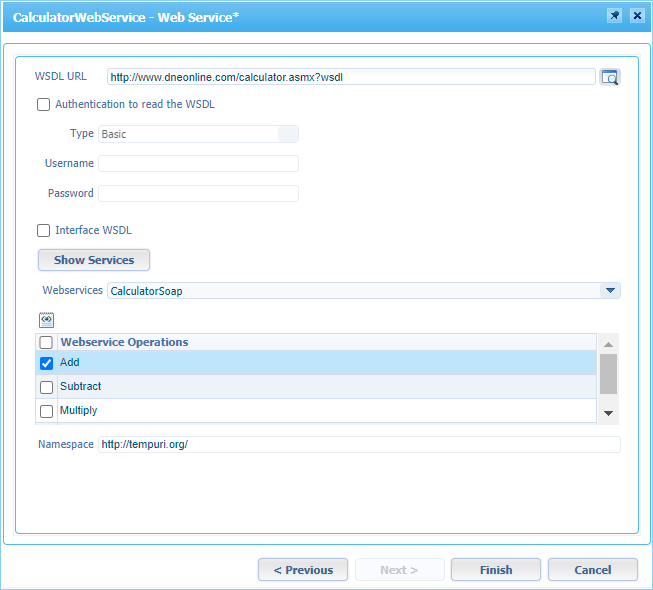
Enter the WSDL URL and retrieve the services with that ‘Show Services’. Select one service operation and click ‘Finish’
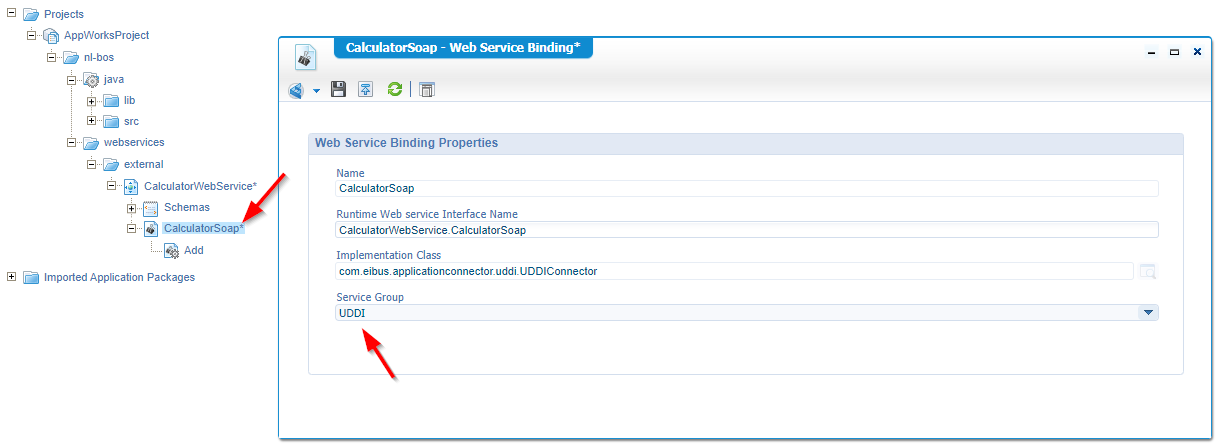
In your project you will now see a nicely generate webservice available in our project to consume from, but first we need to apply 2 things:
Double-click the ‘WeatherSoap’ and make sure you connect it to the UDDI service container
![interceptor_017]()
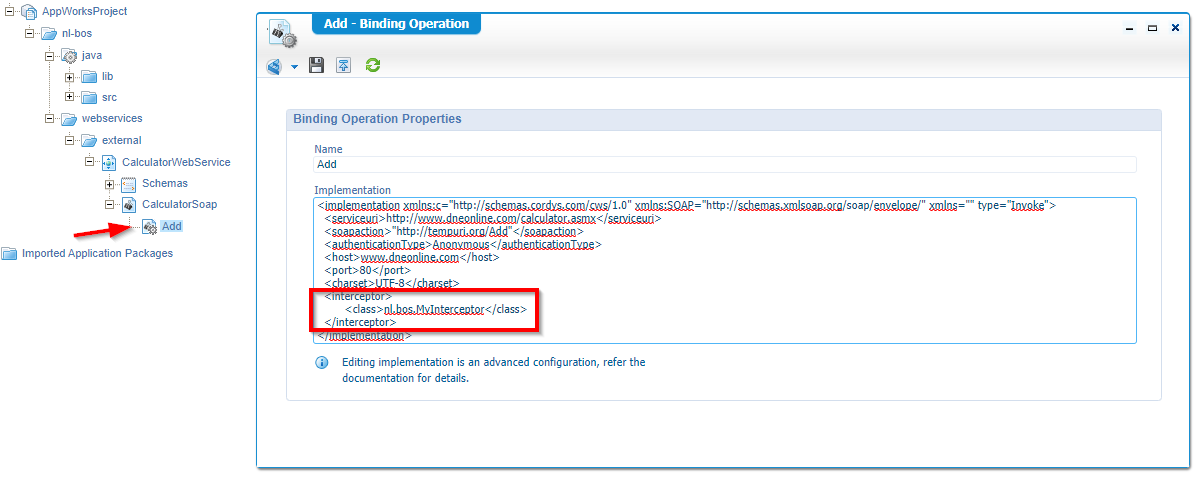
Add an interceptor element in the implementation XML
1
2
3<interceptor>
<class>nl.bos.MyInterceptor</class>
</interceptor>![interceptor_018]()
Save it all and publish the service so we can test it!
The Test
Right-click that ‘Add’ operation and click the ‘Test Web Service Operation’
Provide it with some input like this:
1 | <SOAP:Envelope> |
Invoke the service and check out the response!
1 | <data> |
Fine, but we still have our interceptor?…Well, check the next section…
Enable UDDI debug logging
Our code spits out all kind of debug statements so we just need to enable it to view some of this information in the logging of UDDI
From your MobaXTerm session edit this file: vi /opt/opentext/AppWorksPlatform/defaultInst/config/Log4jConfiguration.xml
And provide it with this element somewhere in the end
1 | <category name="nl.bos.MyInterceptor"> |
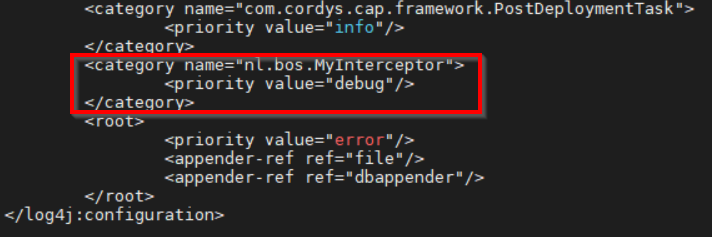
No restart is required; just start tailing the next log file on the server and see the magic passing by when you do a new ‘Invoke’ on your service call that we were testing with our ‘Operation Test Tool’.
tail -f /opt/opentext/AppWorksPlatform/defaultInst/Logs/appworks_tips#uddi#uddi_service.xml
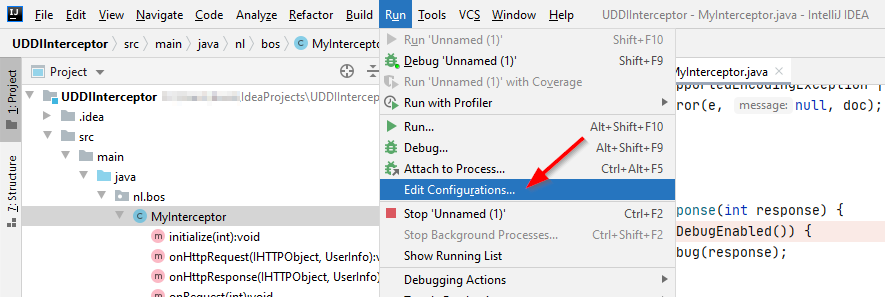
How to remote debug a non-process assigned service container?
Well, we already enabled the remote debug options on our UDDI service container with this string:
-Xdebug -Xrunjdwp:server=y,transport=dt_socket,address=192.168.56.107:8000,suspend=n
From my IDE (IntelliJ) I can now create a new ‘Run Configuration’
Add these settings in that configuration:
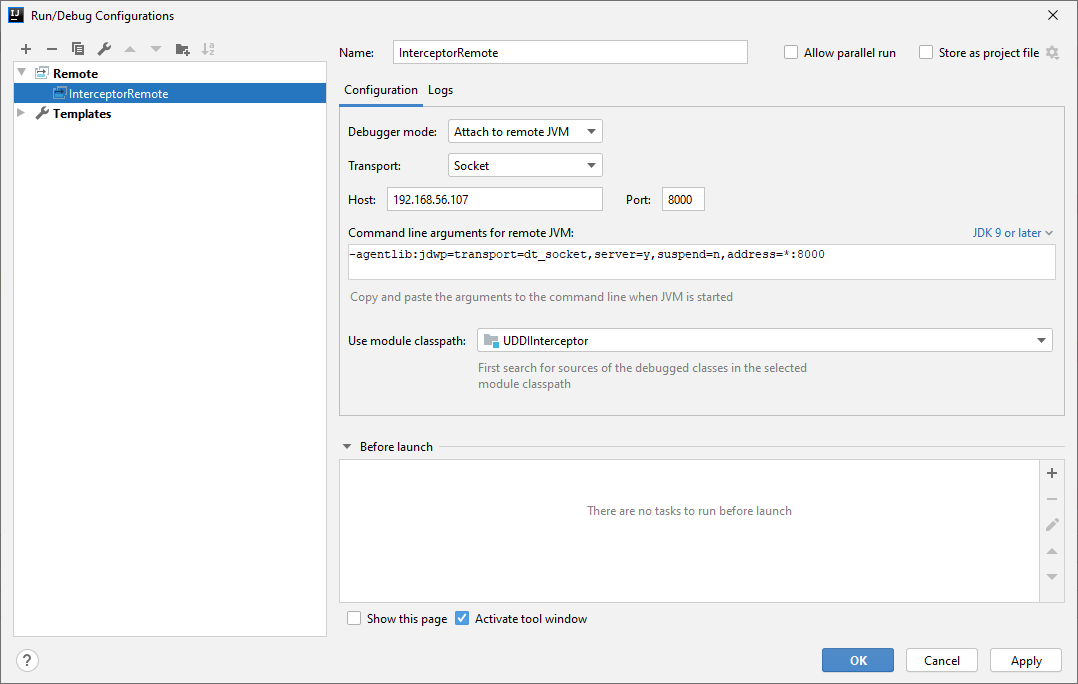
And after we saved this configuration we can start a new remote debug session

After some milliseconds you will also get the message in your IDE console that the connection is a fact

Now that the connection is in place it’s time to place some breakpoints in de code…
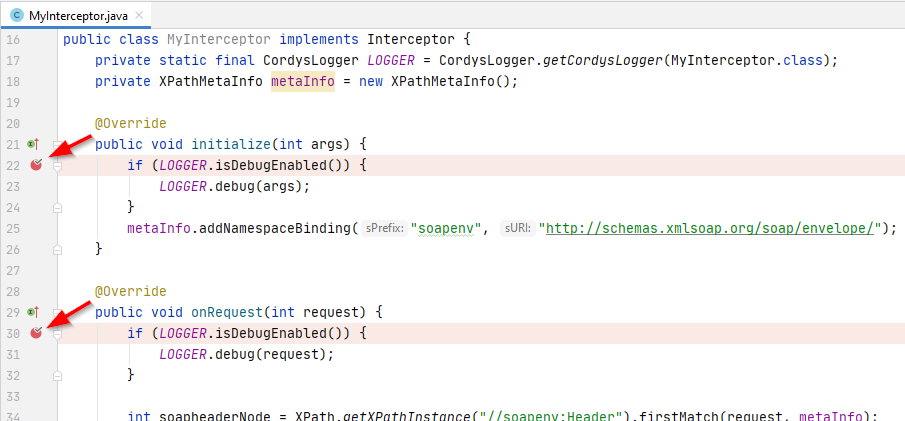
When these breakpoints are in place you’re ready to re-invoke the webservice operation from the ‘Operation Test Tool’ and you should see your remote session triggered and your IDE will highlight the code on your breakpoint…Isn’t that great stuff! 💪
Hell yeah!…Our “DONE”…And greatly earned too! We learned about intercepting an external SOAP call and how we can manipulate it. Always nice to know how to spoof data that is send over the line…And now you also know how to do it in a practical way. Have a great weekend and I see you in the next one.
Don’t forget to subscribe to get updates on the activities happening on this site. Have you noticed the quiz where you find out if you are also “The AppWorks guy”?
