
Hi there AppWorks fans,
Welcome to a new installment of AppWorks tips.
A new week, a new challenge, and a new experience…It stood long on my backlog, but this week we’re going to make the impossible, possible with a distributed installation of our beloved AppWorks platform! How hard can it be!? 🤣 Well, trust me…again blood, sweat, and tears; endless try-outs and a priceless help-line made it come to life!
Watch and learn…
Let’s get right into it…
Boot up your master 1 VM (VM_1 with IP ‘192.168.56.102’ and host ‘appworks.23.4.com’) from last week; Make sure its fully operational, and you can login into the regular UIs. After this we boot up the master 2 (VM_2 with IP ‘192.168.56.103’ and host ‘appworks_node2.23.4.com’). We only have TomEE and a second CARS instance available on this VM…Double-check with last week!
Before we continue we also verify the CARS/OpenLDAP connection (this should work for both VMs!):
1 | systemctl status cars-slapddefaultInst |
The ‘ldapsearch’ command must return the same value as they are in sync!
…
Before we can do the installation, we need to copy some data from the first master node to our second node. Login to VM_1 and download the following data to your local PC.
/opt/opentext/AppWorksPlatform/defaultInst/certificates/opt/opentext/AppWorksPlatform/defaultInst/config/wcp.properties
Save it all into one folder, so you have it like this (‘wcp.properties’ in the root):
AppWorksPlatformMasterConfig
certificates
keystoretruststorewcp.properties
After this download, we upload the content to our second VM_2 in an equal location: /opt/opentext/AppWorksPlatformMasterConfig
I also do a correction in permission: sudo chmod 777 -R /opt/opentext/AppWorksPlatformMasterConfig…Just to make sure!
…
With this checkup, we are ready for a second node AppWorks installation, and this is as simple as following my own installation post on AppWorks…With (like for CARS) some extra notes:
- Make sure the master is fully up and running (incl. the node 2 of CARS!)…Well, check! ✅
- Don’t forget to add the
postgresql-42.6.0.jaron the classpath (it’s described in the AppWorks installation post)! I forgot it as well…😣 - The distributed node will have its own TomEE…lucky we made a clone of our VM last week.
- No need to add any extra table spaces or databases; We point to the master Postgres database.
…
You can start the installer via:
1 | sudo CATALINA_HOME=$CATALINA_HOME CLASSPATH=$CLASSPATH ~/opentext-appworks-suite-23.4-linux/OpenTextAppWorksPlatform/OpenText_AppWorks_Platform_23.4.bin |
Follow the wizard; I only show you the differences in the installation steps:
LDAP Information
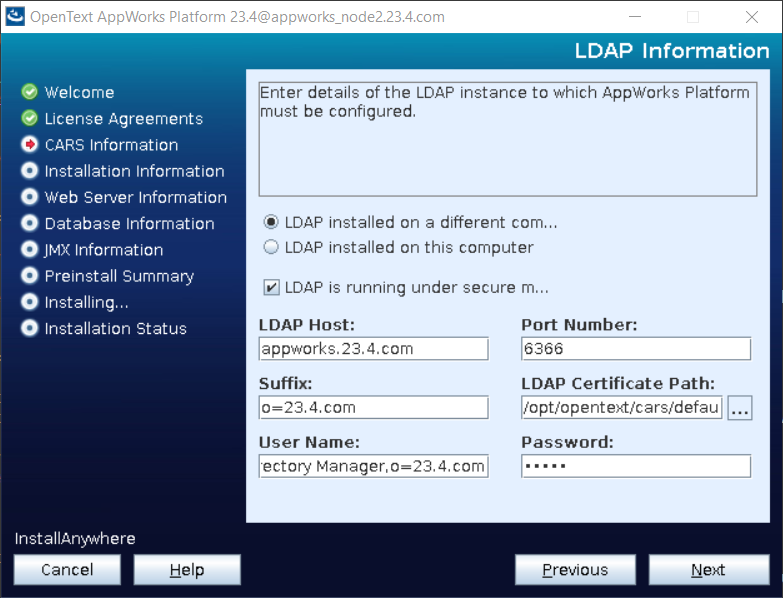
Notes:
- Point to the primary host
appworks.23.4.com- Username
cn=Directory Manager,o=23.4.comwhich we also saw during the ‘ldapsearch’ commands!- Certificates
/opt/opentext/cars/defaultInst/certificates; The master certificates were copied before
Instance information
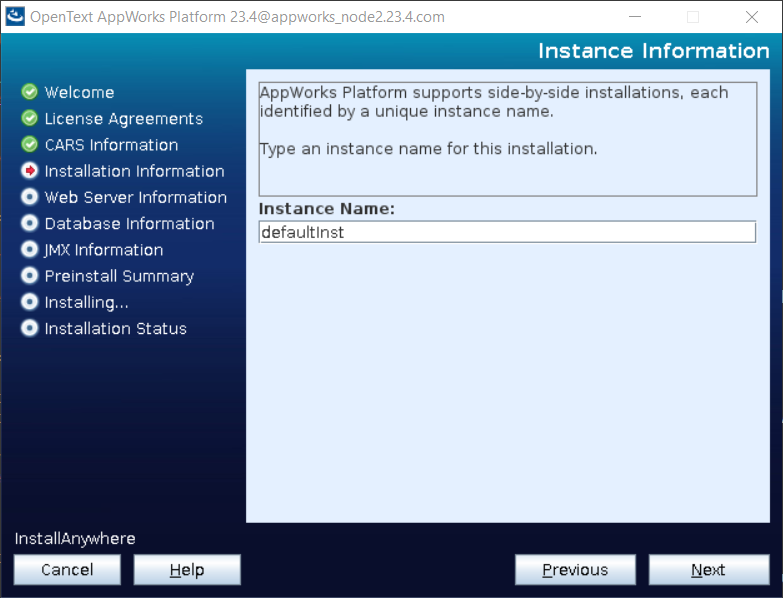
Use the SAME instance name as master 1:
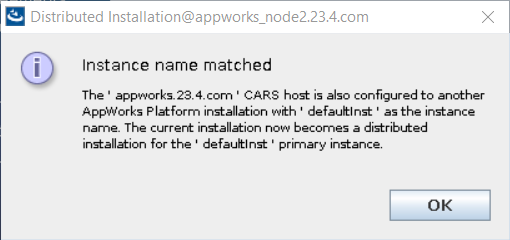
defaultInst; You should get a message called “Instance name matched” to get into distributed mode!
…
The documentation talks about “Distribution mode”. This is some magic flag, but you will not see it when you follow the regular UI wizard! It’s detected during the installation wizard when you provide the same instance name and point to the master CARS instance!
Primary Installation Files

Point to the folder we’ve just created above on our current second node.
Installation Folder
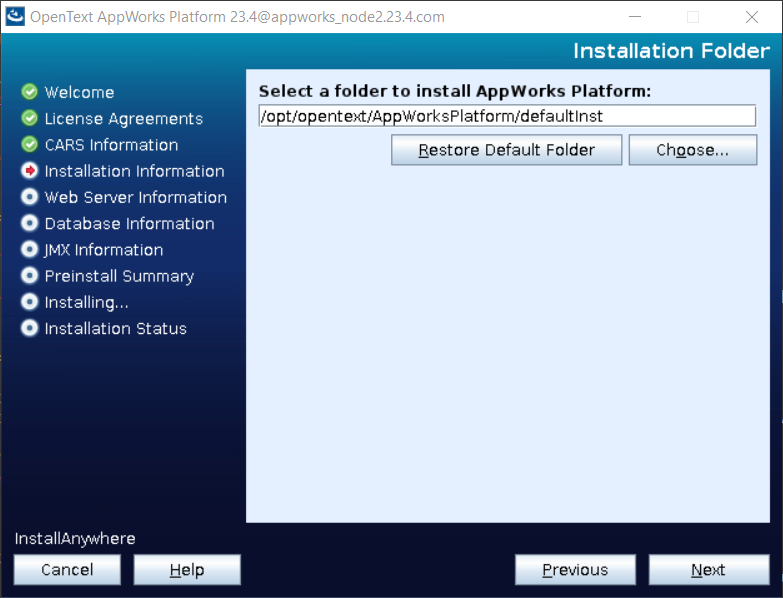
Keep it the same for consistency:
/opt/opentext/AppWorksPlatform/defaultInst
The rest of the wizard equals the primary node…Just follow it until you’re DONE:

Package deployment
With the second node in place, we now do the package installation of node 2 via URL: http://192.168.56.103:8080/cordys/wcp/cap/install?nodeName=appworks_node2
Use the sysadmin credentials when you’re prompted for a login.
After 30 sec. we get the first input screen to select our Data Source Object:
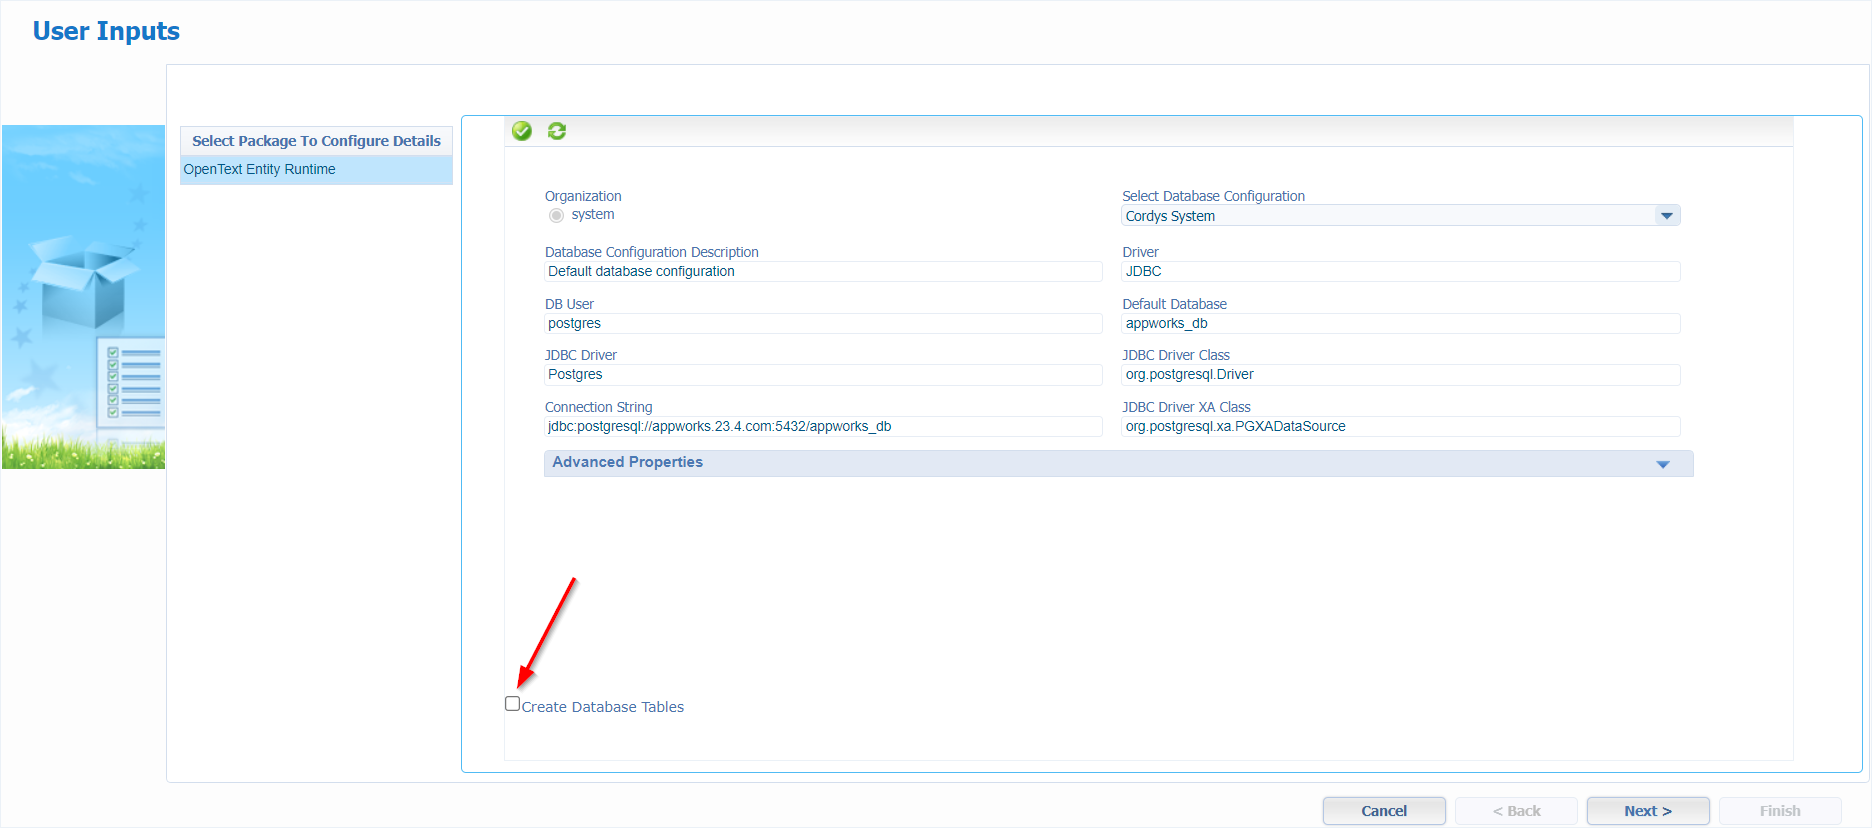
Select the Cordys Database as DSO, but…UNCHECK the creation of tables! We already have them from the primary/master node.
Click ‘Next >’
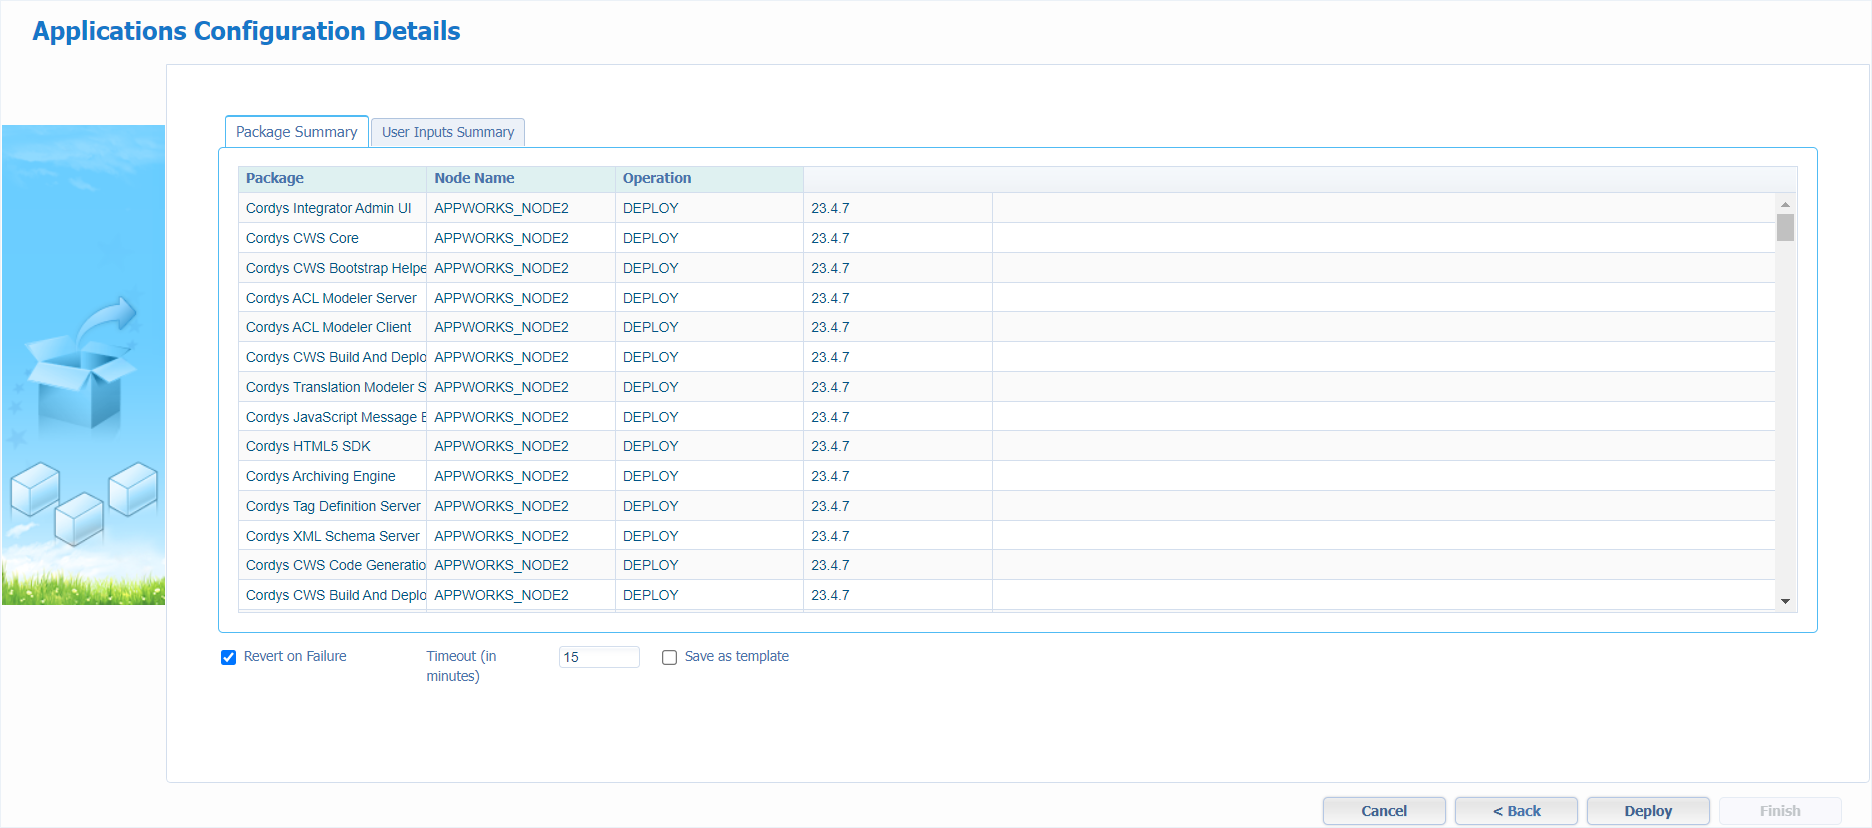
I do a “revert on failure” (I don’t know why…It just feels safe!?) and do a ‘Deploy’…
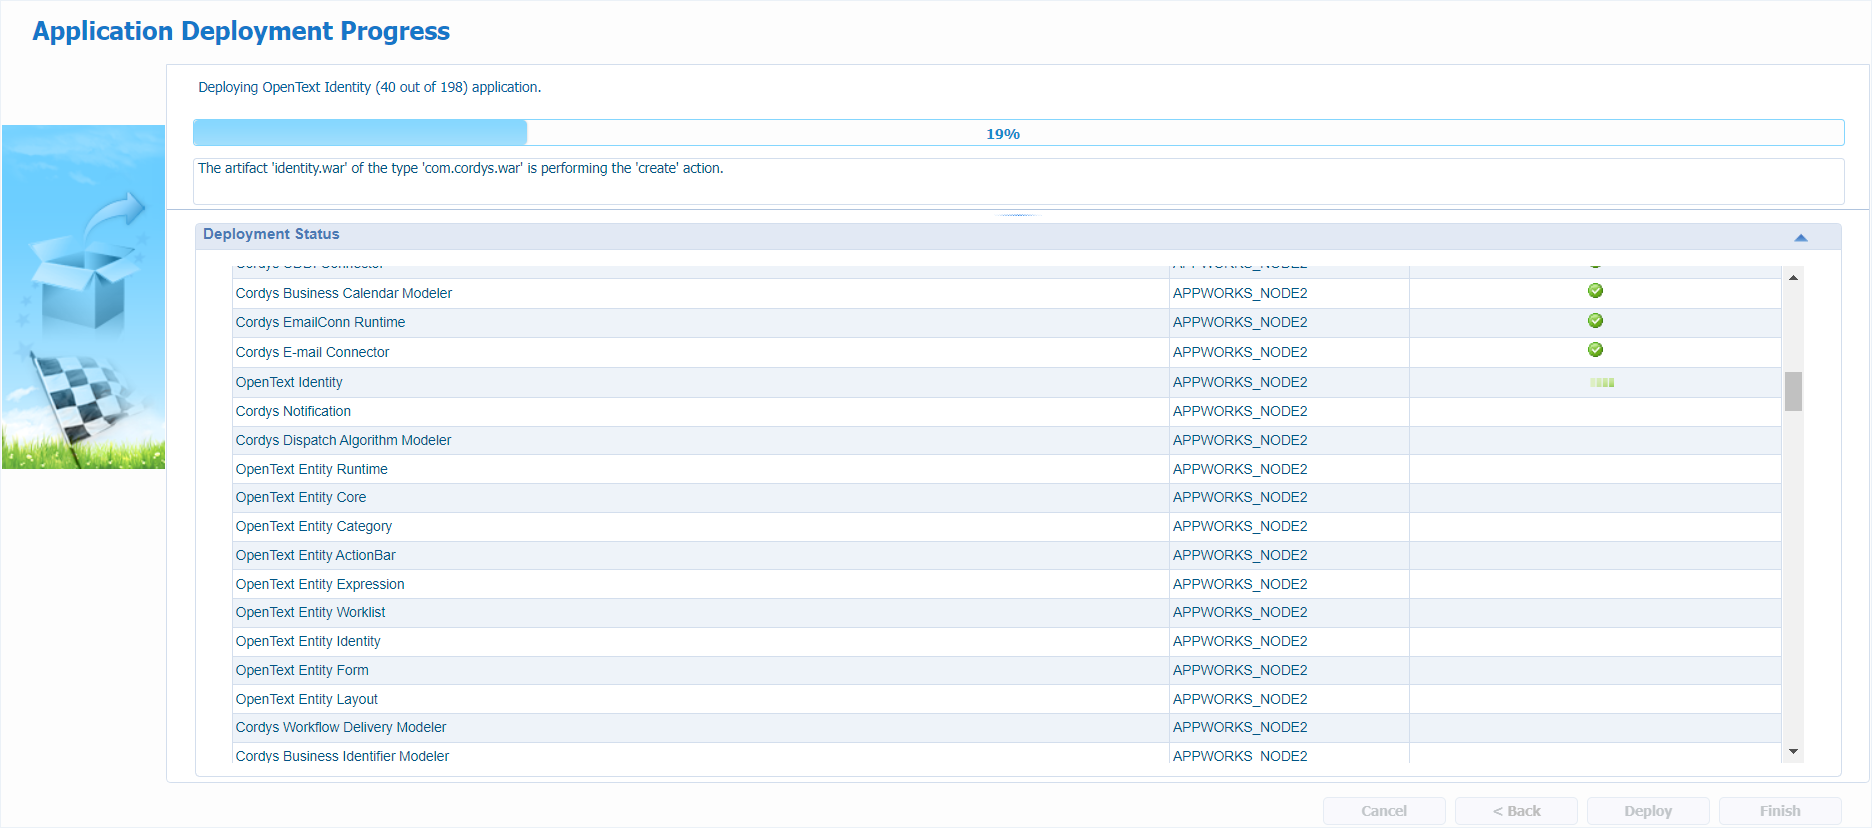
Time for a shower…🚿 (yes, it’s early morning when I started this post)
…
When all is deployed, you have access to your node (via the sysadmin account): http://192.168.56.103:8080/cordys
First have a look in the ‘System Resource Manager’; You now see a CAP- and monitor-service container twice:
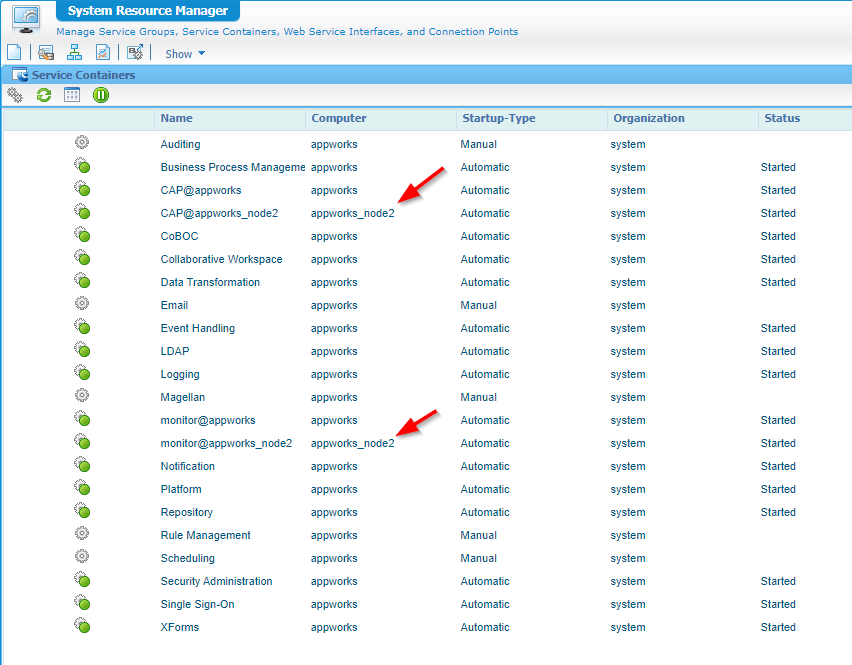
If you do any service container changes, I would do it from the primary/master node URL…Not 100% sure, but this “feels” better for some reason! It’s eventually saved in both synchronized CARS instances. So, we leave this instance as is and move to the master node: http://192.168.56.102:8080/home/system?authID=X
I add the
?authID=Xto by-pass the OTDS authentication!
Open the ‘System Resource Manager’ again and make a clone of the ‘LDAP’ service container (which is our CARS connector!)
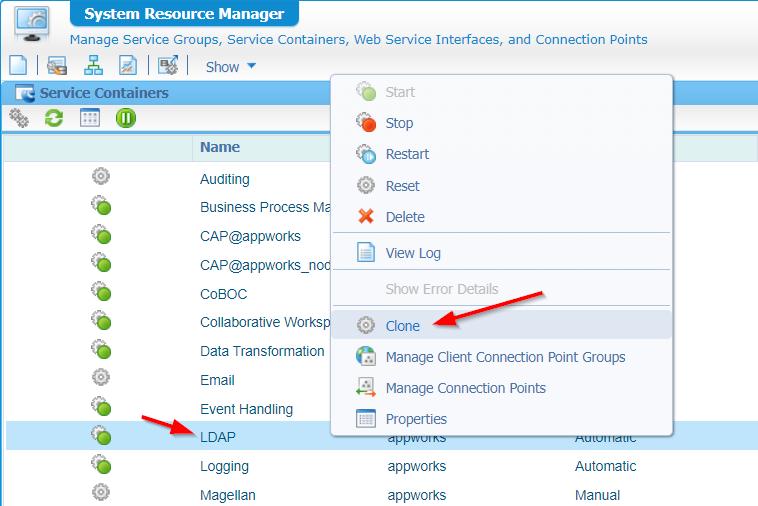
Fill the form with information:
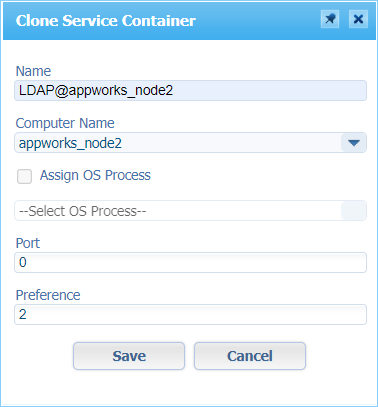
It’s fine to NOT connect it to the OS for now. After creation, get the properties and assign it to the OS Process…Don’t shoot the messenger here! 🤐
…
To finalize the LDAP configuration, we now need to start the ‘Cordys Management Console’ on the second node!
Login to the VM over MobaXTerm and start CMC: sh /opt/opentext/AppWorksPlatform/defaultInst/bin/cmc.sh
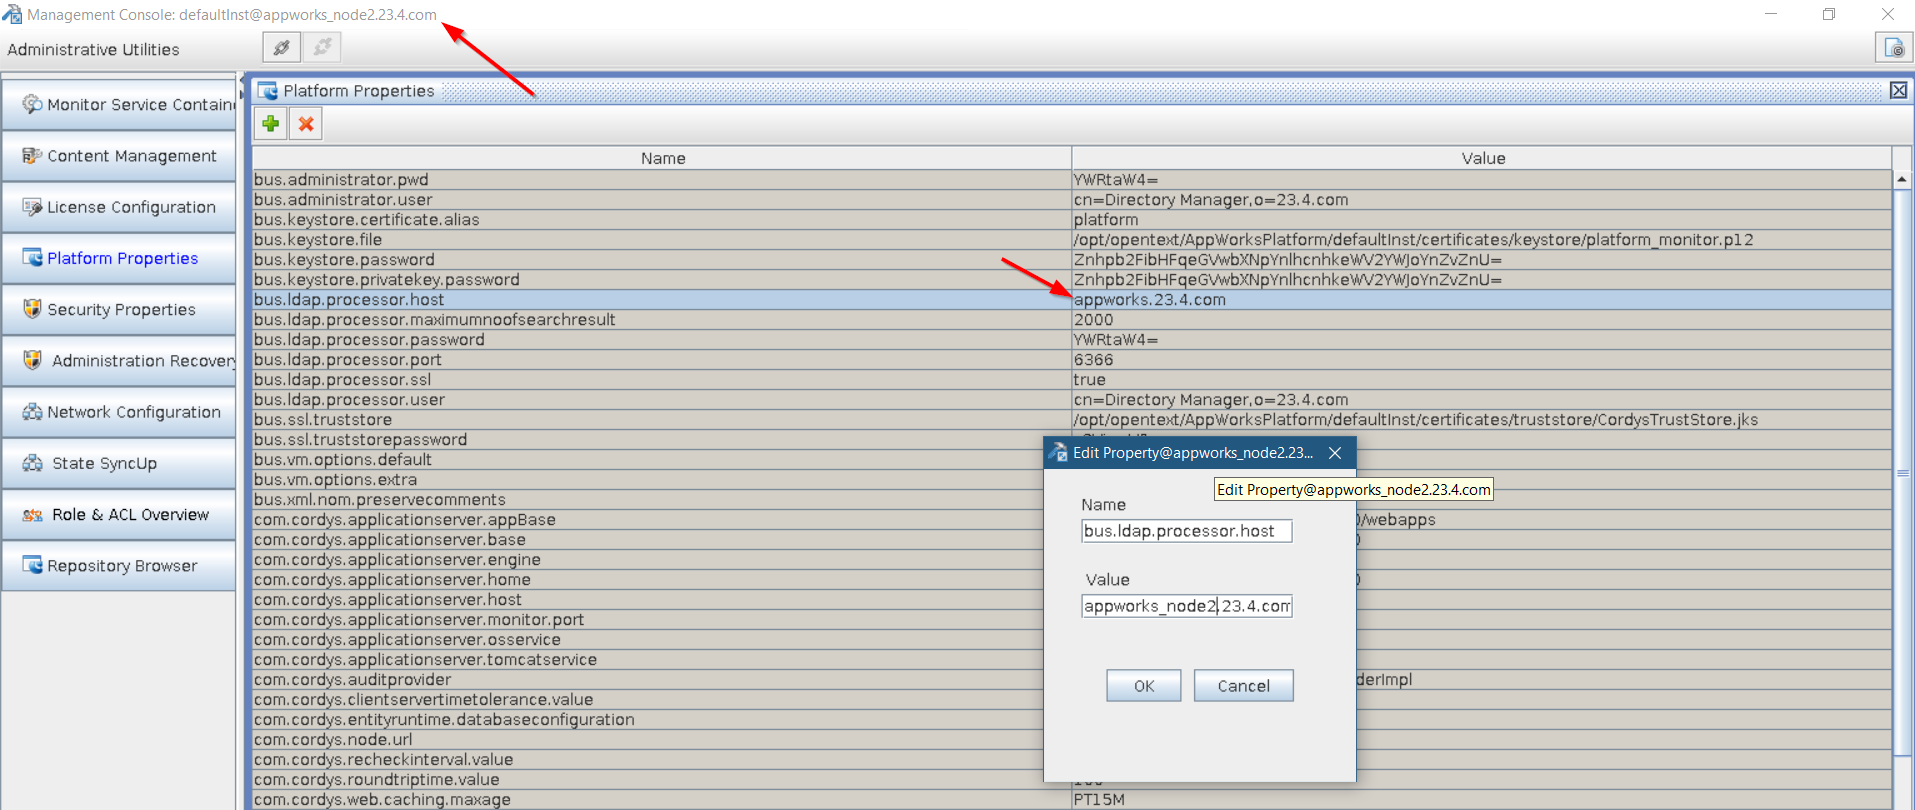
Double-check these 2 properties on availability as well (otherwise you need to add them!):

…
Back into AppWorks (master node 1) where you can now also play with the ‘Routing algorithm’ settings as explained in more details here:

…
Also, get back into the CMC tool as we can do a double-check on the so-called ‘State SyncUp’ section:

You can connect to this over your master node and over the secondary node; Both are in sync!
Looks like we’re ready for a Q/A…
Q/A section
One final question is left to answer; Can we login directly on the second node?
A login with sysadmin with non-OTDS over ?authID=X gives me 2 separate sessions. On both IP addresses, I can independently login and logout.
Now over OTDS!
When I go to http://192.168.56.103:8080/home/system, I get a forward to the OTDS login screen on http://192.168.56.102; Over OTDS, I can only login with my awdev account and I get an error:
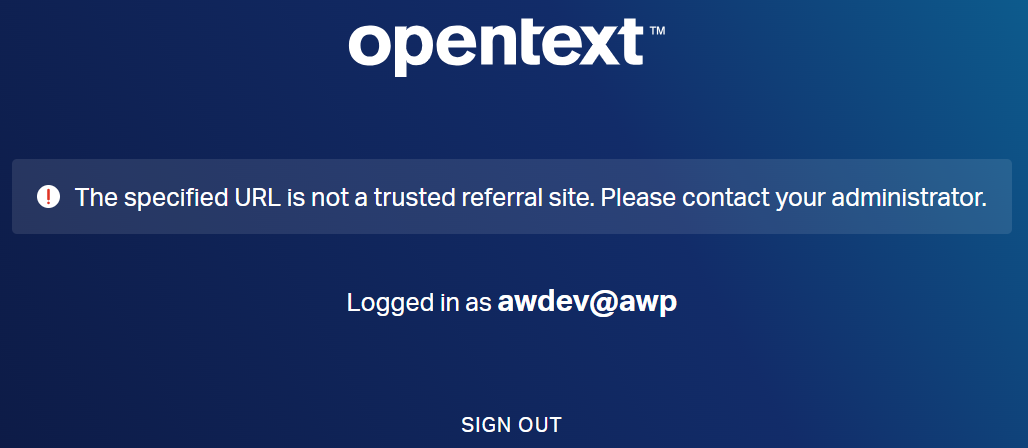
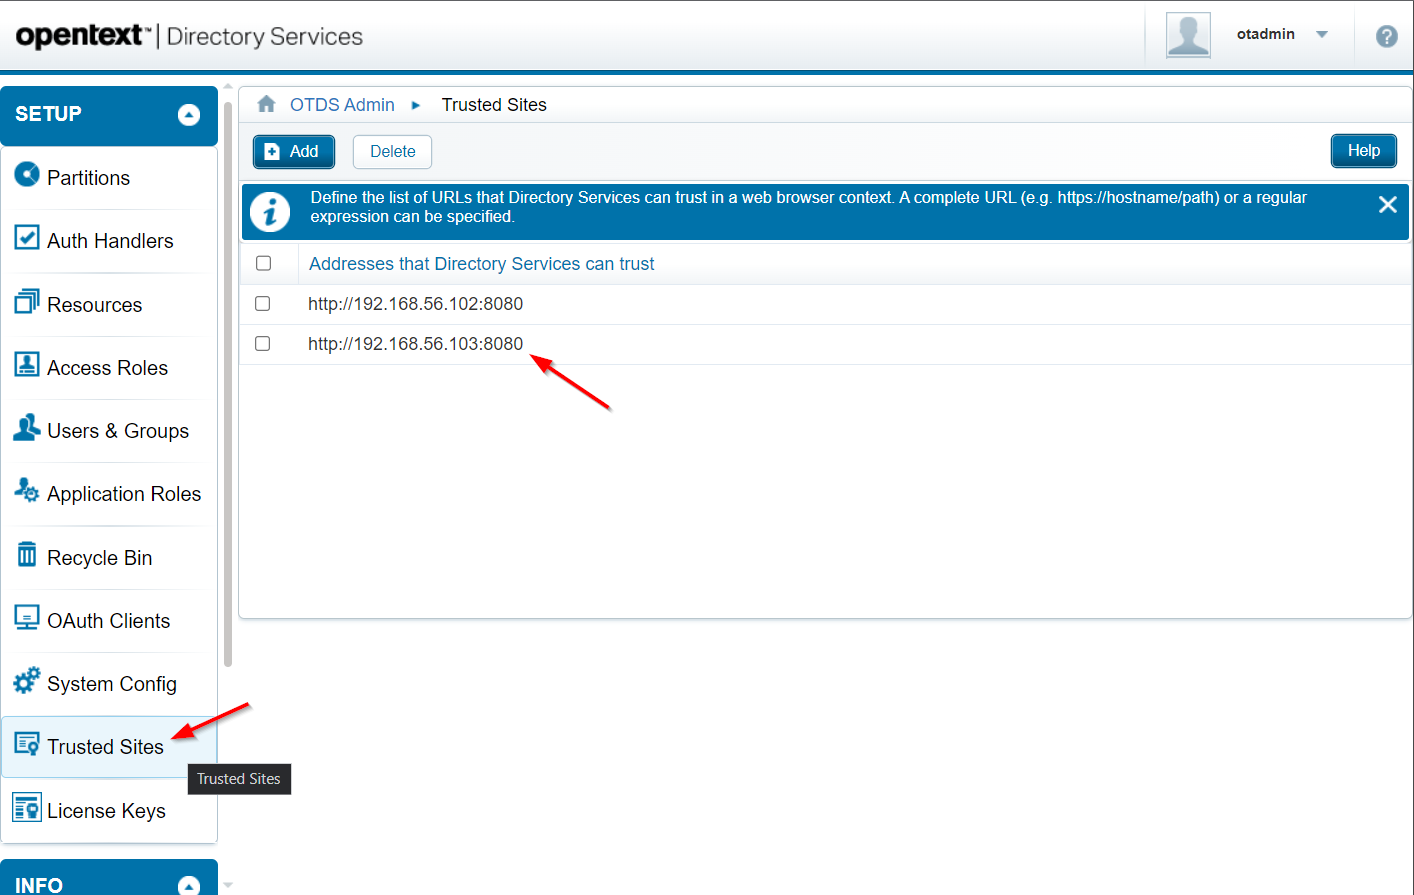
Sounds logic, and we can solve this in OTDS with the otadmin@otds.admin credentials over URL: http://192.168.56.102:8181/otds-admin
Under the ‘Trusted Sites’, we add our new instance URL:
Now what? Well, logout from it all (or use a new incognito tab) and do these steps:
- Go to VM_2:
http://192.168.56.103:8080/home/system(I could even start with:http://192.168.56.103:8080/home/appworks_tips) - I get forwarded to VM_1:
http://192.168.56.102:8181/otdsws/login - Login with the OTDS account
awdev - I can validly enter VM_2:
http://192.168.56.103:8080/home/appworks_tips - Switching to VM_1 via
http://192.168.56.102:8080/home/appworks_tipsis working smoothly as well (without extra login)!
NICEEEE! 😎
…
One extra question…How to shutdown? Well, I would shutdown node two first, and then I would shutdown node one. A start happens visa-versa; First node one, then node two.
What happens when only node one goes down? Well, that’s also our database and OTDS instance! So, that will stop it all; meaning we don’t have high availability. That’s also correct as our architecture plate isn’t designed for real high-availability, but for a minimal distributed system for developers to play with.
Bringing node 2 down will also stop the corresponding service containers; AND in the CMC ‘State SyncUp’ tool, you will only see one membership…Just verified; Trust me!
YESSSSSS…”DONE”; Finally! No other words needed in this outro…What I say; If I can do it, you can do it too! Have fun with this post…Share it wherever you can as it will help others as well. Let me know your thoughts again in the comments about your HA, fail-over, and scalability experiences. I always love to have a chat to help each other grow in experience. Cheers! 🍹
Don’t forget to subscribe to get updates on the activities happening on this site. Have you noticed the quiz where you find out if you are also “The AppWorks guy”?
