
Hi there AppWorks fans,
Welcome to a new installment of AppWorks tips.
Finally, I fixed myself some time to dive into the installation for a distributed environment! Why? because I also would like chit-chat about scalability, high-availability, and fail-over at the coffee corner with my AppWorks buddies. I go in with a straight leg for this post as I have no idea where to start…I saw some documentation and that’s all. To keep it all within scope, I split the distributed installation in two posts; First for CARS/OpenLDAP; And next week, I do it for the AppWorks platform (AWP) itself. What I do leave out of scope is OTDS (the authentication spider); I also don’t dive into OTCS/xECM or Documentum…I know it’s all possible to run it in distributed modes, but not for now!
Let start with CARS…
Let’s get right into it…
Right…where to start? I’ll be smart this time and #RTFM in the first place. My manuals (that I’ve scanned upfront this time):
- ‘OpenText AppWorks Platform High Availability Deployment Guide’
- ‘OpenText AppWorks Platform 2.8 - CARS Installation Guide’
- ‘OpenText AppWorks Platform CE 23.4 Administration Guide’
- ‘OpenText AppWorks CE 23.4 - Installation Guide for Windows’
- ‘OpenText AppWorks CE 23.4 - Installation Guide for Linux’
Notes:
- Why Windows and Linux? Because the Windows manual has just that extra “Appendix A – High availability” flavor!…Don’t shoot the messenger!
- You can also go for the ‘OpenText AppWorks CE 23.4 - Documentation List’, but this link misses the ‘High Availability Deployment Guide’!?…Again, don’t shoot the messenger here!
- When your entrance is support.opentext.com search for
#appworks23.4…Just an insider’s tip; Also here, not everything is magically exposed!
With all the guidance in place we slightly move into the first phase of preparation…
A second VM
By now, you know I run my software on the always (and, so far, never failing) Oracle VirtualBox software. I normally use one VM for my blogpost; sometimes they get an upgrade; sometimes I just start from scratch. For a distributed environment, I (or we) need a new VM next to the already running instance of AppWorks. Let’s put this into a clear image with an eagle-eye to understand what we want to do here.

Notes:
- The documentation has also some interesting example images available…For you to look-up; The image is my architecture running on minimal laptop resources (with 16Gb memory and 4 cores hyper-threaded CPU)!
- We use only 1 OTDS instance for authentication; For our example that’s fine, but in real life you also want OTDS available on that second VM; Even better…on totally separated VMs, for both instances. I have an old post about OTDS tenants, but (I guess/expect) that’s not real HA!? I guess OTDS can be setup with a sync mechanism as well…That’s not my expertise; So, comment me if I’m totally wrong here? I haven’t checked the documentation on this.
- So, after installation we probably need to log in first in node 1 over OTDS before we can access the platform over the URL for node 2; On the other hand…It’s all in sync, so maybe (?) it understands a forward to the master OTDS login screen out of the box? Let’s see!?
- One database is sufficient as well; Normally on a separate VM and your database administrator can make it a cluster for high availability…Out of scope for this post as well.
- During the installation of the AWP second node we point to our master database AND we point also to our master CARS installation…Keep on reading!
Enough with the notes, scoping and questions…Time for some action!
I assume you have a VM available following this manual (don’t start it yet!). I hope you have some snapshots available to revert to; In my case this will be a snapshot of my installation BEFORE I start installing CARS and AppWorks. This means I have the RHEL OS prepared with Java, TomEE, Postgres DB, and the installation files. So, we need to clean up and disable things (like Postgres), and we need to reconfigure the host as 2 of the same hostnames/IPs in one network as always a problem!
If you don’t have a snapshot, you can create a new VM and follow the installation steps until you install CARS; AND you can skip the Postgres installation part for that second VM!
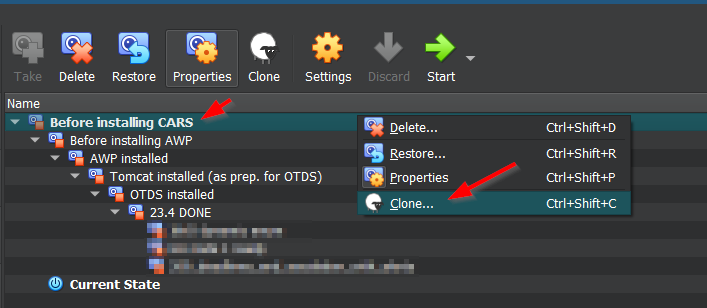
Now, go to Oracle Virtual Box and go to your AppWorks VM (our master…VM_1!). Have a look at the snapshots and create a new clone:
A cloning wizard start where you simply give a new logical name and a location (probably the same location as the original VM):
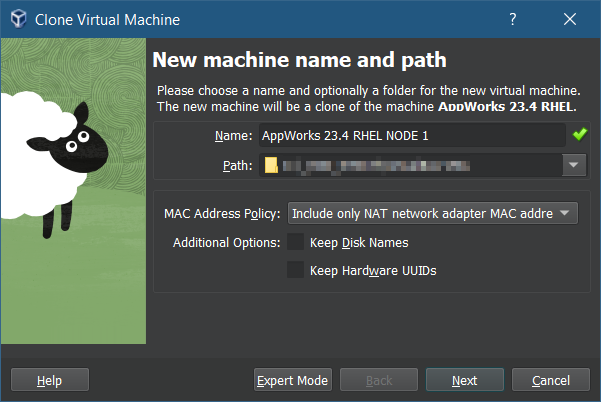
Click ‘Next’
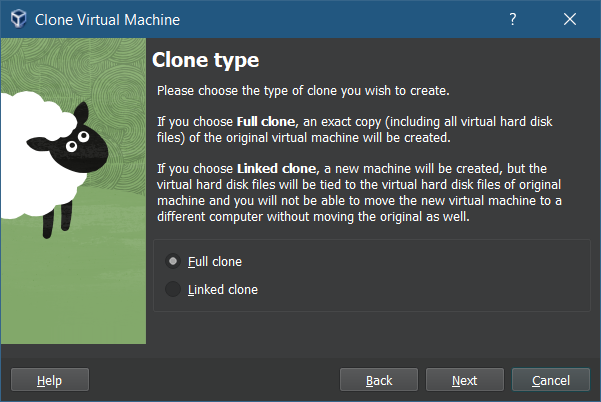
Do a full clone, and hit ‘Next’

Leave it with the ‘Current machine state’, and click ‘Finish’
…
15 sec. later, you have a new VM (our second node…VM_2!). Don’t start it yet as we first do a network tweak on our master VM_1! Why? Well, I normally work with a DHCP server to assign an IP; Only with a cloned VM this might give some problems (and it did)! So, I simply give my master VM_1 a fixed IP 192.168.56.102 with a tool called sudo nmtui to edit the connection:

I know…DHCP is not the way for a static server image, but I normally only have one VM locally which works perfectly fine!
…
FYI: theenp0s3connection is my “Host-only Adapter” from an Oracle Virtual Box perspective whereenp0s8is the “NAT Adapter”…Don’t think I’m the network guru here!? This is just a conclusion based on the mac-address comparison. Don’t ask me why I use 2 adapters as well…3 years ago, I started with 2 of them to make it all works smoothly with an internet connection within my VM (to get software withwgetand to update/upgrade packages). Maybe we can do it with only one, but don’t change a winning team!
After this change, start the second VM and make sure to make the same network settings, but now with IP 192.168.56.103. I do this directly from the Oracle VM console (not over MobaXTerm) as I don’t know yet what IP to connect to… 🙄
After these changes, I reboot both VMs to make sure everything is fine on IP level so far…AND I can make 2 MobaXTerm connection; 1 for each IP!
…
Now, let’s connect to our new second VM and stop/disable the Postgres DB (saves us already some resources from our local laptop):
1 | systemctl stop postgresql |
Next, we change the hostname of the new machine (again with sudo nmtui) to something like appworks_node2.23.4.com; My VM_1/master is named appworks.23.4.com (and I leave it as is!)
Then, we also update the sudo vi /etc/hosts:
1 | 192.168.56.102 appworks.23.4.com appworks |
Don’t forget to ALSO do this
/etc/hostschange on the master VM as well!!
For a double check on both VM’s; Do a ping appworks.23.4.com and ping appworks_node2.23.4.com and check if the correct IP address is returned in the response…
Both connections should also be able to start a UI like
xterm; This is fine on my old VM, but the new VM still points to the old IP! To fix this, I cleaned my xauth entries withxauth list | cut -f1 -d\ | xargs -i xauth remove {}. After this I did a logout and login again with MobaXTerm andxtermshowed me its “thing”!
So far for the VM preparation; Time for our CARS installation on the second node (VM_2 with IP 192.168.56.103)
Installing CARS
This is as simple as following my own installation post on CARS…With some extra notes:
- Use the same instance name (in my case):
defaultInst - The same path (for consistency):
/opt/opentext/cars/defaultInst - A new server name:
appworks_node2.23.4.com - The same port:
6366
The wizard is DONE; You can now do your service tricks with:
systemctl stop|start|status cars-slapddefaultInst
After this installation, you can now connect to the CARS instance with some bash commands (will work on both servers!):
1 | # This is needed to skip the certification validation in the commands below and to set some missing libs |
You can also do this via JXPlorer, but for some reason I always struggle with required SSL connection with certificates? I don’t know what it is.
On my local laptop, I also update myC:\Windows\System32\drivers\etc\hostsfile with these 2 entries:
2
192.168.56.103 appworks_node2.23.4.comFor some reason CARS likes to have a connection over a hostname instead of an IP…Probably because of the CN name in the certificate!? Try it and comment me, It’s out of scope for me now!
With the connection in place, it’s time to make the synchronization of both CARS instances complete.
CARS sync configuration
First we make sure to copy some data from the first “master” node to the second and visa-versa. With MobaXTerm, you can download the content of folder /opt/opentext/cars/defaultInst/certificates/ from both VMs and upload them back to the VM in cross order. So, both VMs will have these files in the certificates folder:
appworks.23.4.com-key.pvkappworks.23.4.com-cert.cerappworks_node2.23.4.com-key.pvkappworks_node2.23.4.com-cert.cer
First quickly a procedure to cover your ass (CYA) cold backup…Not needed for my VM (as I do snapshots, but good to know!)
1 | systemctl stop cars-slapddefaultInst |
Next is the configuration of a multi-master replication for OpenText CARS with some advanced LDIF scripting:
Run both commands only once; You can do it from only one VM!
The ‘server1.ldif’ and ‘server2.ldif’ content is described below.
1 | cd /opt/opentext/cars/defaultInst/sbin/ |
After this, you can restart both CAR instances, but in my case the sync was already triggered after the second ‘ldapmodify’ call!
This is your final test and should result in an equal result from the node 1 call:
1 | ./ldapsearch -H ldaps://appworks_node2.23.4.com:6366 -D "cn=Directory Manager,o=23.4.com" -w admin -b "cn=sysadmin,cn=authenticated users,cn=cordys,cn=defaultInst,o=23.4.com" |
I also add
sleep 30sin the doStart() ofsudo vi /etc/rc.d/init.d/cars-slapddefaultInst; The master (VM_1) starts after 15s! I have my reasons to do so…
…
server1.ldif
1 | dn: cn=config |
server2.ldif
1 | dn: cn=config |
NOTES on the LDIF files:
- Check for trailing spaces (there should be NONE!):
(export GREP_COLOR='0;41'; grep --col -Enm5 '\s+$' /home/sysadmin/server1.ldif)- Don’t use any #comment lines!
- The
-is for multiple changes to the same entry; Read more here!- Double-check the paths, server names, and domains for your use-case.
…
You can also delete entries in LDAP; just in case of (it wasn’t required from my side!):
1 | dn: cn=config |
That’s a nicely LDIF-experienced “DONE”. Was the documentation helpful? Partly! Did we need to figure out new things? As always “YES”! Did we learn something…Owhhh mama! YES! I get a bit enthusiastic here, but that’s because I thought it was not possible to run it all on 1 laptop (with 16 Gb memory). So, great; I guess we know our ins and outs now to challenge the buddies at the coffee corner again! Comment the world about your experience on this post, and we’ll see each other next week for a distributed AppWorks installation…That’s even greater; When we accomplish it! How hard can it be!? 😎
Don’t forget to subscribe to get updates on the activities happening on this site. Have you noticed the quiz where you find out if you are also “The AppWorks guy”?
