
Hi there AppWorks fans,
Welcome to a new installment of AppWorks tips.
Today is the day, we’re installing the great communicated and new product called ‘Intelligent Viewing’ or is it ‘Intelligent Viewer’!? Whatever! As long as we can view content with it on our beloved platform, it’s fine. Content?…Yes, PDF’s, TXT’s, but also DOCX’s, and even PPTX’s! Nice, let’s find out and…
Let’s get right into it…
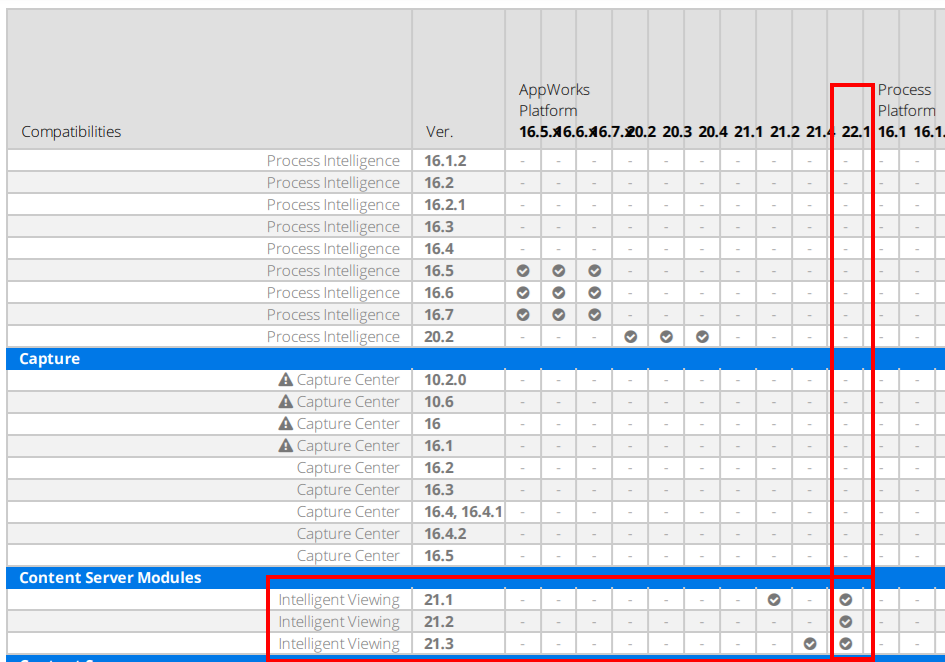
Time to first download the software from this direct download link. I go for Version 21.3 (supported for AWP 22.1 / OTDS 21.3) with filename intelligent-viewing-packaging-linux-21.3.0.56.zip
This version-knowledge is retrieved from the “Product Compatibility Matrices”.
The ‘AppWorks Platform’ (I run v22.1) section tells me this information:
…
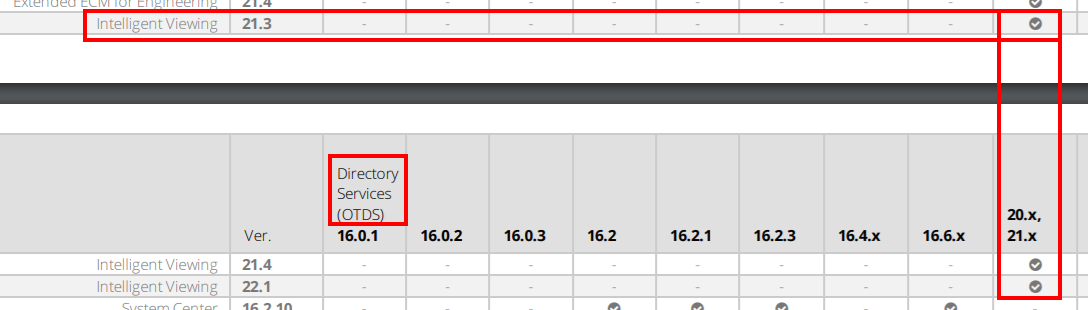
From an ‘OTDS’ perspective (I run v21.3; delivered with AWP v22.1), I see this match passing by:
Let’s grab ourselves some details on the documentation:
- Online for IV itself
- The administration guide of AWP under the sections:
- “Creating and modifying a document store repository”
- “Configuring OTDS to integrate Intelligent Viewing with AppWorks Platform”
It looks like the installation of IV (and make it work for the AWP) is a multistep process:
- Prepare the VM
- Intall “Intelligent Viewing”
- Run some post-double-checks
- Follow the admin-guide of our platform (this will be a new post…next week!)
Let’s just follow these steps per section…
Prepare the VM
Spin up your VM with installed (in my case) AWP 22.1; connected with OTDS 21.3. Once up and running, open a MobaXTerm session to the host. Run a set of preparation commands to install NodeJS, NPM and check Java (or do a Java installation from here)
1 | sudo yum -y install nodejs |
The next set of commands is to install RabbitMQ and enable the management console. You also see ‘Erlang/OTP’ commands passing by. This is required for RabbitMQ; you can read about it here
1 | # Install Erlang |
When ready executing all the commands, you should be able to verify the installation on this URL: http://192.168.56.107:15672. Login with mqadmin, and password admin (as created above!)
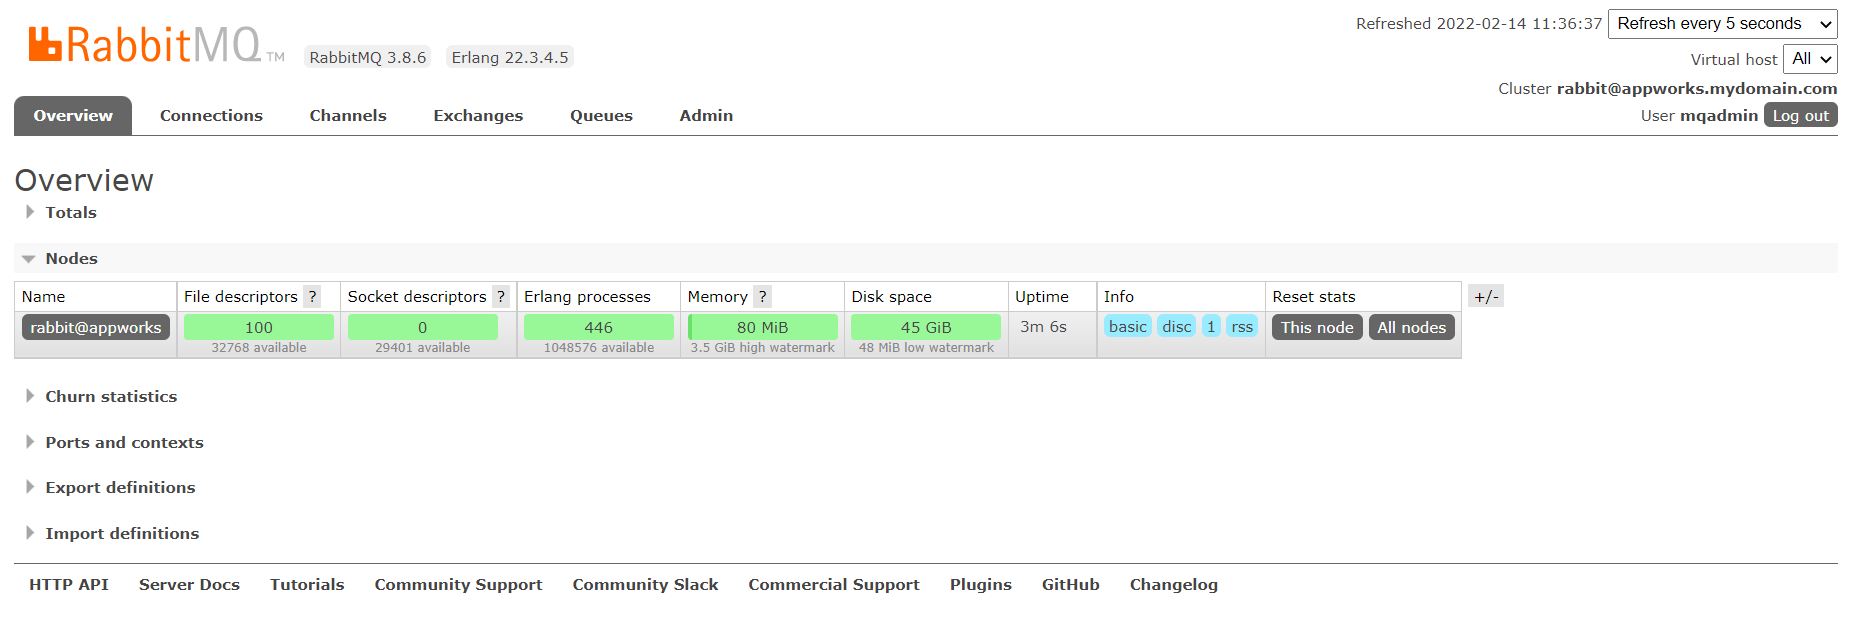
Note: RabbitMQ contains a default user
guestand passwordguestbut is only able to log in from a ‘localhost’ perspective!
Next step on VM preparation is our database. We can reuse our AWP PostgreSQL instance with these commands. Have a look here for a fresh installation of PostgreSQL.
1 | psql --version |
The
postgresql11-contribpackage makes thepgcryptoextension available. This is the output of my\dxcommand for theivconnected database:
2
3
4
5
6
Name | Version | Schema | Description
----------+---------+------------+------------------------------
pgcrypto | 1.3 | public | cryptographic functions
plpgsql | 1.0 | pg_catalog | PL/pgSQL procedural language
(2 rows)
That’s all we needed to do on preparing our VM to have a proper IV installation. Looks also like the new IV is built on ‘microservices architecture’ which is the great future on development. More on this later once we have IV installed.
Next…
Intall “Intelligent Viewing”
Before the installation can start we first need to upload the zip intelligent-viewing-packaging-linux-21.3.0.56.zip to our VM. Just in the home directory of the installation owner (/home/sysadmin in my case). After this upload, we can execute a set of commands:
1 | unzip ~/intelligent-viewing-packaging-linux-21.3.0.56.zip -d intelligent-viewing-packaging-linux-21.3.0.56 |
The last
chmodcommand is just to make sure we have full permission on the installation package
In the next set of commands we create a new folder IVArtifacts where IV will store its data. In the IntelligentViewing_Linux.properties we’ll point to this location. Have a look at my properties file.
We also make sure we have a license file available in the installation directory. When provided upfront, the IV installation will manage the rest for us. A license file must be requested at OpenText support; like we also did with the AppWorks license!
FYI:
- I have both license-, and properties-file (an updated version) available locally and uploaded them to the home directory of
sysadmin- In some IV download packages a limited license file can be found. For this IV 21.3 installation, I use the IV 21.4 license file (because I was just too curious and didn’t want to wait!) which has an expiration date till
2022/10/01…I guess “October 1st, 2022” and works fine for this post.
1 | mkdir /opt/opentext/IVArtifacts |
Some extra notes on the properties file:
- Update
localhostwith the correct hostname / IP only for theX_SERVICE_HOSTsettings. Later on this information will be used in AWP runtime - Check the availability on Java the path:
/usr/lib/jvm/java-11 - Get RabbitMQ information (double-check the port)
sudo rabbitmq-diagnostics listenerssudo netstat -tulpn | grep 5672- Localhost with
guest:guest(by default on same VM) should be fine (in my case!)
- Update the “artifacts” folder location:
ARTIFACT_VOLUMES_ROOT=/opt/opentext/IVArtifacts - Update the OTDS settings:
OTDS_ORIGIN=http://192.168.56.107:8181/otdswsOTDS_ADMIN_USER=otadmin@otds.adminOTDS_ADMIN_PW=admin
- Update the PostgreSQL database credentials
CONFIG_DB_PWD=adminMARKUP_DB_PWD=adminPUBLISHER_DB_PWD=adminPUBLICATION_DB_PWD=admin
Now it’s time to install IV
1 | sudo ./IV.Installer --install ./rpm --prereqs --configure ./IntelligentViewing_Linux.properties --logfile ./install.log |
Coffee time…☕ After some time you’ll see the final conclusion Installation completed.
Run some post-double-checks
We have a ‘DONE’ installation, but we wouldn’t be content if we did not understand what just happened. This section will do a post check in the just finished IV installation.
First the log-file, and installation location:
1 | more ~/intelligent-viewing-packaging-linux-21.3.0.56/install.log |
FYI: I also did a (failed and unsupported) IV 22.1 installation before where I saw this information passing by with a new account
otiv! Just for my registration…
2
3
4
sudo chown -R otiv:otiv /home/otiv/.opentext
sudo ls /home/otiv/
less /etc/passwd | grep otiv
…
Use this set of commands to verify the available services:
1 | systemctl status service-vertx-config |
You can
start | stopthese services by replacing thestatusparameter in the commands above. We have “enabled” services by default and will be running automagically after the installation.
…
Do a port verification with: sudo netstat -tulpn | grep 33. You should get response on these ports:
3350: Java app for asset-service3351: Java app for config-service (aka “service-vertx-config”)3352: NodeJS app for the markup-service3353: NodeJS app for metis-service (demo application!)3356: Java app for publication-service (aka “service-vertx-publication”)3357: NodeJS app for search-service3358: NodeJS app for viewer-service
I found myself a missing port 3355 which is supported for the ot-publisher service, but it doesn’t need to “listen” from outside…Let’s see later on!?
I also learned about this command:
ss -ntl | grep 33
…
For further configuration on all the microservices, have a look at these files:
1 | sudo cat /opt/opentext/viewer-service/.env |
The
.envfiles are correct!
Logging…Yes, logging…Have a look at this set of log-files…have fun with these locations when &^%$^%&# hits the fan! 🤠
1 | tail -999f /opt/opentext/publisher/logs/publisher.log |
…
We’re getting close! Time to open some verification URLs which will return JSON data:
http://192.168.56.107:3352/markup/api/v1http://192.168.56.107:3356/publication/api/v1http://192.168.56.107:3357/search/api/v1http://192.168.56.107:3358/viewer/api/v1
You might just have seen some recognizable data in the responses of those URLs. If not? Have a look at the OT2 viewing service documentation! Yes, my friends…This ‘intelligent viewing’ product is exactly “the one” from the new OT2 platform!
…
Time for the “Metis” demo app on this URL: http://192.168.56.107:3353/webapp
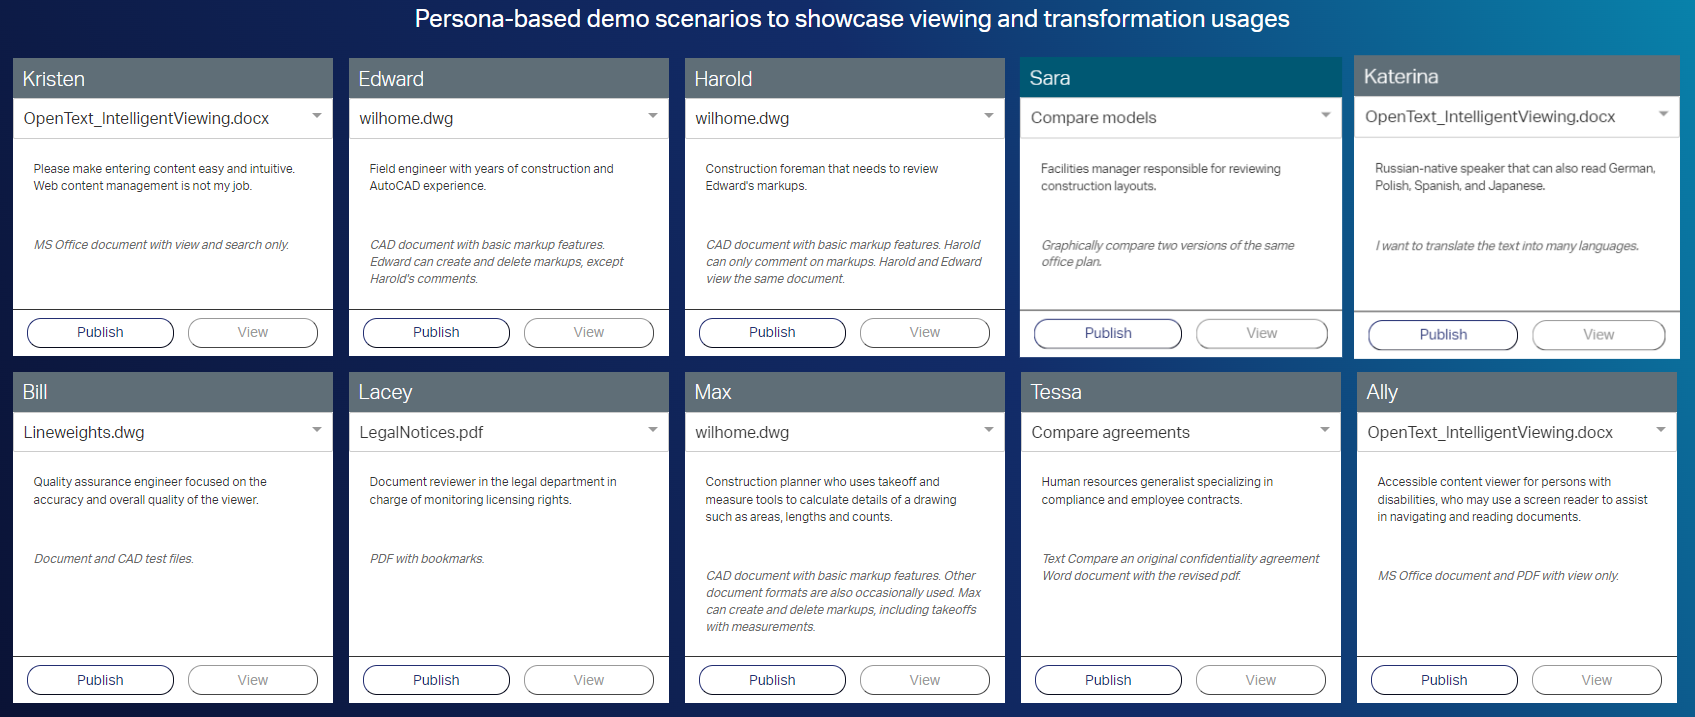
I don’t know if it’s relevant, but ‘Metis’ is something new to me!? Comment me…
What can we do here? Well, hit the ‘Publish’ button on the first tile…Wait a moment, and hit that ‘View’ button:
Party time…IV is working! 🎉 🍰 🍺
Have yourself a final check in this directory too…Interesting!:
/opt/opentext/IVArtifacts/fs-0/publications/{id}/
…
Finally, we’ll do a post check in OTDS:
A dive into OTDS via URL: http://192.168.56.107:8181/otds-admin/. Login with otadmin@otds.admin and password admin (in my case!)
- The ‘License Keys’ section will show you a
Viewinglicense…Have a view behind the ‘actions’ for more information on the license counters and assigned users. - The ‘OAuth Clients’ section will show a set of new clients for each available service.
- The ‘Users & Groups’ section will show those same users.
- The ‘Resources’ section shows us an ‘iv’ resource
- The ‘Access Roles’ section shows us a corresponding ‘iv’ access role
- The ‘Partitions’ section has an ‘OAuthClients’ available with (again) those users as members
In the next post we’ll get back to these sections when we start connecting IV to our beloved AWP! Hooray…😍
That’s an earned installation ‘DONE’ this time…A fascinating IV insight where we exposed as much information as possible to continue our grind on this product. It’s the future of viewing within the OpenText product suite, and I’m glad we’ve nailed it. Let’s see next week which hurdles we require solving to make it all work as default viewer solution for our platform. See you in the next post, next week…cheers!
Don’t forget to subscribe to get updates on the activities happening on this site. Have you noticed the quiz where you find out if you are also “The AppWorks guy”?
