
Hi there AppWorks fans,
Welcome to a new installment of AppWorks tips.
Today we’re going to check out a feature that is called ‘Contract Based Development’. Well, it’s not really a feature, but more a way of crafting our configuration where we use the features of our AppWorks platform. You can read more information on CBD here where it is also called ‘Design by contract’, but it’s exactly the same. In this post we just see how this way of working can be used in our platform…Great stuff I can tell you upfront!
Let’s get right into it…
So, you just read a little information about CBD, but the next step for us is to figure out how you can use it in our platform. For that we split this post into a 5 phased section where can step through each phase with all the information required to continue the whole journey on CBD in AppWorks. The end-result? It will be a BPM with input-output messages that can be called from several locations in our platform (Like rules, sub process or lifecycle). And what should the BPM do…Well, for this post we’ll just create a new instance of a ‘project’ entity!
Now, spin up your AppWorks platform machine and open up your favorite workspace and just have some fun.
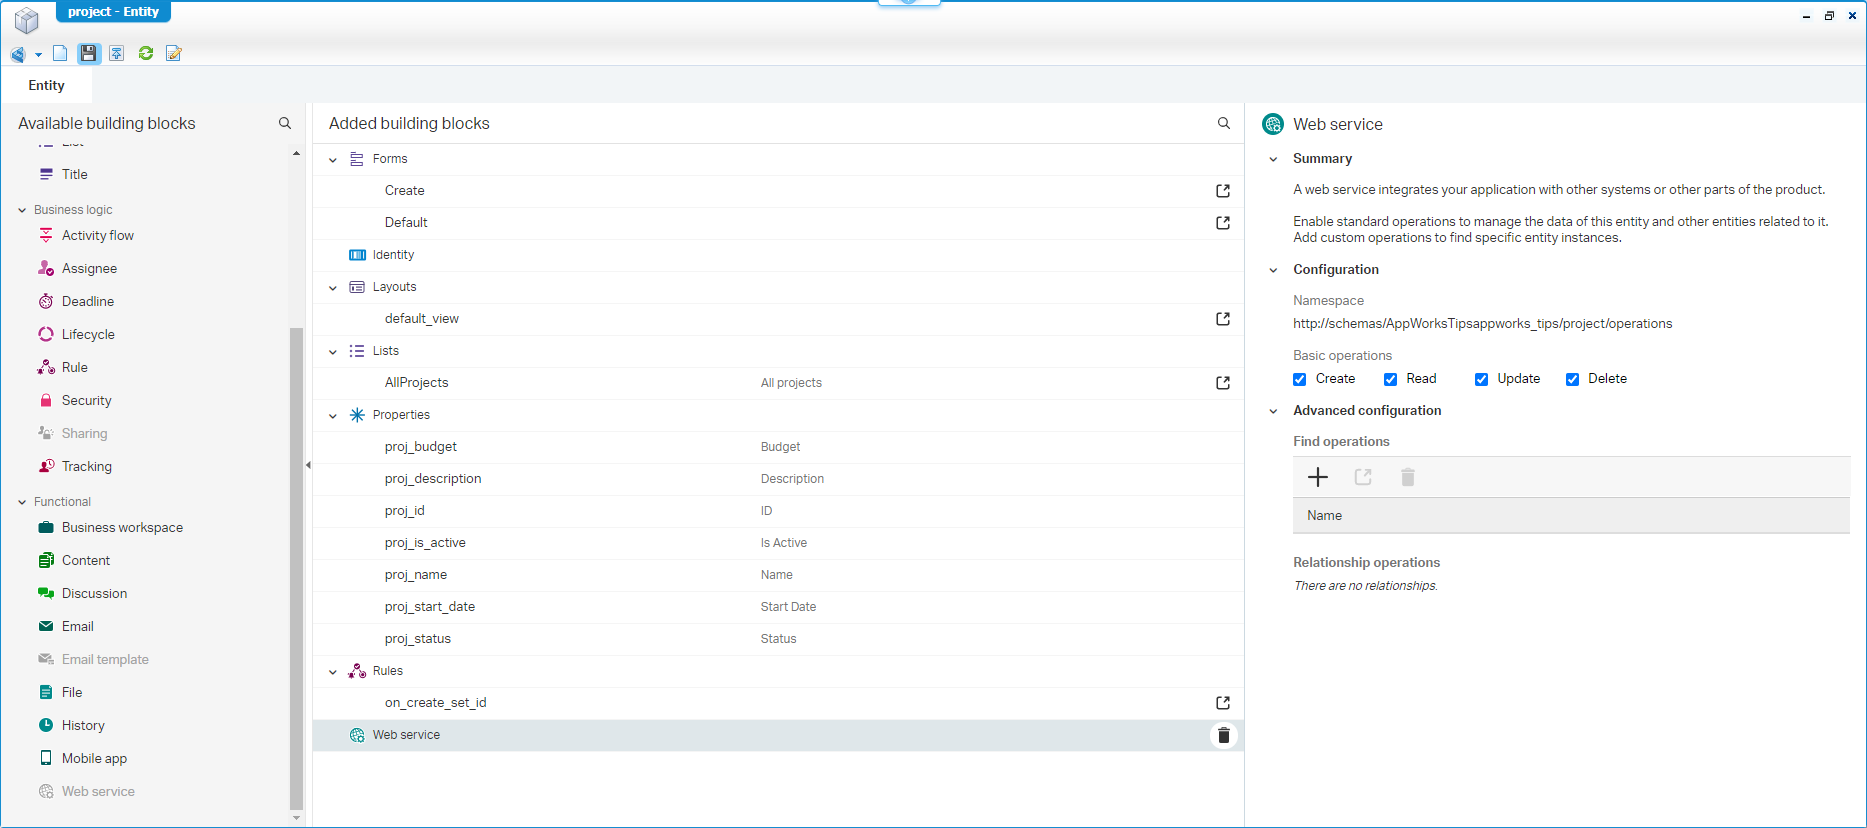
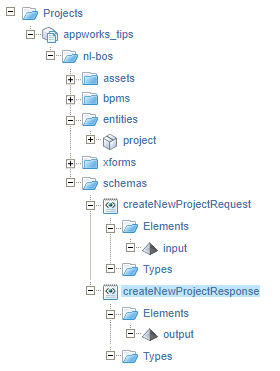
So, for you to know!…We already have a ‘project’ entity available that looks like this (make sure you also enabled the CRUD operations on the ‘Web service’ building block!)
Phase 1: Create request/response (the contract)
In this phase we define our request//input and response/output for the BPM. As our platform is fully XML based this is done via an XSD schema. A what?, Yes…An XSD schema is just a description on how the structure of an XML should look like. See it as a template/boilerplate.
Let’s start by creating a nice folder with the fancy name ‘schemas’ in our project

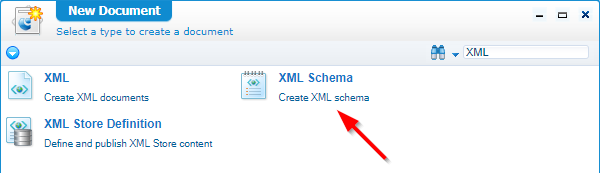
In that folder we create a new document of type ‘XML Schema’
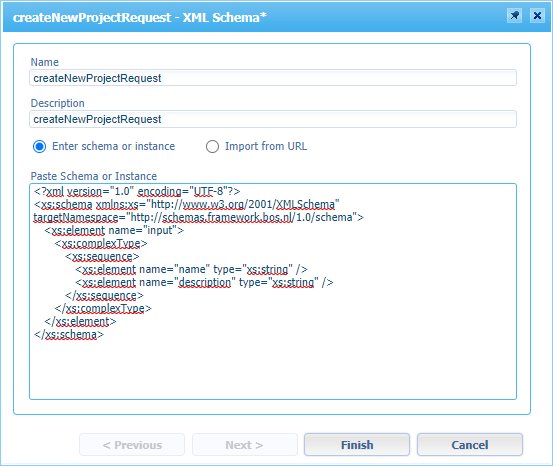
You get a new screen where we give the name of our schema ‘createNewProjectRequest’ with also the below content.
Request XSD
1 |
|
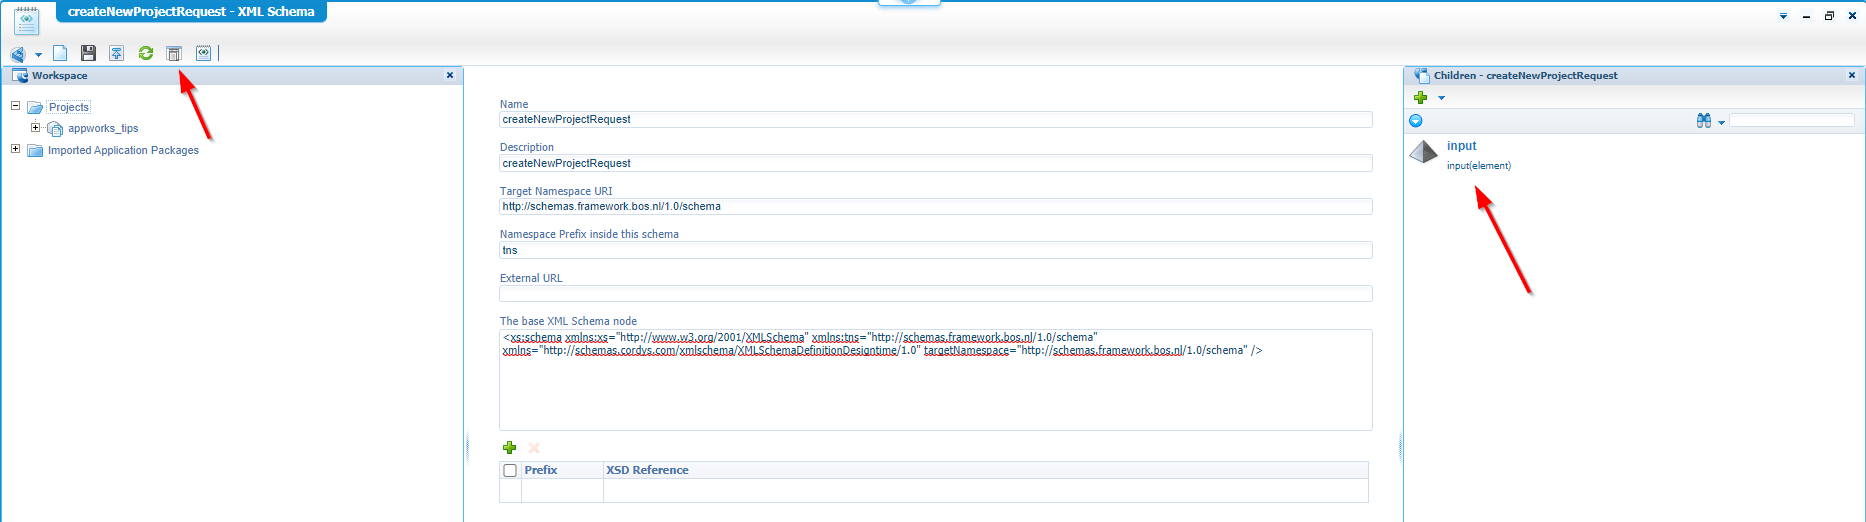
The end-result will look like this where you can also have a further look into the child elements of the XML…Nice to see how things work out as they are intended to be…great…next!
Now for our response; we create a new ‘XML schema’ document in our ‘schemas’ folder with the name ‘createNewProjectResponse’ and we add this content to it:
Response XSD
1 |
|
The end result for the phase should look a bit like this:
Let’s continue to our next phase…
Phase 2: Prepare webservice generation
Before we can generate our required service for CBD we need to add 2 items to our project and organization.
Add BPM runtime reference
A runtime reference is nothing more than a reusable artifact that we can call in our runtime environment. So, a reference for our end-user to make a developed feature available. These developed features are delivered with the platform, but you can also develop them yourself. Samples are UI’s, BPMs, etc.
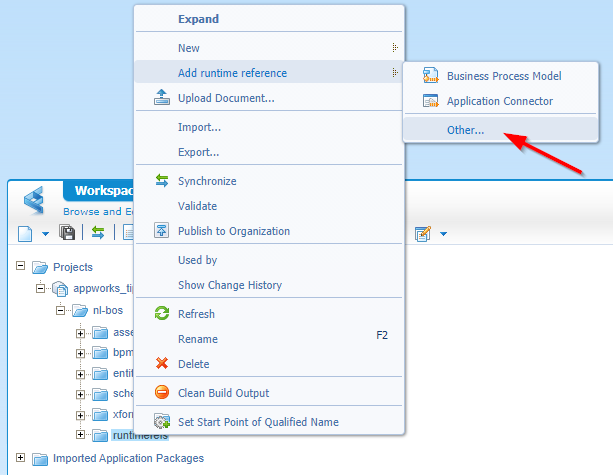
For our CBD feature you will later see that we need a BPM runtime reference in our project. To make this happen we first create a new ‘runtimerefs’ folder in the project.
Now right-click that folder and go to the ‘Add runtime reference’ where you select ‘Other…’
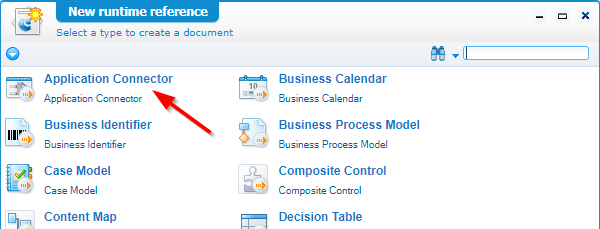
You get a new screen where you need to select the ‘Application Connector’
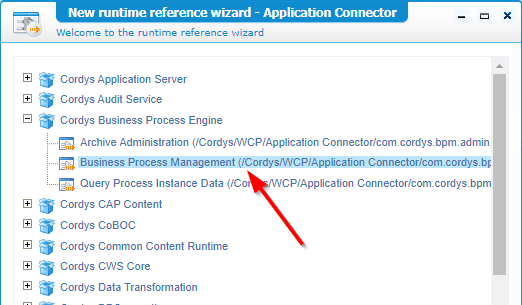
You get a new screen where you can select the BPM runtime reference
After selection just click ‘Finish’ and you will see your brand-new BPM runtime reference available in your project.
The BPM (application connector) runtime reference makes sure that the web services layer of BPM is available in runtime for our end-users. That is also exactly what we want as we will generate a new webservice that is connected to our BPM later on.
Add BPM service container
To make sure that the BPM service call is handled via the correct service container we also need to define a new service container for BPM.
Open the ‘System Resource Manager’ artifact and create a new service container
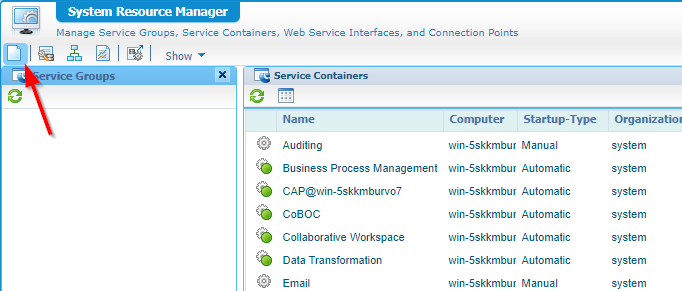
You start a new wizard that you can follow in the next screens…
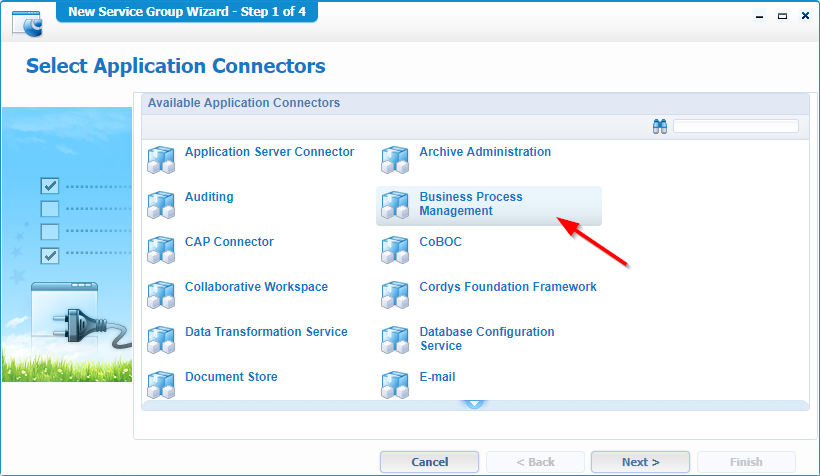
Select BPM and click “Next >”
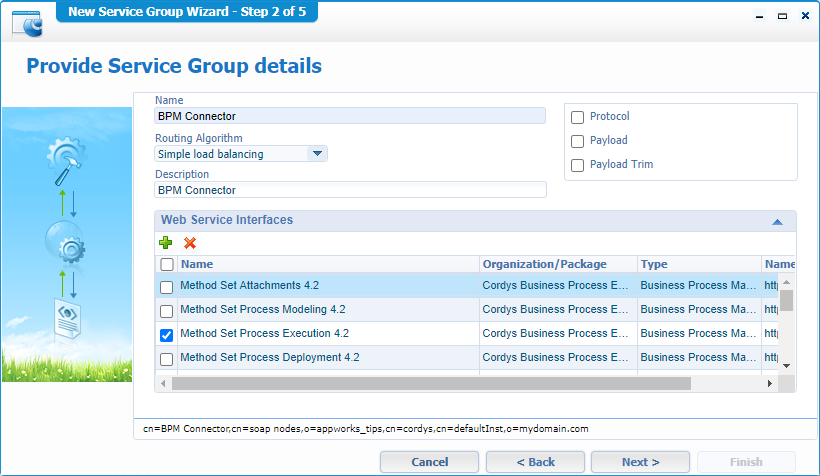
Give a proper name like ‘BPM Connector’ and select 1 service interface…it’s required…Later on we’ll only need our generated service.
Click “Next >”
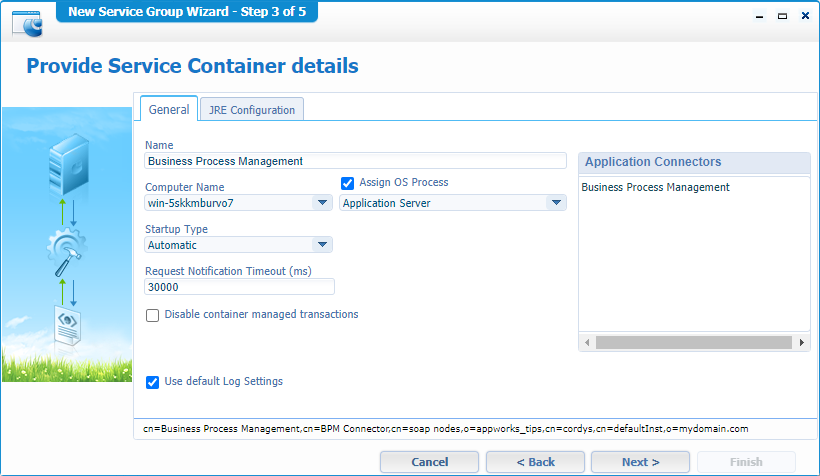
Make it startup ‘Automatic’ and connect it to the OS Process ‘Application Server’. Hit “Next >”
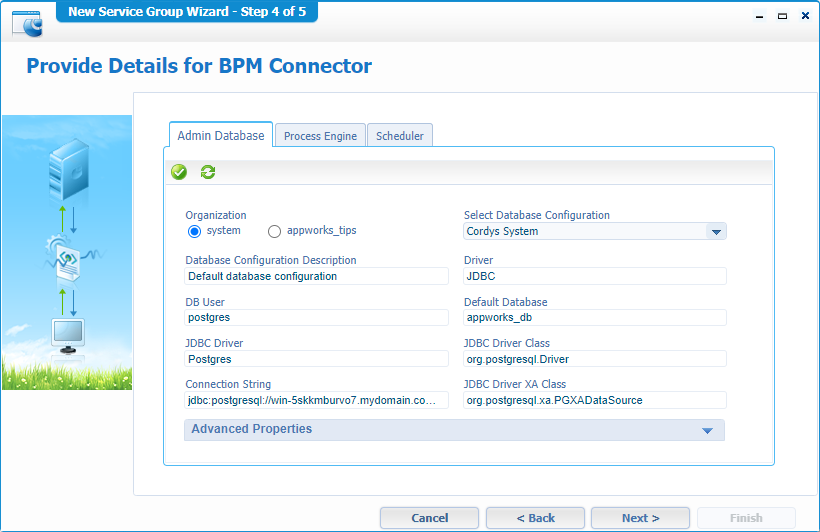
Select the ‘Cordys System’ database from the ‘system’ Organization. You can also do this for the ‘Scheduler’ tab. The ‘Process Engine’ tab can be left as is.
Click “Next >”
And click “Finish”
That’s all for the preparation for our service generation and service usage. Next step…
Phase 3: Generate webservice
In the third phase we will generate a brand-new webservice out of our previous crafted (XML schema) contract. For this to happen we first start by creating a new folder in our project with the name ‘webservices’. On this folder we right-click and we’ll create a new document of type ‘Web Service’

You start a new wizard with this start screen
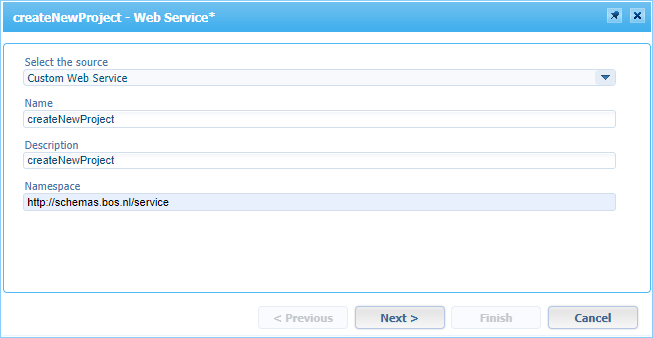
Make it a ‘Custom Web Service’ with a name ‘createNewProject’ and give it a nice namespace like ‘http://schemas.bos.nl/service‘
Hit “Next >” to continue
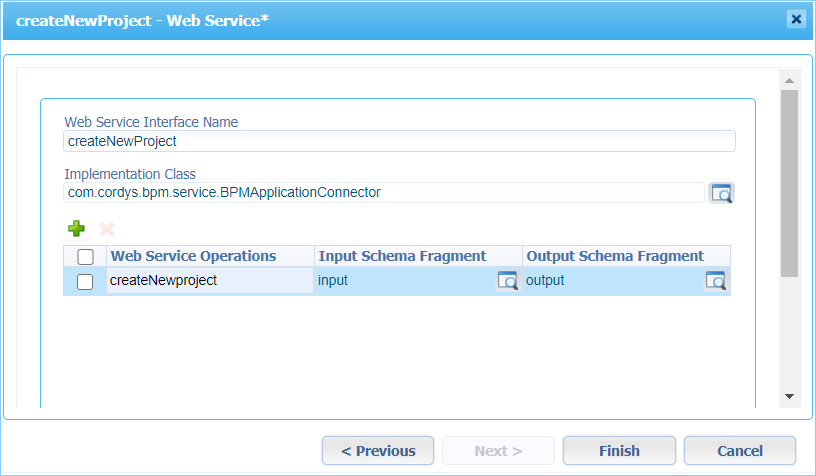
In this screen we give the web service an interface like ‘createNewProject’ and we can select that ‘BPMApplicationConnector’ implementation class because we already inserted a BPM runtime reference into our project…Nice!
Also hit that green plus-sign to add a new operation with that same name and the input/output XSD schema definitions that we also created already in the first phase of this post.
Then it’s time to hit that ‘Finish’ to see some magic happening in our project ‘webservices’ folder!
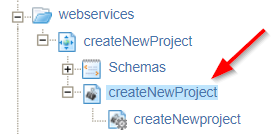
Double-click the ‘createNewProject’ and make sure you select the ‘BPM Connector’ as service group for the webservice binding.
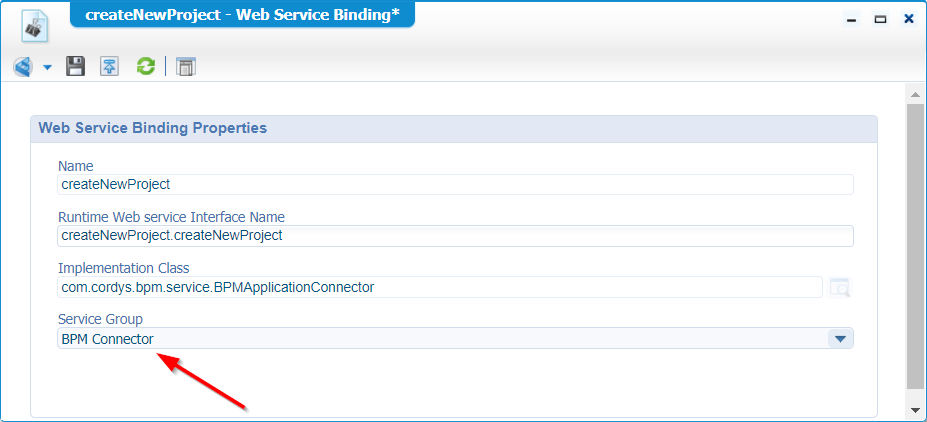
That “BPM Connector” service group is retrieved from the already created service group in the ‘System Resource Manager’…remember!?
Now save the webservice and publish it (otherwise we can’t test it later on!)
Next step…
Phase 4: Initialize contract-based BPM
In our fourth phase we will use that generated webservice as ‘contract’ on our BPM. This is also where you will start to see some real nice magic stuff again!
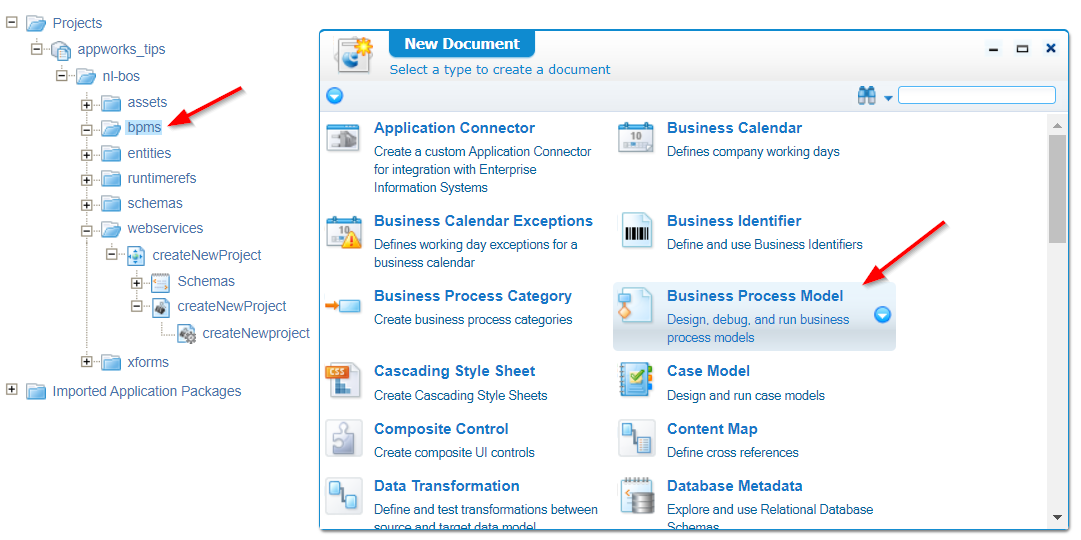
Make sure you have a ‘bpms’ folder created in your project and just create a clean new BPM document.
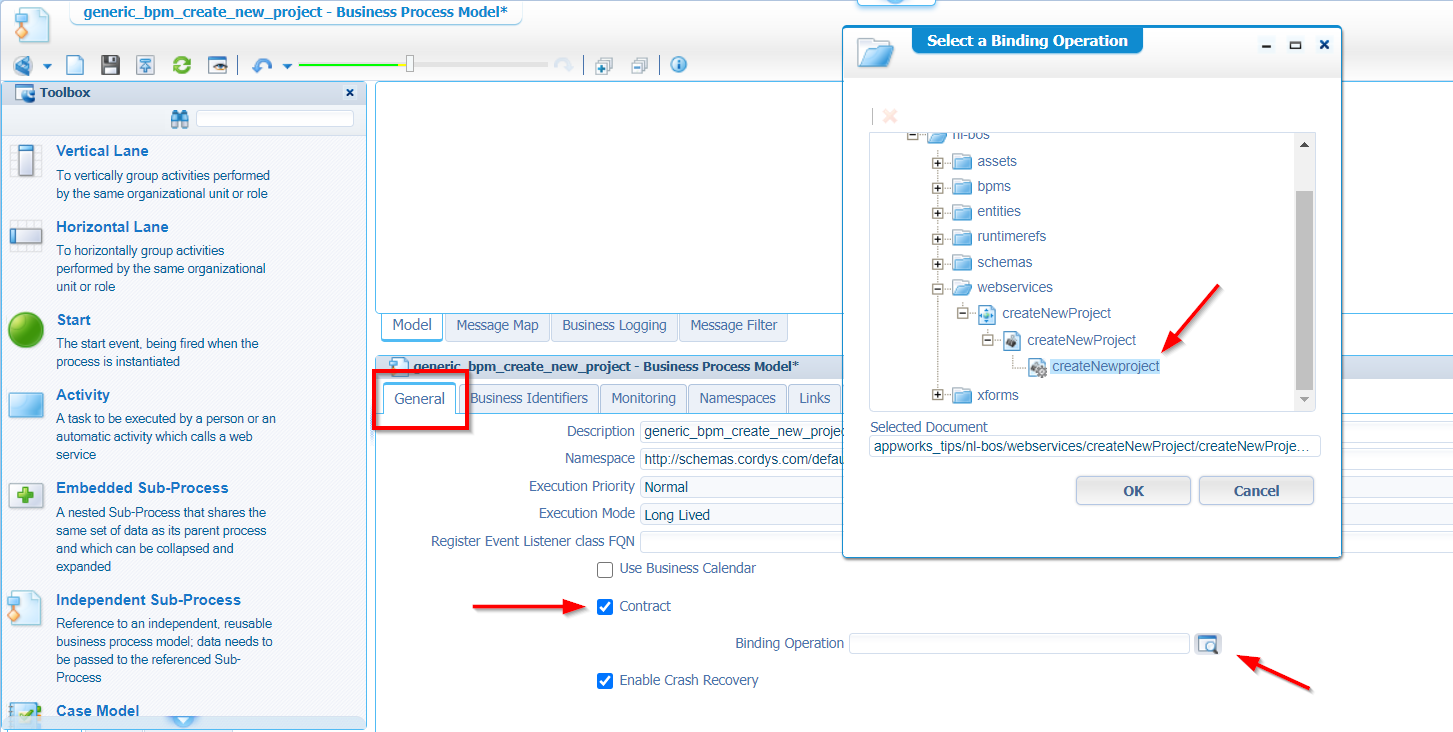
We get a blanc BPM that we first want to save with a name like ‘generic_bpm_create_new_project’
Next we want to get the model properties. Right-click on the blanc space to get those properties or hit <F8>. In that properties screen you want to mark the ‘Contract’ checkbox and you want to select a ‘Binding Operation’. That last one is off course our ‘createNewProject’ binding!
And after you hit that ‘OK’ button you get a fancy result in your BPM modeling pane that looks like this:
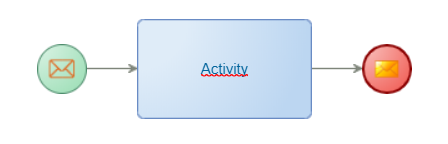
And YES…This is indeed a BPM with a generated input/output message that is mapped to our crafted XSD…That is the power of Contract Based Development! 💪
Let’s check out the message map of this BPM…(Tab in the bottom!)
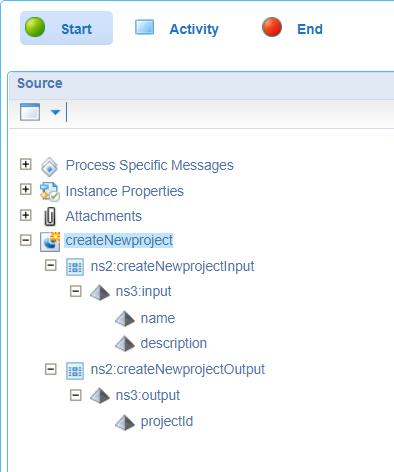
You can clearly see that our XSD input/output are in place for you to use in the BPM!
To get something nice to test I updated the ‘End’ message map like this:
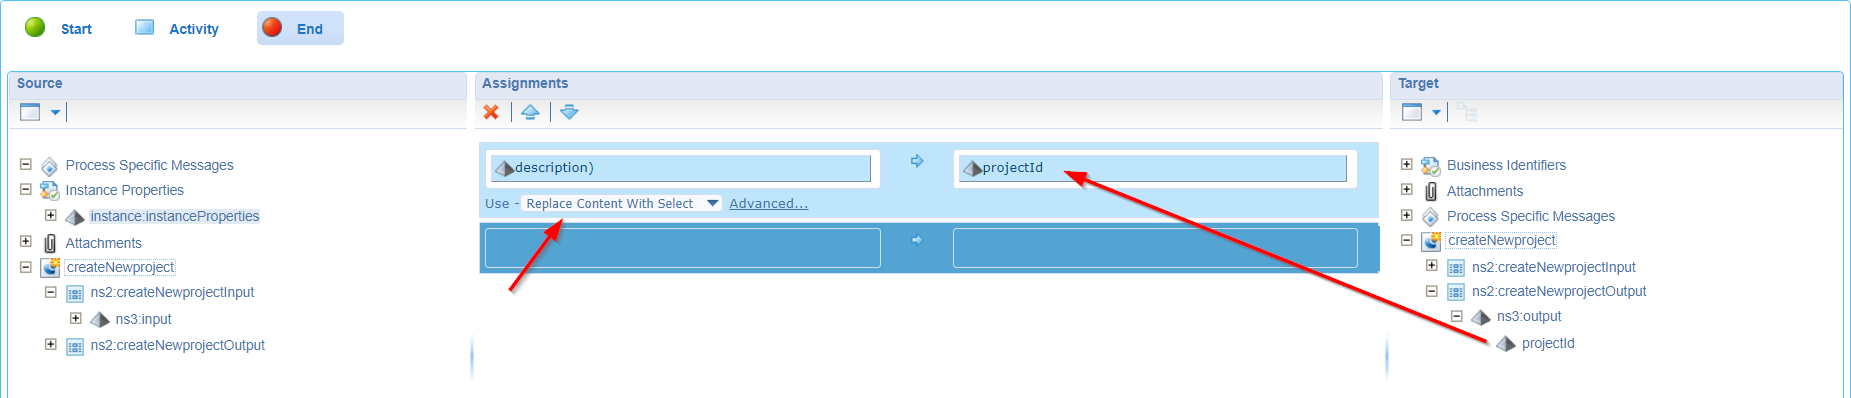
That ‘description’ you see in the screenshot is this value:
concat(ns2:createNewprojectInput/ns3:input/name/text(), '; ', ns2:createNewprojectInput/ns3:input/description/text()). We just concatenate the 2 values from the input message (‘name’ and ‘description’) to the ‘id’ of the output message.This is the consolidated view:

Save it all, validate and build the BPM and…Publish it to the organization!
Final step…
Phase 5: Testing
We can test the contract-based BPM in 2 ways:
- Lean and mean with the BPM debugger facilities, but might be a bit overkill for our test
- Quick and dirty from our generated service operation! (we use this option now)
Make sure that both the BPM and the webservice are published (and also make sure you made that binding in the webservice to the BPM service container as already explained)
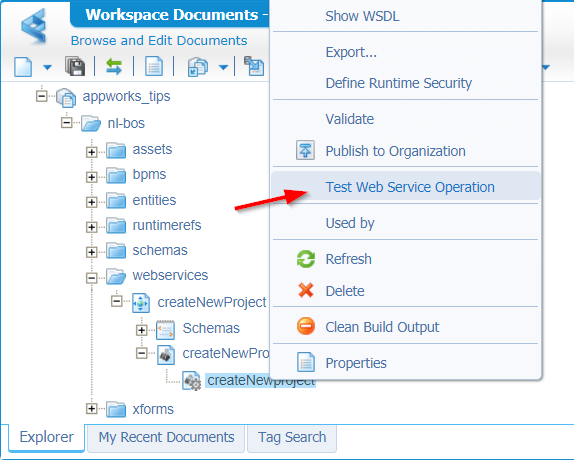
If all it good…right-click that service operation and select ‘Test Web Service Operation’
You get a new test screen where you can provide some input for our ‘name’ and ‘description’…See this SOAP message as an example:
1 | <SOAP:Envelope xmlns:SOAP="http://schemas.xmlsoap.org/soap/envelope/"> |
When you are ready hit that ‘Invoke’ button for a response message:
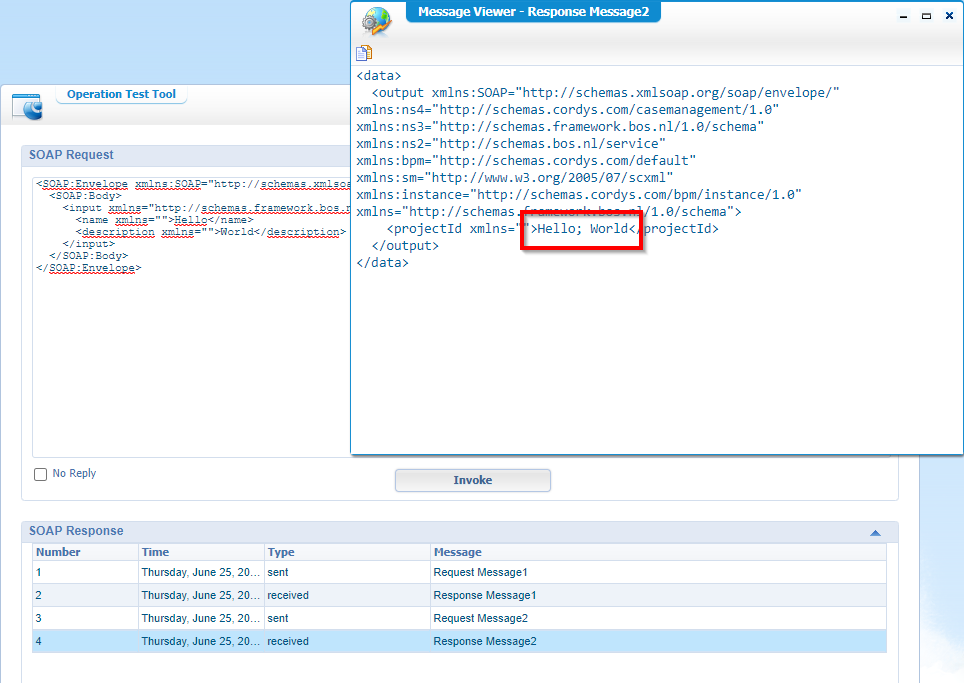
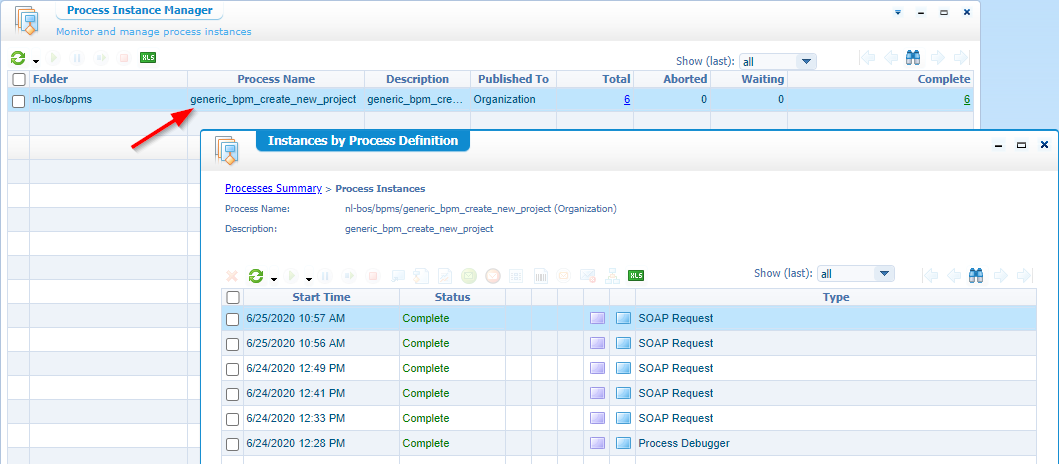
For the unbelievers!…Is the BPM triggered with this test? Off-course, but you can double check in the ‘Process Instance Manager’ artifact.
That last screenshot is our “DONE” for this post where we learned about Contract Based Development. So, we first define how the input and output requests should look like and based on that contract we generate the corresponding service and BPM! It’s a great way of working and now you also know how to do it. Have a great weekend and I see you in the next post where we talk again about another great topic on a brand-new installment on AppWorks Tips.
Don’t forget to subscribe to get updates on the activities happening on this site. Have you noticed the quiz where you find out if you are also “The AppWorks guy”?
