
Hi there “Process Automation” fans,
Welcome to a new installment of “Process Automation” tips.
We did a “Java Message Service”-topic a while time ago, but as it’s still an underrated (yet powerful) feature, it’s important to continue to share knowledge about it. OPA gets more mature with each release and since OPA version 25.2, we have support for RabbitMQ where this post will explain how to install it and get a first glimpse of the UI…
Let’s get right into it…
My first journey on RabbitMQ starts here.
RabbitMQ - One broker to queue them all
2
3
4
5
broker that enables efficient, reliable, and versatile communication for
applications — perfect for distributed microservices, real-time data, and IoT.
Free under the Mozilla Public License 2.0, it has a vibrant global community.
Dive in with our easy-to-use docs or contribute to shape its future!
After some reading, understanding (which you can do on your own), and searching, I continue my installation following these steps. Also, this was a valuable post to read AND for the dependent ‘Erlang’ package, you can read this post.
…
I install RabbitMQ next to my current OPA (incl. OTDS) installation on the same ‘Oracle Virtual Box’ VM. My OS is RHEL developer edition.
Boot up the OPA machine, login to your VM via MobaXterm (I have an account with name sysadmin) and follow some bash commands to install RabbitMQ (incl. dependencies); I will run version 3.13.7:
1 | #Clean and install logrotate (for managing large logfiles!) |
With these 2 commands, you can verify the installation parts on their versions:
1 | erl -eval '{ok, Version} = file:read_file(filename:join([code:root_dir(), "releases", erlang:system_info(otp_release), "OTP_VERSION"])), io:fwrite(Version), halt().' -noshell |
If you get curious about ‘Erlang’ (a functional programming language), do the command
erl; Do a simple thing like2+5., and quick with this callq().! Want to know more? #RTFM
Next step is to further configure our RabbitMQ instance…
1 | #Enable and start deamon service |
To get a deeper insight on the instance itself call: sudo rabbitmqctl status
We also like to click through a nice UI, so we also enable some management plugin: sudo rabbitmq-plugins enable rabbitmq_management
You can now access the UI via: http://192.168.56.107:15672

You can use guest with password guest, but it’s better to create a new “Administrative” account:
1 | sudo rabbitmqctl add_user admin admin |
After administration login, we have something to play with:
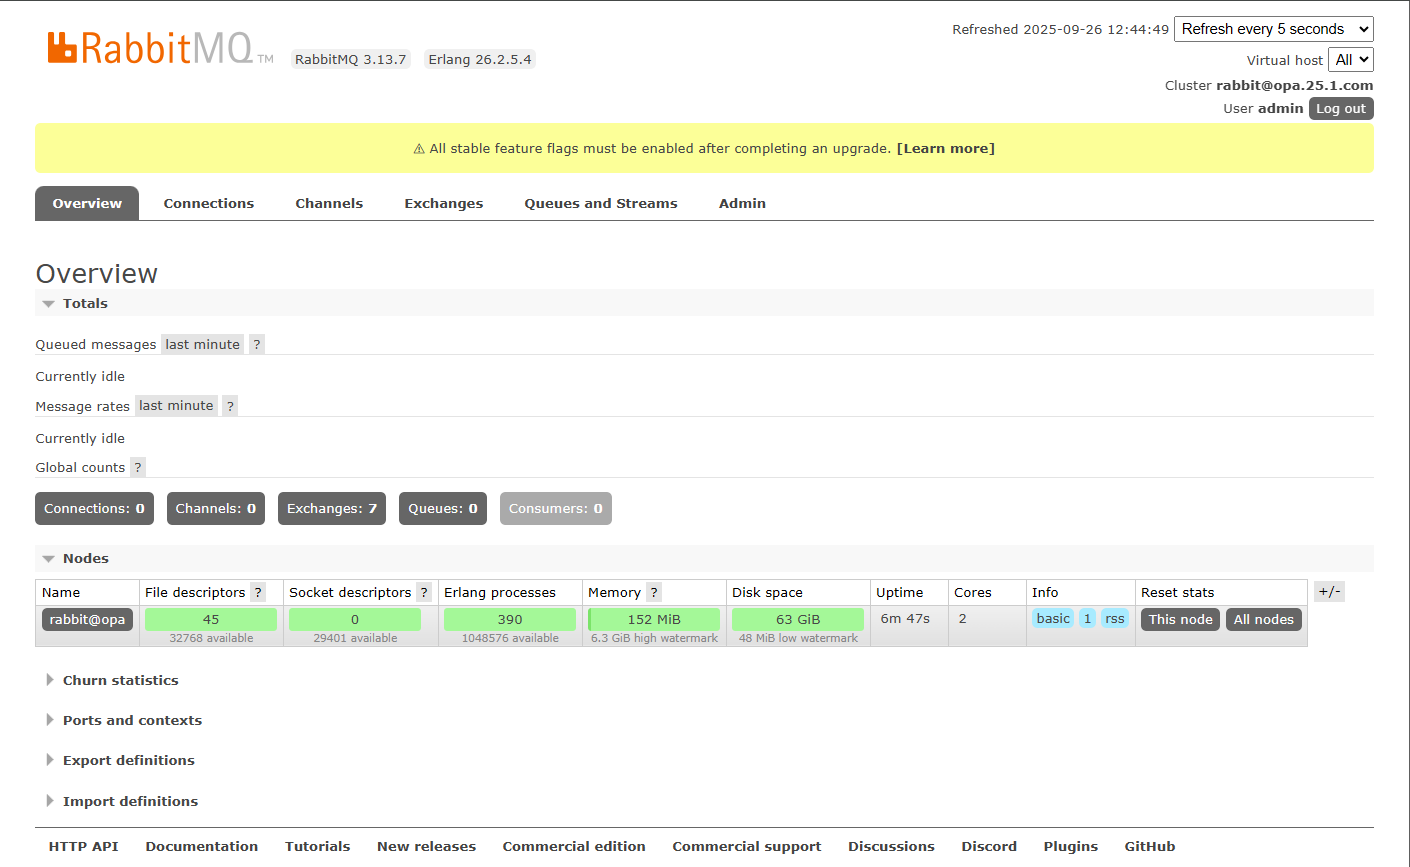
Great…Victory! 🥳
There was only one nasty after-taste! I saw a change passing by in my
/etc/hostsfile that causes problems for my OPA instance. It was an extra line127.0.0.1 opawhich I removed eventually to make OPA fly again. Probably something specific on my VM, but now you know!
…
Now just follow these first grinding steps to evaluate functionality:
- Navigate to “Exchanges” (where routing/decision takes place with keys, arguments, headers, and properties)
- Add a new exchange with name
myexchangeand leave the default settings - Navigate to “Queues and Streams”
- Add a new queue with name
myqueueand make sure to select typeClassic(the only supportive type for our OPA connector!), and leave the rest as is - Go back to the “Exchanges”, open the new exchange, and bind the new queue to your exchange
- In this same section, you can now publish a new message
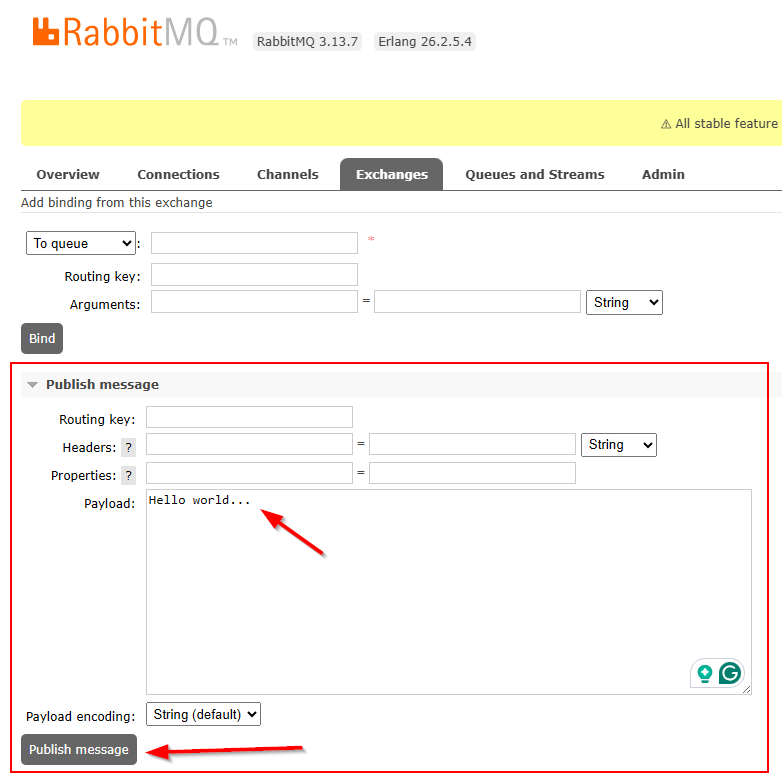
We have now one “pending” message on our queue, but we don’t have any consumers picking it up…And…That’s exactly where our follow-up post (next week), will continue!
An easy “DONE” which I didn’t expect; The only hard part was finding out the “Erling”-part. Well, it can’t always be difficult; What I always say: “If I can do it, you can do it too!”. Have a good weekend…Next week we’ll do a second dive into the “OpenText JMS Connector” part for our brand-new RabbitMQ instance!
Don’t forget to subscribe to get updates on the activities happening on this site. Have you noticed the quiz where you find out if you are also “The Process Automation guy”?
