
Hi there “Process Automation” fans,
Welcome to a new installment of “Process Automation” tips.
This post is a continuation of the post three weeks ago. The final goal? Get a grip on the current user session in OPA and use that same session to communicate to xECM! These quick steps make it possible, and we demonstrate the concept with a real implementation…Watch and learn!
Get a SAMLart ID (for the current user) via the ‘Request’ service call (depending on the runtimereference “Cordys Single Sign-On” -> “SAMLProtocol”)
Make HTTP GET request (over the HTTP connector) with a
Samlartin the header to this endpoint for the organization:http://192.168.56.107:8080/home/opa_tips/app/documentservices/rest/xecm/csconfig
👉 The response will give anOtcsTicket, but more important aContentServerOtdsTicket!Make another HTTP GET request with the
Otdsticketin the header to this endpoint (as first example):http://192.168.56.107:8282/otcs/cs/api/v1/authMake additional calls with the
Otdsticketheader to for example:http://192.168.56.107:8282/otcs/cs/api/v2/app/container/{object_id}
👉 {object_id} can be the ID of the business workspace!
Time for a practical implementation!
Let’s get right into it…
For this post, you require an advanced VM! We need the OPA platform. We also need OTCS/xECM, including a man-in-the-middle package called cws.war. Read all about it here where the “xECM installation”, the “OTDS connection”, and “documentstore configuration” are the three main parts. If you also want to read a BW, you also need to read about the “xECM preparation” and the “connected workspace configuration”…Take a week off, give it a shot, and you’ll understand exactly what I’m talking about. Or, simply use an environment where this is already done for you! 😎
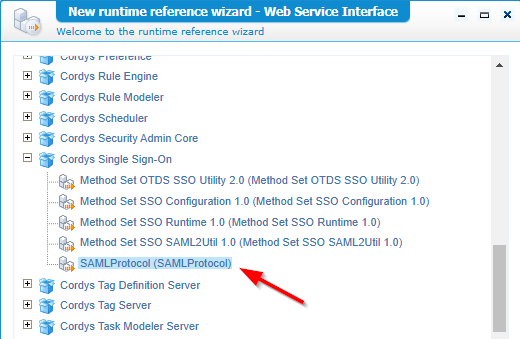
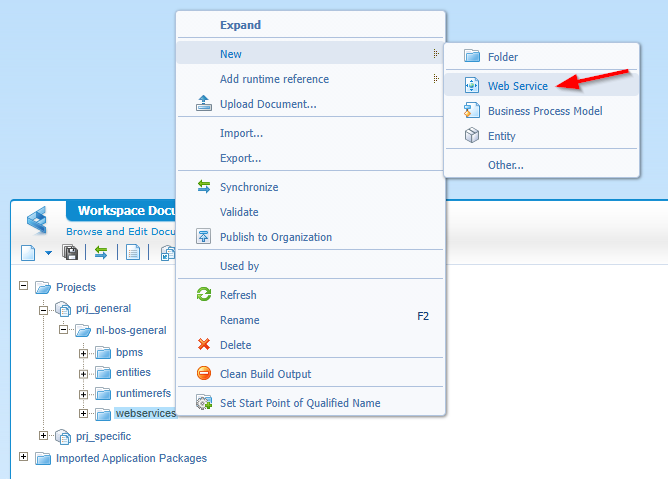
You can start with two runtimereferences in your project (saved in your ‘runtimerefs’ folder of the project). The first one is a reference of type ‘Web Service’. Under the category of ‘Cordys Single Sign-On’, you can add the method set ‘SAMLProtocol’ containing the ‘Request’ service operation:
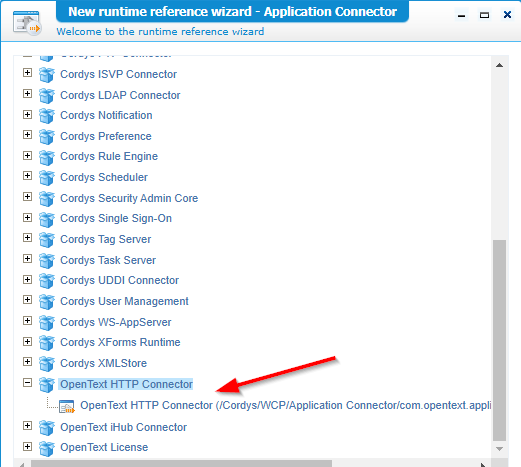
The second runtimeref is of type ‘Application Connector’ under the category ‘OpenText HTTP Connector’ selecting the connector with the equal name:
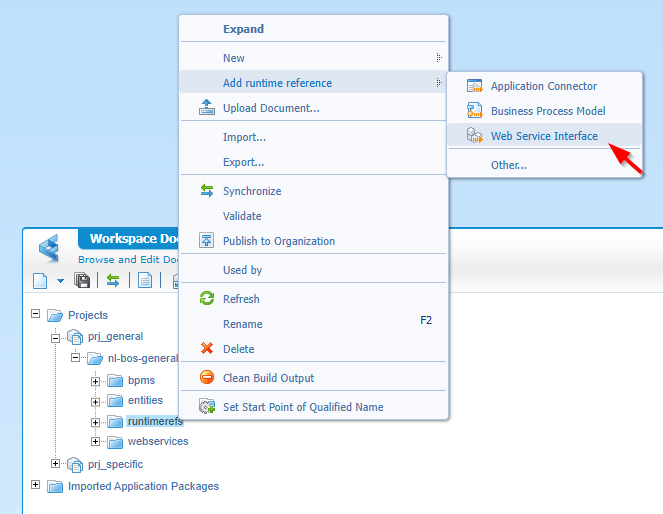
You can add a runtimereference from the context menu of the project:
We will consume the ReST API of OTCS/xECM, so we also need a new service container and service group of type “OpenText HTTP Connector”. You can do this from the ‘System Resource Manager’ artifact with this input:
- Connector:
OpenText HTTP Connector - Service group:
sg_http - Add the default two method sets for config and transform
- Service name:
sc_http - Assign to the OS
- Startup automatically
- Point to this path as config XML:
OpenText/HttpConnector/config.xml
Because of the dependent config.xml, we also add this file to our project with the same folder structure having the root as “Start Point of Qualified Name”. The XML has this content part:
1 | <connection id="xecm"> |
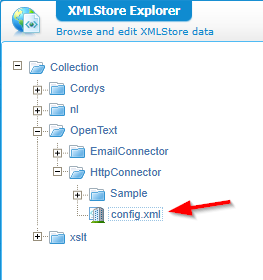
With the correct XML Store definition, the XML should land in this location of the XML store after a publication: OpenText/HttpConnector/config.xml. Double check it with the ‘XML Store Explorer’ artifact:
If the above goes too quickly; Have a look at this post where we explain it in much more details!
Right…let’s continue our journey!
It’s time for some webservices…A separate type of document (like your ‘Entity’ type of document)
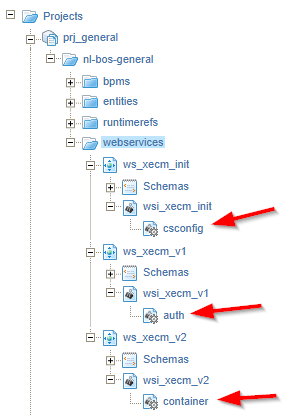
Create three new custom type of services with this input:
- xECM
- Service name:
ws_xecm - Namespace:
xecm - Interface name:
wsi_xecm - Implementation class: The HTTP runtime reference!
- Operation:
csconfig
- Service name:
- xECM v1
- Service name:
ws_xecm_v1 - Namespace:
xecm - Interface name:
wsi_xecm_v1 - Implementation class: The HTTP runtime reference!
- Operation:
auth
- Service name:
- xECM v2
- Service name:
ws_xecm_v2 - Namespace:
xecm - Interface name:
wsi_xecm_v2 - Implementation class: The HTTP runtime reference!
- Operation:
container
- Service name:
Your result is something like this:
Now each service requires an implementation XML; So, double-click on each one of them and add the below implementation XML parts:
For csconfig:
1 | <implementation |
Once “implemented” and published, you can do a call like this from the ‘Web Service Interface’ explorer (or right-click and do a test call)
1 | <SOAP:Envelope xmlns:SOAP="http://schemas.xmlsoap.org/soap/envelope/"> |
The organization name
<orgname>can even beo=opa_tips,cn=cordys,cn=defaultInst,o=mydomain.com. You’ll later see this is an available value in the BPM instance properties! So, we don’t require to do any advanced xPath-substringy-tricks!
For auth:
1 | <implementation |
Once “implemented” and published you can do a call like this from the ‘Web Service Interface’ explorer (or right-click and do a test call)
1 | <SOAP:Envelope xmlns:SOAP="http://schemas.xmlsoap.org/soap/envelope/"> |
For container:
1 | <implementation |
Once “implemented” and published you can do a call like this from the ‘Web Service Interface’ explorer (or right-click and do a test call)
1 | <SOAP:Envelope xmlns:SOAP="http://schemas.xmlsoap.org/soap/envelope/"> |
Nice technical stuff so far…Time for a coffee! I hope you’re still with me! 😉
A quick question: Would you also split
cs/api/v1andcs/api/v2as we did above? Let me know in the comments! It was not a specific reason, but just tasted good!
The BPM implementation
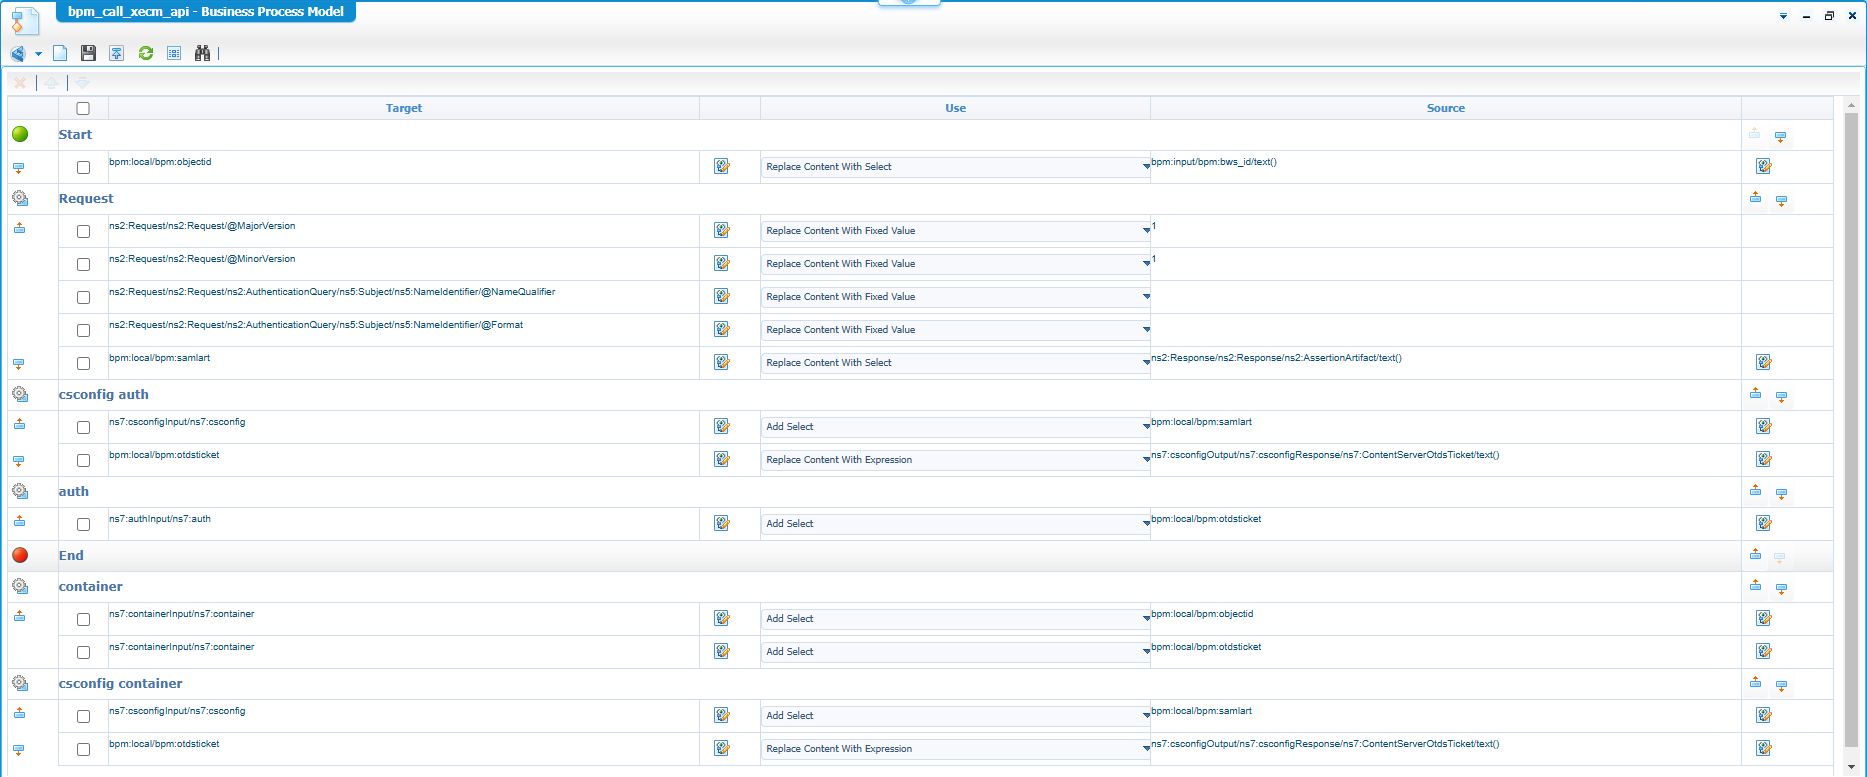
From your project perspective in (a new!?) bpms folder create a new BPM type of document with name bpm_call_xecm_api. You can do a first implementation like this injecting the webservices to the activities:

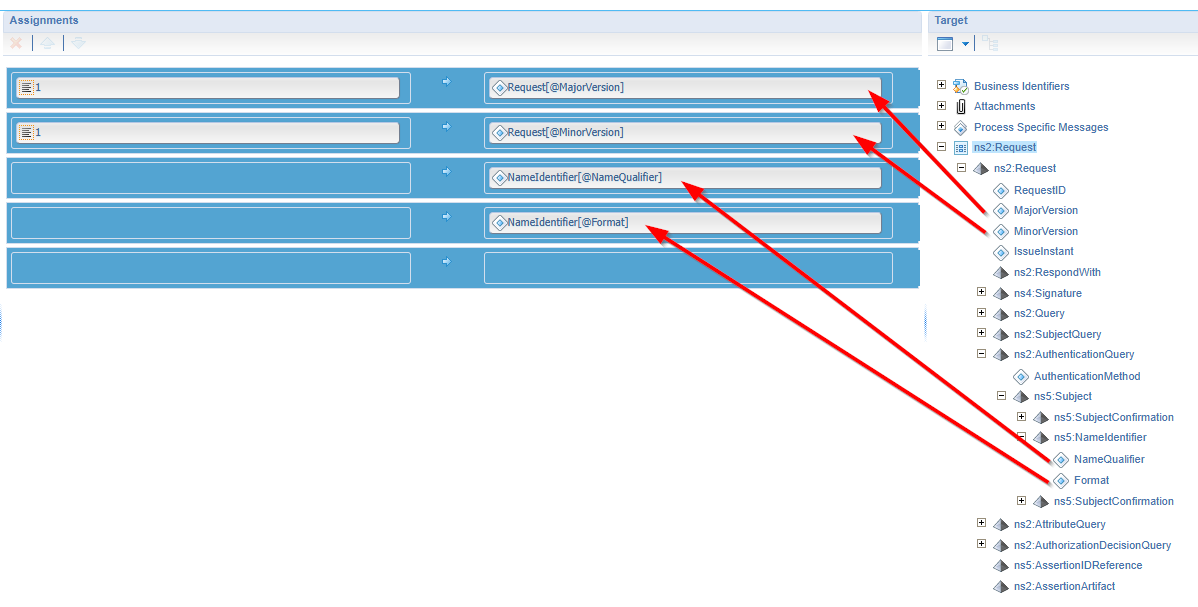
Move into the messagemap and do your mapping tricks on the ‘Request’ like this (all fixed values):
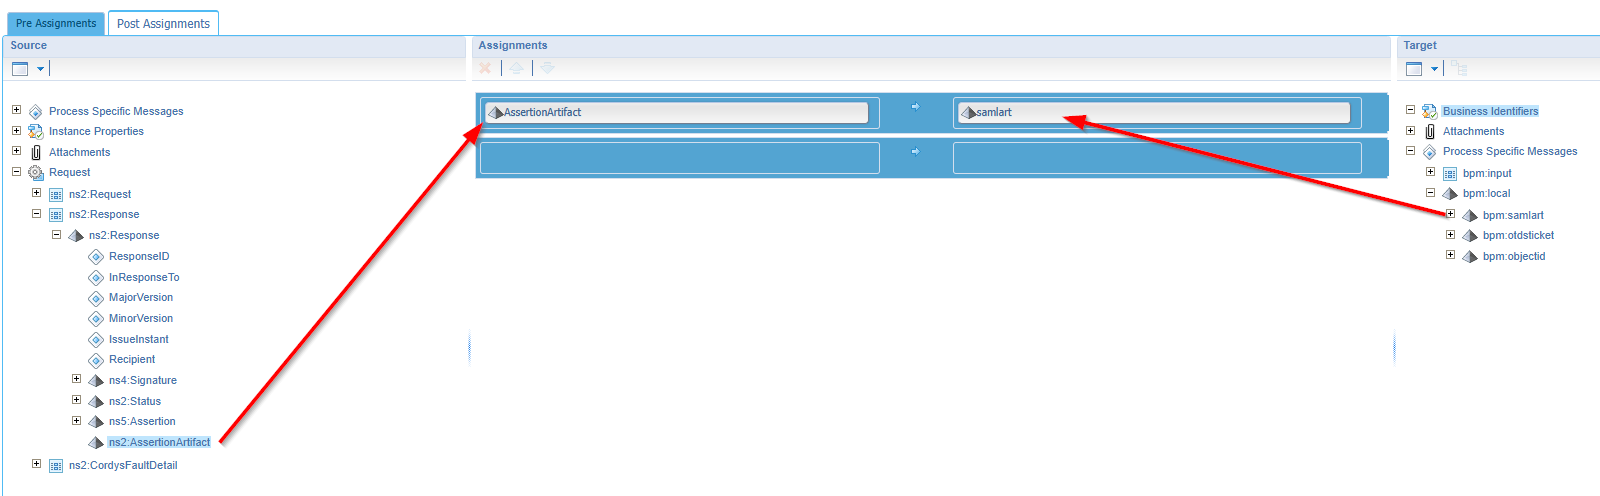
In the post assignment for this ‘Request’, I save the SAMLart token for further usage (like a global BPM variable):
Next is the csconfig call (watch the ‘Add Select’ usage! We need the full element in the call; incl. the <samlart>):

You get an otdsticket as response which we save in the post assignment (as variable again!):
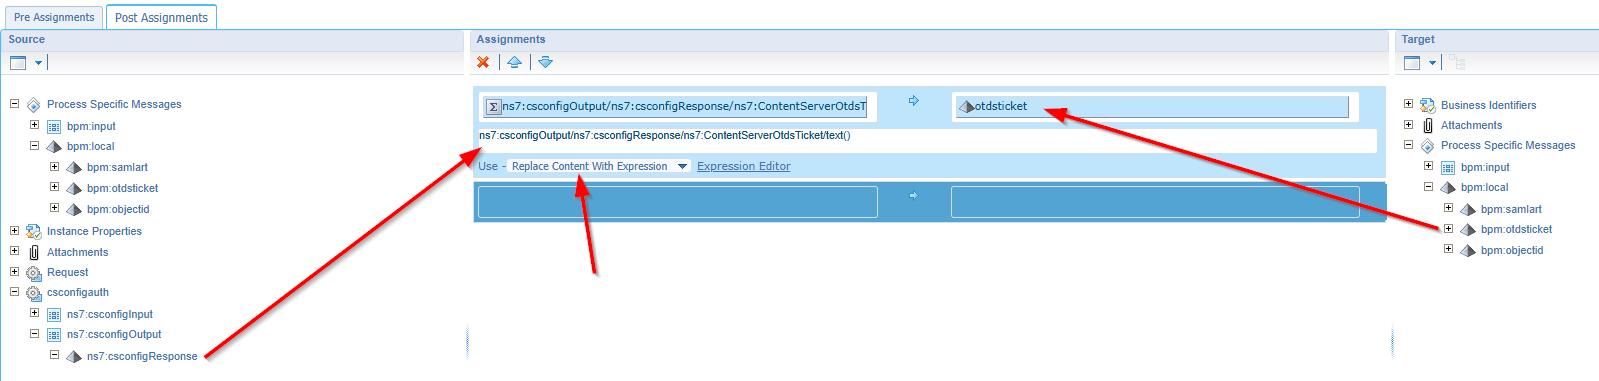
You see me doing an expression
ns7:csconfigOutput/ns7:csconfigResponse/ns7:ContentServerOtdsTicket/text()which you don’t see on the left side to select! #WTF…Yes, that’s a trick you can learn here
Let’s continue to the auth request mapping which is as simple as this (again with an ‘Add Select’):

For the container call, it’s all the same stuff. Adding two elements; the OTDS ticket and a BW ID:

Now the great question where to get the objectid from? I set it in the ‘Start’-construct as fixed value, but my improved BPM below uses an input message! The value of the ID itself? Well, that’s xECM/OTCS…Watch out for &objId=2065873&objAction=browse&viewType=1 in the URL for xECM; In my case 2065873!
Do a publication, and a first assessment running the BPM with <F12> from the designer. You will go wrong the first 10X times, but eventually you will see “the light” too! 😇
…
This is my improved final BPM executing the trick very well at this moment of writing:

This is the consolidated view for message map:
Notes:
- Be aware you miss the
orgnamefor thecsconfigcall, but that’s because I made it hard-coded in my initial setup! It’s an improved version in the examples above, but I assume you get the trick…right?- You also see an input message on the green start construct. It’s not required, but you get a nice popup on starting the BPM where I can inject the ID of the business workspace! It’s not required; It’s just conveniency.
- I also faced an error calling the xECM API layer twice with the same ticket; I solved it with a second
csconfigcall. Comment me when I oversee something here…
That’s the impossible made possible; A BUSTED “DONE” where I will never use a “Service account” to communicate across OpenText products. Use OTDS as central authentication component and reuse your current session for further communication. Security wise, your solution will be much safer and solid in usability and traceability. Have a great weekend and see you next week for another great topic of “Process Automation Tips”. Cheerzzz!
Don’t forget to subscribe to get updates on the activities happening on this site. Have you noticed the quiz where you find out if you are also “The Process Automation guy”?
