/ Development  

Expand productivity; The game-changing setup for PIM 2.0 you need to see

Hi there “Process Automation” fans,

Welcome to a new installment of “Process Automation” tips.

It’s been a week later with the OTDS admin login hack in between; It gave me a little extra time to build something nice to get a head start for all our creativity. This week we’ll continue the custom artifact creation with the first implementation of the GridJS library and calling the Soap services of the good old PIM with a fresh start. Get yourself a drink and see how easy you can implement something nice and quickly where you can continue to put the dots on the ‘I’…

You can download the full project of the implementation here


Let get right into it…

First things first; That’s the initialization of the GridJS library. For this we update the playground.html with these three lines of content (see comments!):

1
2
3
4
5
6
7
8
9
10
11
12
13
14
15
16
17
18
19
20
21
22
23
24
25
26
27
28
29
<!DOCTYPE html>
<html>
<head>
<title>Page Title</title>
<link rel="stylesheet"
href="/cordys/thirdparty/jquery/cordys.min.css"
type="text/css"/>
<link rel="stylesheet"
href="../app/start/web/startup.css"
type="text/css" />
<!--GridJS CSS-->
<link rel="stylesheet"
href="https://cdn.jsdelivr.net/npm/gridjs/dist/theme/mermaid.min.css" />
<script src="/cordys/thirdparty/jquery/jquery.debug.js"
type="text/javascript"></script>
<script src="/cordys/html5/cordys.html5sdk.debug.js"
type="text/javascript"></script>
<script src="/cordys/html5/cordys.html5sdk.util.debug.js"
type="text/javascript"></script>
<!--GridJS CSS-->
<script src="https://cdn.jsdelivr.net/npm/gridjs/dist/gridjs.umd.js"></script>
<script src="./../js/playground.js"
type="text/javascript"></script>
</head>
<body>
<!--GridJS placeholder-->
<div id="wrapper"></div>
</body>
</html>

You also see me adding cordys.min.css, cordys.html5sdk.debug.js, and cordys.html5sdk.util.debug.js; They’re part of the HTML5SDK we’ll use later in this post!

Next, is an update in the playground.js file to fill the placeholder-<div> with a grid of dummy data:

1
2
3
4
5
6
7
8
9
10
11
12
13
14
$(document).ready(function() {
new gridjs.Grid({
columns: ["Name", "Email", "Phone Number"],
sort: true,
data: [
["John", "john@example.com", "(353) 01 222 3333"],
["Mark", "mark@gmail.com", "(01) 22 888 4444"],
["Eoin", "eoin@gmail.com", "0097 22 654 00033"],
["Sarah", "sarahcdd@gmail.com", "+322 876 1233"],
["Afshin", "afshin@mail.com", "(353) 22 87 8356"]
]
}).render(document.getElementById("wrapper"));

});

Notes:

  • $(document).ready(function() {...}); is a jQuery functionality to call the code when the HTML file is ready loading.
  • After this, it’s all GridJS stuff which you can also read in this “Hello world” example.

So far so good with a first glimpse of our changes in the custom artifact (after publication):

custom_pim_001

You can make it bigger, smaller, whatever…It’ll nicely grow with it; Or when you want to sell it as a product, you call it “Responsiveness”! 🤣

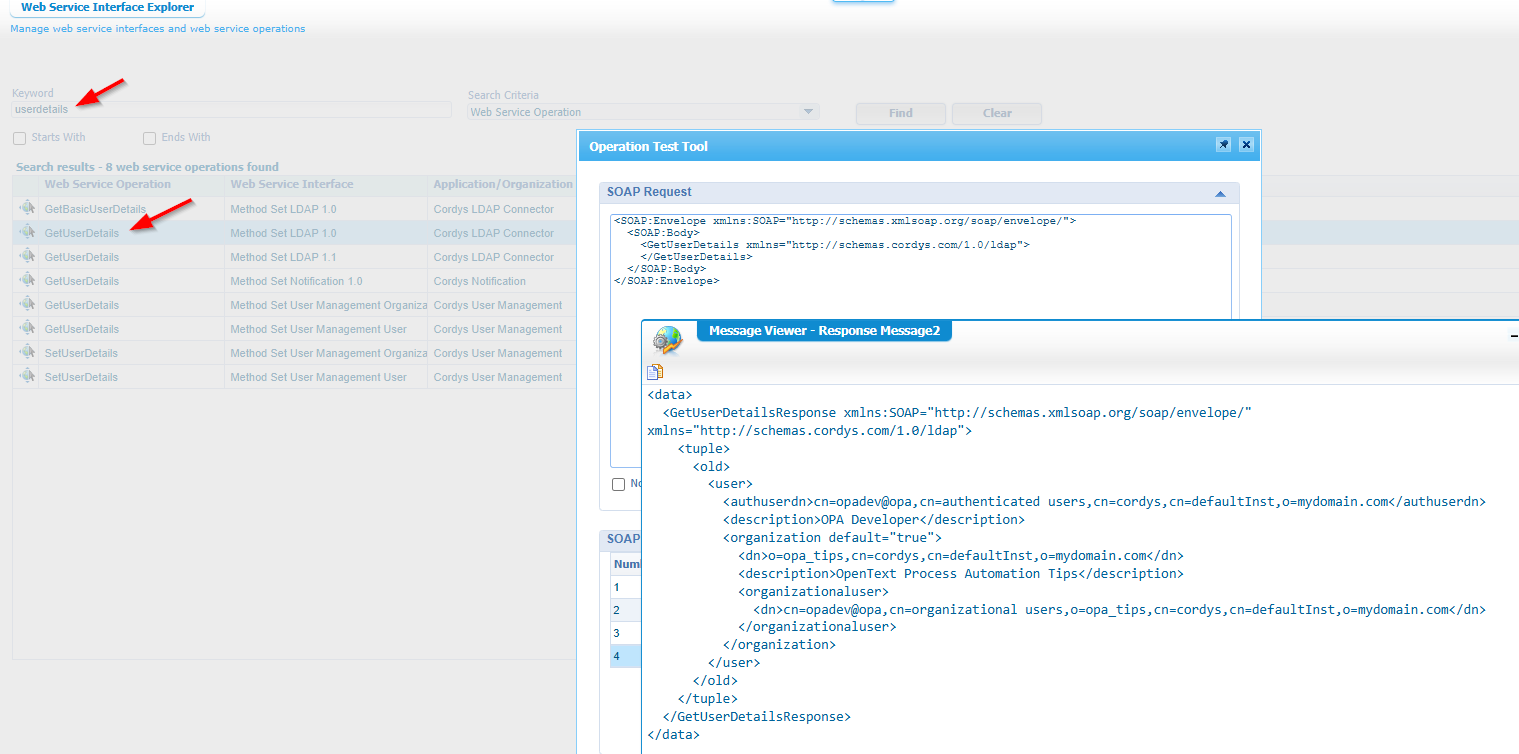
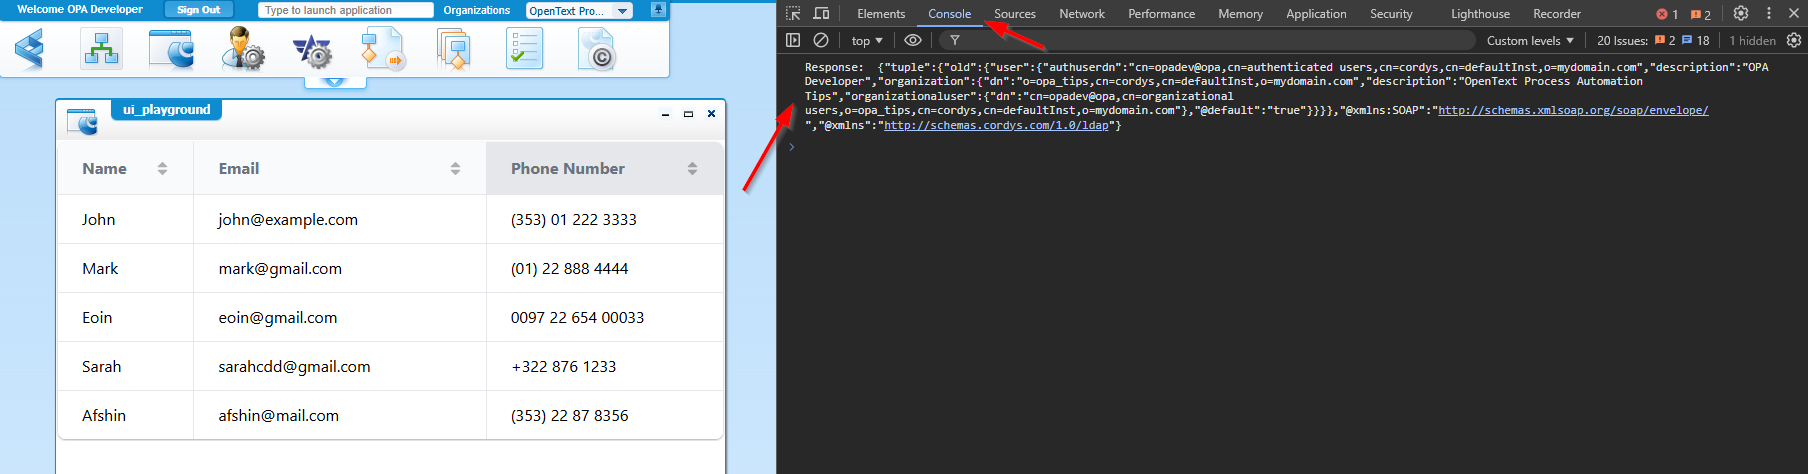
Our next step is to glue our lessons learned from the service calls (3 weeks ago) with this grid! 🤔 How? Well, from this post we learned how to call a Soap service from the HTML5SDK via this peace of code $.cordys.ajax({...}! So, let’s start from there with an update in the playground.js on the simplest Soap call GetUserDetails:

1
2
3
4
5
6
7
8
9
10
11
12
13
14
15
16
17
18
19
20
$(document).ready(function() {
new gridjs.Grid({
...
}).render(document.getElementById("wrapper"));

$.cordys.ajax({
method: "GetUserDetails",
namespace: "http://schemas.cordys.com/1.0/ldap",
success: successFunction,
error: errorFunction
});

function successFunction(response) {
console.log("Response: ", JSON.stringify(response));
};

function errorFunction(error) {
console.log("Error: ", error);
};
});

This is how it’ll look like from the ‘Web Service Interface Explorer’ artifact when you do a test:

custom_pim_002

For us (via our custom artifact), and after a publication it’ll look like this:

custom_pim_003

NICEEEEE…Next is the more advanced service call GetProcessInstanceSummary:

1
2
3
4
5
6
7
8
9
10
11
12
13
14
15
16
17
18
19
20
21
22
23
24
25
26
27
28
29
30
31
32
33
34
$(document).ready(function() {
new gridjs.Grid({
...
}).render(document.getElementById("wrapper"));

$.cordys.ajax({
method: "GetProcessInstanceSummary",
namespace: "http://schemas.cordys.com/pim/queryinstancedata/1.0",
parameters: {
'Query': {
'Select': {
'QueryableObject': 'InstancesSummary',
'Field': 'ProcessName'
},
'Filters': {
'In': {
'@field': 'STATUS',
'Value': 'ABORTED'
}
}
}
},
success: successFunction,
error: errorFunction
});

function successFunction(response) {
console.log("Response: ", JSON.stringify(response));
};

function errorFunction(error) {
console.log("Error: ", error);
};
});

Watch the @field which will convert into an attribute within an HTML element…I almost got a headache from it!

Does it work after a publication…What do you think? Dûhhhh!

custom_pim_004

We’re getting close to our target as now we only require gluing this output into our GridJS table! 🤗

Watch this quick update after prompting my friend ChatGPT:

1
2
3
4
5
6
7
8
9
10
11
12
13
14
15
16
17
18
19
20
21
22
23
24
25
26
27
28
29
30
31
32
33
34
35
36
37
38
39
40
41
42
43
44
45
46
47
48
49
50
51
$(document).ready(function() {

$.cordys.ajax({
method: "GetProcessInstanceSummary",
namespace: "http://schemas.cordys.com/pim/queryinstancedata/1.0",
parameters: {
'Query': {
'Select': {
'QueryableObject': 'InstancesSummary',
'Field': 'ProcessName'
},
'Filters': {
'In': {
'@field': 'STATUS',
'Value': ['ABORTED', 'WAITING', 'COMPLETE']
}
}
}
},
success: successFunction,
error: errorFunction
});

function successFunction(response) {
console.log("Response: ", JSON.stringify(response));

const tuples = Array.isArray(response?.tuple) ? response.tuple : [response?.tuple];
const gridData = tuples.map(tuple => {
const instancesSummary = tuple?.old?.InstancesSummary || {};
return [
instancesSummary?.ProcessName || "N/A",
instancesSummary?.Description || "N/A",
instancesSummary?.NrTotal || "0",
instancesSummary?.NrAborted || "0",
instancesSummary?.NrComplete || "0",
instancesSummary?.NrWaiting || "0"
];
});

new gridjs.Grid({
columns: ["Process Name", "Description", "Nr Total", "Nr Aborted", "Nr Complete", "Nr Waiting"],
sort: true,
data: gridData
}).render(document.getElementById("wrapper"));
};

function errorFunction(error) {
console.log("Error: ", error);
};

});

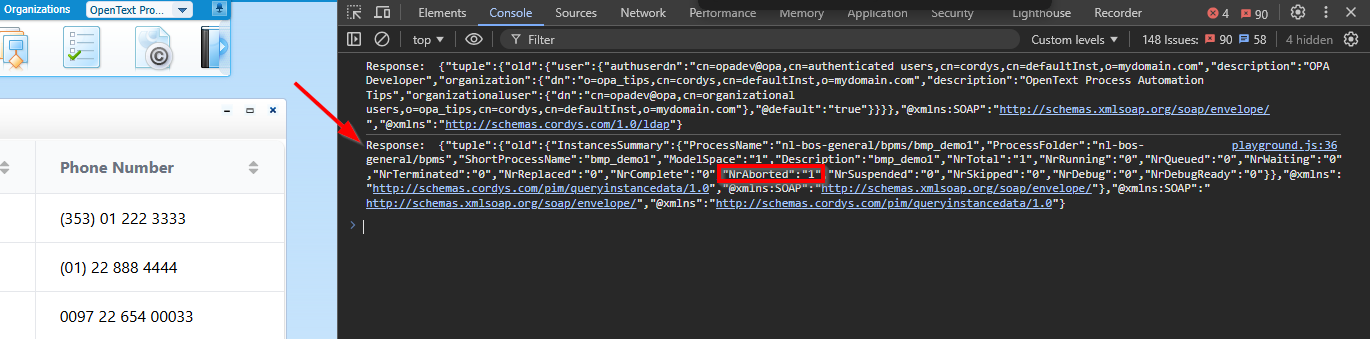
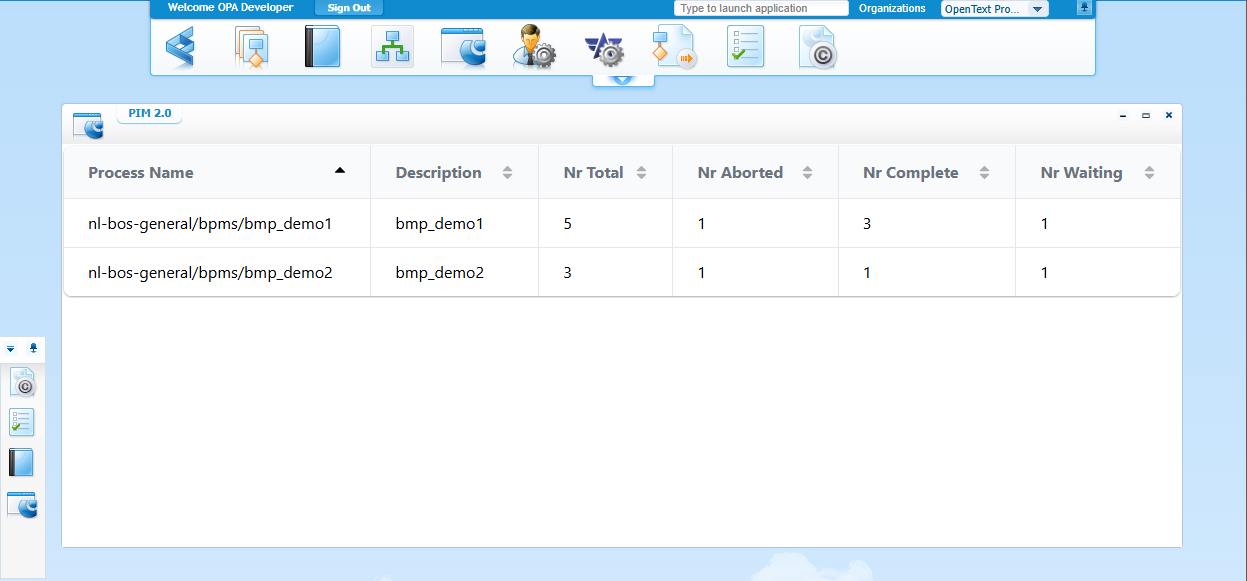
After publication, and playing with some more BPM templates and instances…Watch this:

custom_pim_005

That’s a ReBirth of PIM 2.0 for further extension! 😍


That’s an exposable “DONE” for a new implementation on the PIM artifact; Is it already PIM 2.0? Well, not if it’s up to me. You see already the power of reusing libraries and putting the lessons in practice from previous posts. Here it all comes together with a basic implemented piece of customization you can continue with; Have fun with it! We see each other next week on a total new topic. It’s not the custom CIM implementation…I leave that one with you! 😏

Don’t forget to subscribe to get updates on the activities happening on this site. Have you noticed the quiz where you find out if you are also “The Process Automation guy”?