
Hi there AppWorks fans,
Welcome to a new installment of AppWorks tips.
This is our final post on the extended ECM (xECM) part of the platform where we glue it all together with so-called business workspaces. This is a building block available on an entity within AppWorks. We’re ready on all preparation this far from all previous posts, so we should be fine to finalize this post with a “happy end”!
Let’s get right into it…
First an overview of what we have so far:
- We have AppWorks up and running:
http://192.168.56.107:8080/home/appworks_tips - Also, OTCS is up and running:
http://192.168.56.107:8282/livelink/cs?func=llworkspace- Here we also installed and enabled the xECM module
- Both platforms have a seamless authentication through OTDS:
http://192.168.56.107:8181/otds-admin- I have the account
awadminprepared for this.
- I have the account
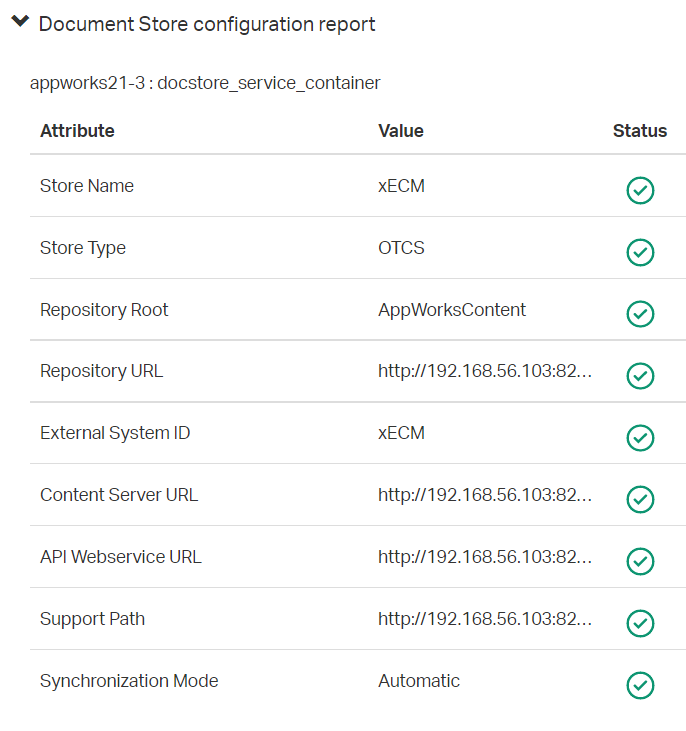
- We’ve created a documentstore service container in AppWorks which points to OTCS folder
/Enterprise/AppWorksContent- Updated the OTCS folder with “full access” for all (not smart but does the trick well enough!)
- We exposed an extra required CWS service layer:
http://192.168.56.103:8282/cws/services/DocumentManagement - Created an entity with the ‘Content’ BB applied
- Finally, we also prepared xECM to be able to use business workspaces
- This exposed an extra webservice for xECM:
http://192.168.56.103:8282/otsapxecm/services/ECMLink - Update the documentstore connector with this information
- This exposed an extra webservice for xECM:
This will be the plan for this post:
- In AppWorks we create a second entity with the ‘Business workspace’ BB applied
- In OTCS we need to create several types of documents (keep on reading for more information):
- A “Folder” to create a business workspaces (just like the
AppWorksContent…With full permission!) - A “Category”
- A “Classification”
- A “Workspace Type”
- A “Business Workspace”
- A “Folder” to create a business workspaces (just like the
- In xECM (within OTCS) we create two extra documents:
- A “Business Application”
- A “Business Object Type”
- Do a final test AppWorks runtime (for the second entity)
- Post questions:
- What do we see created in OTCS; should be a connected workspace?
- What is the
/app/admintelling me now?
Time to descend and nail this post to a final conclusion…
A second entity with the ‘Business workspace’ BB applied
Well, I guess you can do this step on your own…right?
This is what I did:
Open your workspace and corresponding project (or create one if you don’t have it yet)
Create an ‘entities’ folder (if not yet available)
Create a new ‘Entity’ type of document in this new folder (just with one property, and generate all the rest)
Update the layout of the entity with a ‘Business Workspace’ panel
Add the ‘Business workspace’ BB to it (make sure to select at minimal one property store)
![bws_001]()
Publish it all, and have a first test
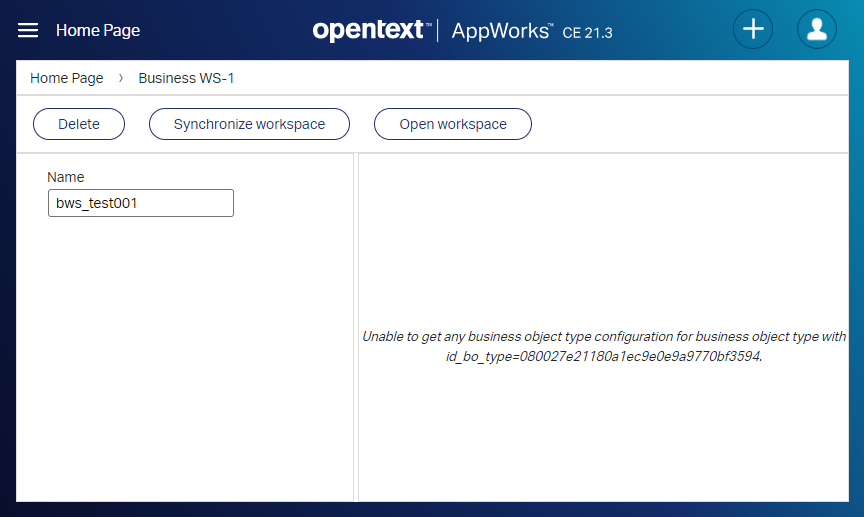
After creating a new instance of this entity and directly open it, we see our first (as expected!) hurdle to take:
Create a second “Folder”
We’ve already created a folder in the ‘Enterprise’ workspace with name AppWorksContent. We just create a second one with name AppWorksWorkspaces. Don’t forget to apply a full permission on the public access level. Not smart, but it works for our demo!

Easy!…Next…
Create a “Category”
Time to do dive more into the OTCS configuration where we start with a new “Category”. An applied category to an object in content server will “describe” the object with custom metadata / properties, so we can easily find it back. I’m a Documentum guy, so it took me a while before the concept of “categories” fell into place. In Documentum, we use a tool called ‘Composer’ to create custom attributes on an object type. Why do we need this specifically for xECM? Well, eventually we would like to use a property in this category to fill it with a value retrieved from the AppWorks entity instance!
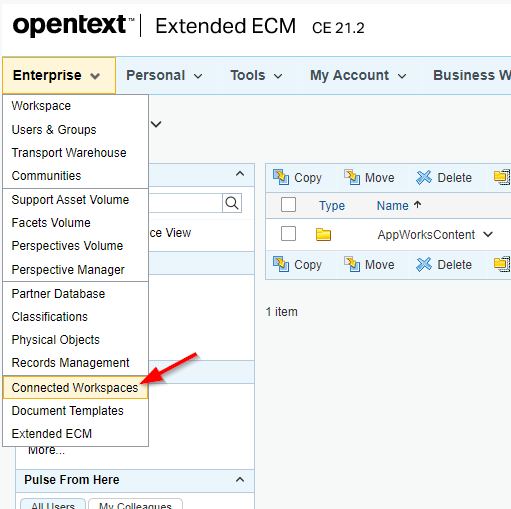
Open OTCS (with in my case the awadmin account with full permission) on URL: http://192.168.56.107:8282/livelink/cs. Open the ‘Connected Workspaces’ from the menu:
We end up in the landing page for connected workspaces. Now open the ‘Categories’ element:
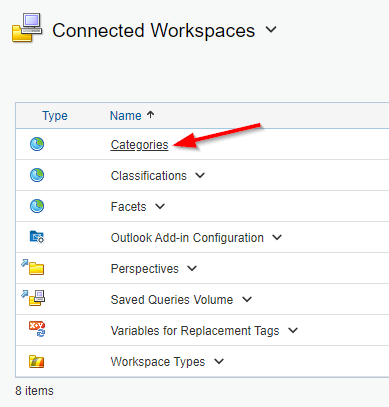
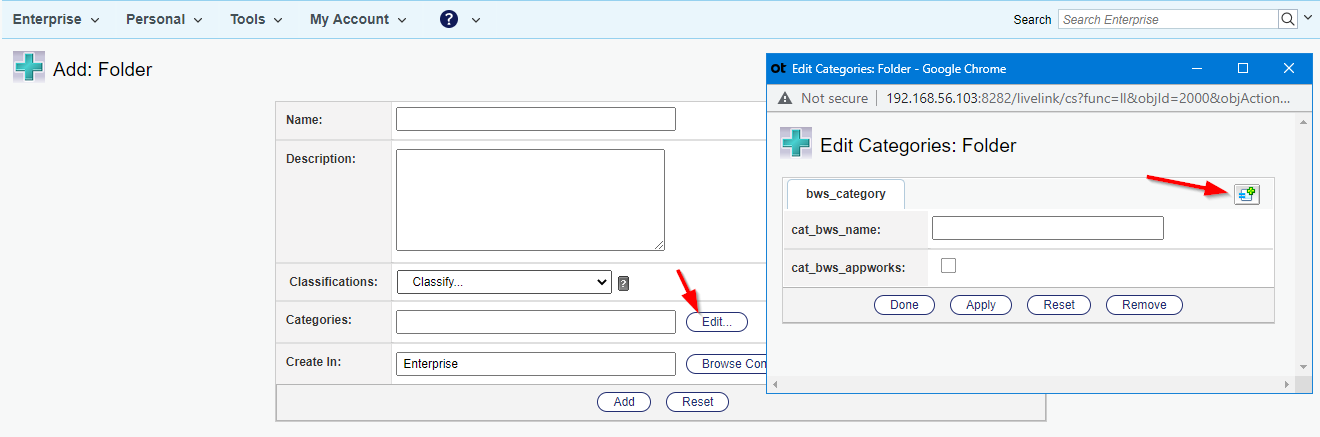
You see already the generated category passing by from our previous documentstore connector in AppWorks (have yourself a closer look if you like). We continue by creating a new category from the menu:
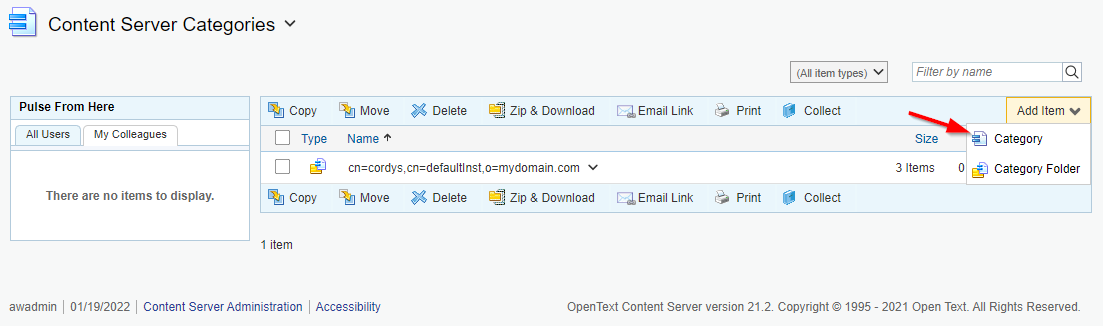
We see a new creation screen:
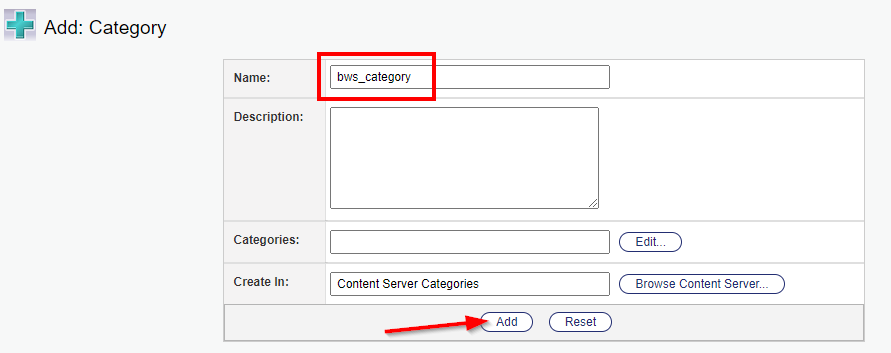
Give an interesting name and hit the ‘Add’ button. Now just open the new created category, and you have the ability to add new properties to it:
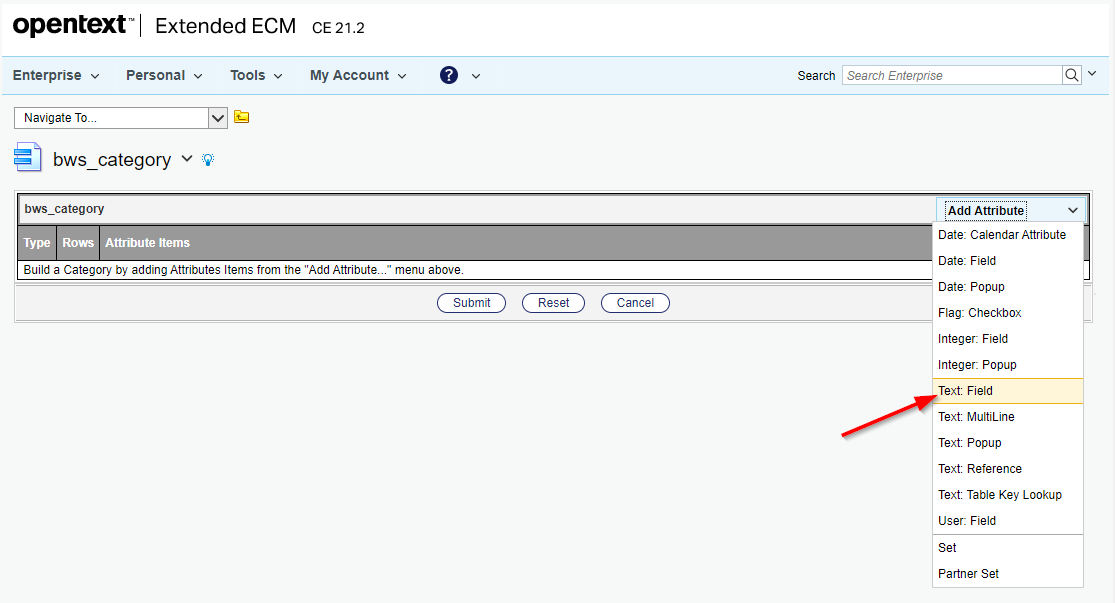
You will see this field configuration:
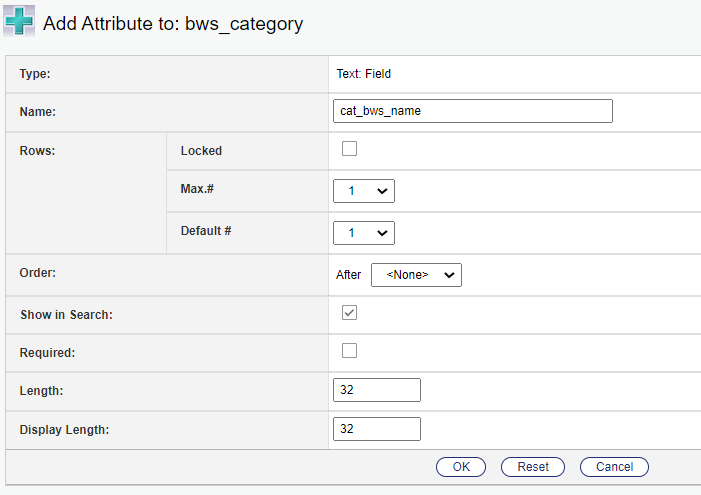
I give it the name
cat_bws_namewisely to make the difference between the entity propertybws_namewhich we will map to each other later on!
This will be the end-result we can do a ‘Submit’ on (the second “flag”-property is just to play around with).
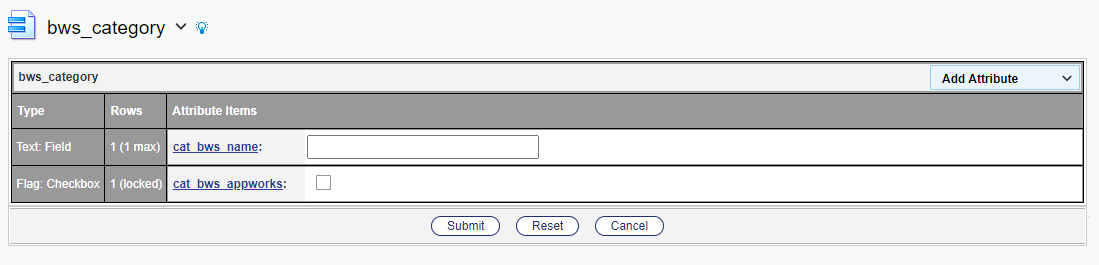
That’s it…Our first category in OTCS…Hooray!
FYI: We can now use this category when you create (for example) a new folder / document in your favorite workspace, but this is something we’ll automate in the business workspace connection! Just continue the grind…
Next!
Create a “Classification”
Another ‘Unknown’ terminology for me as a Documentum guy…Smells like another layer of information to find back your data. #RTFM tells me this: “It’s an alternative for users to organize, browse, and search items in OTCS. It provides a systematic grouping of knowledge or items based on a specific set of
criteria!”. Ahaa…I heard about this concept before from my ‘Intelligent Capture’-scanning (aka ‘Captiva’) connected people!
So, let’s create our first classification!? Do this in the same ‘Connected Workspaces’ section in OTCS. Open the ‘Classifications’ link and create yourself a new classification. Well, almost!…First a “Classification Tree”? What?…Another unknown term!?
A little Google would be in place…
https://www.solver.com/classification-treehttps://en.wikipedia.org/wiki/Decision_tree_learningNice, so our ‘mined’ data will fall through a forest of classification trees, before it eventually will get its final classification applied…Interesting stuff, but out of scope for this post.
We just continue our journey and create just a new tree with just one ‘trunk’! Let’s name it one_trunked_tree. 😏
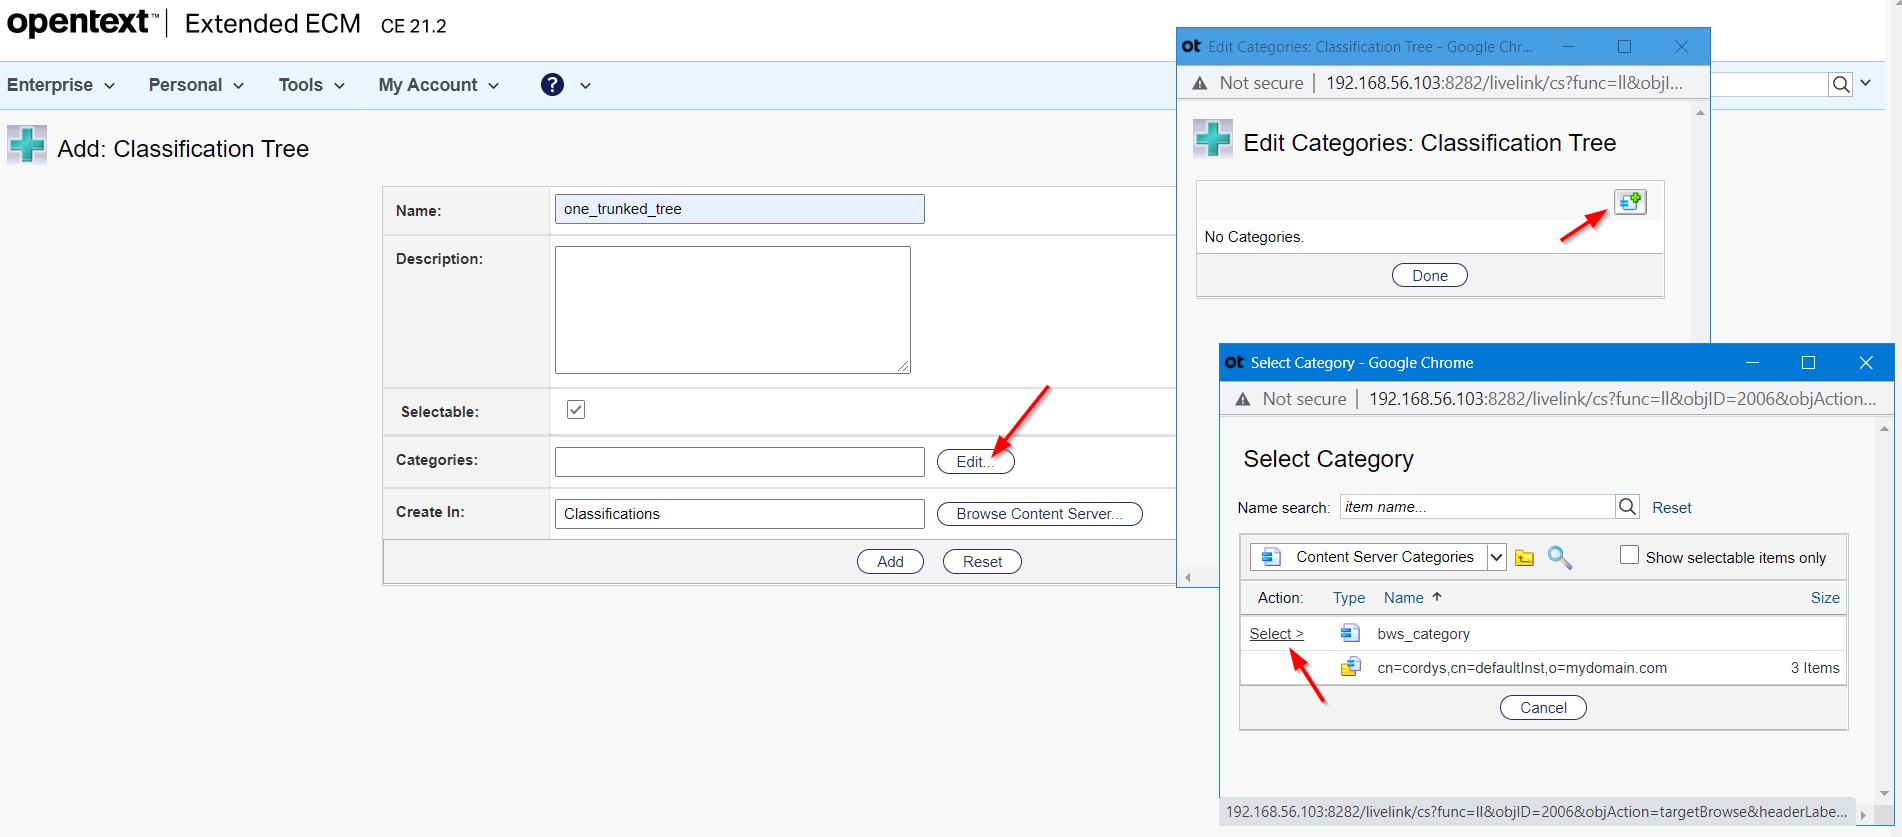
Before hitting the ‘Add’ button, we also apply our previous created category to our trunk (this makes sure all the classifications in the tree will inherit from it!)
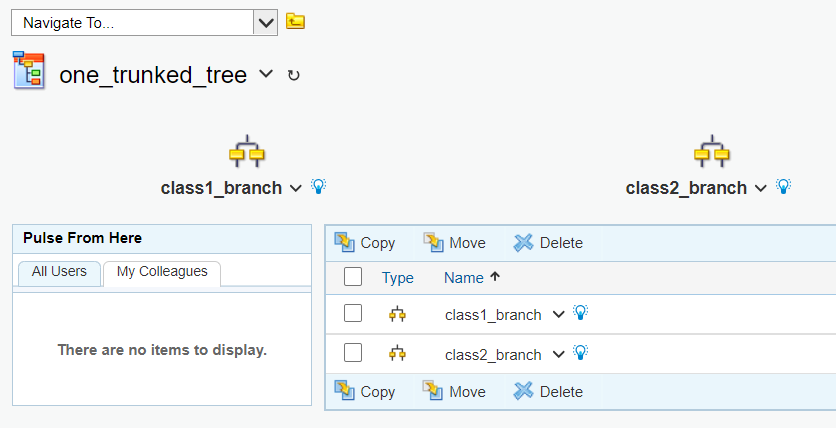
With the category applied we can hit the ‘Add’ button, we get back to the main screen where we can “Open” our one-trunked-tree.
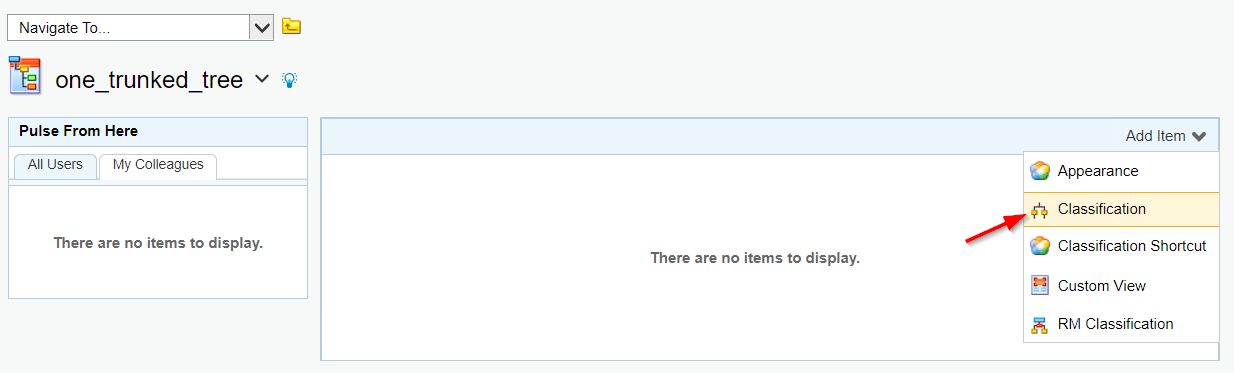
Here we can now create a first classification with (how nice!?) the name class1_branch
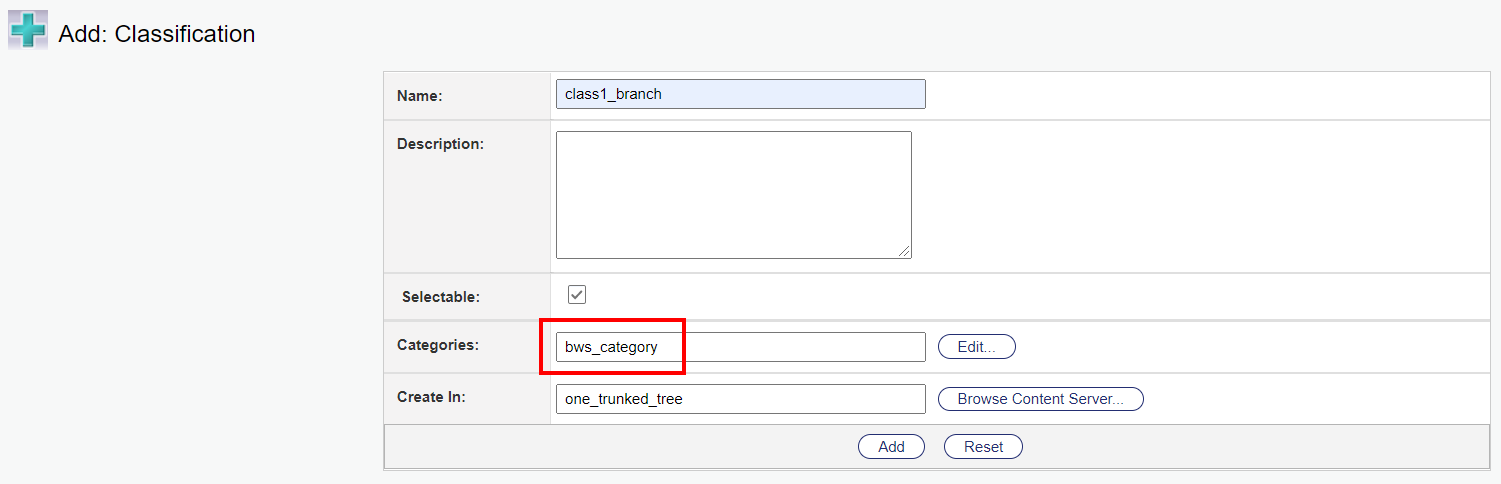
Watch the inherited category and hit the ‘Add’ button to commit it to OTCS. We also create another classification with name class2_branch. This is the final result:
Nice…Learned something in this section! Next…
Create a “Workspace Type”
Again, unknown territory…#RTFM…Looks like this type of document is a “framework provider” for creating business workspaces! Ahaa, we’re getting close. So, this document ‘describes’ how our business workspace will eventually look like! This ‘smells’ like a “template” kind of thing where our business workspace is an instance of it?…comment me if this is a valid conclusion!?
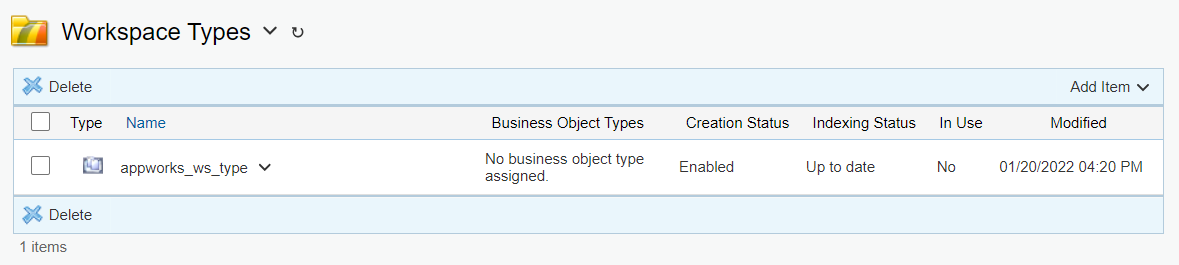
Go to the ‘Connected workspace’ section again, open the ‘Workspace Types’ link, and create a new one:
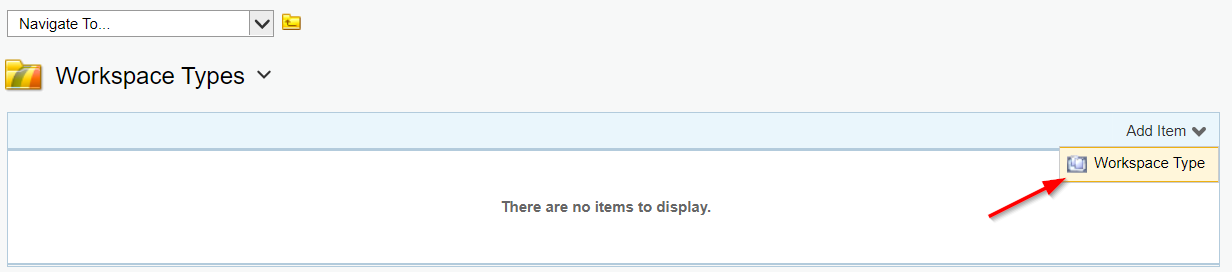
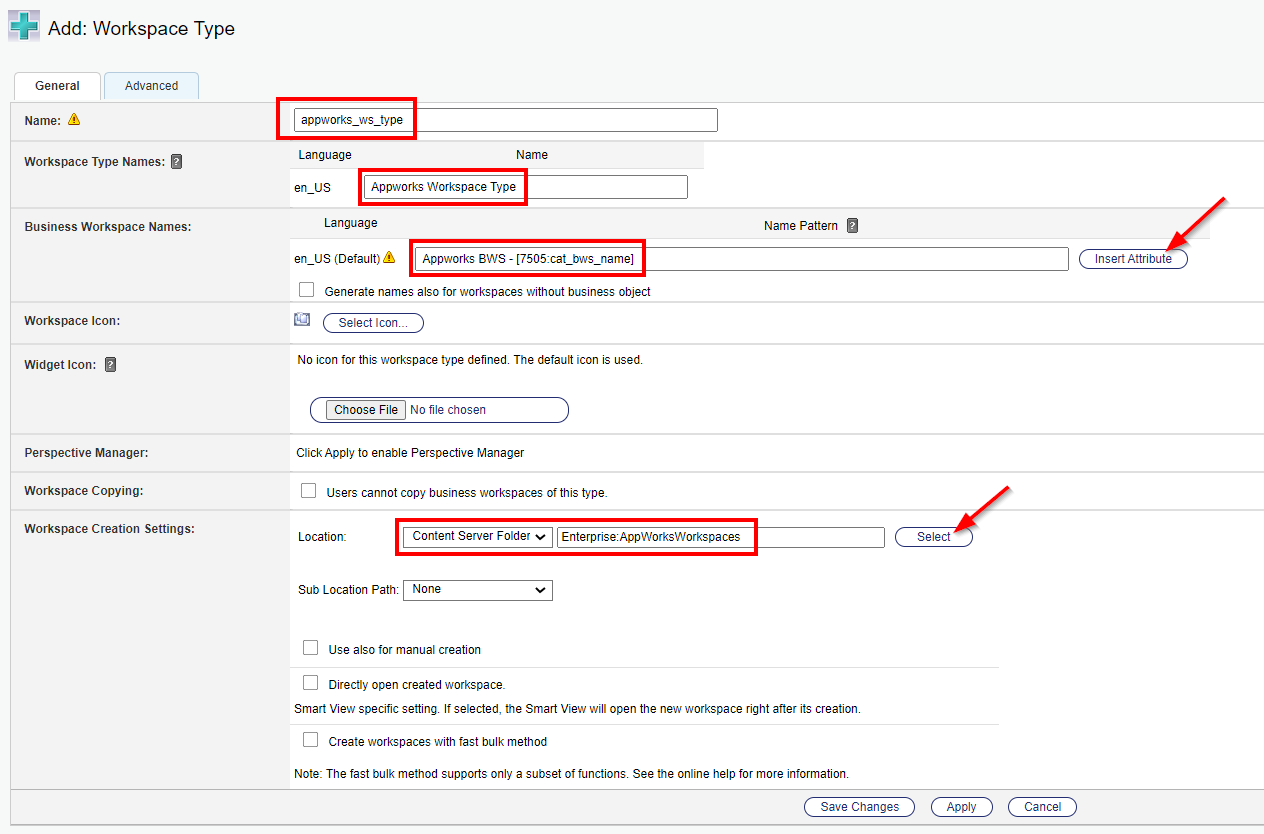
We get an interesting form which we fill it like this
- Provide a name
appworks_ws_type - Add the workspace type name(s) for your languages (see it as the workspace type “label”). I just use
Appworks Workspace Type - For the ‘Business Workspace Names’, I use
Appworks BWS - [7505:cat_bws_name]- The property “bws_category:cat_bws_appworks” is selected from the ‘Insert Attribute’ button!
- The ‘Workspace Creation Settings’ gets an update to ‘Content Server Folder’ where we select our created
AppWorksWorkspacesfolder
This should be your end-goal:
Hit the ‘Save Changes’ button to get back to the overview page of the ‘Workspace Types’
Next step…
Create a “Business Workspace”
Now open the ‘Document Templates’ section of the ‘Enterprise’ dropdown menu. This is the place to create a new ‘Business Workspace’…finally!
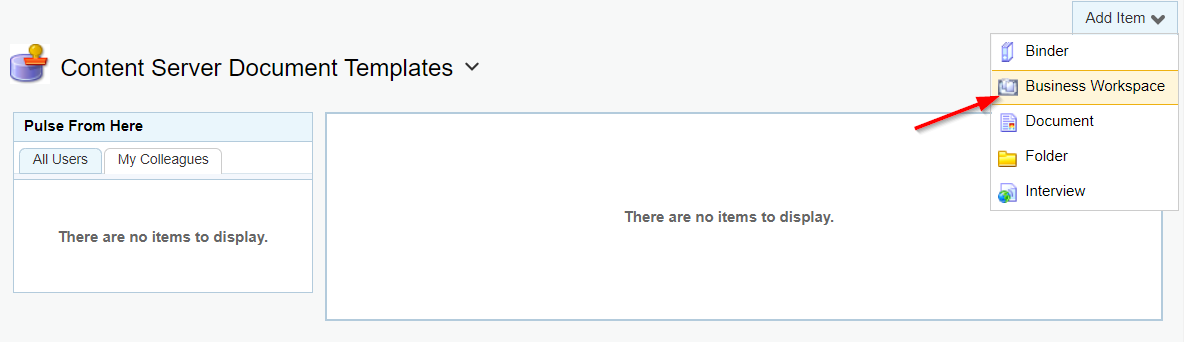
We are in a ‘templates’ section here, so the previous ‘smelled’ conclusion about business workspace isn’t fully correct. We create a template here, so the previous ‘Workspace Type’ is more a framework to describe our business workspace template! When we start to really create our business workspaces (in our
AppWorksWorkspacesfolder), we will have a business workspace instance of this template. Looks like a better conclusion to me! 😅
The form data to use:
- Give a name like
appworks_bws_template - Select the ‘Workspace type’:
appworks_ws_type - Add our classification:
one_trunked_tree:class1_branch - Apply our category:
bws_category - Save it to:
Content Server Document Templates(if not already selected!)
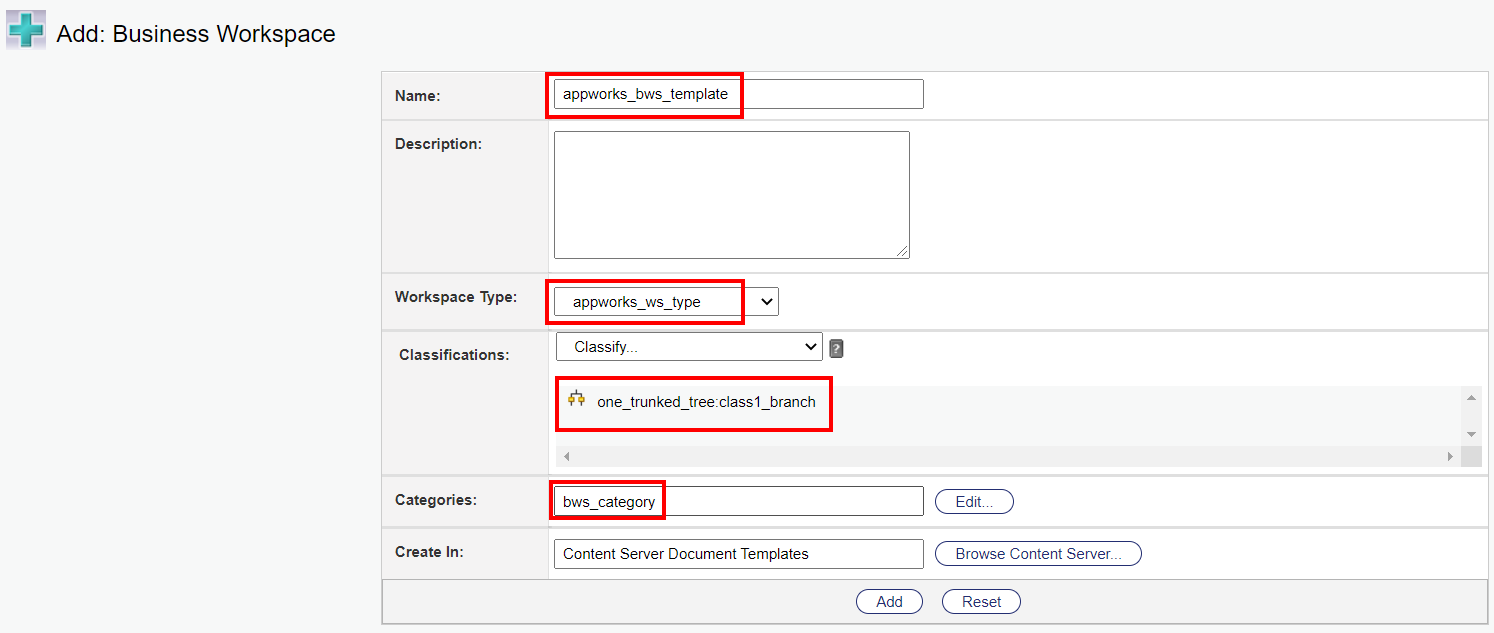
Hmmm…Looks like we glue it all together here!…Save it via the ‘Add’ button. After this, you can open our ‘templated’ business workspace to add a “body” with predefined folders:

Make sure the folder inherit the classification, and category from the parent business workspace template!
We’re getting close my friends…Next!
Create a “Business Application” (part of xECM)
Time for xECM! Open it from the ‘Enterprise’ dropdown menu (last one in the list if you followed all the information correctly!)
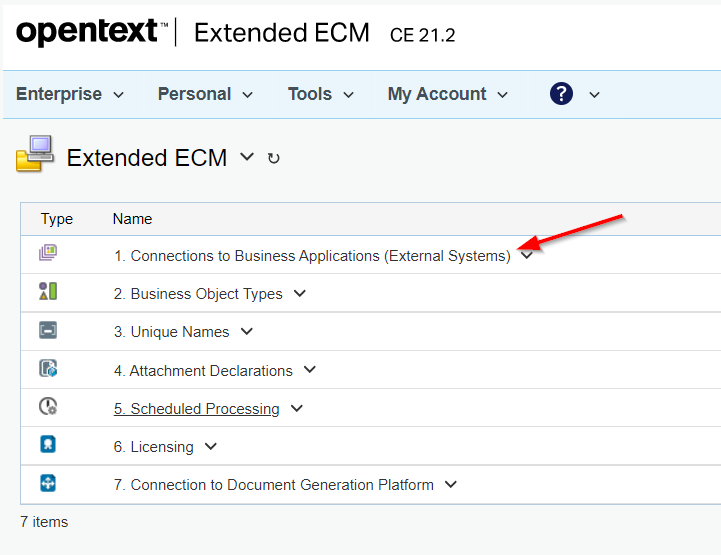
Let’s dive into the creation of a new connection to a business application (our external system…called AppWorks!). You enter a blank screen where we have the ability to add a new ‘Business Application’ type of document.
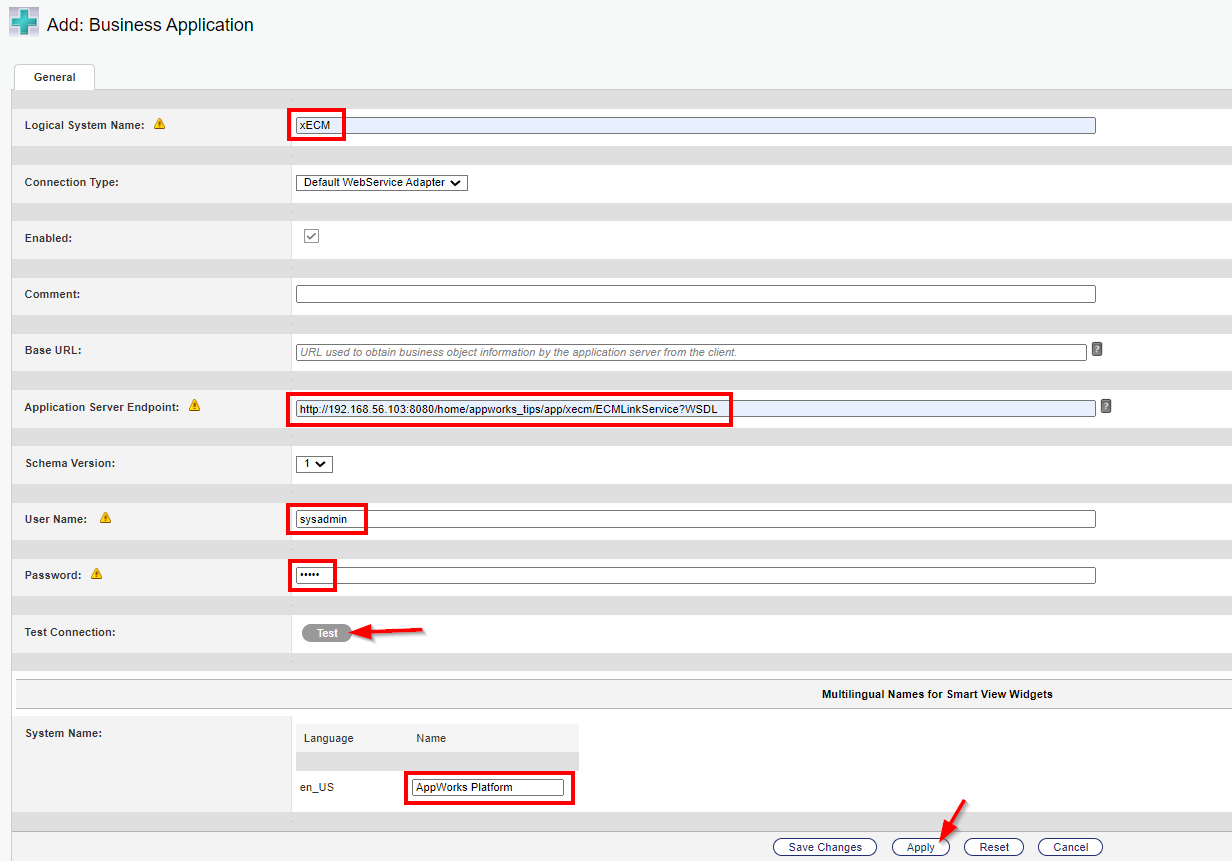
This is how we fill in the requested form:
- Logical System Name:
xECM(NOTE: This name needs to match the ‘External system ID’ defined on the documentstore connector in AppWorks!) - Application Server Endpoint:
http://192.168.56.107:8080/home/appworks_tips/app/xecm/ECMLinkService?WSDL(In AppWorks, each organization has its own xECM end-point available OOTB) - Username:
sysadmin - Password:
admin(in my case!) - System Name:
AppWorks Platform(or whatever you like)
This will be the end-result to give an ‘Apply’ to…Don’t ‘Save Changes’ yet!
You have now the ability to earn a green flag on the ‘Test’ button:
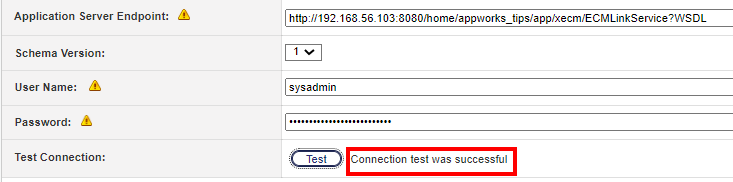
Now, save your stuff and give me a knuckle-bump if you made it this far…You’re my man (or woman)! 👊
Create a “Business Object Type” (part of xECM)
Our last step…Also in the xECM space…The creation of a “Business Object Type” (the same steps as this business application)
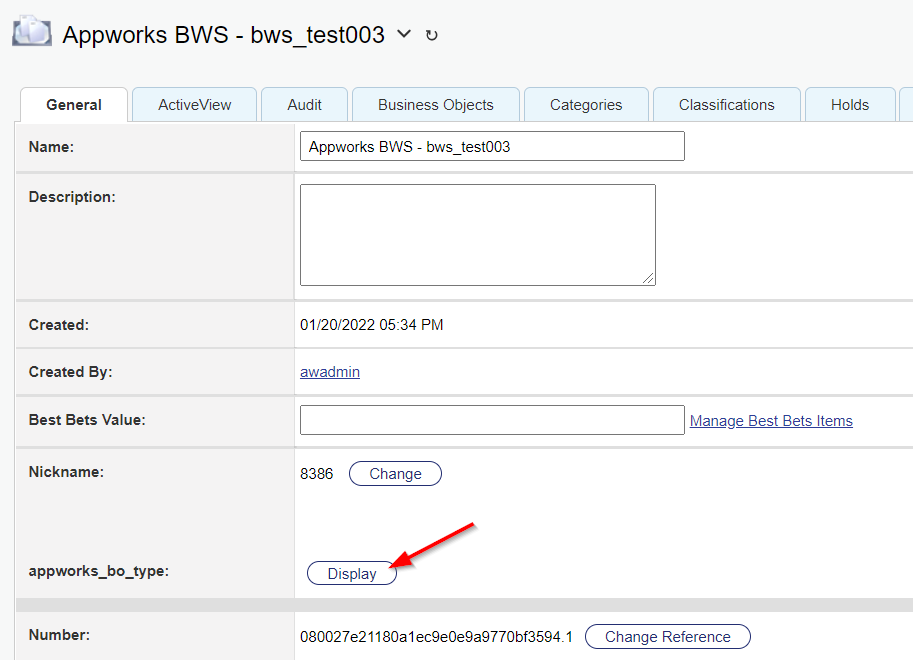
Start with a name like appworks_bo_type and select the just created business application xECM (HTTP). Now let’s hit the ‘Select From Business Application’ button!
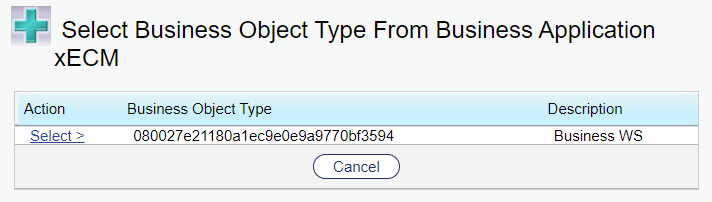
Do you see what I see? Isn’t that a recognizable number!? If not? Scroll back to the top of this post and look again!
Also, double-check the roles on the AppWorks side for your ‘sysadmin’ account which you need to assign as configured on the entity ‘Security’ BB (if applied!)
…
Exactly…That’s an ‘ItemID’ value from our beloved platform! 😁
…
Well…Where are we waiting for…select it!
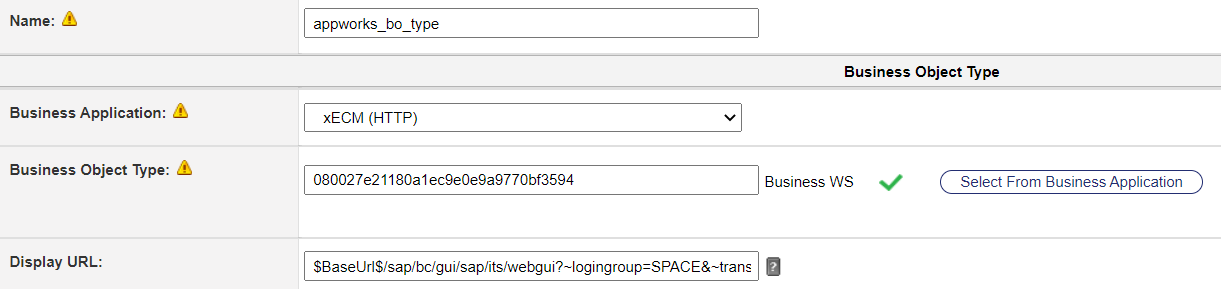
Later on, I also updated the ‘Display URL’ field to
http://192.168.56.103:8080/home/appworks_tips/app/start. The screenshot points to a URL of SAP.
SPOILER ALERT: This is the location where the platform uses this URL definition:
Continue to the ‘Workspace Type’ and select our appworks_ws_type. Same for the ‘Workspace Template’ with value Content Server Document Templates:appworks_bws_template
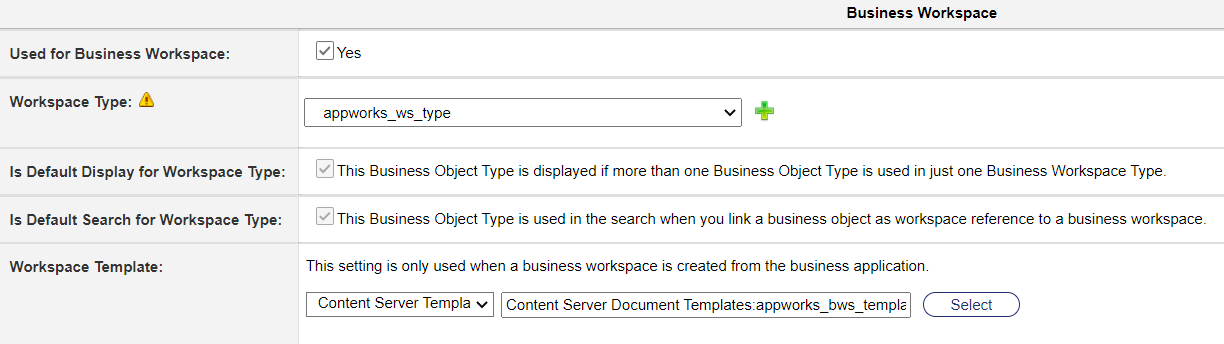
Further down we mark the option ‘Can be Added as Business Object’ and enable the option Enable Metadata Mapping from the business application to OpenText Content Server. Now we have the ability to add a ‘Business Object Name Pattern’ like this [Properties: bws_name]
Yes, you have it correct…This property should match the property name of our previous created entity (the one with the business workspace BB applied!)

In the property mapping we’ll do things like below. We do a mapping from the AppWorks properties to the OTCS properties of our category:
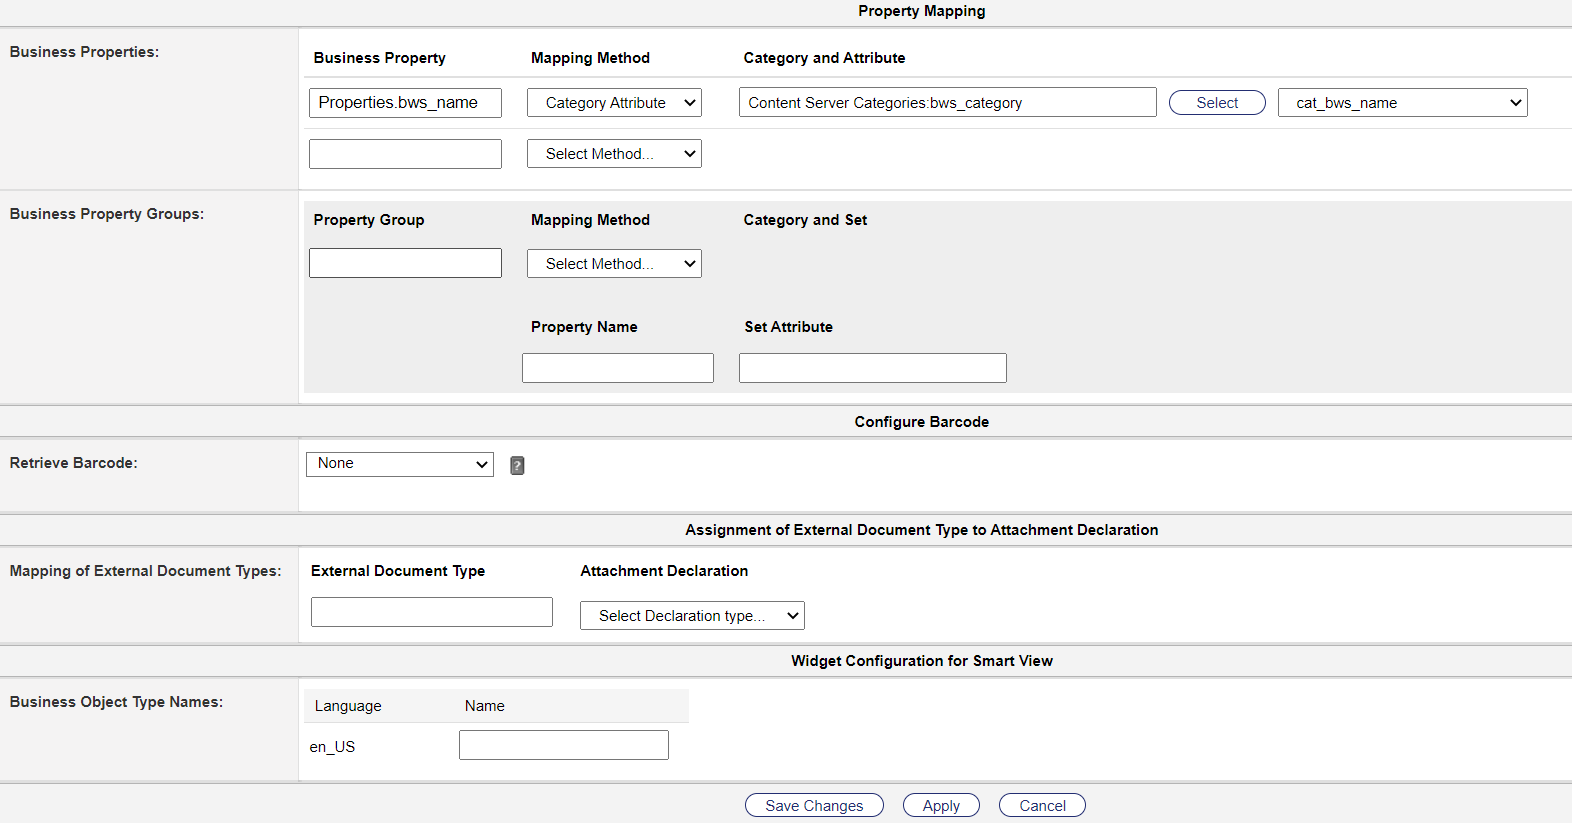
After hitting the ‘Save Changes’ button, we get a nice end-result back:

Looks promising for that final test step! 😍
Try our second entity instance in runtime (again)
Back into AppWorks runtime…without any restart of any service! That’s for the first time!
Open the already instantiated entity with the business workspace applied…Hit the ‘Synchronization workspace’ button!
…
!!OMG!! && !!WTF!! (as my kids would pronounce it)
…
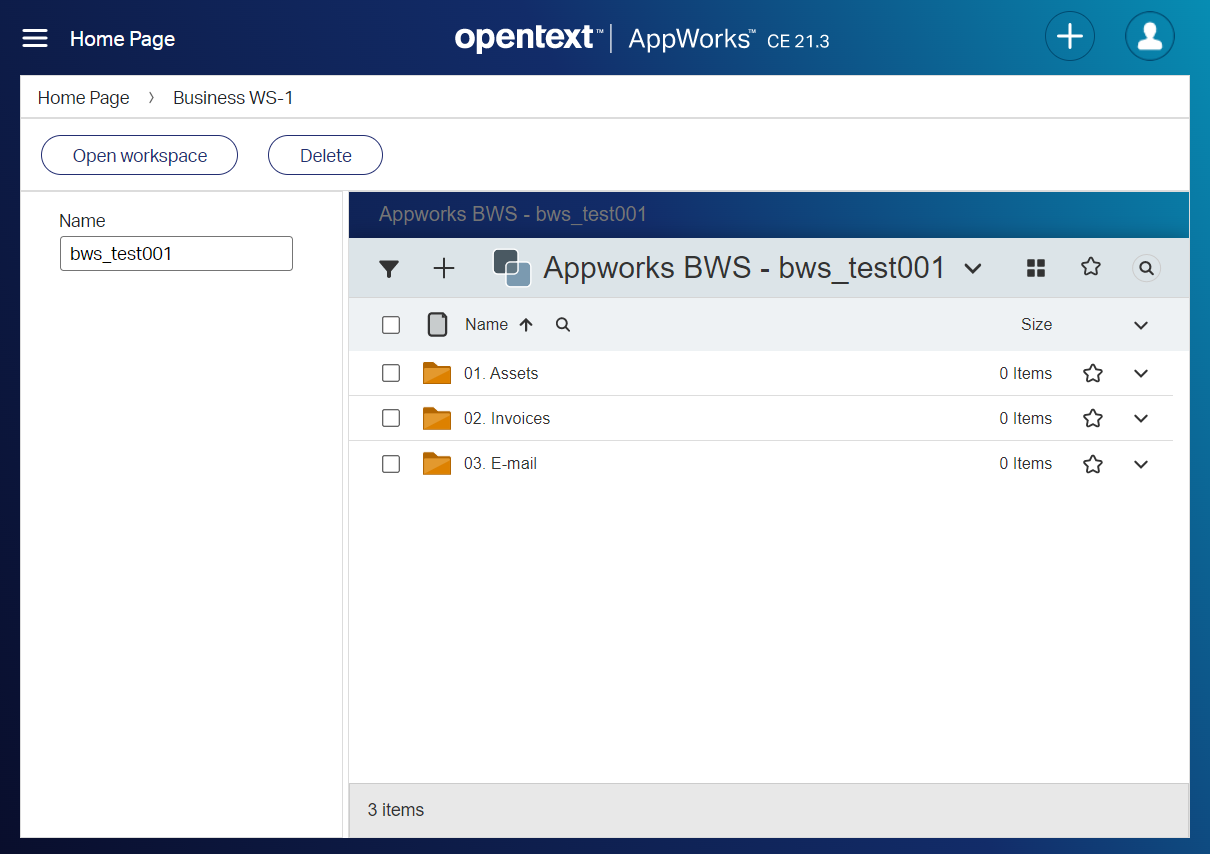
The image clearly shows us a created business workspace with a name based on the configured ‘Workspace Type’ appworks_ws_type…Remember: Appworks BWS - [7505:cat_bws_name]!? So, this means our entity-property-value synchronizes to the category-property-value:
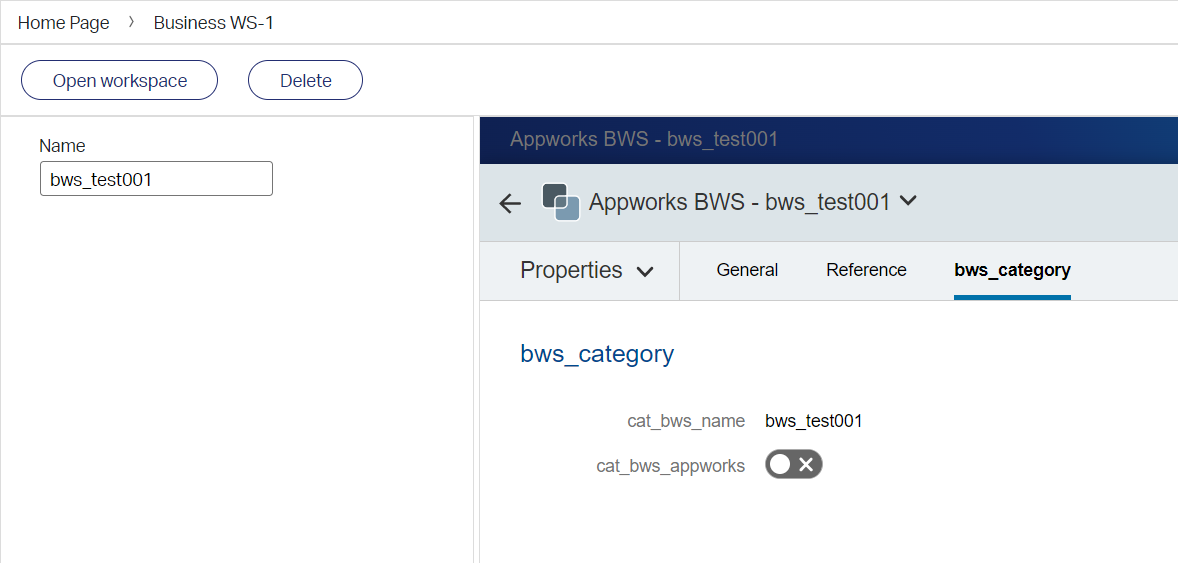
Nice…Beer time! 🍺
Post questions (with answers)
Let’s get ourselves time to answer some questions…
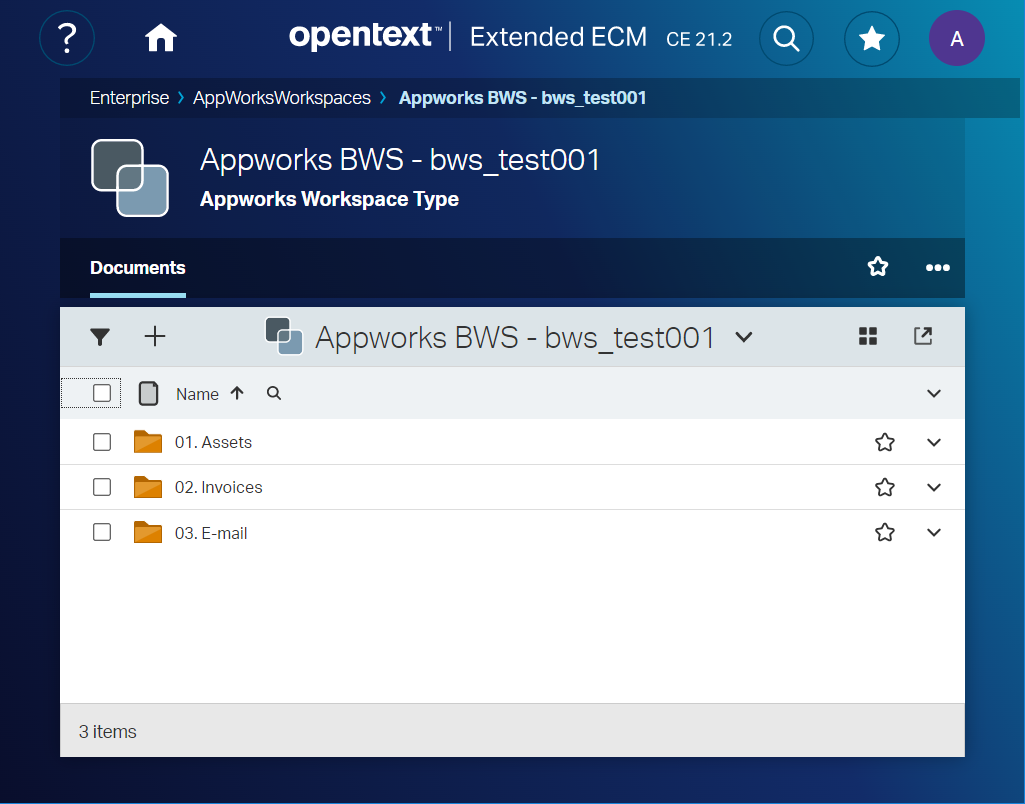
What do we see created in OTCS?
Well, have yourself a view in the ‘AppWorksWorkspaces’ folder via the SmartUI where the screenshot tells us a thousand words!
What is the /app/admin telling me now?
Interesting, since I’ve applied the business workspace BB to my entity I already saw something happening here (Yes…I double-checked up-front!). Two things to note:
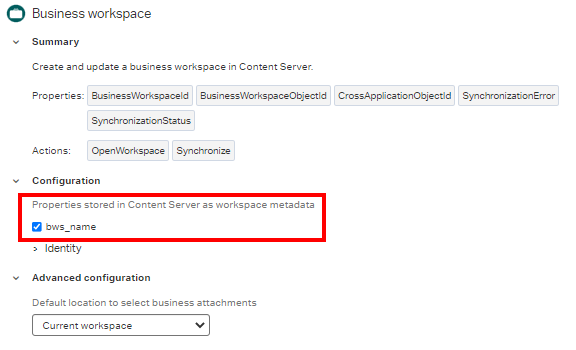
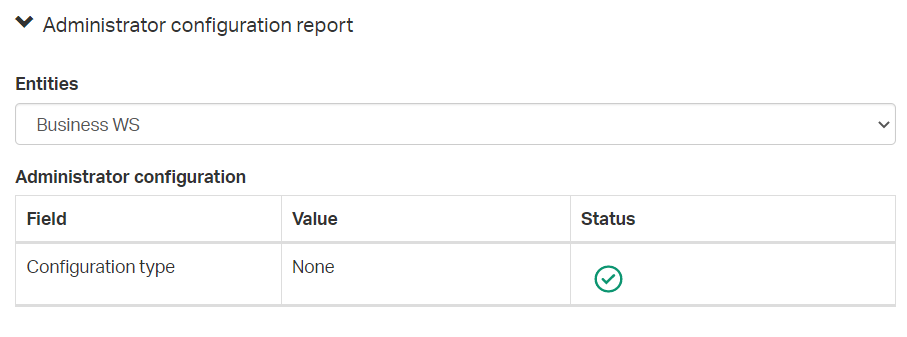
‘Business workspace configuration’ for the corresponding entity:
![bws_033]()
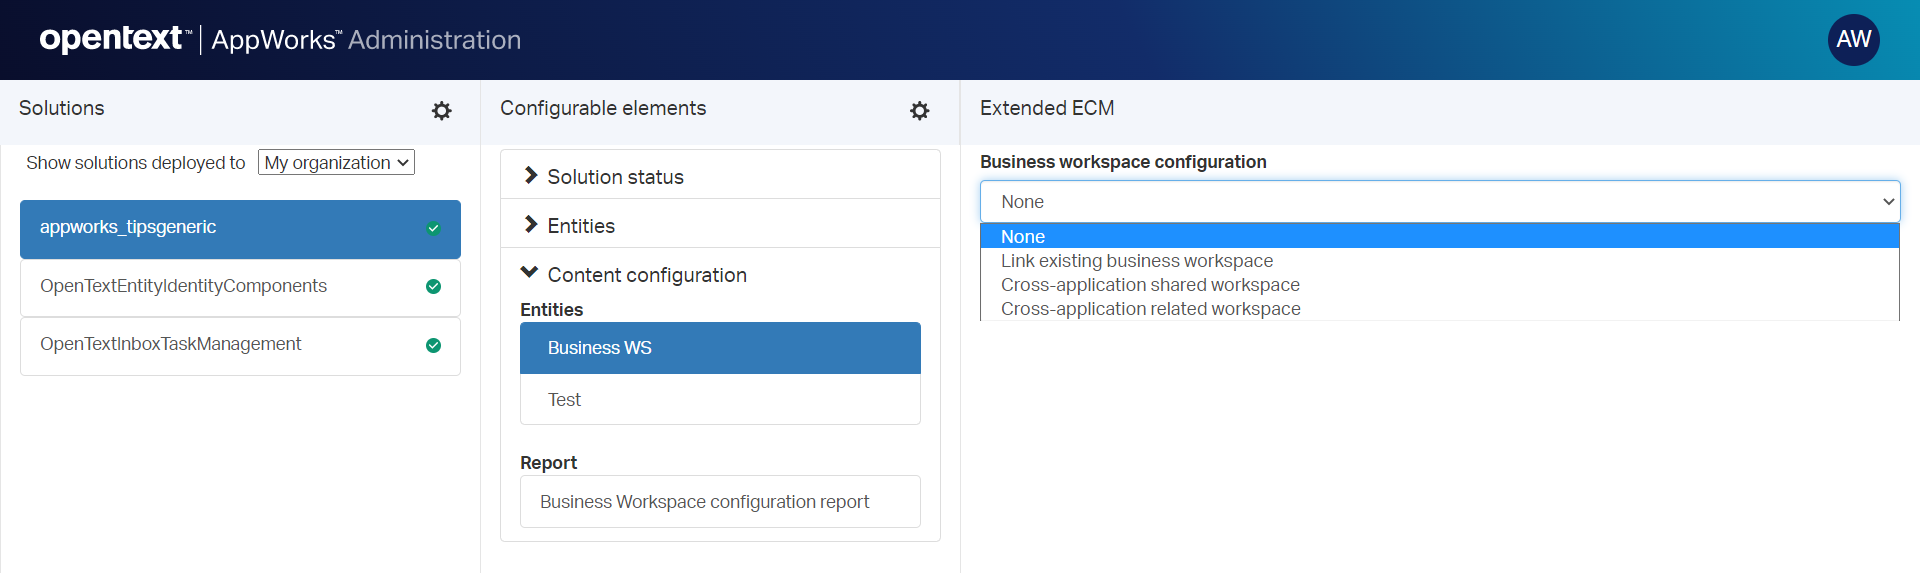
For our post, we can leave this option as is (default ‘None’), but if you require different:
- ‘Link existing business workspace’: When you create the Business WS manually in OTCS, and you want to link the Business-WS-enabled-entity instance in runtime to the already available business WS in OTCS. We made it already a 2.0 connection with automatic linking!
- ‘Cross-application shared / related workspace’: Used when you have a similar object type in other applications too. This option enables you to share the business WS with multiple applications! An option out of scope for this post.
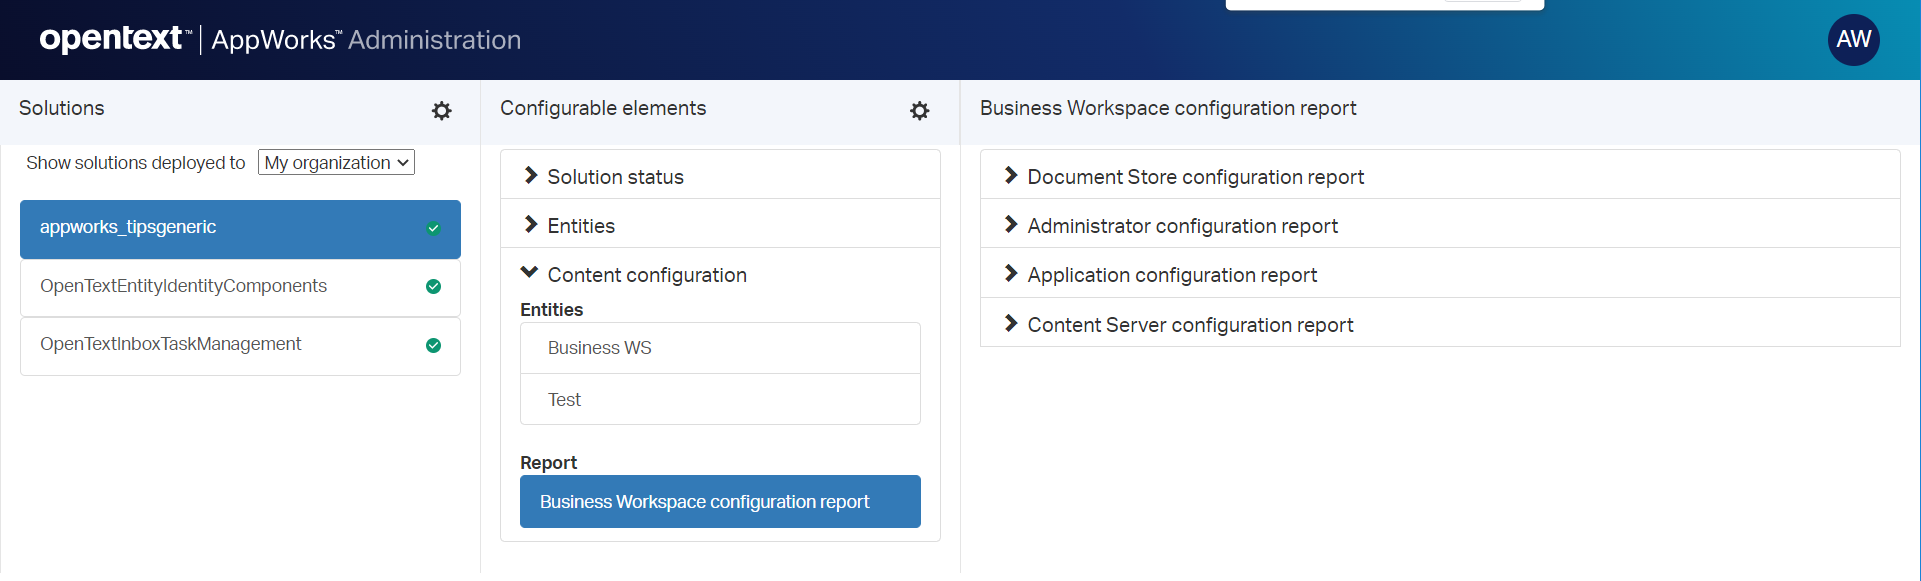
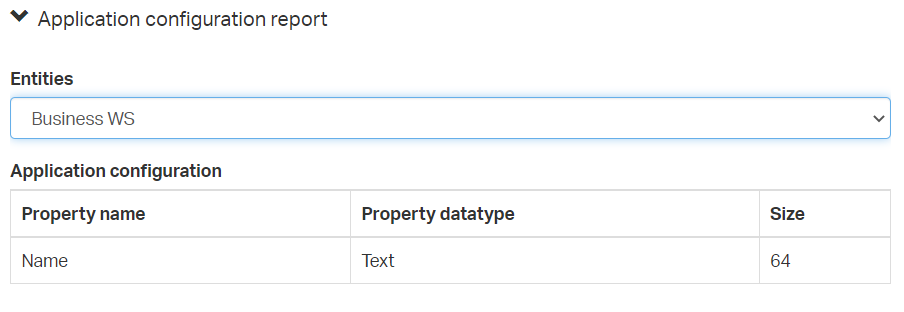
This is what I see for the reporting section with interesting insights:
![bws_034]()
Let us grep the screenshots…to give a “feeling”:
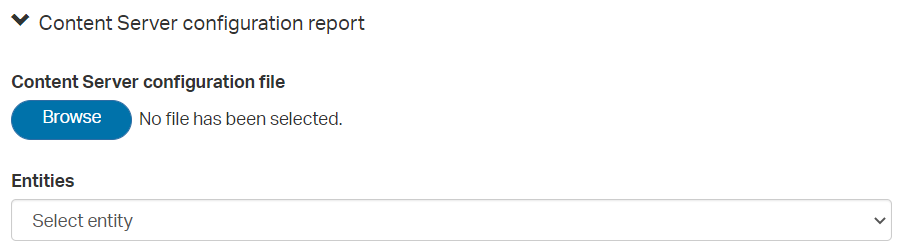
The last screenshot requires a file input! These quick steps provide you the correct file to play with:
From OTCS, open the ‘Transport Warehouse’ from the Enterprise menu
Add a new document of type ‘Workbench’ with name:
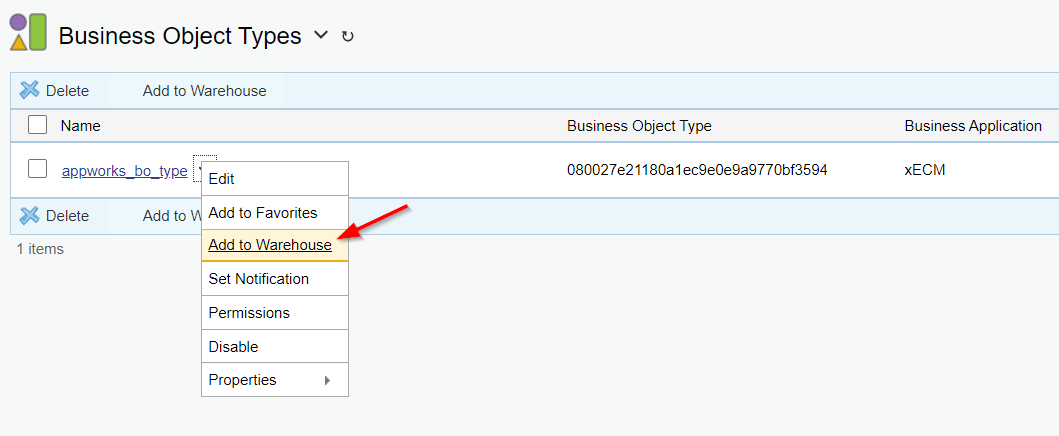
wb_business_ws(no further classification / categorization)Now go to the ‘Business Object Type’ we’ve created before. The one with name
appworks_bo_type. You can add it to the created workbench warehouse:![bws_039]()
Just follow the steps till you’ve added it…Nothing special
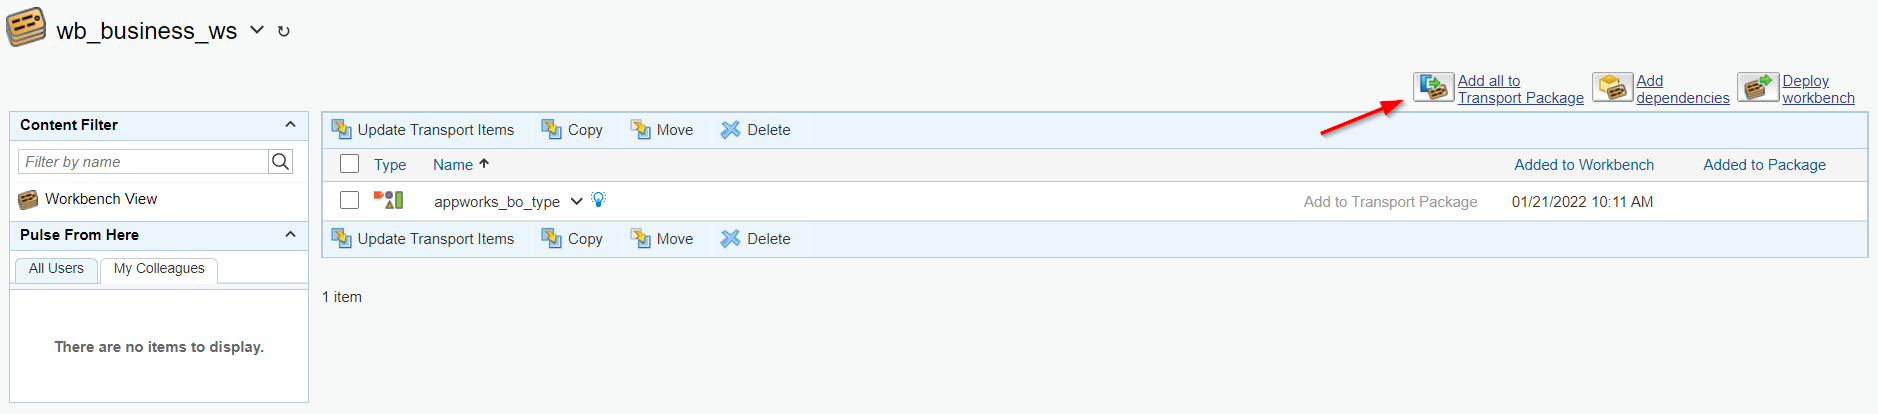
Go back to the created workbench (within the transport warehouse), and open it. You see the ‘Business Object Type’ passing by, and you can also hit the link ‘Add all to Transport Package’
![bws_040]()
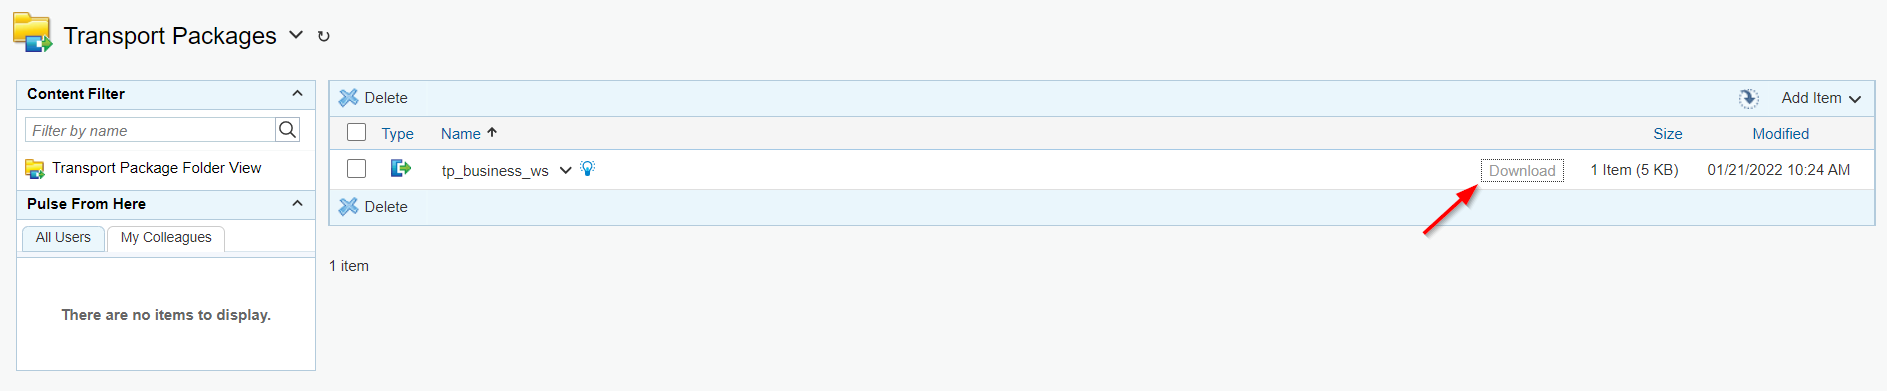
I give it the name
tp_business_wsand ‘Add’ it.Now we go to the ‘Transport Packages’ section of the ‘Warehouse’, where we can download our zipped package!
![bws_041]()
Add another entity property to the category flag cat_bws_appworks?
During the category creation, we’ve added a second field which is unused this far. We created this field specially for this question. Follow these steps to have a recap (a better understanding) of the connection!
…
AppWorks design-time
- Add a Boolean type of property to the
business_wsentity with name:bws_is_appworks- Remove the ‘none’ value as valid option
- Update the “Create” form with this new property (add it as a checkbox)
- Select this new property in the ‘Business workspace’ BB for this entity (as configurable metadata to OTCS!)
- Save it and publish it.
OTCS
Go to the xECM section from the Enterprise menu
Open our ‘Business Object Type’ with name:
appworks_bo_typeScroll to the ‘Property Mapping’ and add the mapping to
Content Server Categories:bws_category:cat_bws_appworks; The valueProperties.bws_is_appworksshould be available from the “Business Property” field as drop-down (although it doesn’t look like a dropdown)!![bws_042]()

AppWorks runtime
Just open the instanced entity of our business workspace entity and have a double check!
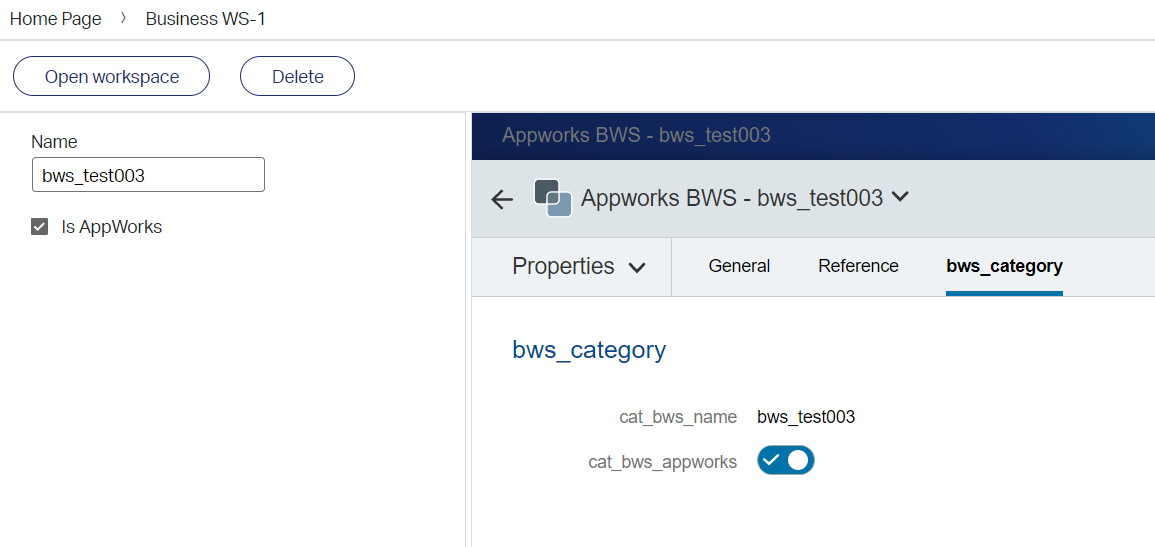
No, there was no manipulation behind it, no service restart either. Just a refresh of the screen! 😇
…
Where can we find more information about this xECM connection?
- Have a look in the low-code design guide. There is a section available called “Configuring Extended ECM for AppWorks Platform”.
- Have also a look at the security parameters of the OTCS instance behind the function URL:
http://192.168.56.107:8282/livelink/cs?func=admin.securityvars. You might need to apply specific settings on your side! - The extended connection like shown in this post depends heavily on the log files within the system. This is just a quick list of commands I used during my journey:
1 | #find files updated last minute |
I guess that’s it…A proudly “DONE” where we finally put a point behind an interesting deep-dive on xECM. It was a ‘Black box’ to me, but now we’ve covered it from A-Z! If you made it all the way till the end, we should shake hands. I guess the platform will not get more complex after this journey where we learned about:
- Installing OTCS
- Connecting it to OTDS
- Applying a seamless login between OTCS and AppWorks
- Putting the documentstore connector in place
- Eventually, brought life in the business workspace BB.
Time for vacation! Have a great week-end and CU in the next post on another great topics about any AppWorks-Tips!
Don’t forget to subscribe to get updates on the activities happening on this site. Have you noticed the quiz where you find out if you are also “The AppWorks guy”?
