
Hi there AppWorks fans,
Welcome to a new installment of AppWorks tips.
For this week I have a great customer case as backlog item to write about.
Case description: Create an approval flow which makes it possible for a pre-selected approvers list to “sign-off” the requested entity instance as ‘Approved’. The approvers should retrieve sign-off tasks in parallel-mode, and it should be possible to check if a certain number of users already approved within the approval due-date.
An interesting case as you will see such functionality is not directly available as standard building block on an entity. When we can’t build it with the standard building blocks, our next step is BPM with ‘webservices’. You’ll see this will exactly be the approach we’ll dive into for this post. It will be great…as always! 😎
This post will also give you a 2.0 answer to Mr. Mission Impossible his comment on this post: Correct I don’t think there is an out-of-the-box option to allow a certain number of users to complete the task. However, you could assign the task to the team. Then, in the task layout, hide the claim button. Then add a “Complete Task” action rule in the Lifecycle child entity. Have a BPM run that determines if a sufficient number of team members have executed that action rule and then claim and complete the task on behalf of the user.
We will extend this comment with 2 extra features:
- We keep track of the list of approver names that hit the ‘Complete Task’ action rule
- We make it possible to make that ‘Team’ dynamic. This way not all team members get a task, but only the pre-selected team-members as approver for the entity instance! For dynamic team approach we’ll use entities from the Identity package and when we use this, we also would like to make use of an OTDS instance to manage the data.
Let’s get right into it…
First some thoughts on several approaches (on what we could also do) with some advantages/disadvantages:
- When we send an approval task, we could send it to a predefined functional role. We can apply users to this role and assign to task to this role. This makes it really simple, but it will send only one task to be completed by one user of that role, and we need multiple approvals from several users.
- We could also send a task to each selected list of users on an entity and loop over it from a BPM standpoint. This approach is more work, but because we send tasks to a specific user it makes it a “sequential” approach where want to have a “parallel” approach.
- Next level will be the ‘comment’ (mentioned before) where we assign the task to the team (= organizational unit). Then, in the task layout, hide the claim button with an “Action Bar” BB. Add a “Complete Task” action rule in the Lifecycle child entity. The action starts a BPM that checks if all (or a certain number of) team members have executed that action rule and then claim and complete the task on behalf of the user.
- The approach described in this post…continue reading:
This will be the outline we want to build to match the full requirement which is built on top of the valuable comment:
Create a second OTDS test user ‘awtest@appworks’ to test with
- We will also use the OTDS account (for development): awdev@appworks
Create an entity
- With just one property: todo_name [TEXT, length 64]
- Generate the other BBs, so we can create new instances in runtime
- Add the CRUD operations webservice
Expose the webservices with the ‘appserver’ service container
Relate to many users (and add it to the ‘Create’ form as selectable ‘Approvers’)
- Name: todo_approvers
- Add the GET operation webservice of this relation
Create an action rule which starts a BPM
- Name: a_start_approval_flow
- Label: Start approval flow
- We have the option here to call a modal ‘Approvers’ dialog (This requires an additional ‘Approvers’ form on the entity)!
Create the BPM (dynamic_approval_flow) to be started from the action
In pseudo-code:
1
2
3
4
5
6
7
8
9
10
11
12
13
14
15
16
17
18
OrgUnit orgUnit = WebService.createOrgUnit("ou_" + processInstanceId);
Position position = WebService.createPosition("pos_" + processInstanceId);
List<String> todoApprovers = WebService.getRelatedTodoApprovers(todoItem.ItemId);
List<Assignment> assignments = new ArraryList<>();
for(String approver : todoApprovers) {
User user = WebService.findUserByName(approver);
Person person = WebService.readPerson(user.getItemId());
assignments.add(WebService.CreateAssignment(position.getItemId(), person.getItemId()));
}
Task task = Activity.assignWork("ou_" + processInstanceId);
//clean up, when done
when(taskIsCompleted(task.getId())) {
for(Assignment assignment : assignments) {
Assignment assignment = WebService.DeleteAssignment(assignment.getItemId());
}
WebService.deleteOrgUnit("ou_" + processInstanceId);
}In this pseudo-code you can clearly see we heavily lean on the Identity package entities, and the exposed webservices with it.
We could optionally add some “break” functionality when task is not finished on time…we’ll see.
Add lifecycle BB (this makes it possible to call entity information in BPM!)
- We want to be able to show an entity layout on a BPM activity task!
- This will introduce also a related ‘LifecycleTask’ entity with all BBs available where we’re going to keep track of the approvers…watch and learn!!
On the lifecycle task entity we’ll also create an action Rule
- Name: ‘a_complete_task’
- Label: Complete task
On this entity we also need a ‘tomany’ Users relation, so we keep track on the list
- With this we also expose the webservice for this relation to be used in the second BPM!
Create a second BPM (complete_task) to be started from the task action
In pseudo-code:
1
2
3
4
5
6
User user = WebService.findUserByName(flow_owner);
WebService.AddApproverToTaskRelation(user.getItemId());
if(WebService.GetApproversToTaskRelation().size() == parentToDoInstance.getApprovers().size()) {
Process approvalFlow = parentToDoInstance.getCurrentRunningApproversFlow();
WebService.ClaimAndCompleteTask(approvalFlow);
}
The lifecycle task entity will also have its own action bar where we can trigger the ‘Approval completion’, and it will have a layout to show some task related information (like our approvers list!)
Finally, we will probably add some rules which hide some buttons at certain moments in time
Finally, finally…The ‘complete_task’ BPM should be able to claim and complete the final task from the ‘dynamic_approval_flow’ BPM…I don’t know how yet, but we’ll figure that one out when we’re at that moment in time… 🤔
I know…It’s much, but keep reading as it will all be explained in small pieces. Ready?….Time for some craftsmanship! But first a quick coffee!
Create a second OTDS test user ‘awtest@appworks’ to test with
You can already see I will start to use OTDS for this implementation. Why? Well, because I will use parts of the ‘Identity’ package of the platform. Read about the ‘Identity package’ in this post. The post tells you how to get rid of it, but this post will show you it can bring also valuable information to the surface. FYI: OpenText is also pushing to use OTDS in combination with AppWorks, so why not just use it from the beginning!
Alright…Did you follow these posts? If so, you should be able to dive into OTDS where I have at the moment only one user called: ‘awdev@appworks’.
I use this account
otadmin@otds.adminwith this URL: http://192.168.56.107:8181/otds-admin/
Once logged in to OTDS, we go to the “Partitions” where you have the ‘appworks’ partition available. Hit the ‘Actions’ and view the current members:
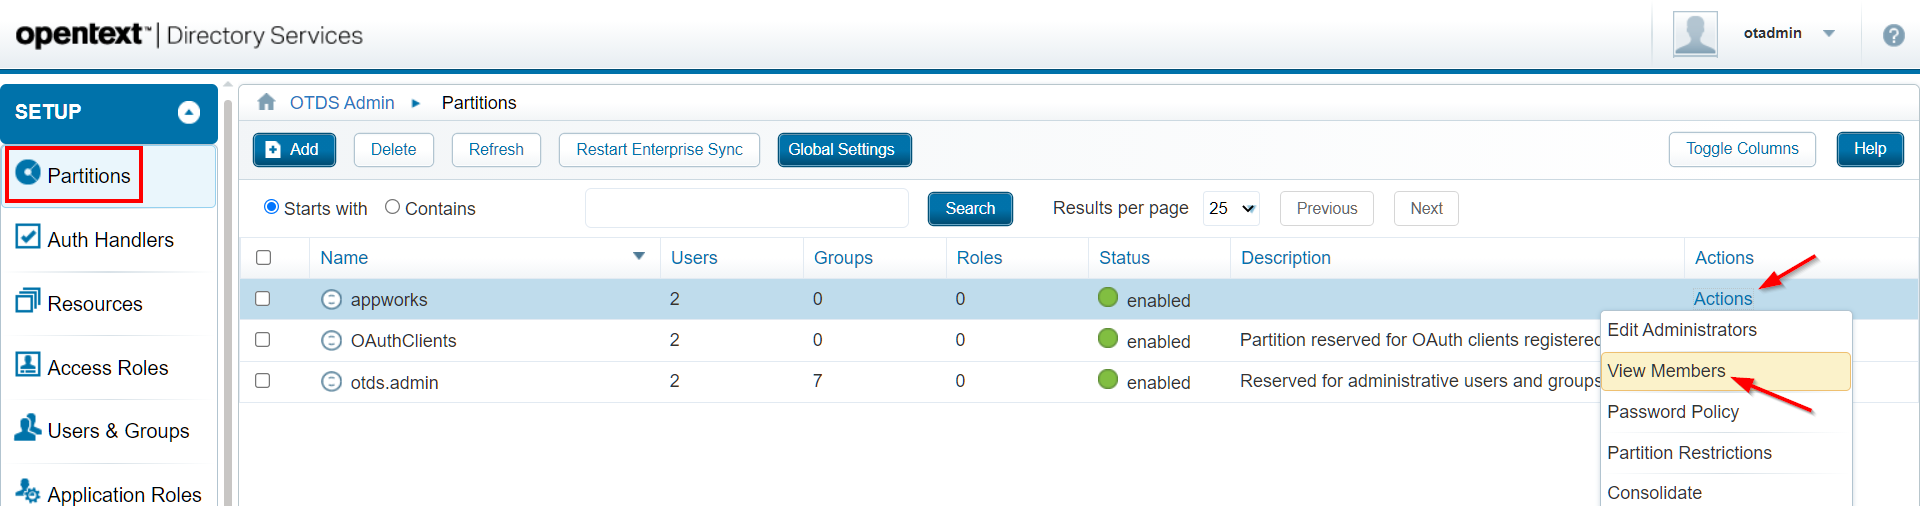
I know…I already have 2 users available…I did some preparation for this post!
Now add a new user:
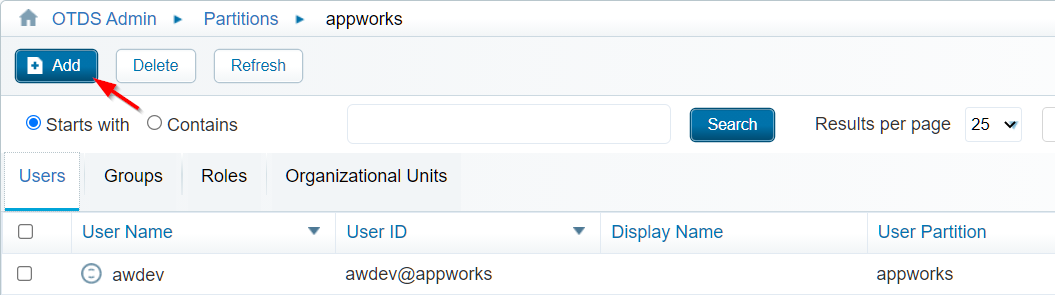
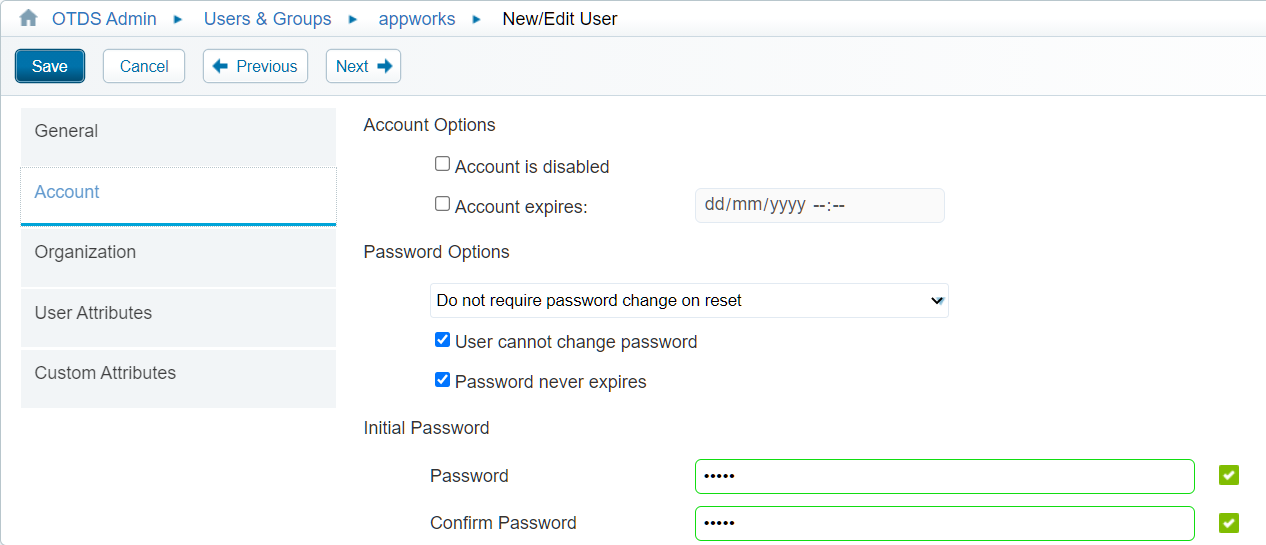
I just use ‘awtest’ as username in the “General” tab, my “Account” tab looks like this, and the rest is left empty.
Now the account is added to the partition…Time to synchronize it to AppWorks. If you followed the OTDS posts, you have an ‘appworks_resource’ available in the “Resources” tab where you can do a ‘Consolidate’ action in the “Actions” menu:
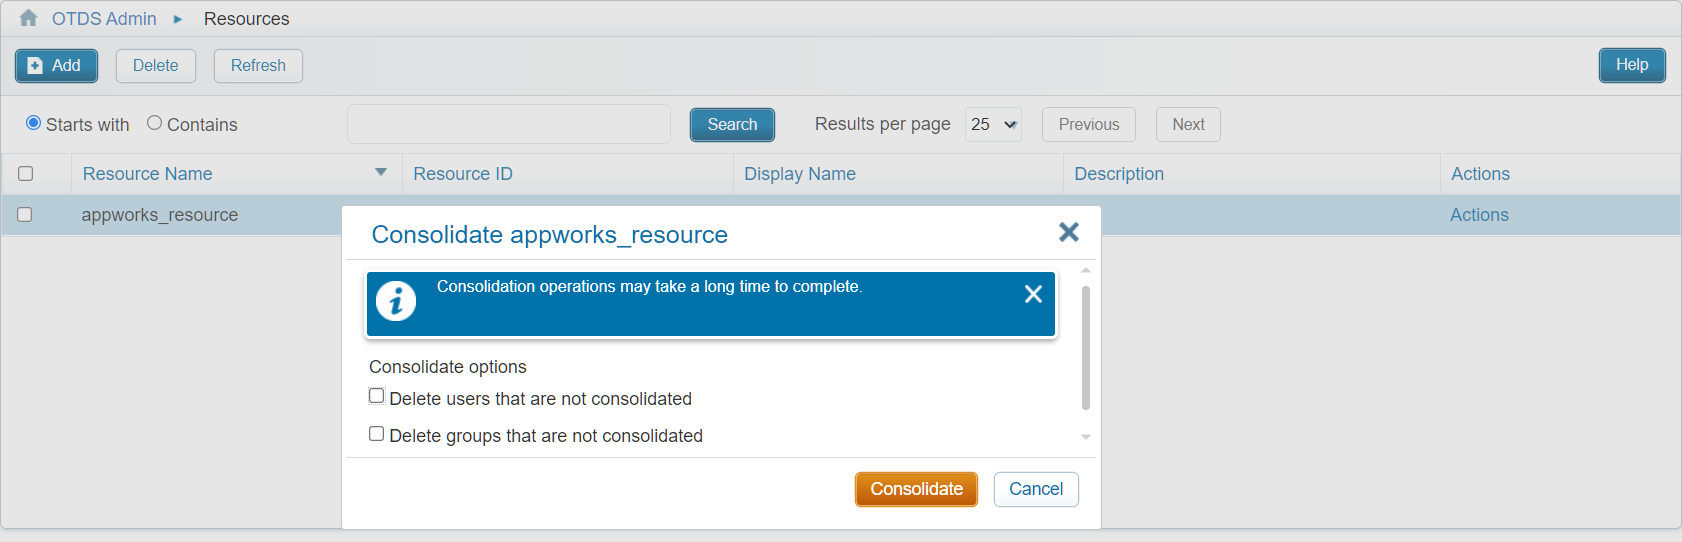
I see now you can also consolidate from the ‘Partition’ directly!…There are always more roads to walk to the city of Rome! 😊
When the ‘Consolidate’ happened you should see the just created account in AppWorks:
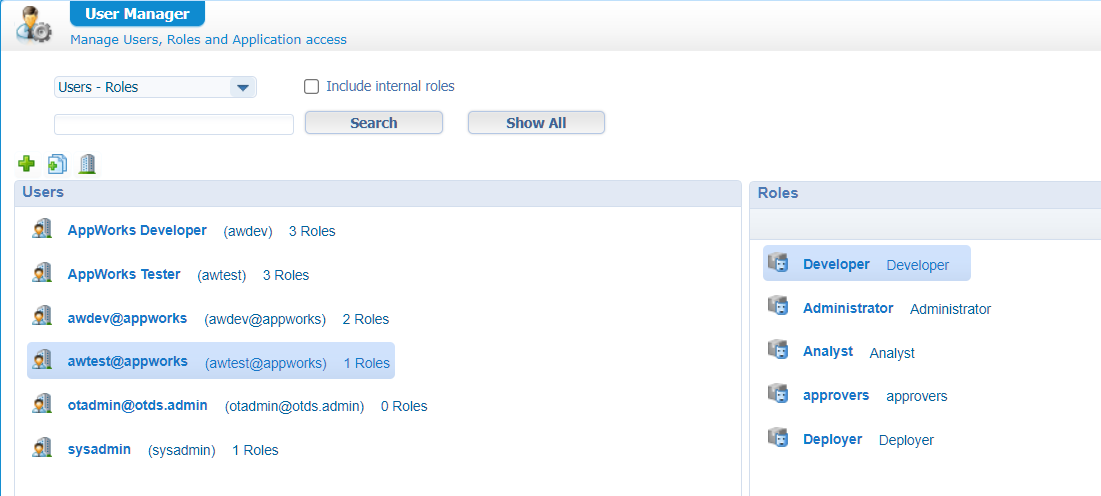
I assigned the ‘awtest@appworks’ account to the ‘Developer’ role for now as I don’t want to have any role based ‘security’ problems for this blog. Smart? Not in real life! Always test with an account which has the real security and roles applied for your solution!
Check this logfile for some more monitoring on this action:
tail -999f /opt/tomcat/latest/logs/directory-provenance.log
Quickly logout and login to see if it’s working and otherwise we’ll continue…
Create an entity
For this post we just use a simple ‘Todo’ entity with just one property todo_name [TEXT, length 64]. Let’s generate all the other basic BBs, so we can create new instances in runtime for quickly prototyping and testing…Nothing fancy here…correct?
These are the simple things I updated after that initial creation of the entity:
- Give the DefaultList BB a better name: All Todo items
- In the entity properties
- Give the entity itself a display name: Todo
- Give the entity a name: todo
Extra BBs to be applied are on this entity:
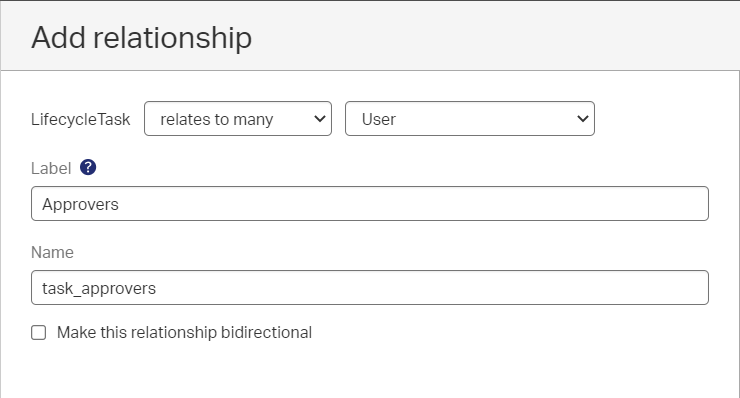
A ‘to many’ relationship with the Identity entity ‘User’. I give it the name ‘todo_approvers’ and a label ‘Approvers’
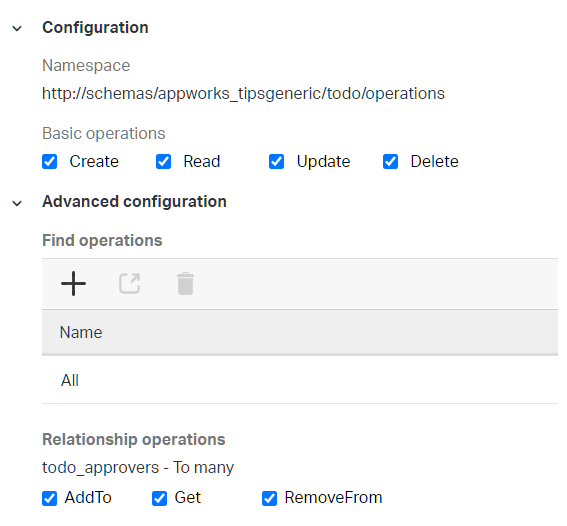
The ‘Web service’ BB which exposes all the CRUD services, one ‘All’ find operation (although I can’t remember where it’s used!?), and also all the relationship operations:
![dynamic_task_006]()
Add the lifecycle BB, but don’t design any lifecycle functionality. We need this BB, so it’s possible to get a grip on the entity information in a BPM which we will built start later on! Maybe you noticed the related ‘LifecycleTask’ entity when adding a lifecycle…Well, that will be the entity we will use for showing a nice task-layout to our end-user (keep on reading!)
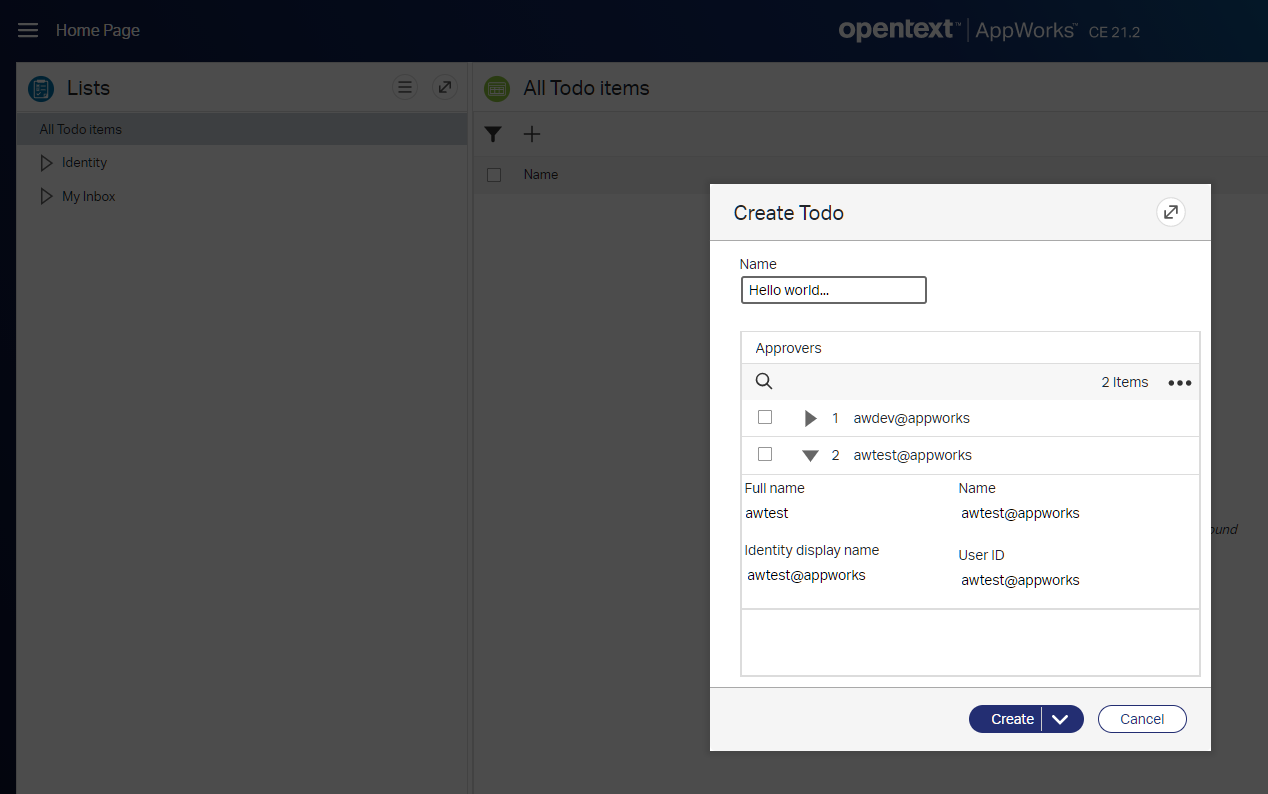
As cherry on the cake we update the ‘Create’ form with the related “to many users”, so we have a selectable ‘Approvers’ list to fill in on the creation form.

I make sure we can only execute the minimal required actions, and we need to make sure it’s attached to a ‘Browse list’.
Well, time for a save (in the ‘entities’ folder), and a first publication of the ‘Todo’ entity. After this we can create some runtime instances:
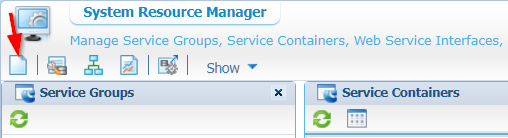
Expose the webservices with the ‘Appserver’ service container
As we have exposed the Webservices BB on our entity, we need to tell the platform what service container is responsible for handling these webservice requests. For this we’ll open the ‘System Resource Manager’ where we can create a new service group (with the top left corner button), and we attach the connector called ‘Application Server’.
We did a couple of times already in this blogsite, but in small steps per wizard screen:
- Select the ‘Application Server Connector’…click ‘Next >’
- Give a name for the service group:
appserver_service_groupand mark the webservice interface called ‘Method Set Entity todo’…click ‘Next >’ - Give a name for the service itself:
appserver_service_container, make it start automatically, and assign it to the OS Process ‘Application Server’…click ‘Next >’ - Click ‘Next >’
- Click ‘Finish’
How easy!
With this service container in place it’s possible to test your exposed webservices with the ‘Web Service Interface Explorer’ like this:
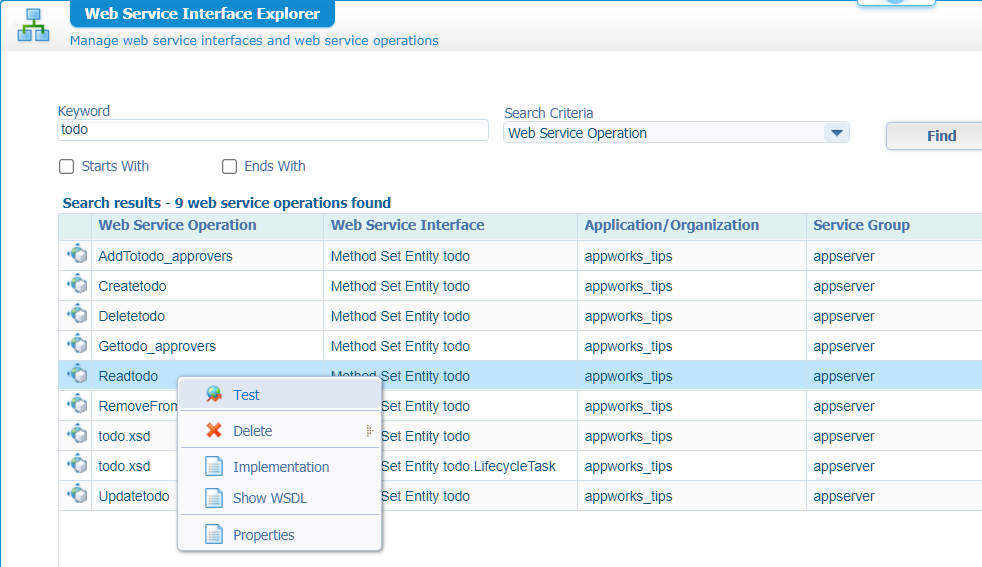
With a SOAP request like this:
1 | <SOAP:Envelope xmlns:SOAP="http://schemas.xmlsoap.org/soap/envelope/"> |
The
ItemIdis retrieved from the runtime instance of our ‘todo’ items I’ve created in the first test. Have a look in the URL when you open the instance in runtime to view its metadata (check for655362):/home/appworks_tips/app/start/web/item/0800273e9411a1ebb7580c9f20961410.655362/0800273e9411a1ebb758109e356ca6ad/4e7ac7ca92543520b11a460cf67404dc?authID=OTDS
Ok…services ready…time for some BPM action (which we will trigger via an action Rule in the step after it!)
Create the ‘Dynamic Approval’ BPM
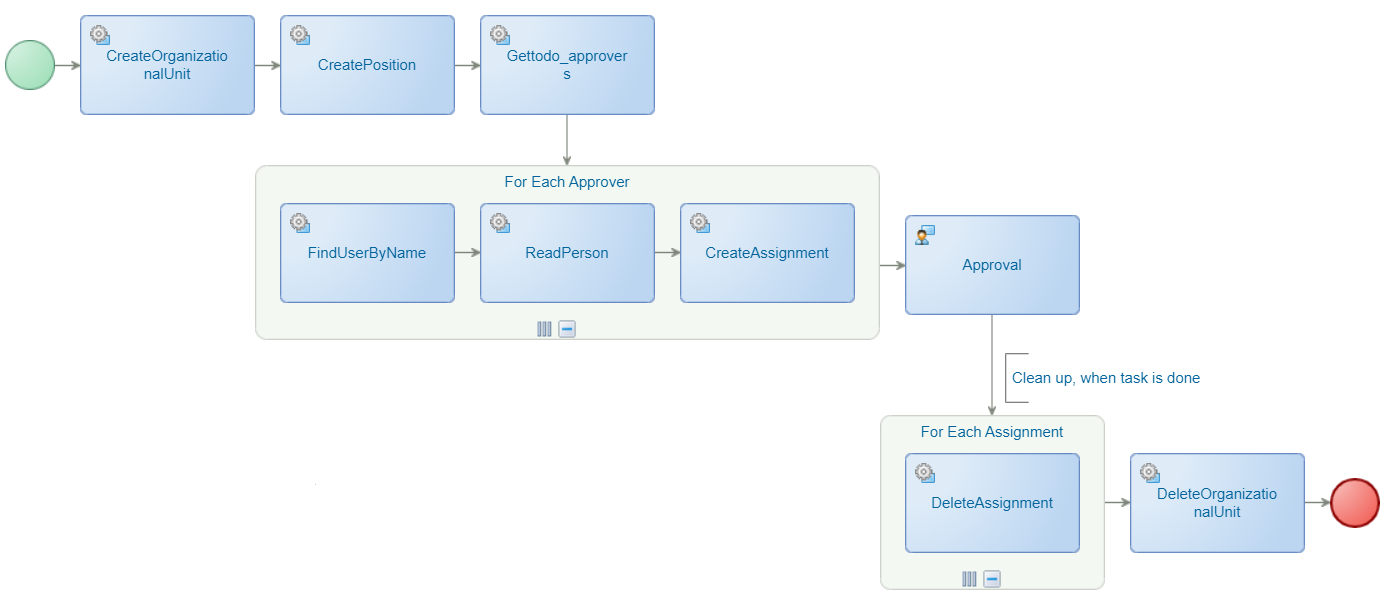
Back into design-time where we right-click on the ‘bpms’ folder (create it if you don’t have it!) and create a new document of type ‘Business Process Model’. You get a black screen where we start with a simple BPM flow like this. We just follow the pseudo-code from before; nothing fancy and nothing attached (yet) to any of the activities (That’s the step after the Rule BB!):

Notes:
- Watch the flow arrows and connect them to the correct constructs (especially the for loops)!
- To create such a ‘for-loop-group’, you need to right-click to one activity and select your group option:

Save it for now (with name dynamic_approval_flow), and also do a first publication as we want to attach it to a Rule in the next step and see it triggered in runtime.
Next step…
Create an action rule which starts the BPM
The first BPM is ready for consumption, and we execute this by adding an action rule to the ‘todo’ entity. Give is a name like a_start_approval_flow and we give it a label like ‘Start approval flow’.
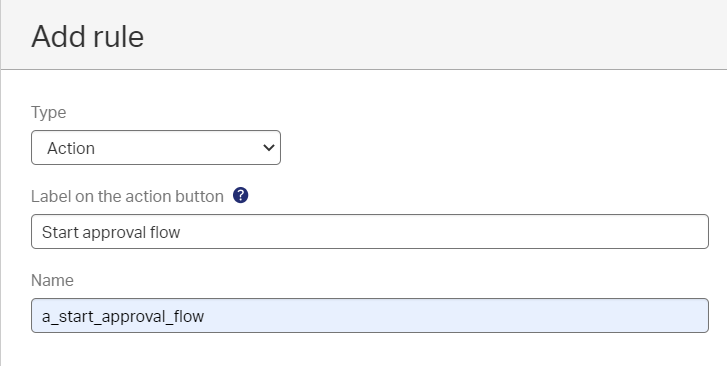
This is how we model the rule. It just needs to start our BPM!
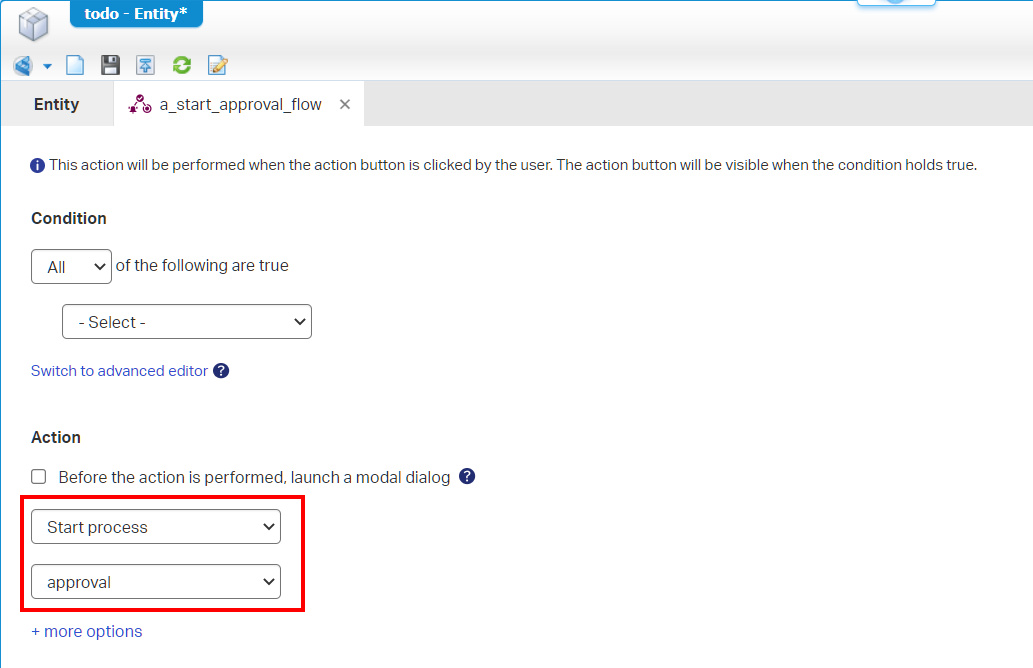
I named my BPM
approvalinstead of the mentioneddynamic_approval_flow. Keeps you focused! 😁
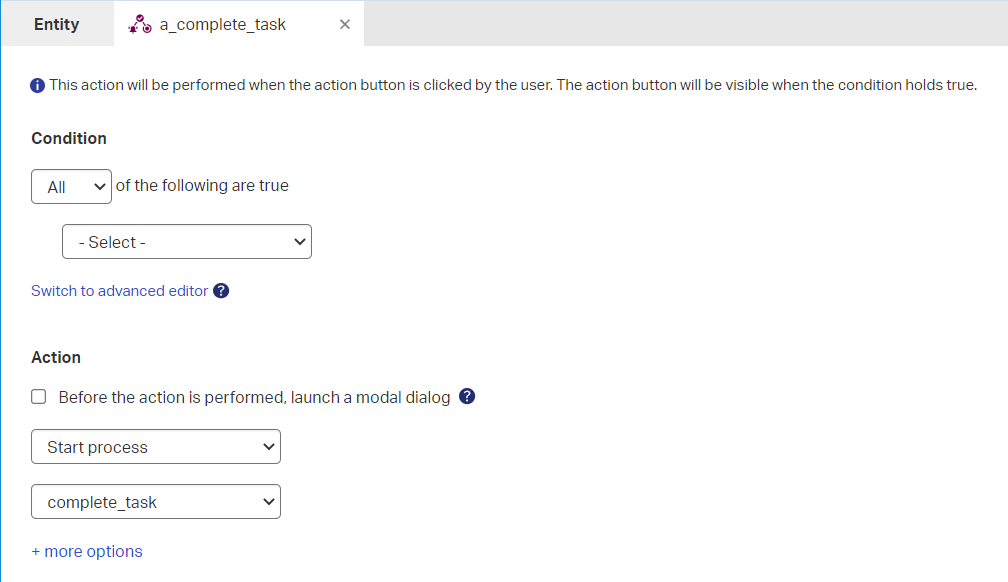
In the screenshot, you can also see the option ‘Before the action is performed, launch a modal dialog’. This is where we could also choose our approvers! For this we need to remove the ‘Approvers’ list from the ‘Create’ form and create a separate form to show with this option. We keep it in the ‘Create’ form for now.
Save, publish, and do a first test in runtime:
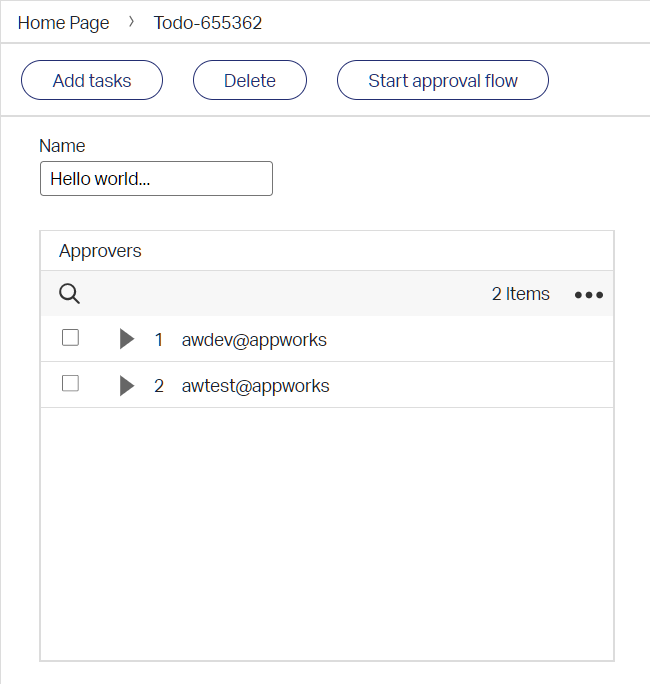
Because our entity already has a ‘DefaultLayout’ available (with an ‘Actionbar’ panel), we will directly see the action Rule on the Actionbar in runtime!
Ok, hit that button and check the ‘Process Instance Manager’ artifact for some feedback:
You will see the BPM will eventually fail because we didn’t do any implementations (yet!), but it gets started for now!
Next…
Implement the BPM
Back to the dynamic_approval_flow BPM…Right-click the activity which must be a manual task (the third one from the end; just before the ‘For Each Assignment’). From the context menu, you are able to select the option ‘Insert’ and ‘Entity Layout’. Now you need to select the correct layout…This will be the “DefaultLayout” of our ‘todo’ entity (for now). Hover over it to identify the correct on!

You’ll see the activity gets updated with the same name, but we just update it to a nice task name like: ‘Approval’
For all the other activities we will do some webservice calls. From the context menu on the first activity we can insert a ‘Web Service Operation’. Make sure to select the correct operations, so the BPM will look like this after applying them all:
All those services are part of the ‘Identity’ package delivered with the platform.
Starts to look more like our pseudo-code…right? Also check those service icons and the manual task icon! The next step is the implementation (also called message mapping!) on all those services…First a soda-break. 🥤
…
On the bottom of the BPM modeler, we see a tab ‘Message Map’…Enter it. The first mappings for the first three services look like this:
CreateOrganizationalUnit
We want to create a unique temporary Organizational Unit for this flow. Why? Well, when we reach the ‘Approval’ manual activity we want to assign work to a ‘Team’ (from the identity perspective, a ‘Team’ is the same as an ‘OrganizationalUnit’). So, we make a temporary team (with a dynamic set of pre-selected approvers) to handle the task!
To a unique OU, we make use of the unique identifier available for each running instance of the BPM. This information is saved in the ‘Instance properties’ of the BPM. So, the mapping we make looks like this:
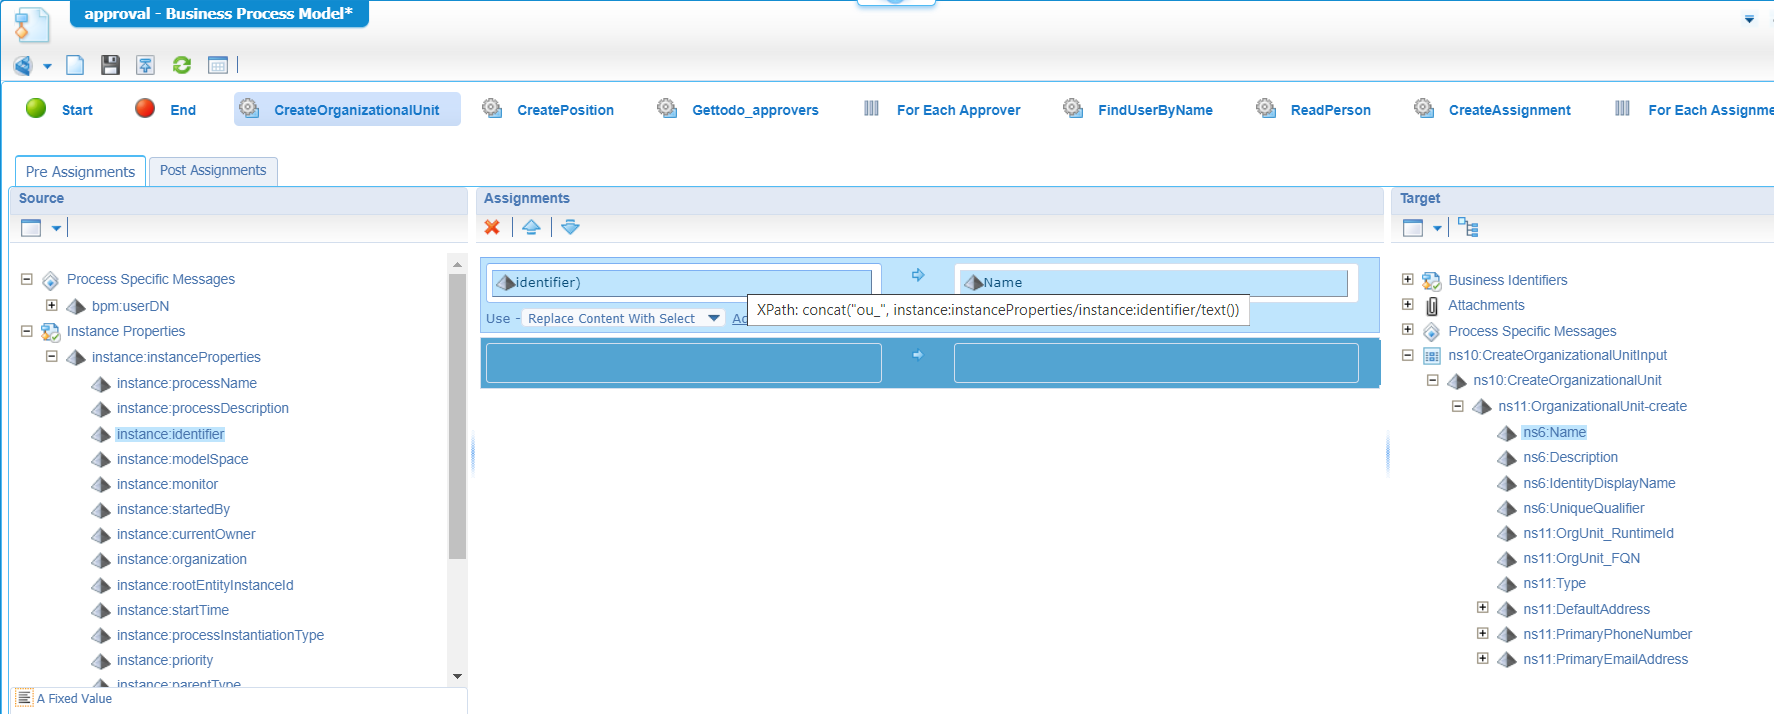
We make the expression a bit more advanced by adding a prefix with a concatenate function:concat("ou_", instance:instanceProperties/instance:identifier/text())
So, this webservice will create a new OU with name: ou_{flow_id}. When we start our first test we’ll show you the outcome in runtime!
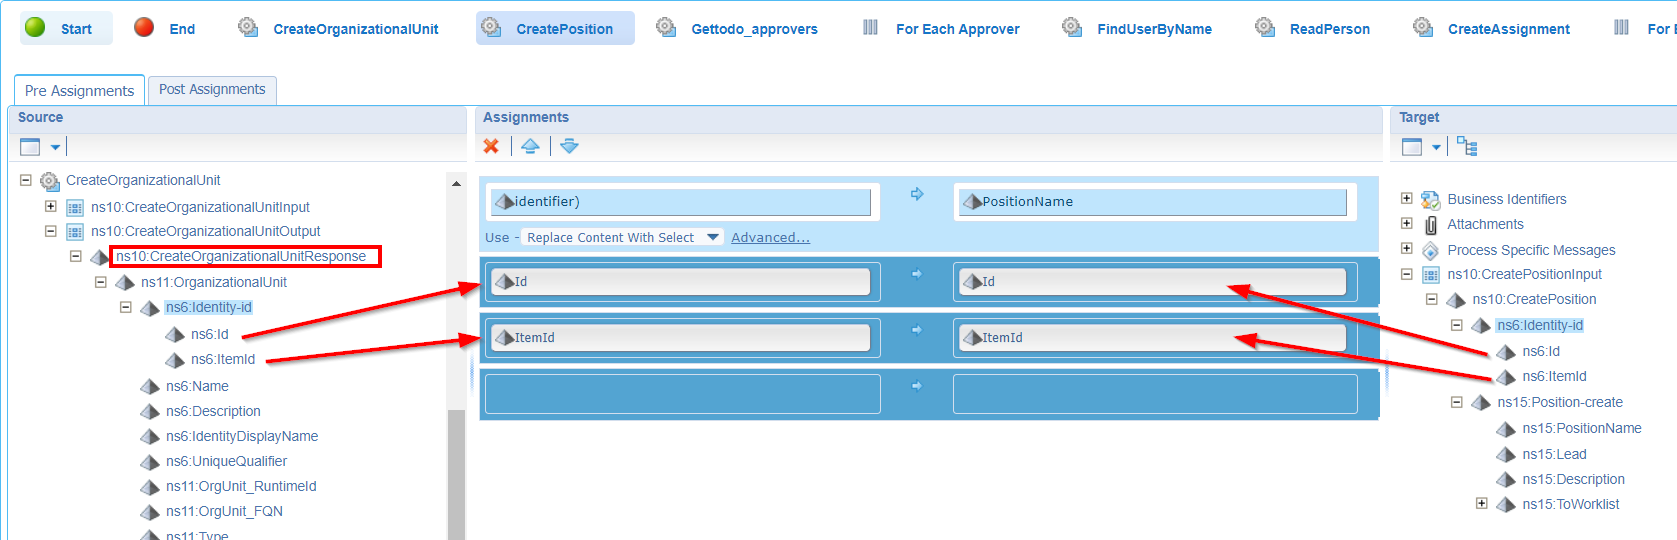
CreatePosition
Same trick here…name will be pos_{flow_id}. Only, this time we also need to pass in the ‘Id’ and ‘ItemId’ of the created Organizational Unit (which can be retrieved from the response of the previous webservice call)!
This will be the expression for the position name: concat("pos_", instance:instanceProperties/instance:identifier/text())
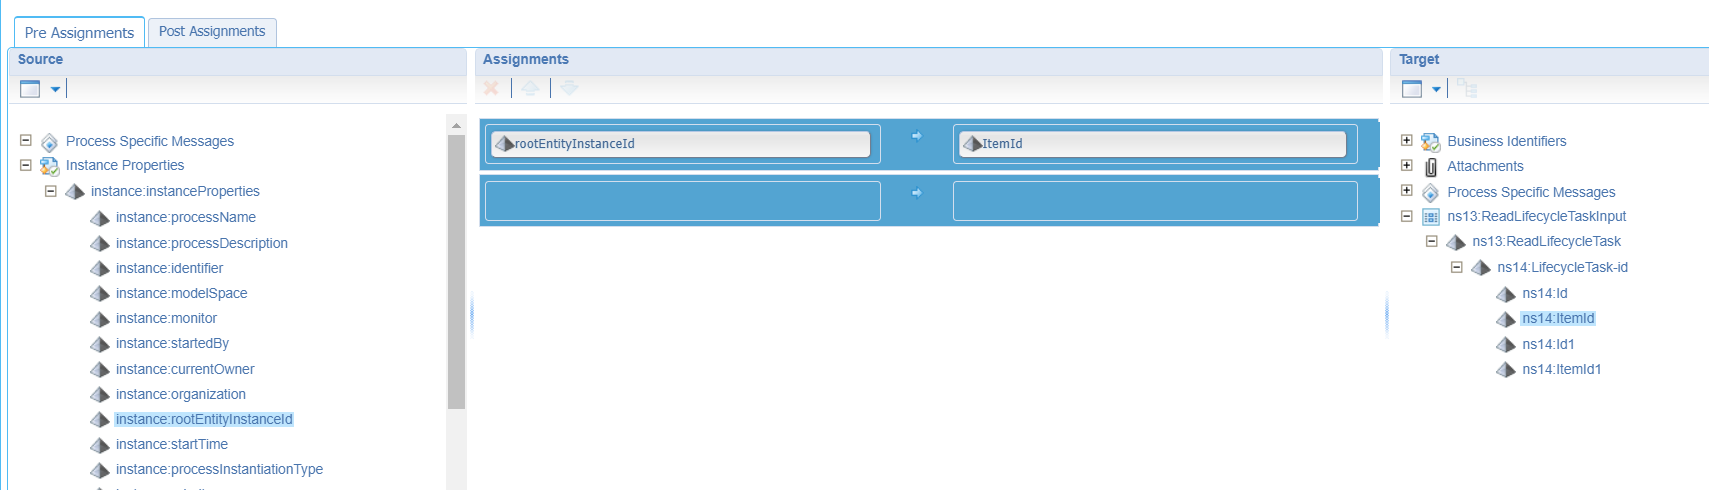
Gettodo_approvers
This is a simple one, as we only need to pass in the so-called ‘rootEntityInstanceId’ (which is the ‘ItemId’ of the current “Todo” entity instance) to the ‘ItemId’ of the webservice:
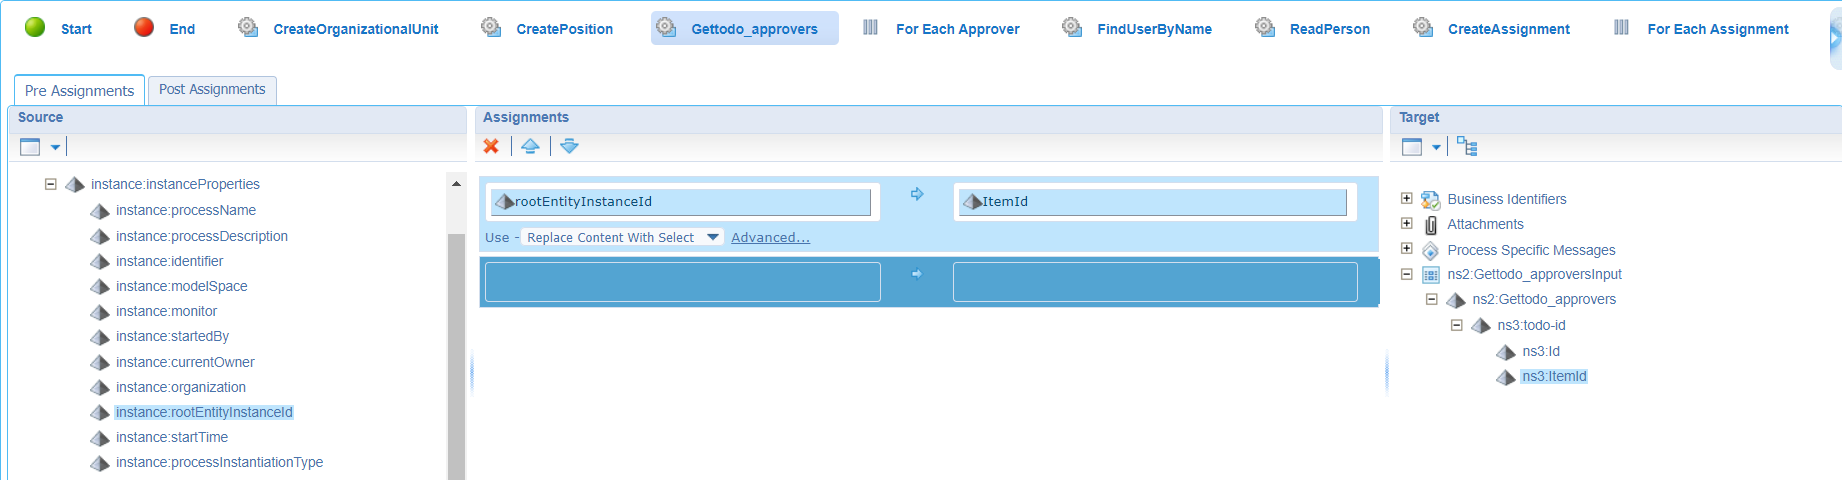
If you didn’t know…It’s possible to select the property on the left/source side…hold the
<Ctrl>key…and select the property on the right/target side! See that magic assignment created for you…Much easier…Much faster!
Let’s do a first save with a publication and have a first test on the ‘Start approval flow’ action rule in runtime for these 3 services…
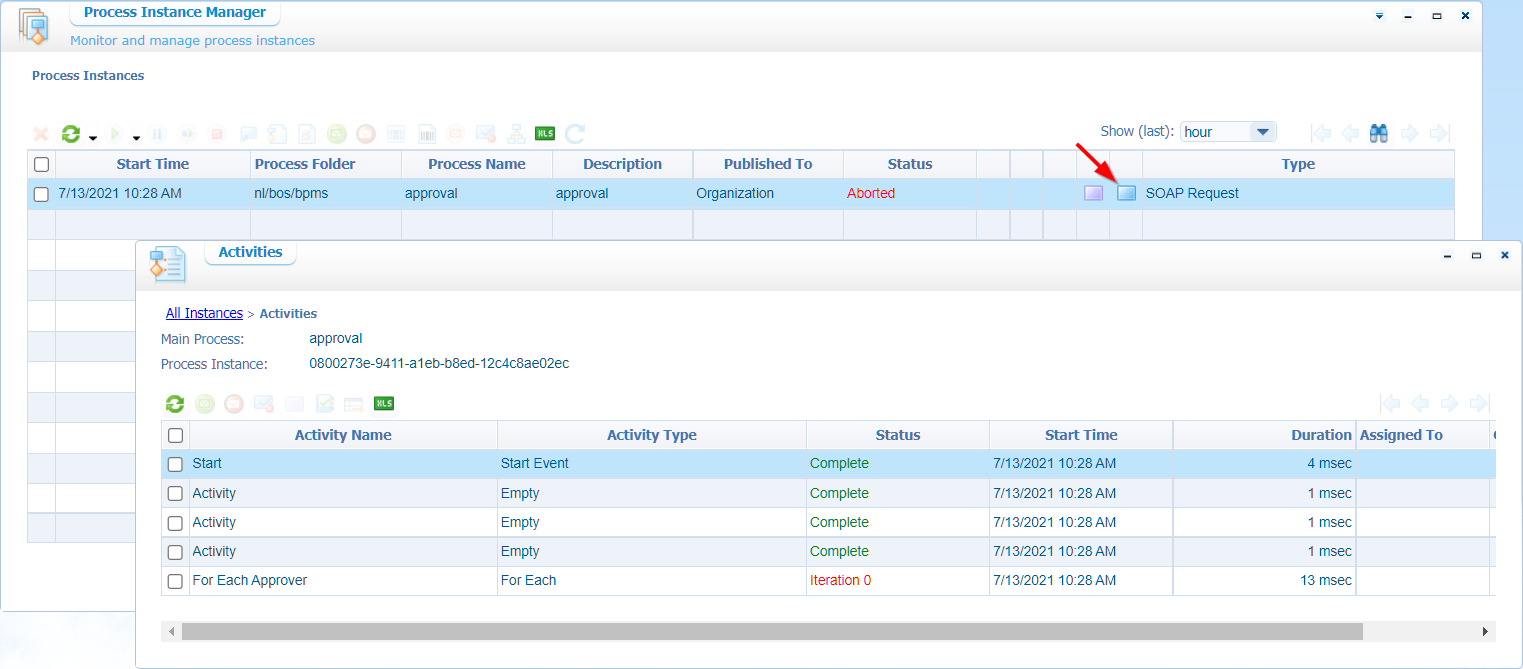
After a run…Check the PIM where you will see some result like this:
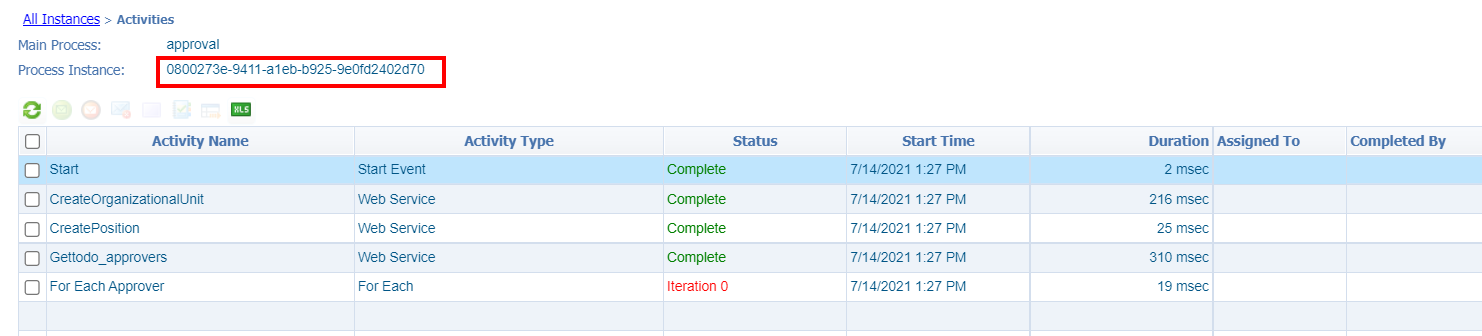
Remember the ID and see our services do get calls…Double check in runtime for the identity homepage?

We also have the ‘Position’ in place:
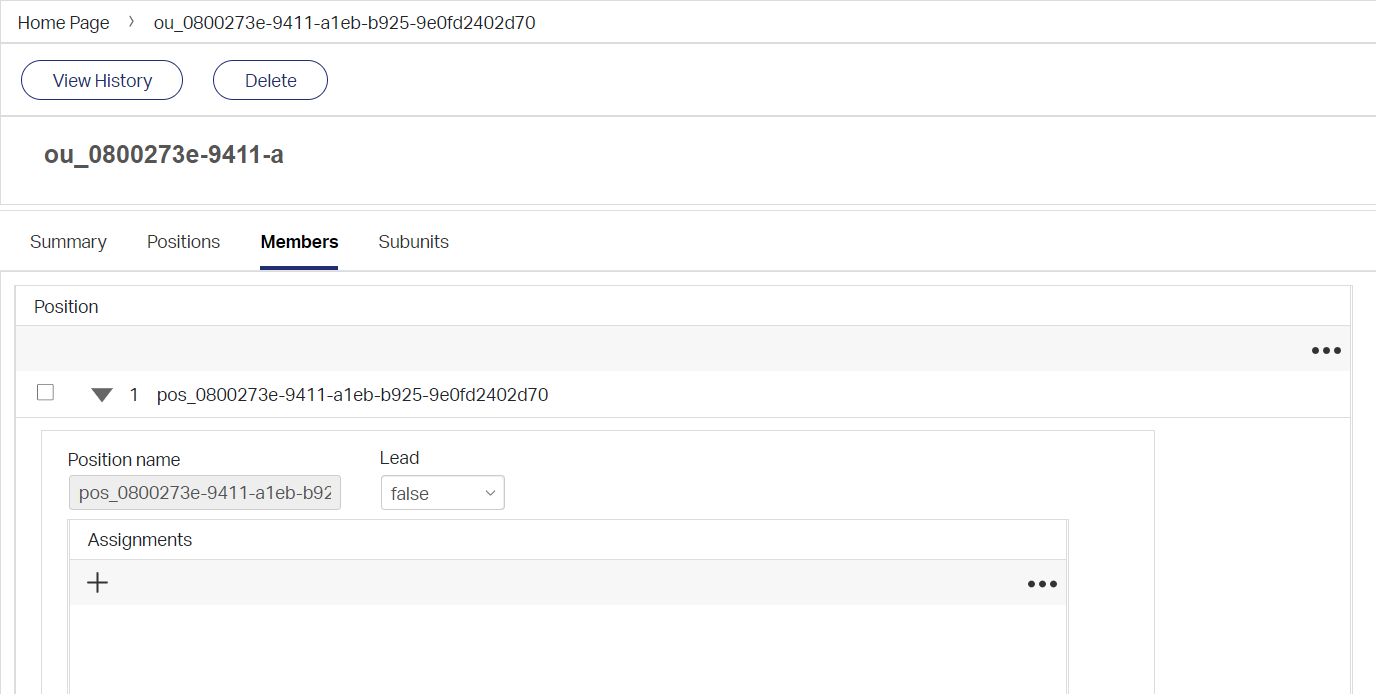
The next thing is to create assignments per selected role! That’s our BPM loop…First have a check if the approvers are retrieved in the response:
For me, that’s a green flag where a retrieve my two selected OTDS users as ‘Approvers’! ✅
I also removed the OU in runtime by hand for now…Later on we will remove it with the BPM!
Next step…Our “Approvers” for-loop…This is a simple one and just an update in the properties of the for-loop itself:
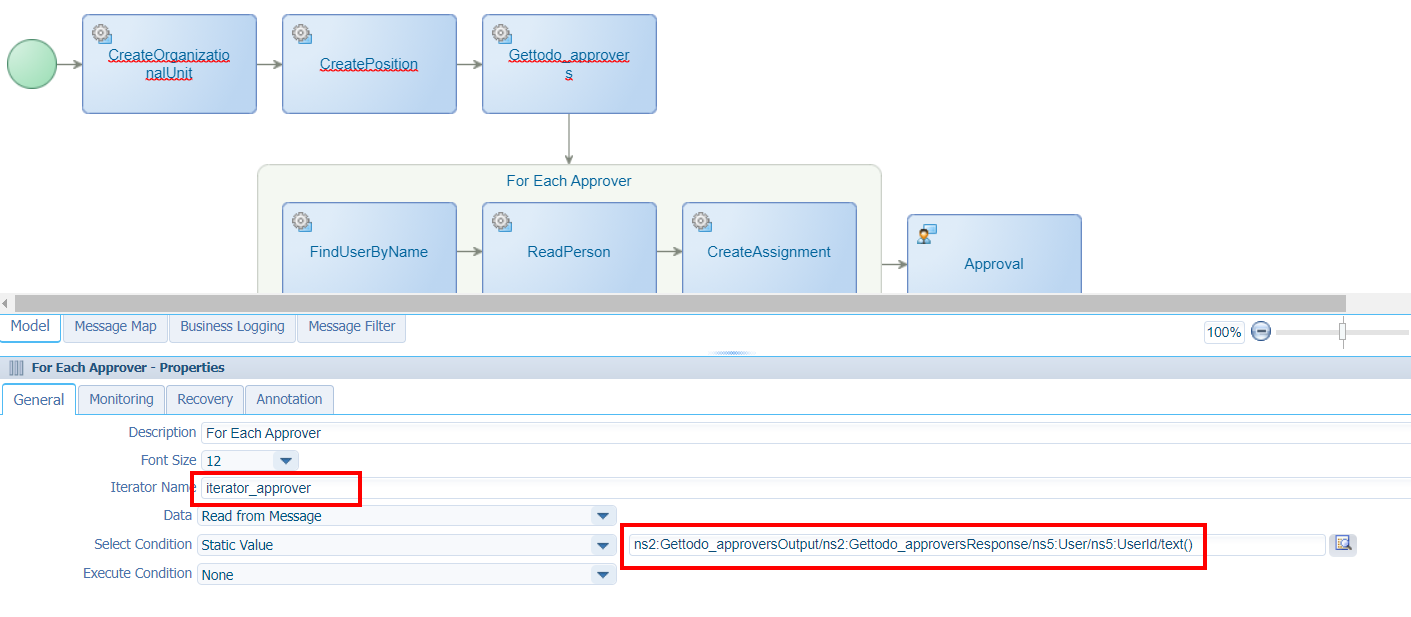
Give the iterator a nice descriptive name.
For you to copy:
ns2:Gettodo_approversOutput/ns2:Gettodo_approversResponse/ns5:User/ns5:UserId/text()
Let’s continue with the 3 service calls in the loop.
FindUserByName
Well, our iterator has the userid (equals our username) text value attached. We should be fine with just a simple mapping like this:

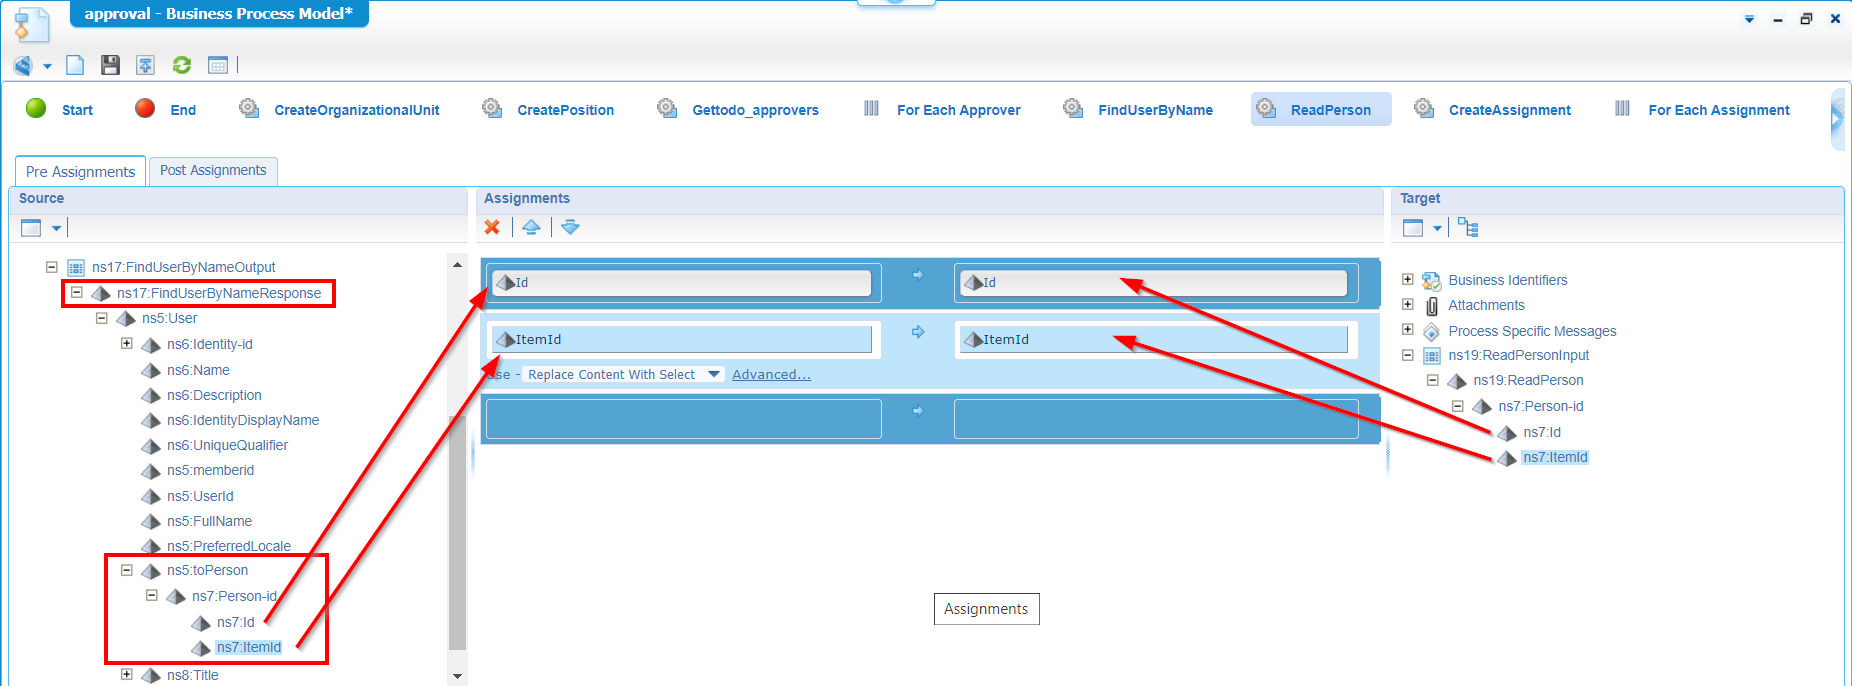
ReadPerson
The ‘ItemId’ of the previous call can be used as input for this call, but keep in mind we need this time the ‘toPerson’ id which is related from the ‘User’ entity…Again and easy task, but watch out to map the correct IDs of the related ‘Person’ entity:
CreateAssignment
This one connects it all together, it’s just a bunch of ‘ItemIds’ mapped together (The one for ‘Position’ and for ‘Person’). Have a look in the ‘Consolidated view’ for the message map for the activity (that’s an option in the top bar where all the BPM icons can be found…Like the publish-icon)

Question! Why the extra steps to find the user by its name and have an extra service call with ‘ReadPerson’? Great question!…That’s because the ‘Gettodo_approvers’ response doesn’t give us the proper information to create an assignment to the user. The ‘CreateAssignment’ requires a ‘Person’ entity as input where the ‘Gettodo_approvers’ returns a ‘User’ entity as output. We just convert our information from ‘User’ to ‘Person’; Maybe there is another way (as always, leave a comment), but this approach works fine for our demo (and we learn more about the available services)!
Hmmm…Looks like we have a 0.1 version for our first BPM implementation…With service calls that create a temporary approvers team where we assign a team task to. Let’s do a save, a publication and have our first test in runtime! Don’t forget to assign some ‘Approvers’ on the ‘Todo’ instance as this information will be re-used in the BPM.
Our Organizational Unit:
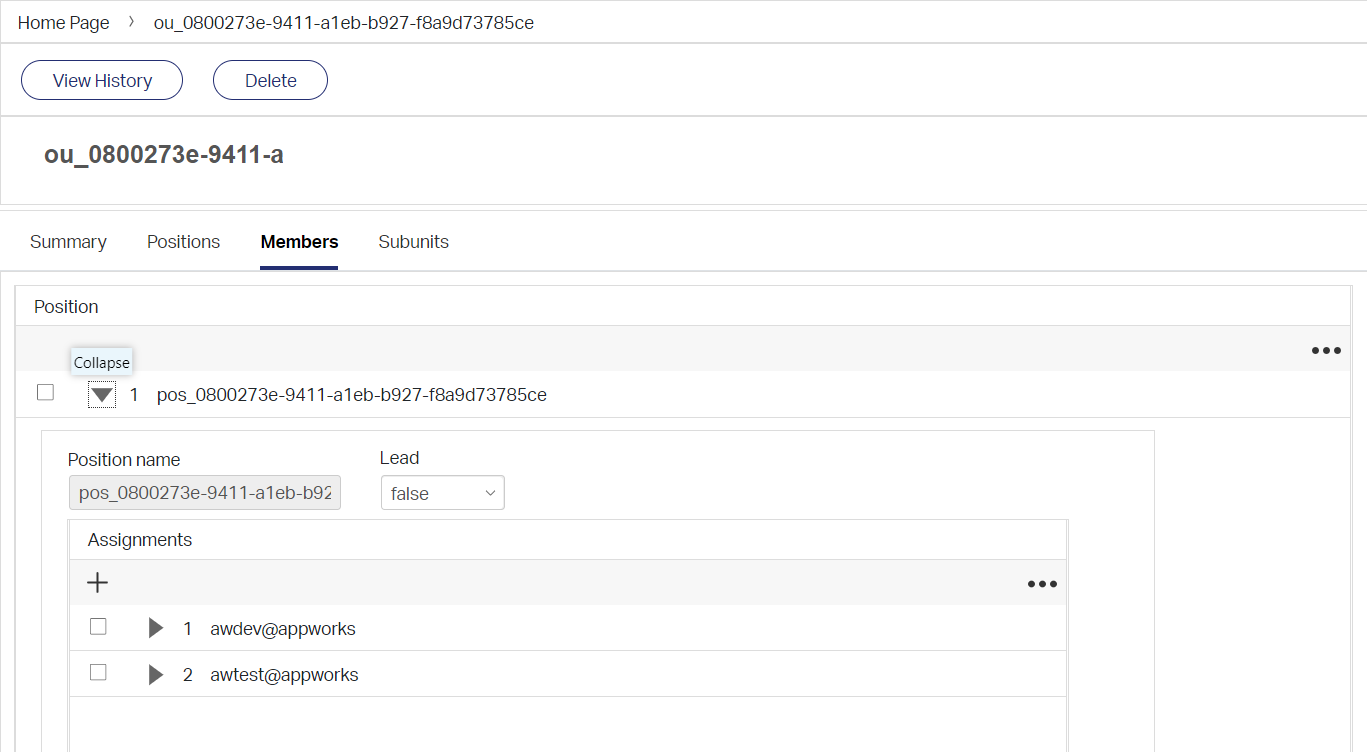
Nice…Our task?
Hmmm…empty!? Where did it go? or did the BPM fail?…Check PIM!
Looks fine by me…Who is the assignee??
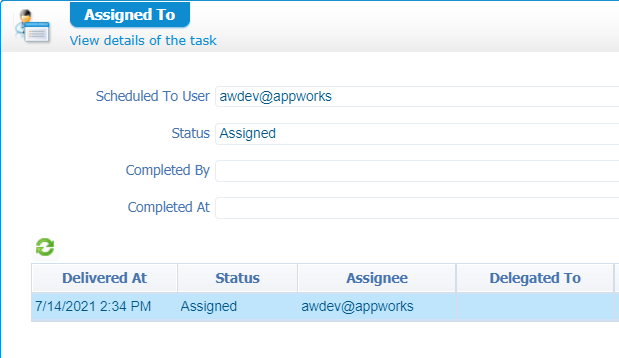
Aha…That’s me, myself, and I…That’s a personal task…
Back to the drawing table…Or better…The next step! Configure the ‘Work assignment’ tab for the manual ‘Approval’ activity:
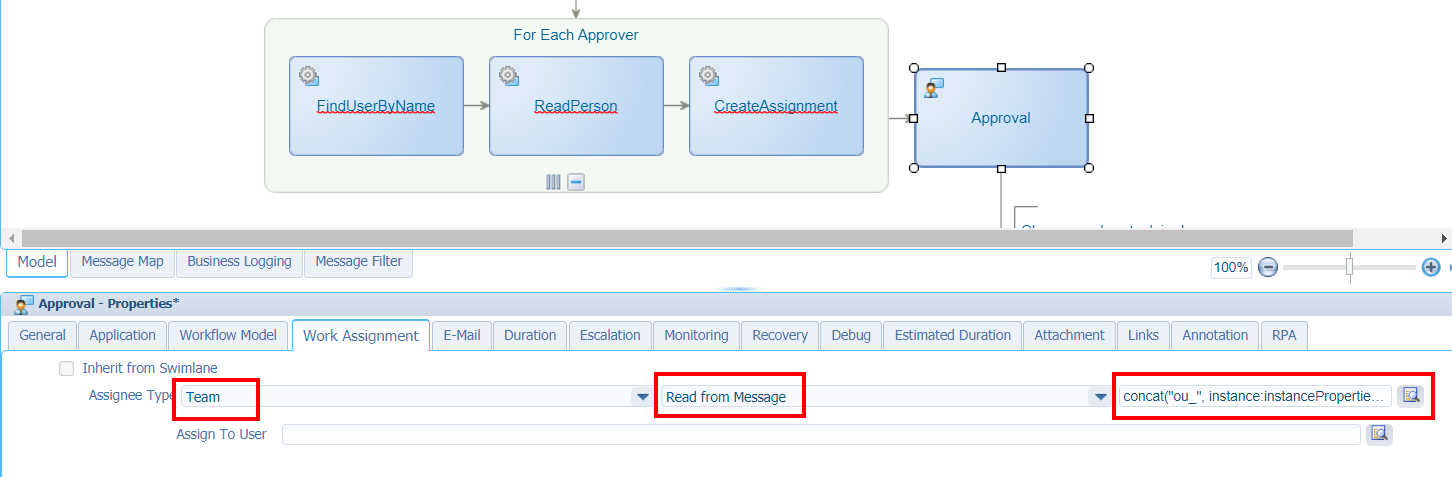
concat("ou_", instance:instanceProperties/instance:identifier/text())
Save, publish, and try again…
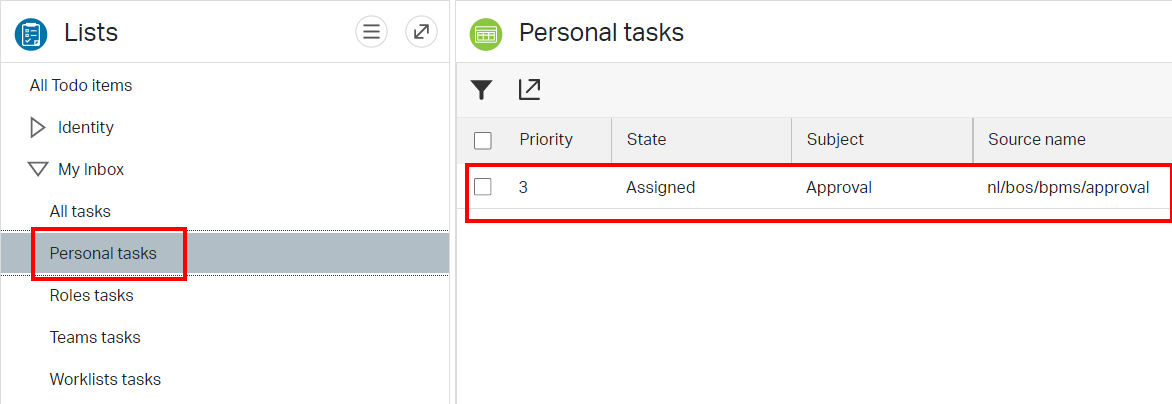
Now we’re getting somewhere! How about the ‘awtest@appworks’ account? Ohwwwww mama!…Touch-down, task received, and works like a charm.
Both accounts are able to claim the task and complete it, but that’s not what we want!! What we want at this moment is to disable those actions to complete the task and simulate some sort of “task completion”…Keep on reading…It will be explained!
First the rest of the BPM…The clean-up part!
…
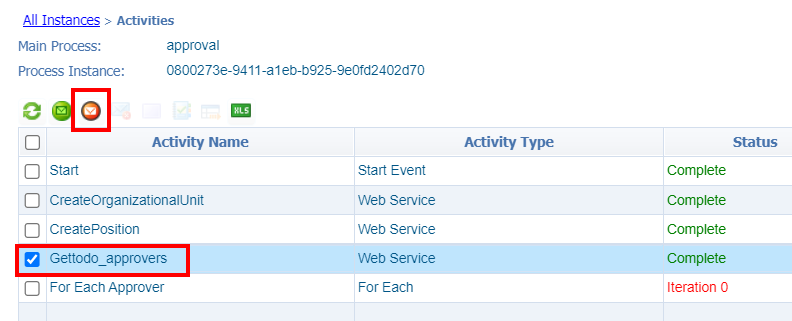
We already defined a for-loop for the created assignments, but we don’t have a “saved” list where we keep track on the created ItemIds for those assignments…Let’s first create this! We need a global process variable called ‘assignment_ids’. This can be created in the “Message Map” of the BPM in the ‘Source’ panel on the left. The option is called ‘Process Specific Messages’ where we create a new element:
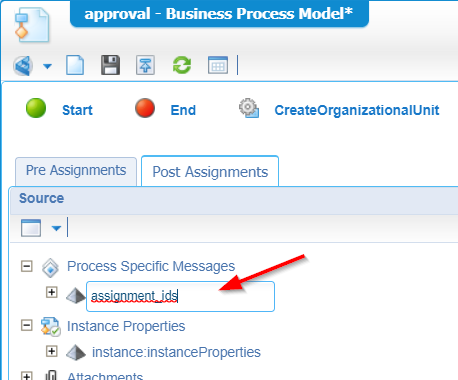
On the ‘CreateAssignment’ activity we’ll add a ‘Post Assignment’ (see that screenshot above!) where we will map the retrieved ‘ItemId’ of the ‘CreateAssignment’ request to this global variable.
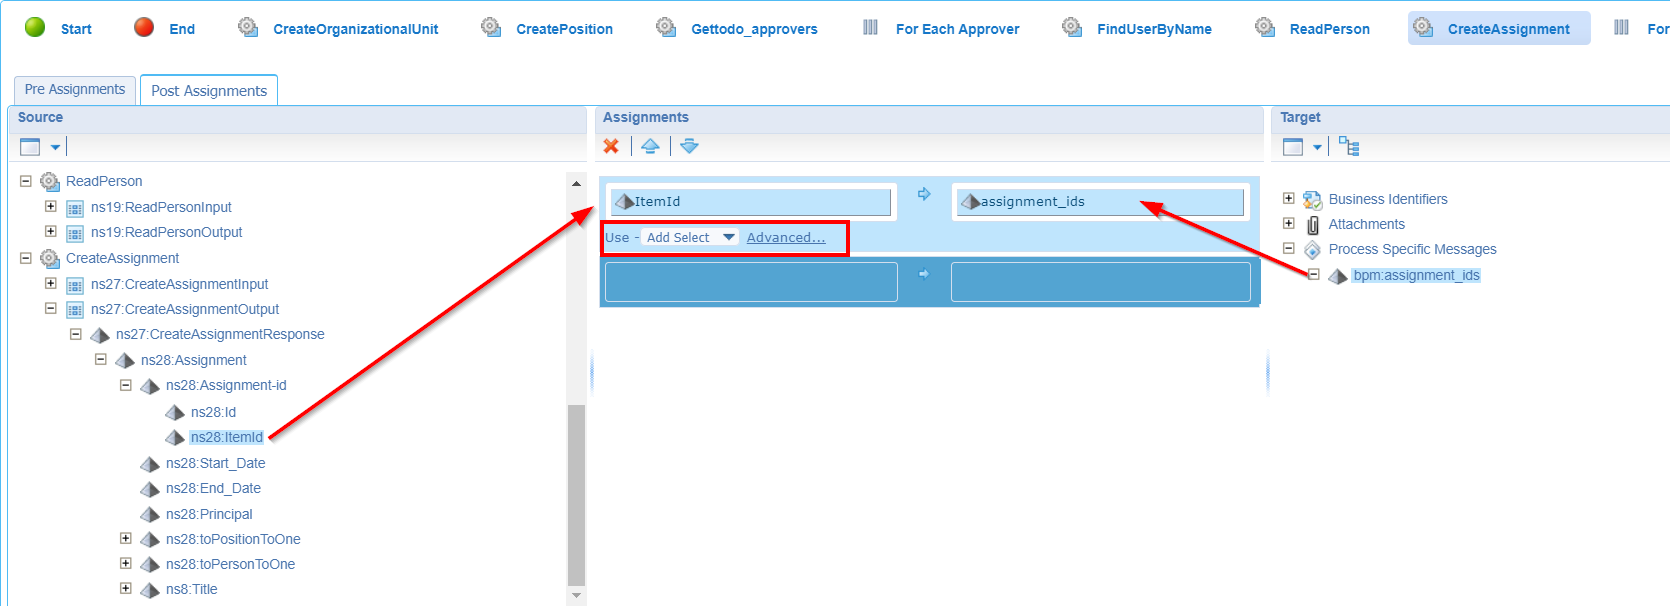
Notes:
Update the ‘Replace with’ usage with the ‘Add Select’ usage.
Remove the ‘text()’ function in the end of the xPath expression in the ‘Advanced…’ editor:
ns27:CreateAssignmentOutput/ns27:CreateAssignmentResponse/ns28:Assignment/ns28:Assignment-id/ns28:ItemId
Once we reach the assignments for-loop we will walk over XML data which will eventually look like this:
1 | <assignments_ids xmlns="http://schemas.cordys.com/default"> |
Next is the cleanup…
For the for-loop on the assignments we will need to do something like this in the properties:
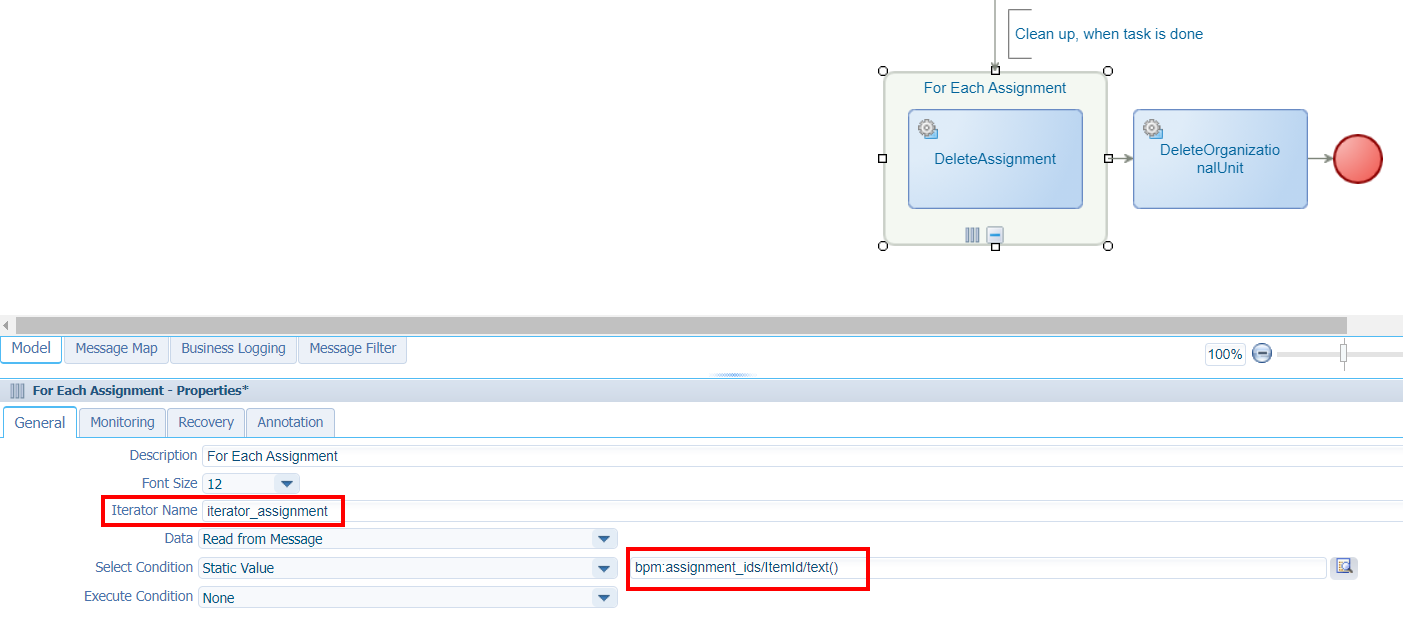
For you to copy:
bpm:assignment_ids/ItemId/text()
The final parts on those last two webservice calls:
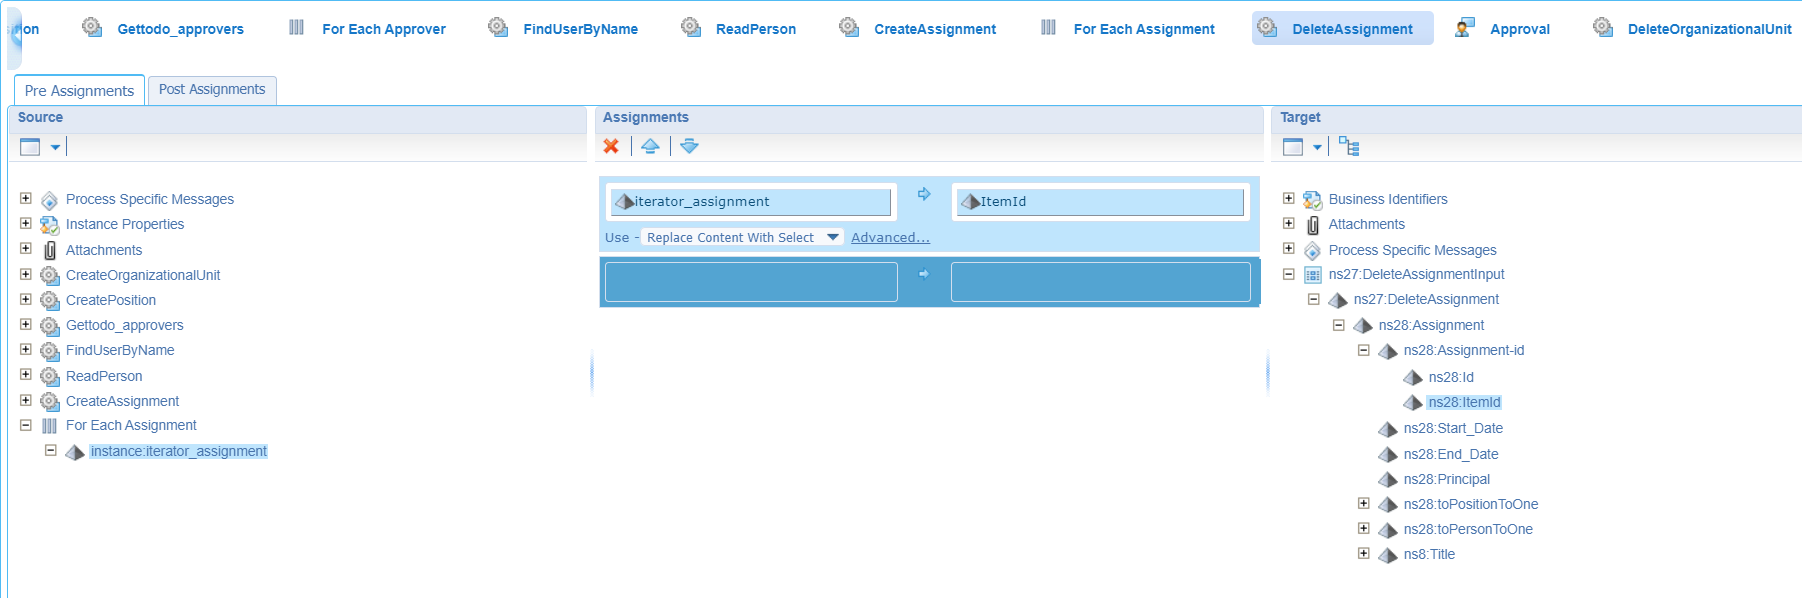
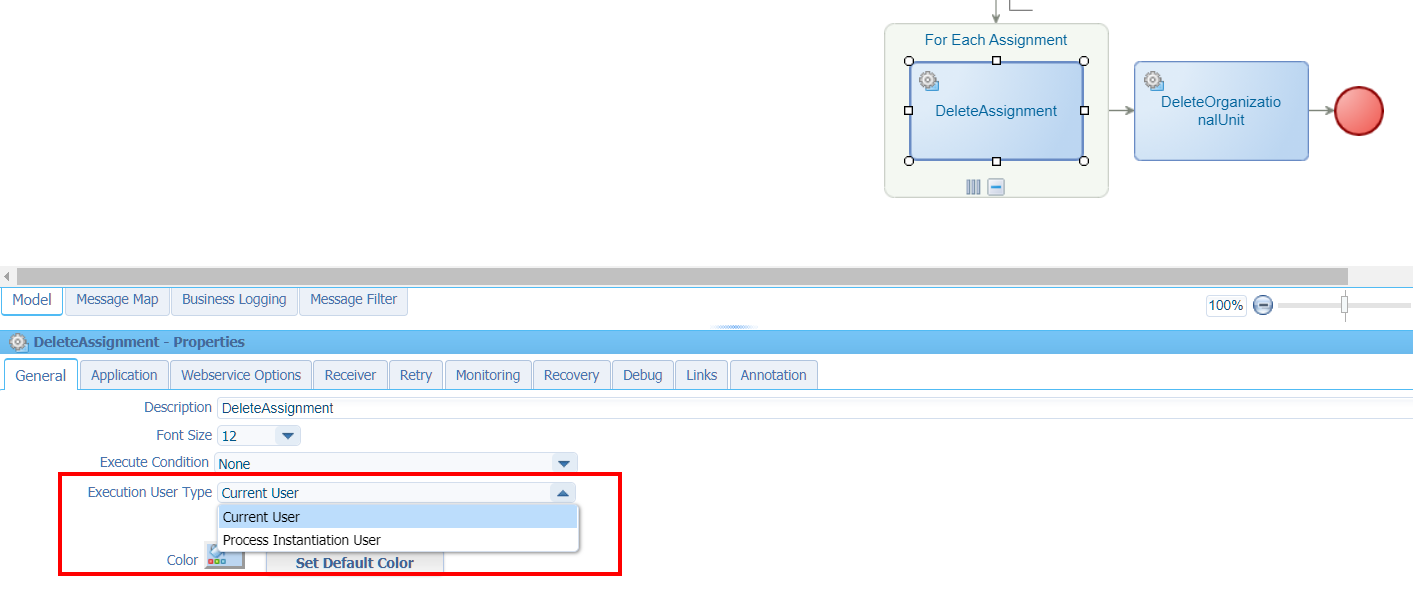
DeleteAssignment
This one is as simple to assign our current iterator value to the ‘ItemId’ of the webservice:
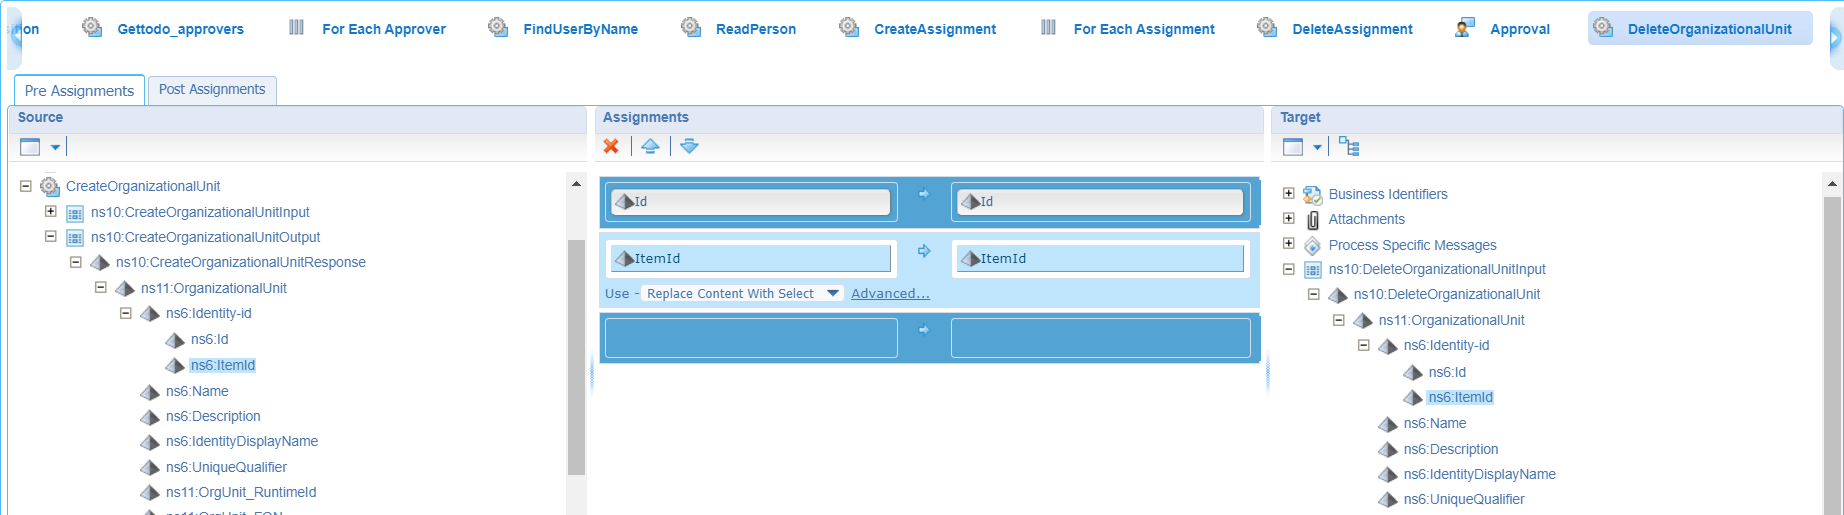
DeleteOrganizationalUnit
This one is as easy as connecting the response data of the ‘CreateOrganizationalUnit’ to this webservice:
Nice…Looks like we’re ready for a final test on this flow (after a save and publication). For now, we just use one of the 2 users to complete that task; This will change later on…Continue the grind…
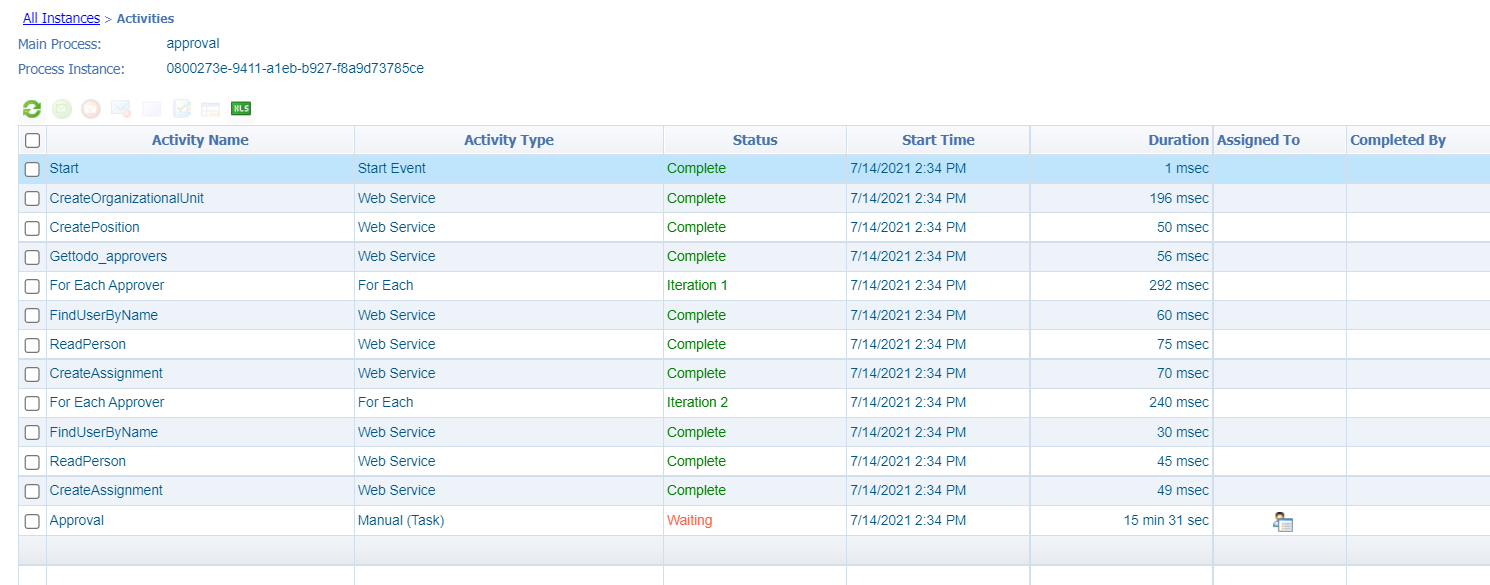
This is how my BPM UI looks like after a complete run. Note the 2 iterations on each loop!
You can open this view from the PIM, by selecting the BPM instance and click the ‘Show Graphical View’ icon.
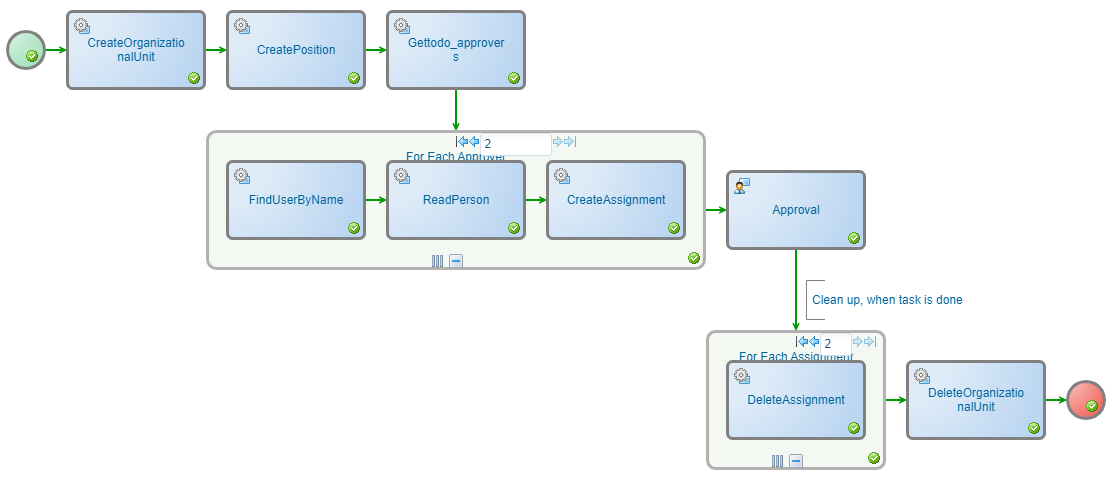
Also green marks like my screenshot? Time for the next step…
Create the ‘Complete task’ (second) BPM
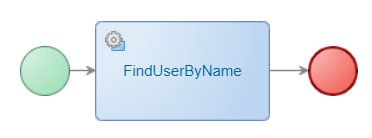
On our ‘bpms’ folder in the project, we create a new BPM. This time with name ‘complete_task’. Start simple with just one activity which will call just one webservice to retrieve some ‘Person’ information of the current user who is triggering this flow! Yes, the BPM will be triggered from an action Rule within the related ‘LifecycleTask’ entity…Remember that one?
We start with this:
In the ‘Message Mapping’ of this webservice activity we need to pass in our current user (the one who triggered the action Rule!). Like this:
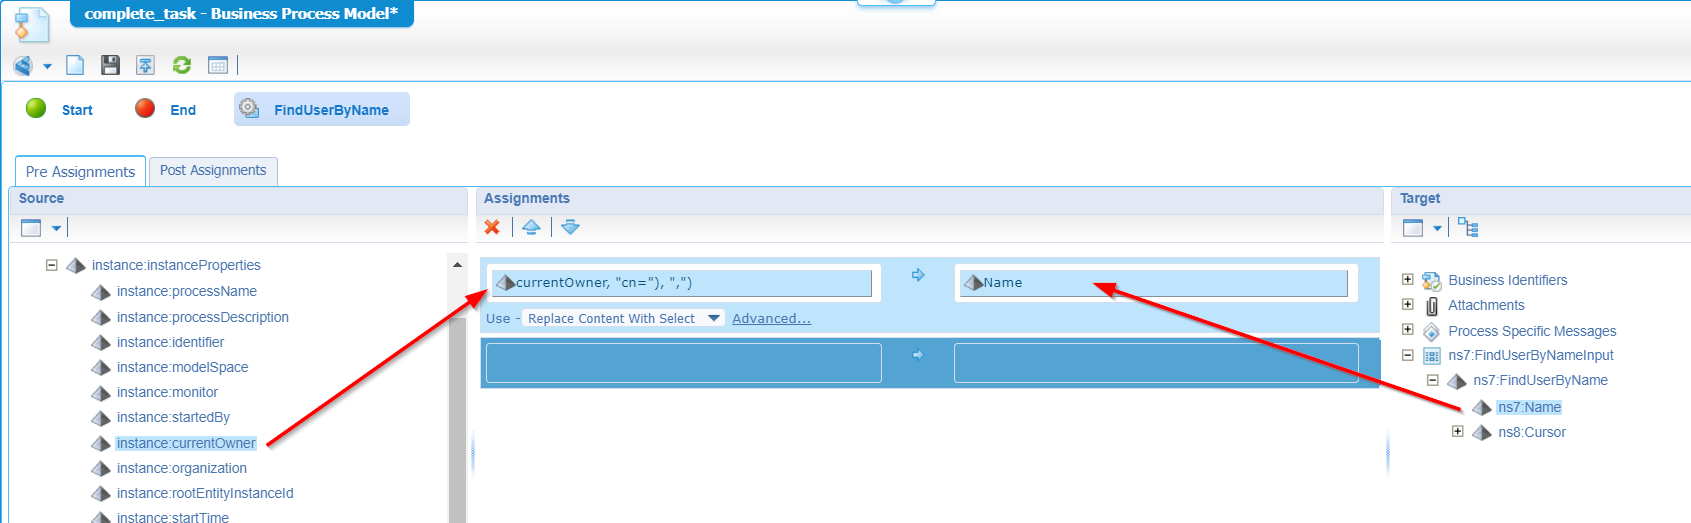
This is the expression I use: substring-before(substring-after(instance:instanceProperties/instance:currentOwner/text(), "cn="), ",")
Why? Well, the “currentOwner” value looks like this:cn=awdev@appworks,cn=organizational users,o=appworks_tips,cn=cordys,cn=defaultInst,o=mydomain.com
For our service call, we only need to pass in: awdev@appworks
Save it, publish it, and go for the next step…We’ll be back!
Configure the lifecycle task entity
Alright…From the ‘todo’ entity (where also the lifecycle BB is applied), we have a BB available called ‘Task list’. Select it, and from the right panel you have the option to ‘Open’ this entity from the ‘Advanced configuration’ section.
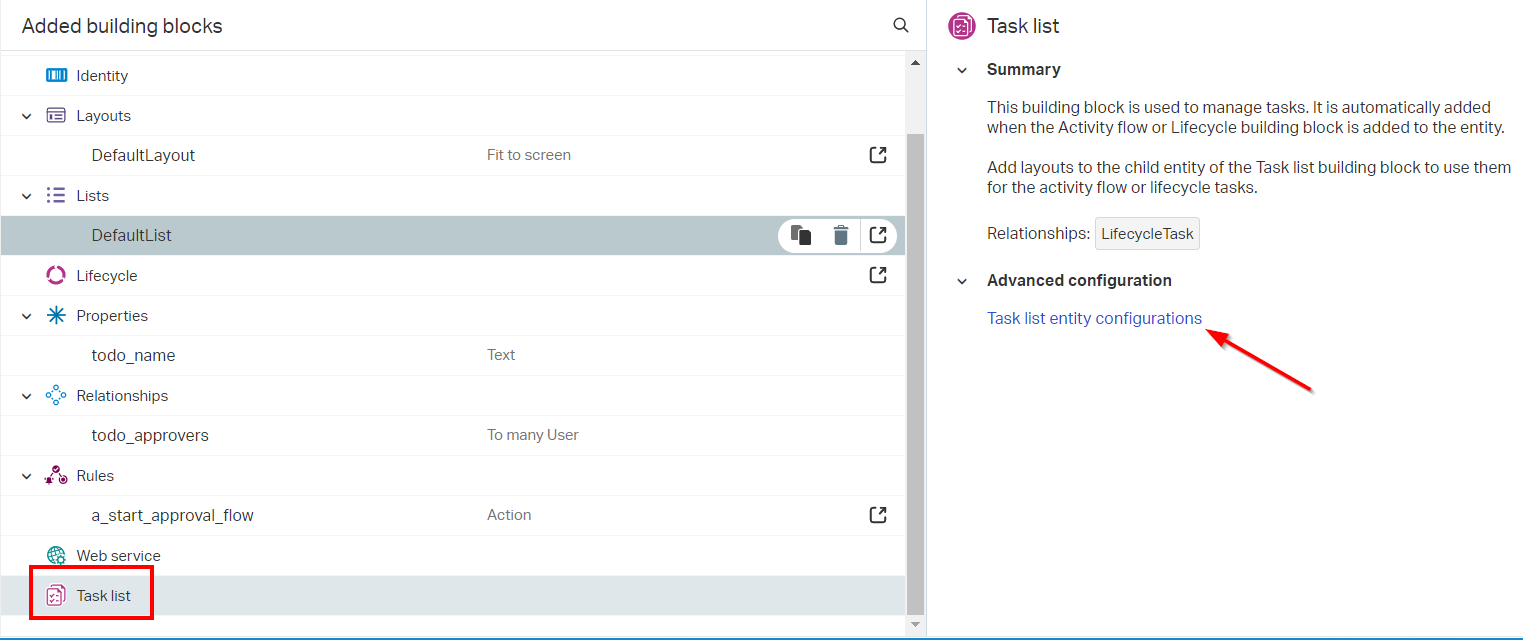
You see a new entity with again the full list of building blocks to apply. This is what we need to add:
An action Rule
Name will be ‘a_complete_task’, and label will be ‘Complete task’. We don’t need any conditions. Just make sure it starts the ‘complete_task’ BPM.
A ‘to many’ relation to “Users”
A screenshot describes a thousand words…
An ‘Actionbar’
I give it a name ‘task_action_bar’ and only show the action rule ‘a_complete_task’. This way we hide all other actions and show only the minimal actions required!
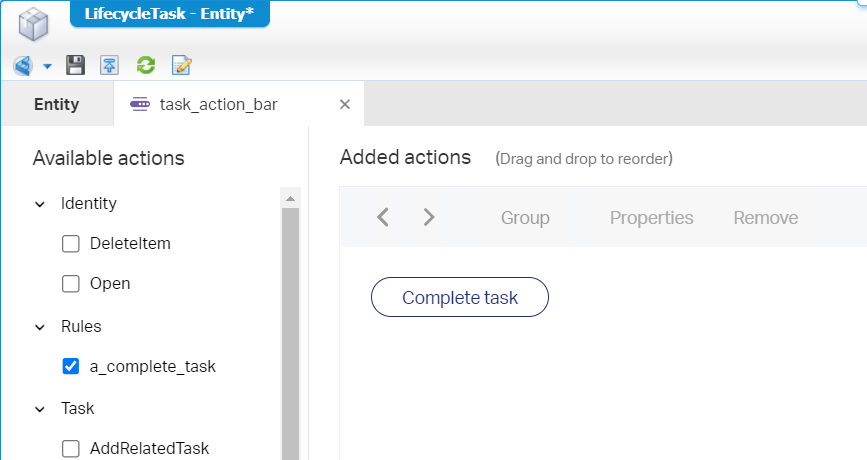
Remember we talked about simulating a task completion…Well, this is it! You see it just triggers a BPM which updates another (task)approvers list. The real task completion will be handled differently…Keep on grinding…
A “Default” form
This one is used to show task related information (just our approvers list) in the DefaultLayout of the task.
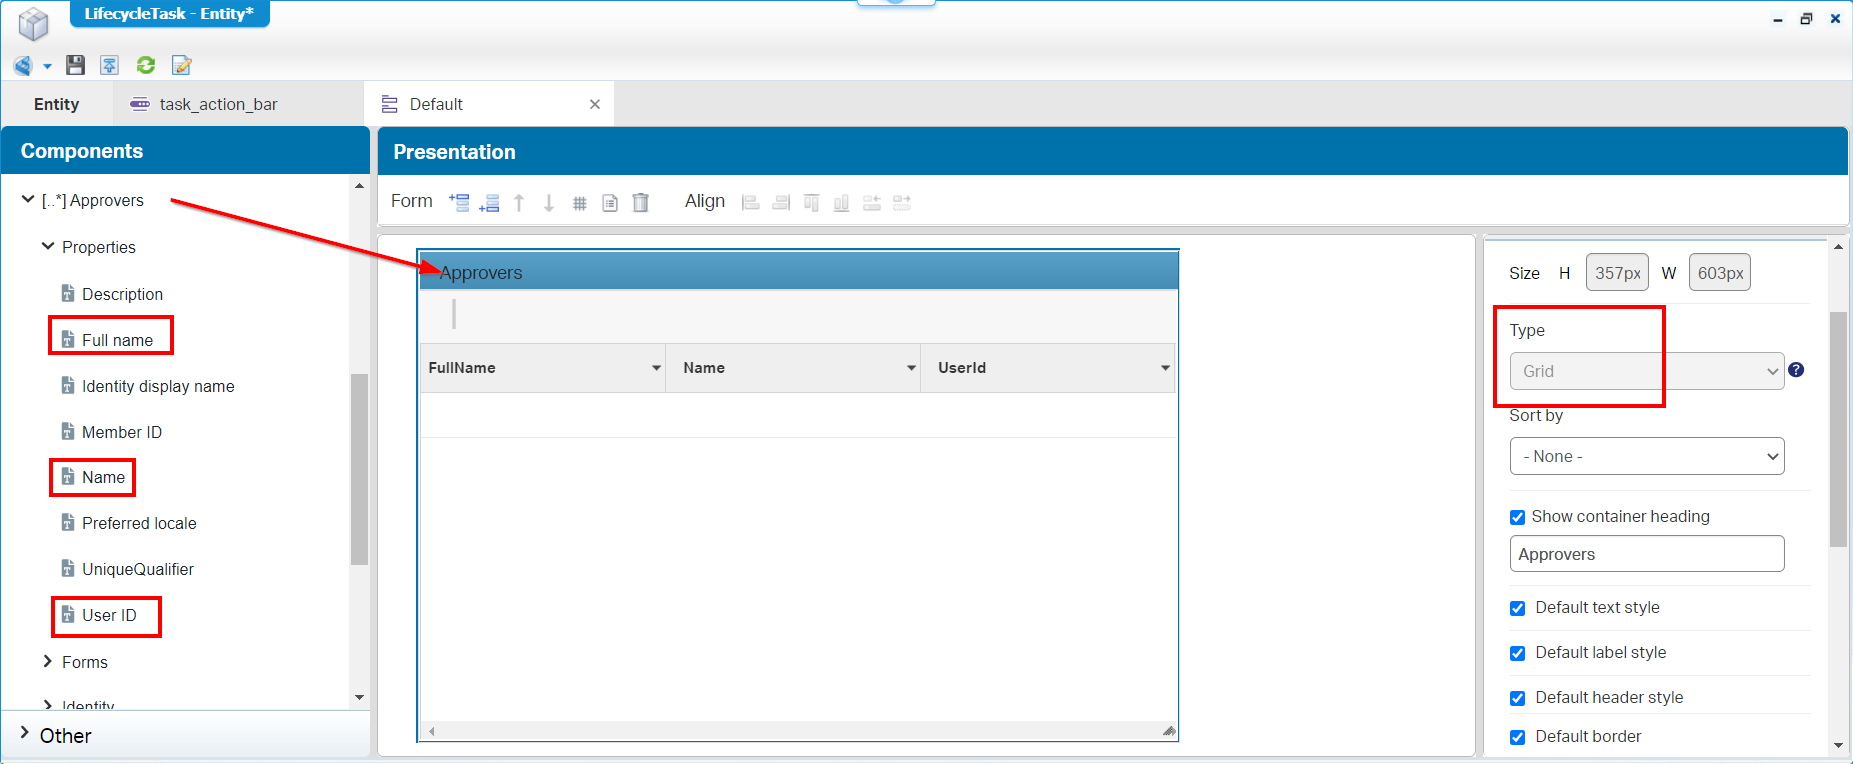
Just drag & drop the ‘Approvers’ relation to the form. I made it a grid with some user specific columns. I also made sure this grid can’t be manipulated at all, so all the actions on the grid are disabled (you don’t see it on the screenshot, but they are disabled!)
A Layout
I name it ‘Task_Layout’ of type ‘Fit to screen’. It will look like this:
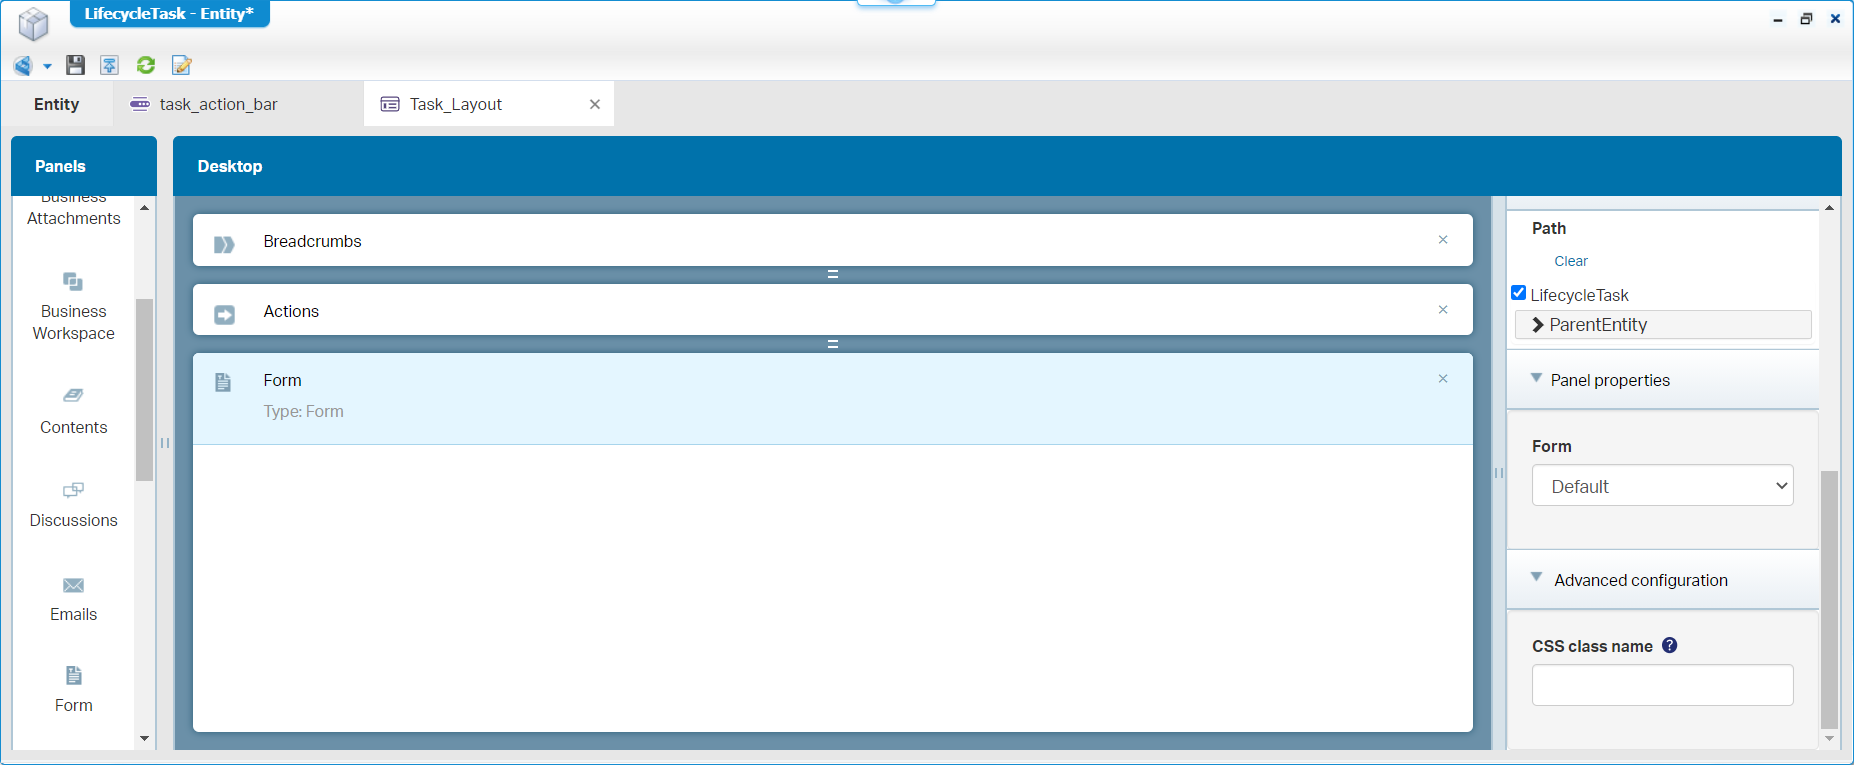
Notes:
- The “Form” panel will show that ‘Default’ form
- The “Actions” panel will show our ‘task_action_bar’
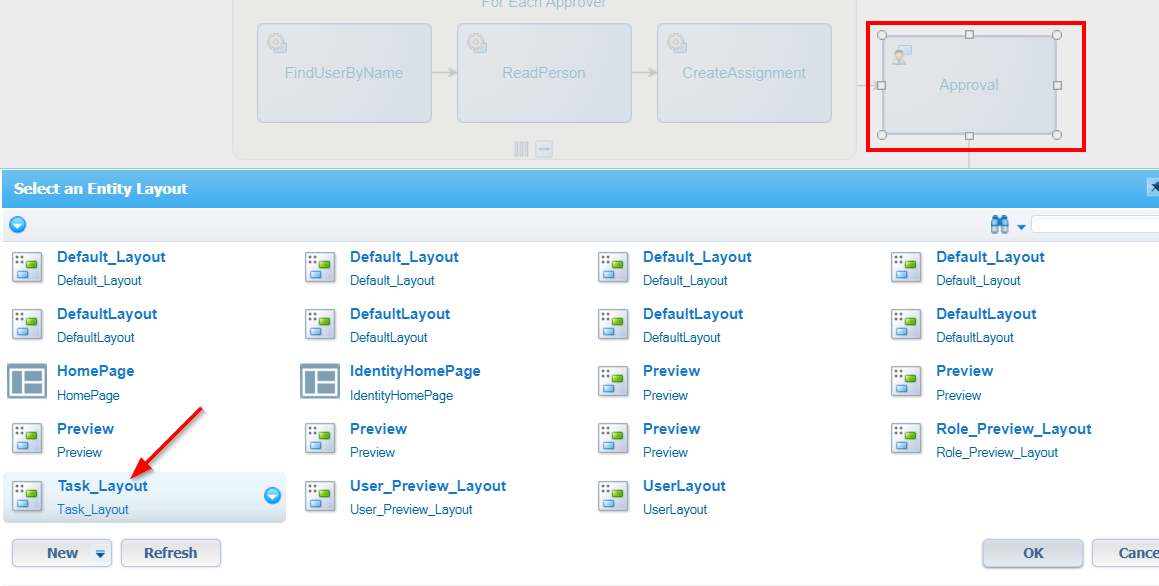
To show this “Task_Layout” for our task, we need to jump back to the first BPM where we insert (again) an ‘Entity Layout’. Only this time we select this last created layout of the lifecycle-task entity!
Expose the webservices
We just add the ‘Web service’ BB to the lifecycle task entity and (for now) we just mark all the operations:
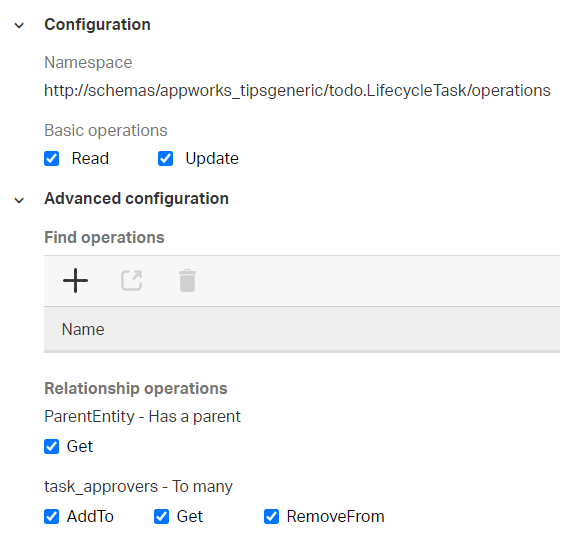
Normally you select only what is required, but for our demo I just want to make sure we have it all in place.
Done…Do a save, and a publication. Time (in runtime) to start a new approval flow from our ‘todo’ entity instance…It will drop an approval task to our dynamic team and when you ‘Open’ the task (don’t mark it as you see the ‘old’ actions, but we can fix that my using our own ‘List’ BB…not for now!) you should see our ‘Task_Layout’ with our ‘simulation’ action. Hit the ‘Complete task’, but it wouldn’t do that much…check the next step.
What you can do is checking the PIM and see already if the correct ‘User’ data is retrieved with the related ‘Person’ data!
Implement the second BPM
Now that we have our “Webservices” BB available on the lifecycle task, we can extend our ‘complete_task’ BPM. What we want is to update the approvers list which is related from the lifecycle task entity and shown on the ‘Default’ form of that same entity (all the good stuff we’ve created in the previous step).
So, we just add another activity, and we apply to webservice ‘AddTotask_approvers’
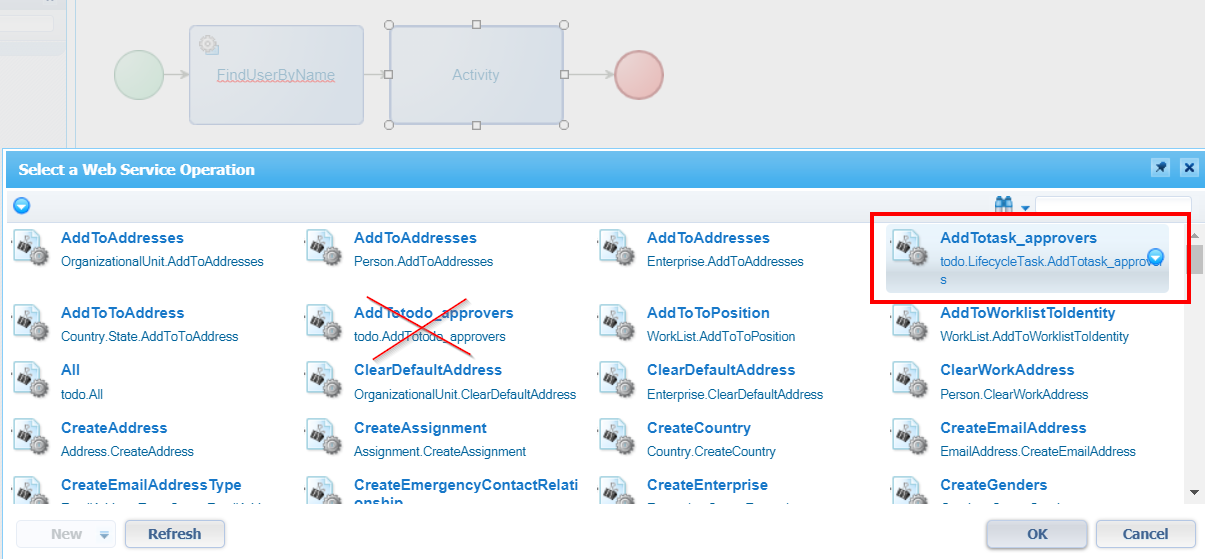
Make sure to select the correct one, as we also see the webservice operation called ‘AddTotodo_approvers’ passing by in that selection!
The mapping of the service activity will look like this consolidated view:

Almost forgot!…Make this BPM ‘Short-lived’, like ‘In-memory’, or like in ‘Stateless’ (check the properties on the BPM itself). This makes sure you have a nice interaction directly in runtime, so your approvers list is updated on the fly! The first BPM must be long-lived as we have a ‘Manual’ task in it.
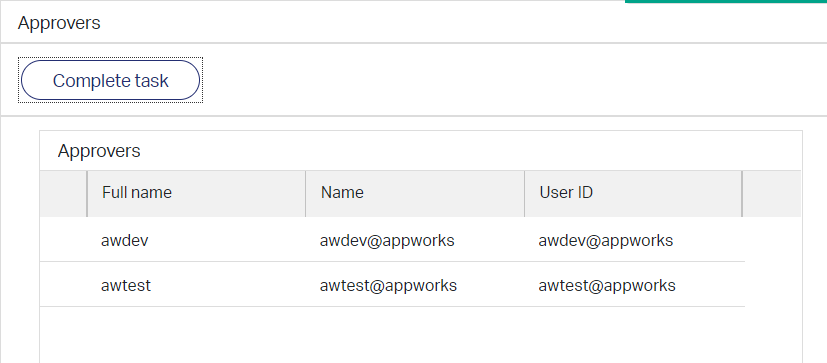
After publication, you should be able to hit that ‘Complete task’ action, and the user will be in the approvers list for this particular task. Also, the ‘awtest@appworks’ account is able to open this ‘Team’ task and give an approval:
Nice…Only, this doesn’t complete the task from our parent flow!? Correct!, but what we do have at this point in time is a dynamic list of approvers! So, in the ‘complete_task’ BPM we can now easily add some logic where we can check if the full approvers list (from our parent ‘todo’ entity instance’) did an approval for this task! We can even check if just 50% of the approvers did the task…Once that check is done we need to finish that parent task in some way!?
Build that check and finish that one parent task
Before we continue in this section we need an interesting so-called ‘Runtime reference’ into our project…A what? This makes it possible to reuse platform components into your own project which are not yet available by default (like the webservices of the identity package we saw earlier!)
In our project we create a new folder called ‘runtimerefs’ (at the same level as ‘bpms’ and ‘entities’). Right-click the folder, go for the ‘Add runtime reference’ menu-item and insert a new reference of type ‘Web Service Interface’ where we see an interesting modal screen:
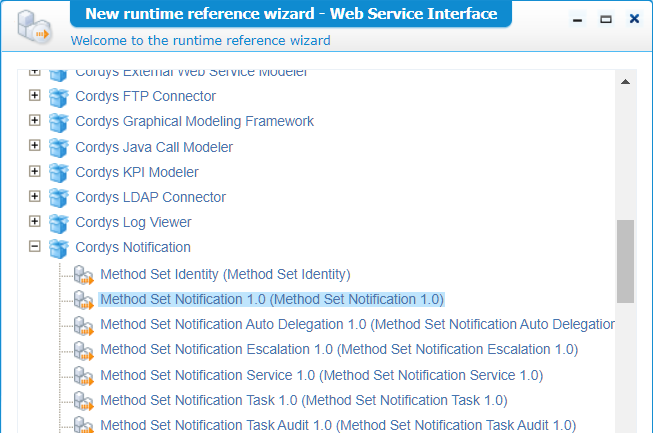
Go to the ‘Cordys Notification’ package, select the runtime reference called ‘Method Set Notification 1.0’ and finish the wizard. What do we have available now on our project? Well, a set of services (to be called from a BPM for example) which have a relation with ‘Notification’. Not only “notification”, also ‘Task’ related services like for example the interesting service called ‘PerformTaskAction’…Keep on reading…
So, we need to perform 3 tasks:
- Collect all the data we want to check (The approvers list from the initial ‘todo’ entity, and the task-approver list where we keep track on the approvals!)
- Build the ‘All approved?’ check itself
- When ready…Finish the parent task (with service call ‘PerformTaskAction’)!
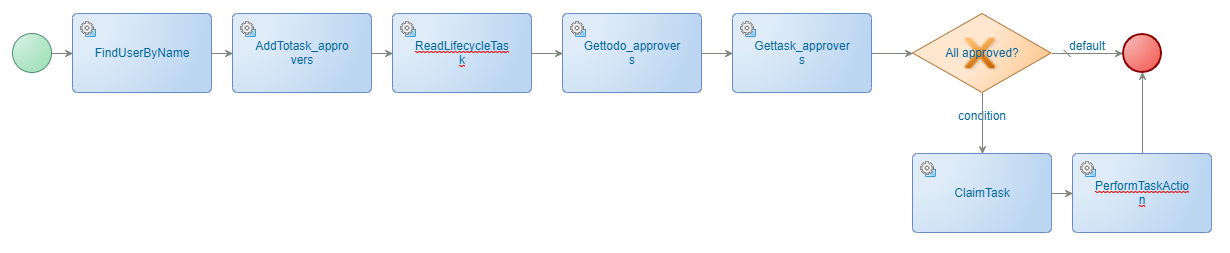
First thing to do is extending the ‘complete_task’ BPM with some activities (incl. the decision split) like this:

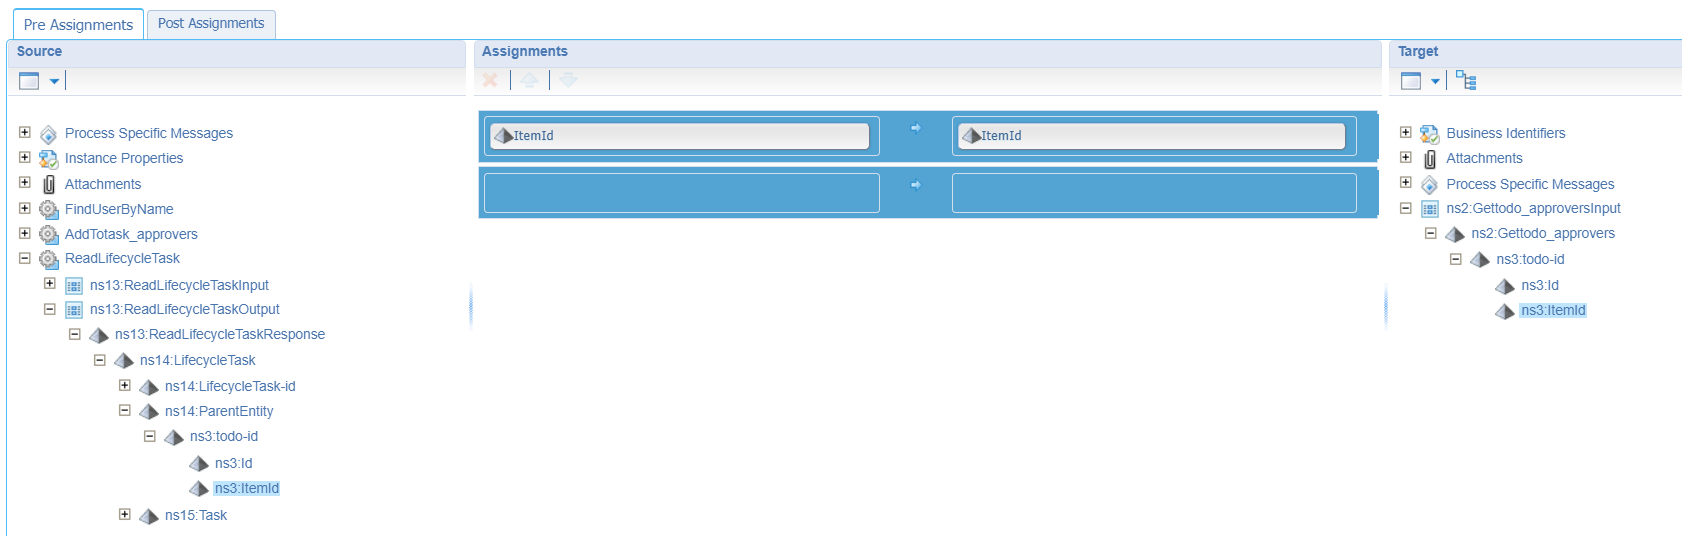
Keep in mind we are in ‘context’ of the lifecycle task entity of our ‘todo’ entity with this BPM! So, the first thing we need to do is getting access to our ‘todo’ entity. We can do this via the service called ‘ReadLifecycleTask’ service we exposed on the lifecycle-task entity…remember? In the mapping (of this first new activity) we can easily map the ‘rootEntityInstanceId’ with the ‘ItemId’
The response of this call will call have our ‘parent’ todo ItemId available, so in the next activity we can do a call to the exposed service ‘Gettodo_approvers’ with again a simple and efficient mapping:
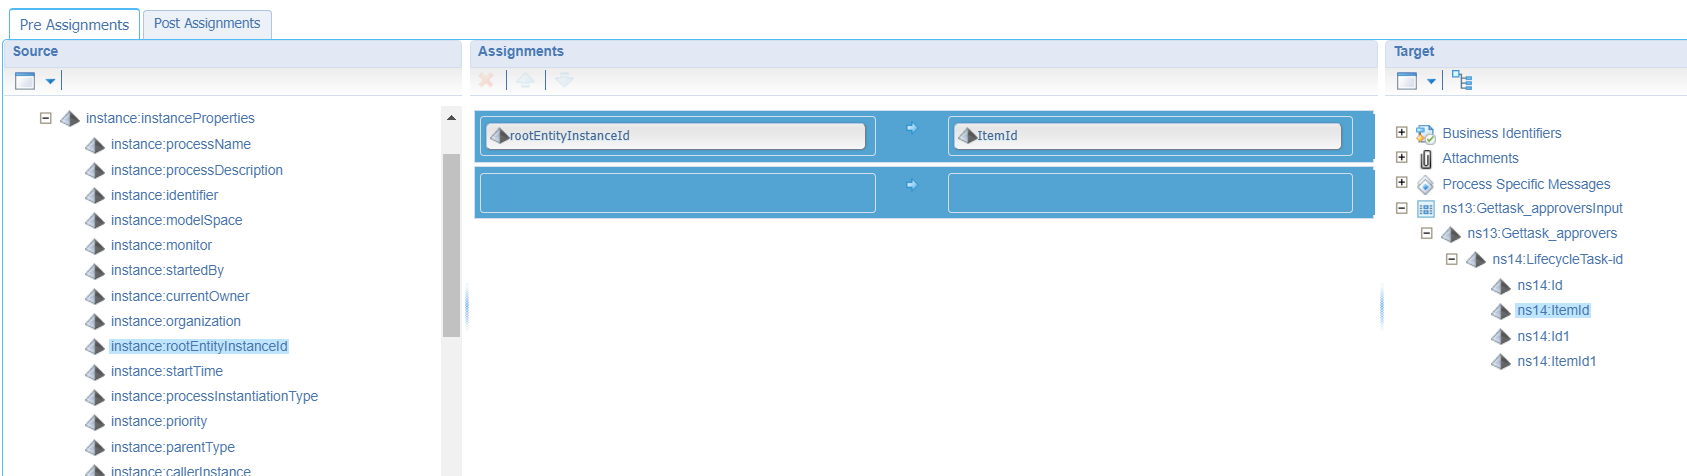
The response of this call will retrieve our selected approvers list on the ‘todo’ entity. Keeps us with “an open end” on the ‘approvers’ list of the “current” lifecycle task entity (which is in scope) of this running BPM…So a service call to ‘Gettask_approvers’:
Next step is our “Check”!
This one is easy now, as we have all the data collected. We can create a simple check like this:
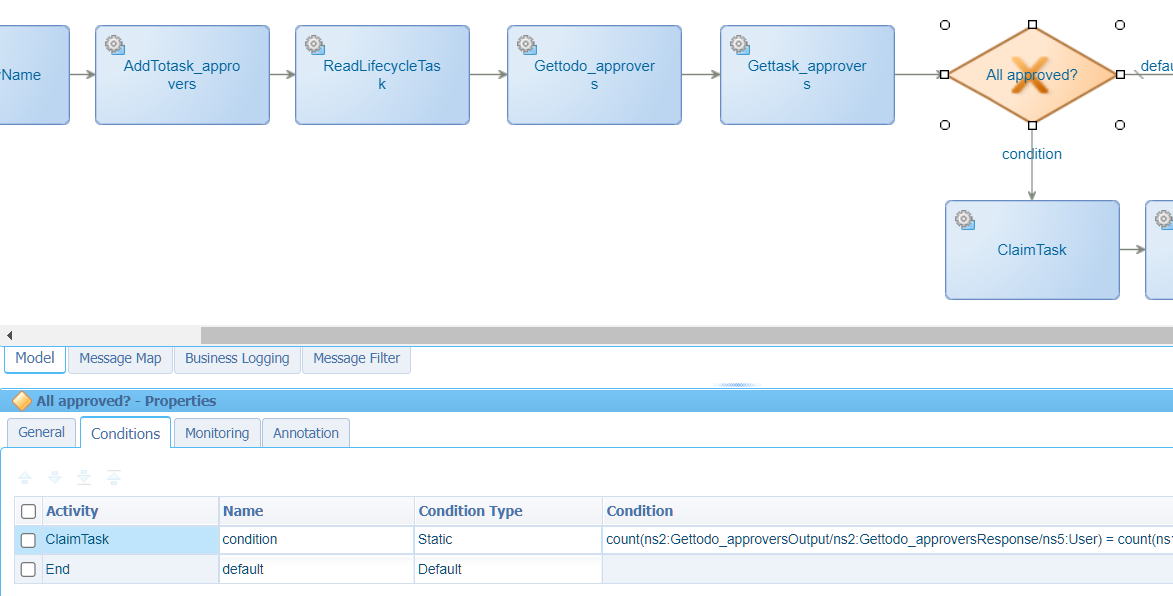
For you to copy:
count(ns2:Gettodo_approversOutput/ns2:Gettodo_approversResponse/ns5:User) = count(ns13:Gettask_approversOutput/ns13:Gettask_approversResponse/ns5:User)Note that we use an xPath function to “count” the elements in both returned SOAP responses. We make it an ‘equal’ statement, but you can make it as fancy as you like! 😎
We also make sure our decision is an ‘Exclusive’ type. This makes it sure that only 1 output is chosen based on the applied condition.
The difference with ‘Inclusive’ is that all the other conditions are skipped when a condition is satisfied. So, with ‘inclusive’ all conditions are checked and that makes it possible to satisfy multiple conditions with multiply output flows!
Then the final task which is completing the task of the parent BPM! The task is open for completion, but because it’s a ‘Team’ task we first need to ‘Claim’ it before we can complete. That’s another service call…This time a call from our runtime reference webservices called ‘ClaimTask’. Insert it and make sure you make the correct mapping with the correct properties:
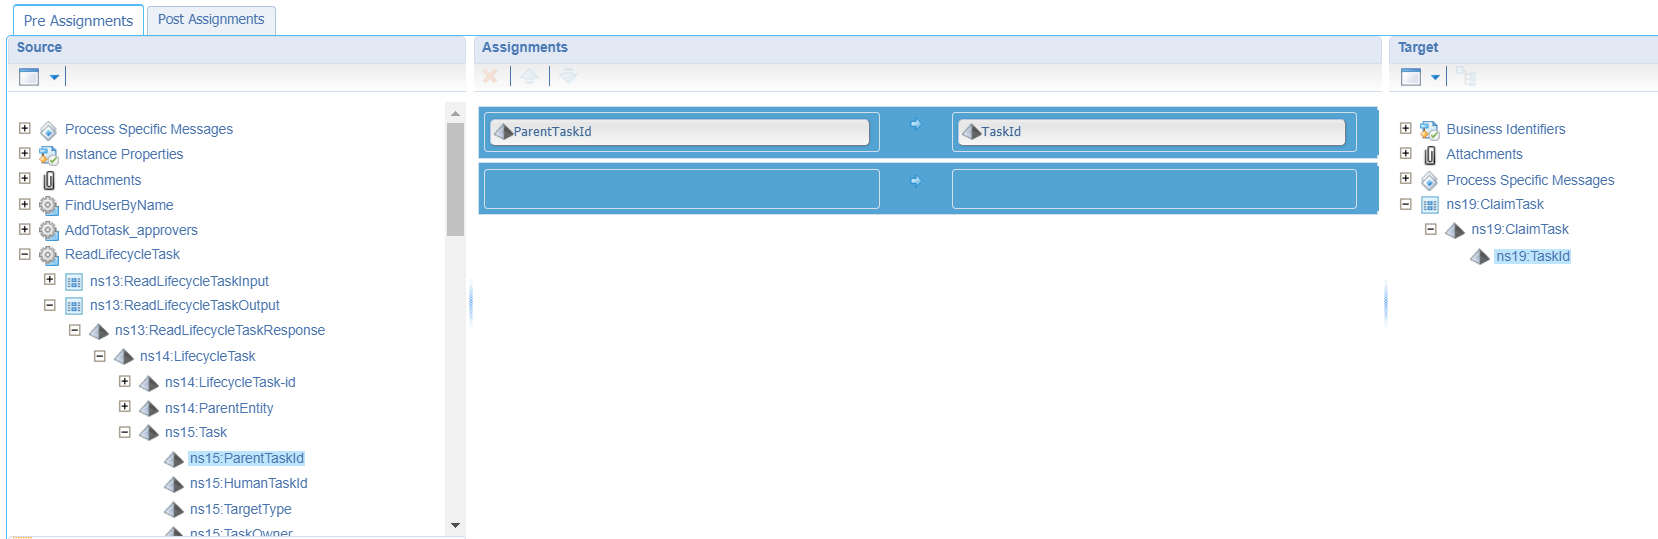
You see an interesting ‘ParentTaskId’ passing by which is exactly what we need in this call! Later on (when the BPM is ready, and you double-checked the messages passing by), you will start to see some ID like this
0800273e-9411-a1eb-ba28-058f421301f9where we normally see entity id’s passing by which look like this0800273e9411a1ebb9593e71f8cc8a01.1.327686. That’s another format! This is also the difference between the ‘new’ entity modeling paradigm versus the ‘older’ Cordys BPM paradigm. Our ‘Notification’ method set is also from the ‘older’ stamp, so this makes it work smoothly!
Our task is claimed, time to also ‘Complete’ it in that final activity step where we (again) have the same TaskId mapping, but with an extra ‘Action’ parameter which we fill with the value ‘COMPLETE’:
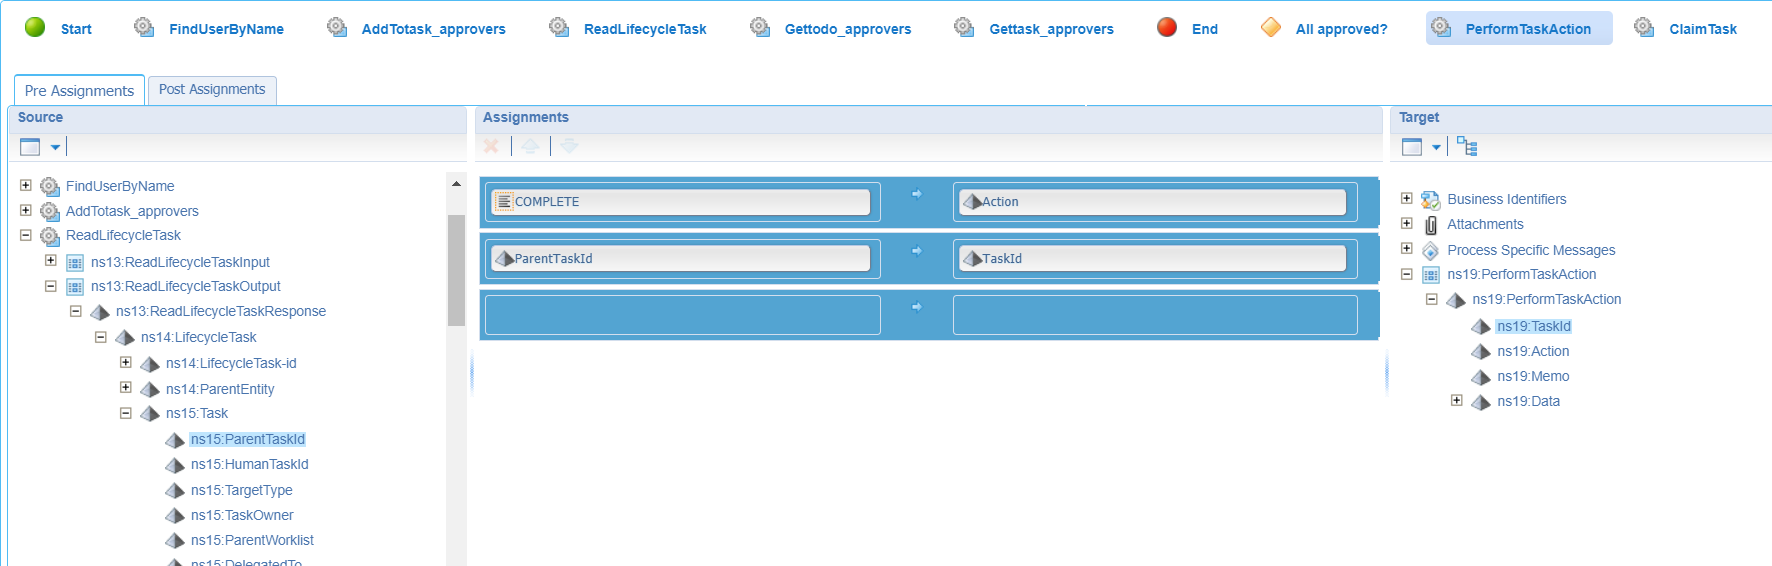
The ‘PerformTaskAction’ is also reused from the ‘Notification’ runtime reference.
The final flow?
For the complete overview, a copy of the consolidated view of the message map of the BPM
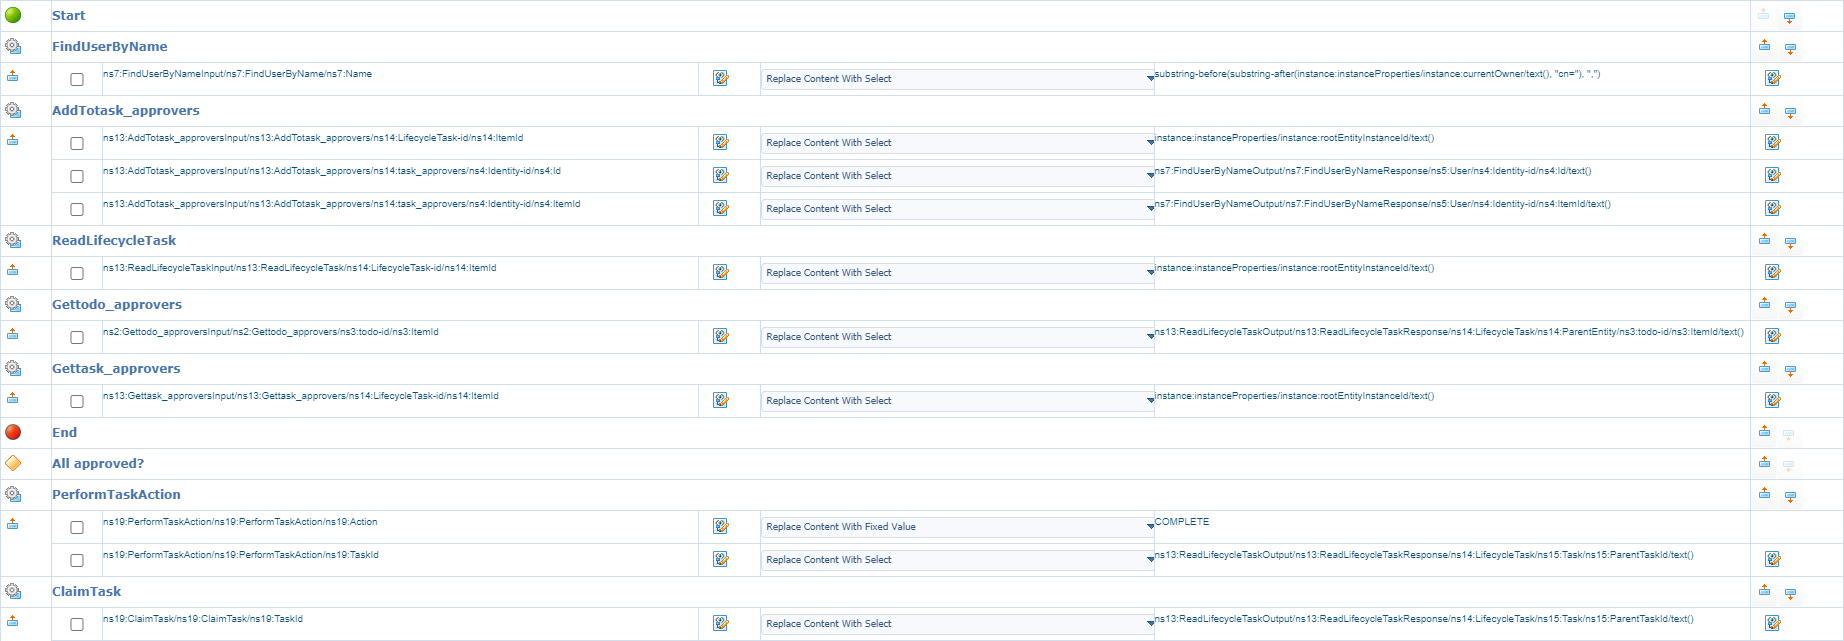
OK…Time for saving, deploying, and testing…
Test steps:
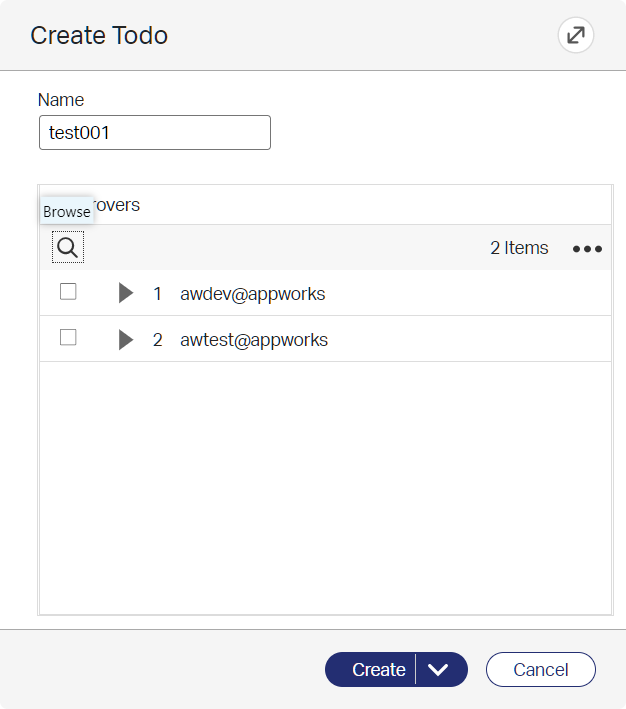
With account ‘awdev’: create a new ‘todo’ entity instance and add ‘awdev’ and ‘awtest’ as approvers
![dynamic_task_066]()
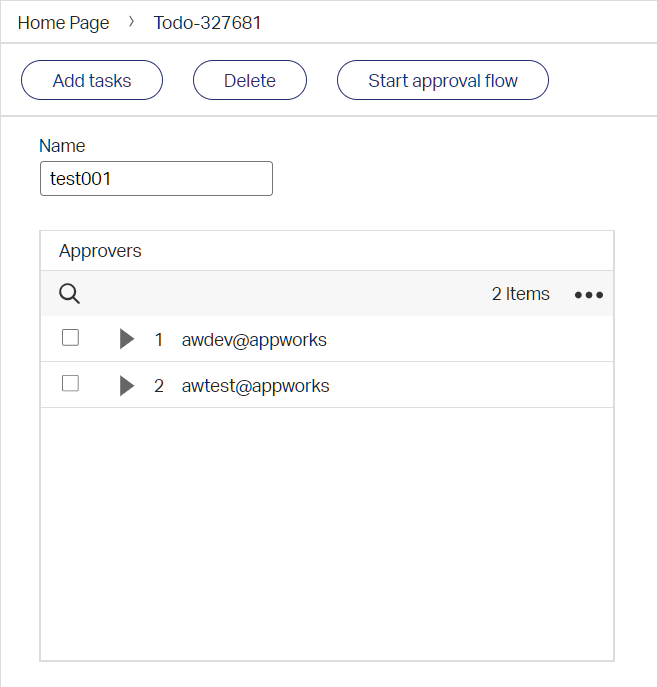
With account ‘awdev’: open the entity and click the ‘Start approval flow’
![dynamic_task_067]()
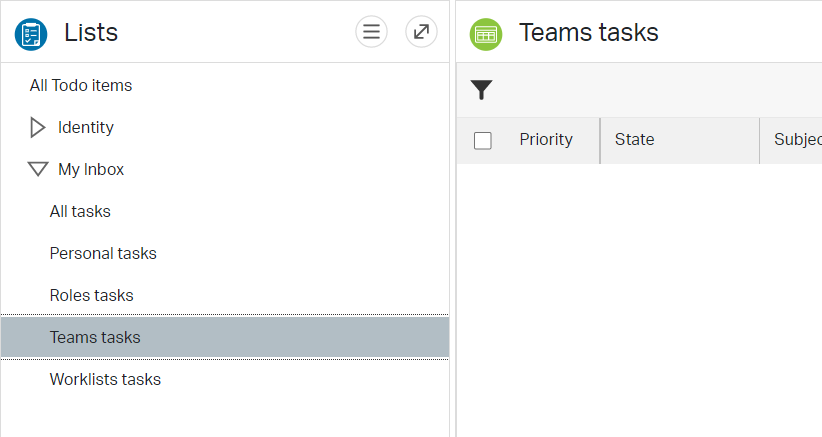
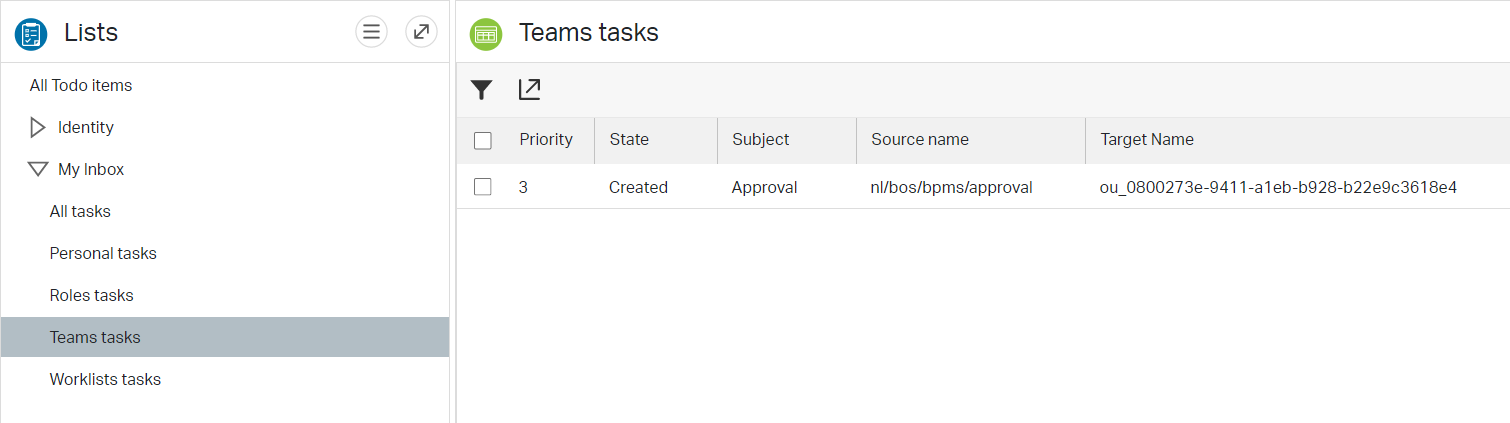
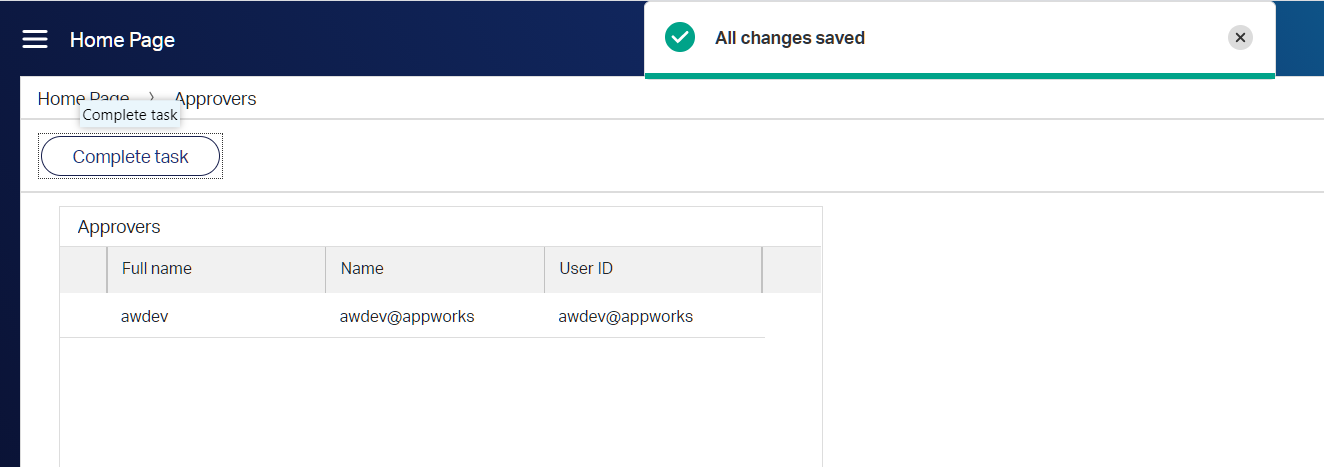
With account ‘awdev’: open the ‘Teams tasks’ and open the new task (don’t mark it for now)
With account ‘awdev’: click the action button ‘Complete task’ once, so you see your name in the approvers list (that’s the power of the interactive short-lived BPM!)
![dynamic_task_068]()
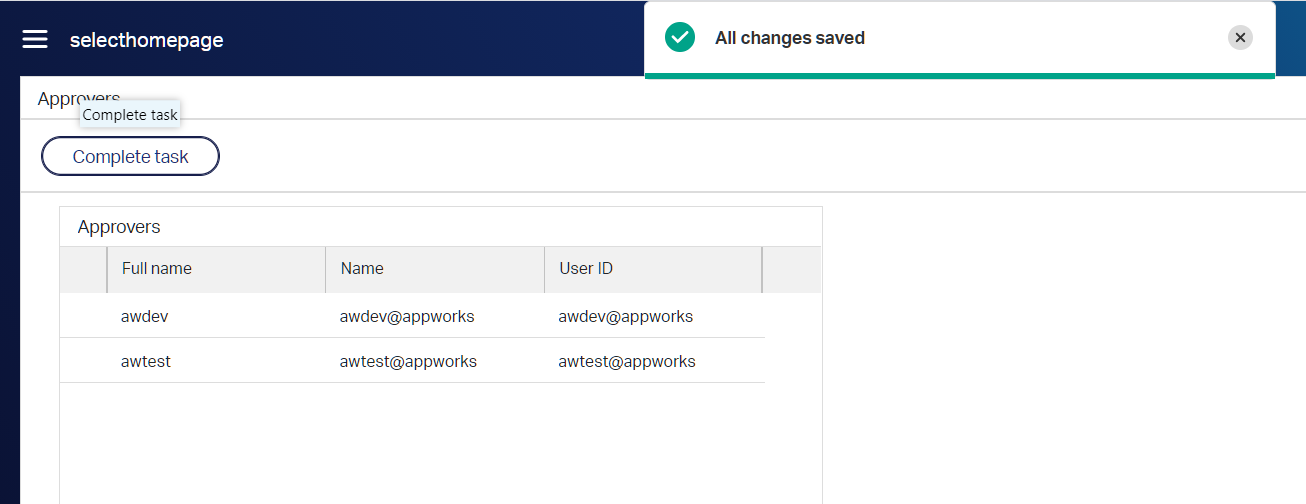
With account ‘awtest’: open the ‘Teams tasks’ and open that same task
With account ‘awtest’: click the action button ‘Complete task’ once, so you also see this name in the approvers list
![dynamic_task_069]()
All approvers did the job, so our parent task should be finished now
![dynamic_task_070]()

Looks nice but have a further look as also the ‘Dynamic’ team (that ‘Target Name’) should be gone from the ‘Identity’ homepage! We need to check this with the ‘awdev’ account as our ‘awtest’ doesn’t have the ‘Administrator’ role to view the entity data! We have our first problem because the ‘Team’ is still there…damn!?
Let’s check the PIM!
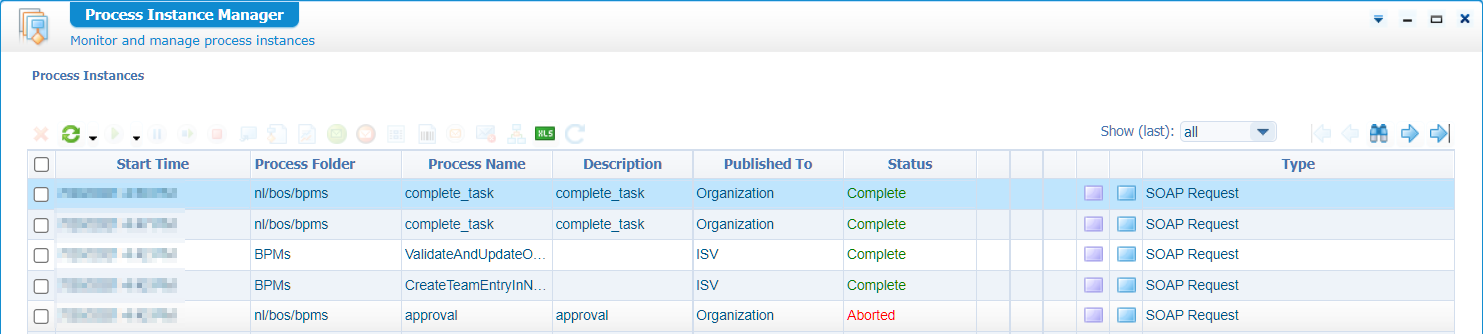
That’s an aborted flow…Why?
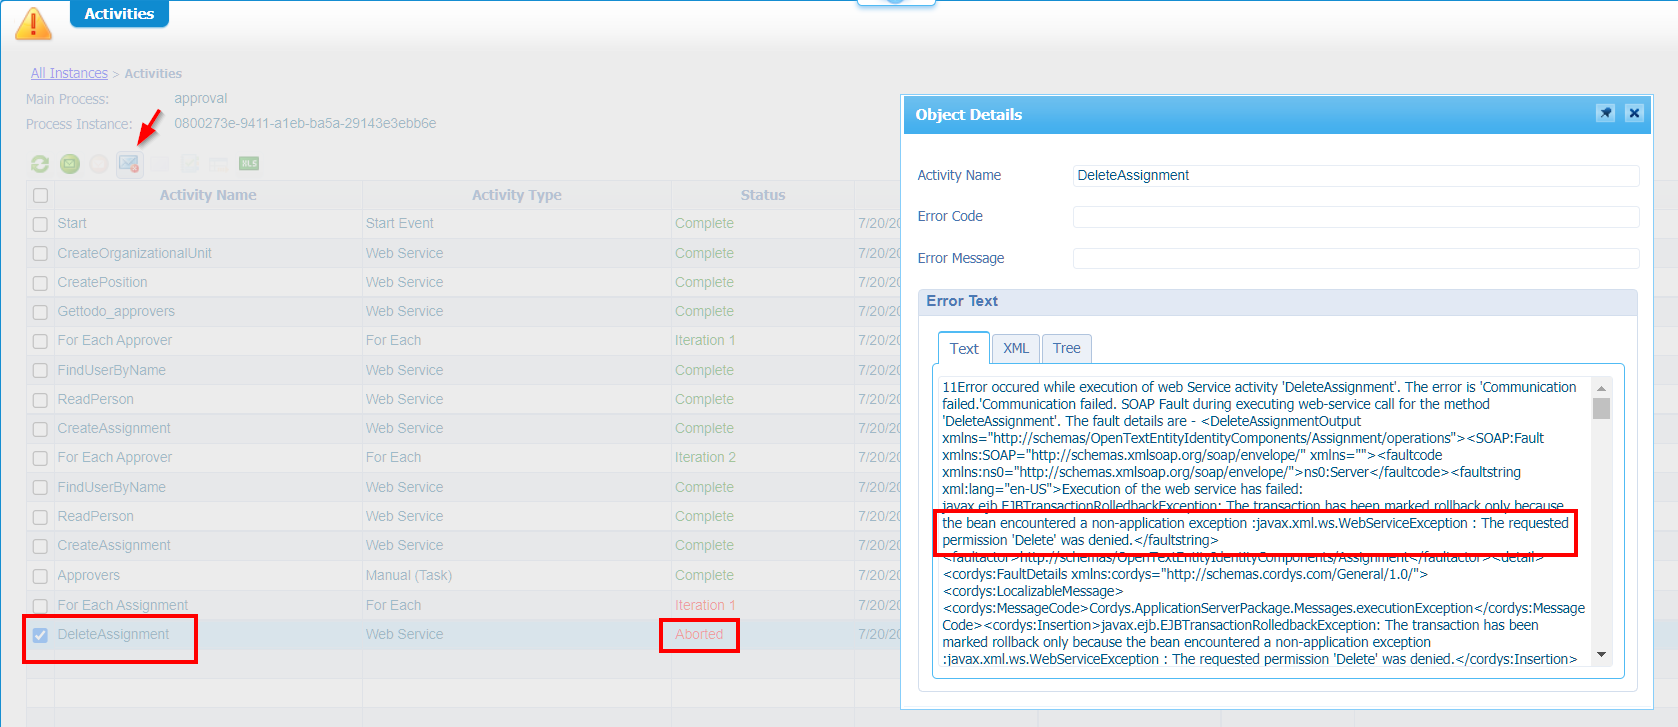
So, maybe our ‘awtest’ account doesn’t have ‘runtime’ permission for the ‘Service call ‘DeleteAssignment’…
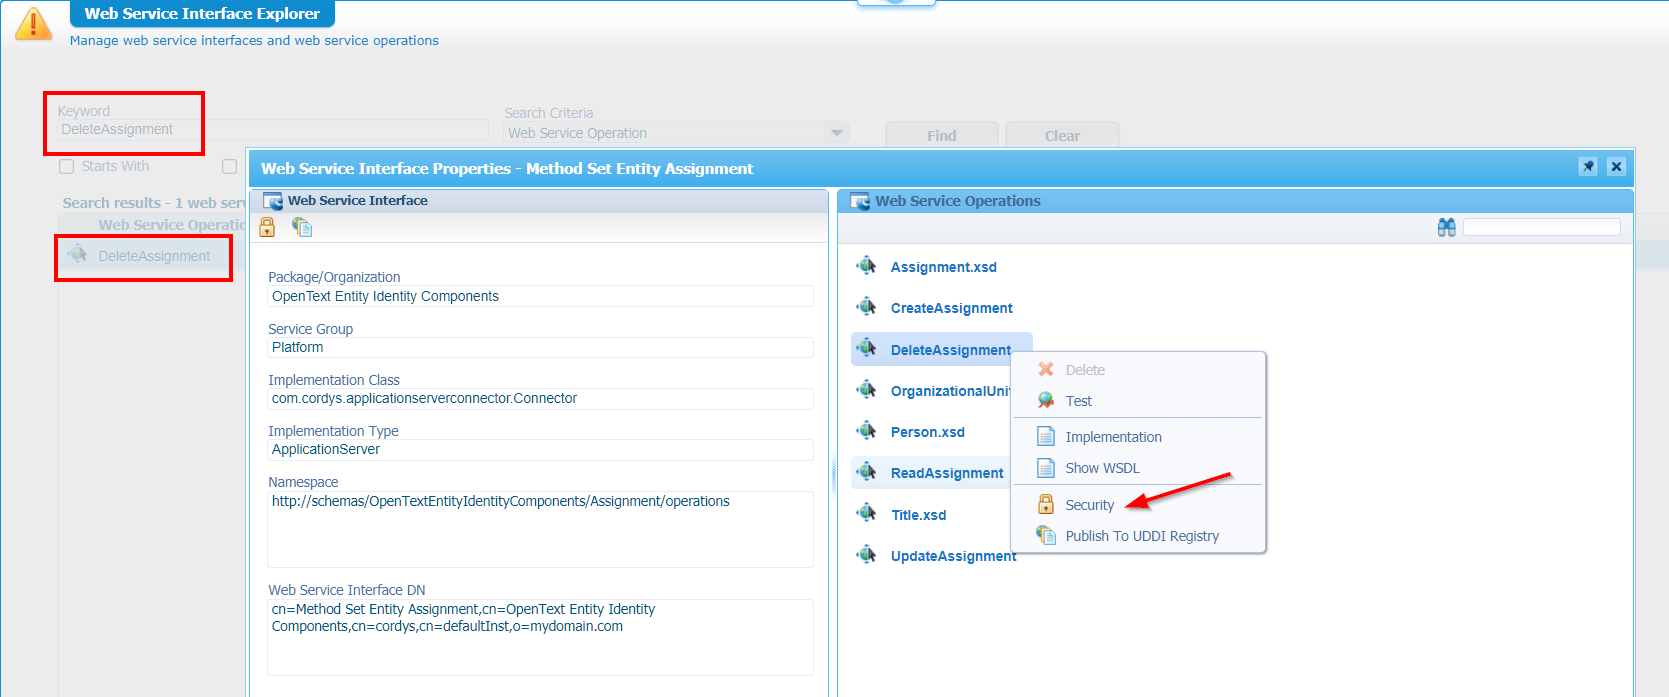
Let’s fix it, so you also know what to do what things break…I don’t know if it fixes the problem, but open the ‘Web Service Interface Explorer’, search for the service, get the property and update the security:
For now, I just add ‘everyone’ of the organization to allow this service but think about a better solution based on a role like ‘resources’!
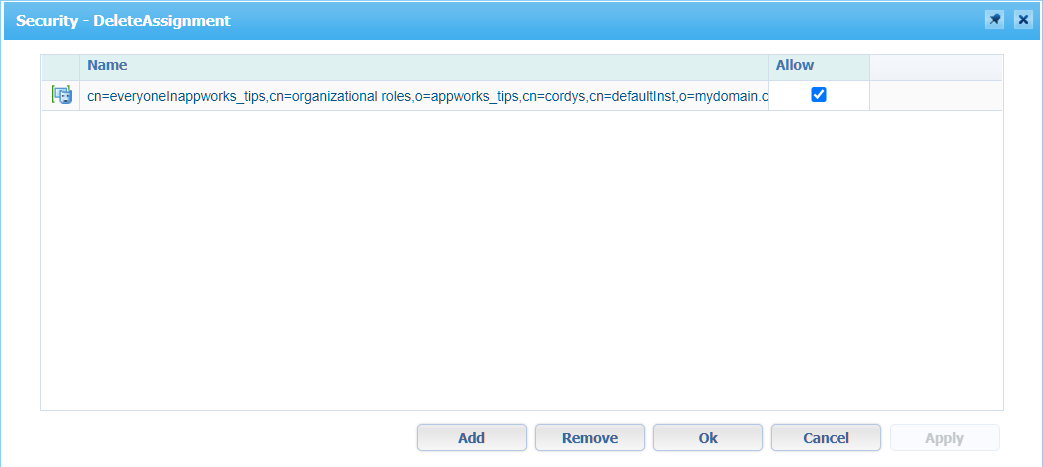
Apply it and save it…Let’s do a rerun in runtime…
…
Still a failure in the PIM…Ok, let’s update our ‘awtest’ account, so it has the role ‘Identity Administration’!?
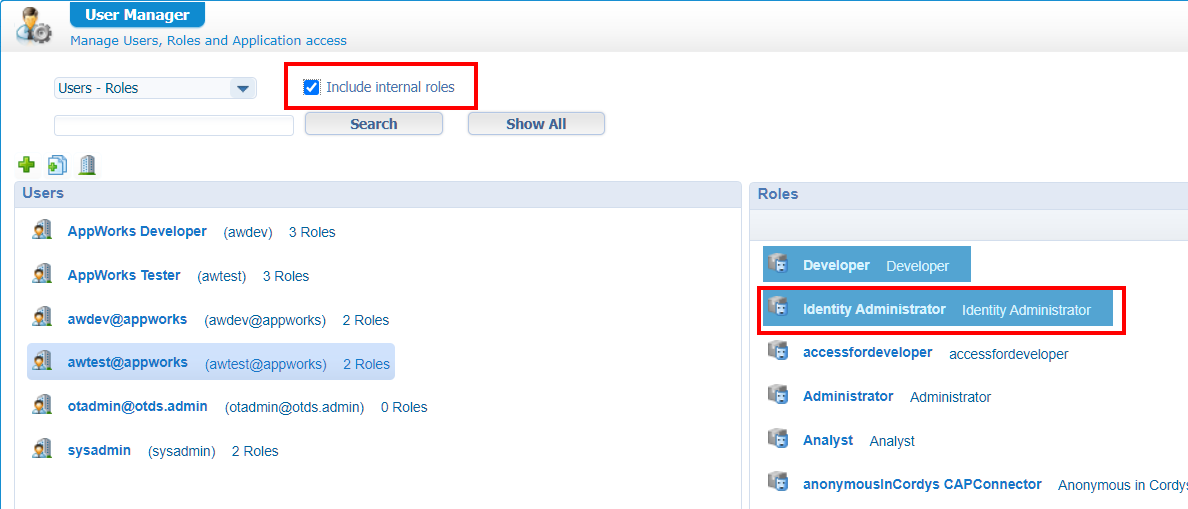
A rerun and this time we have a green light in the PIM! Only now our user has a lot more permission on the Identity package!? Is this a risk? This all depends…For my demo it’s not a risk, but for your environment it might be!? How to solve this? Real simple, make sure only those final service calls are done via an ‘Authorized’ user who has the ‘Identity Administrator’ role applied (or just ‘Administrator’ role).
Or maybe you can come up with something even better? Let me know in the comments!? Maybe do a task forward action to a real person (not a team) and make the final decision from that perspective…AppWorks delivers all kinds of solutions for this problem!
Wowsers!…Is this a “DONE” or is this a “DONE”!? OK…It’s an end-to-end “DONE” for now as the requested functionality is working, but we can still improve things for our feature to work nicely for our end-users. Let’s do these improvements for next week. At this moment we never learned so much from the internal AppWorks webservices that it’s time for a beer first! 🍺 If you made it through the whole post…kudos for you!…We should grab a beer together next time. What you saw in this post is just one of the implementations done for a real customer, but it has beneficial information which can be of value on you own implementations too. So, reuse it and tell other people where to find it. I see you in the next post where we will improve our customer case with a 2.0 version…Cheers!
Don’t forget to subscribe to get updates on the activities happening on this site. Have you noticed the quiz where you find out if you are also “The AppWorks guy”?
