
Hi there AppWorks fans,
Welcome to a new installment of AppWorks tips.
Let’s continue our journey on our ‘testing’ feature that we exposed last week with Selenium. Where we saw last week that we can automate our regression testing; this week we do a small dive on load/stress testing where we put our system under pressure to see if it’s still stands strong when we attack it with Apache JMeter.
Also, this tool (like Selenium) is used by me for the first time, but I heard again a lot of greatness about it, so we’ll just dive in to see the possibilities. Great stuff I think as I’m really am curious how this works and if we can break the solution under load…happy hacking again with this post! 🤔
Let’s get right into it…
We start with a Google search ‘How to start with JMeter’. You’ll quickly see results that point into these directions:
- https://jmeter.apache.org/usermanual/get-started.html which is your home base for the JMeter software package
- https://www.guru99.com/jmeter-tutorials.html
- Again a very good 7 days all in JMeter testing tutorial…your next thing to follow!
- https://www.blazemeter.com/blog/getting-started-jmeter-basic-tutorial
- A quick startup what we’ll use as starting point (with also good video tutorials!)
Now for the software download. Grab the ZIP package (for me version 5.3) and extract it to your local machine somewhere. Enter that extracted folder and open the bin directory apache-jmeter-5.3\bin where you can double-click jmeterw.cmd
You will see a quick splash screen passing by…

…and after this we enter the JMeter tooling with this screenshot:
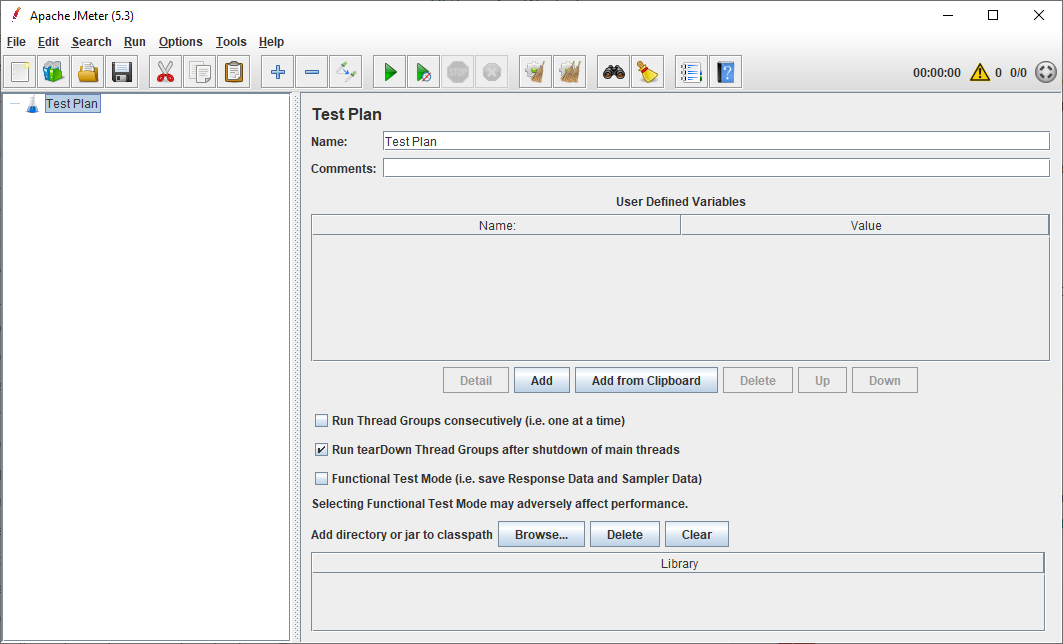
Now what? Spin up our AppWorks VM so the platform can be tested maybe!?
It all starts with a (test) plan!
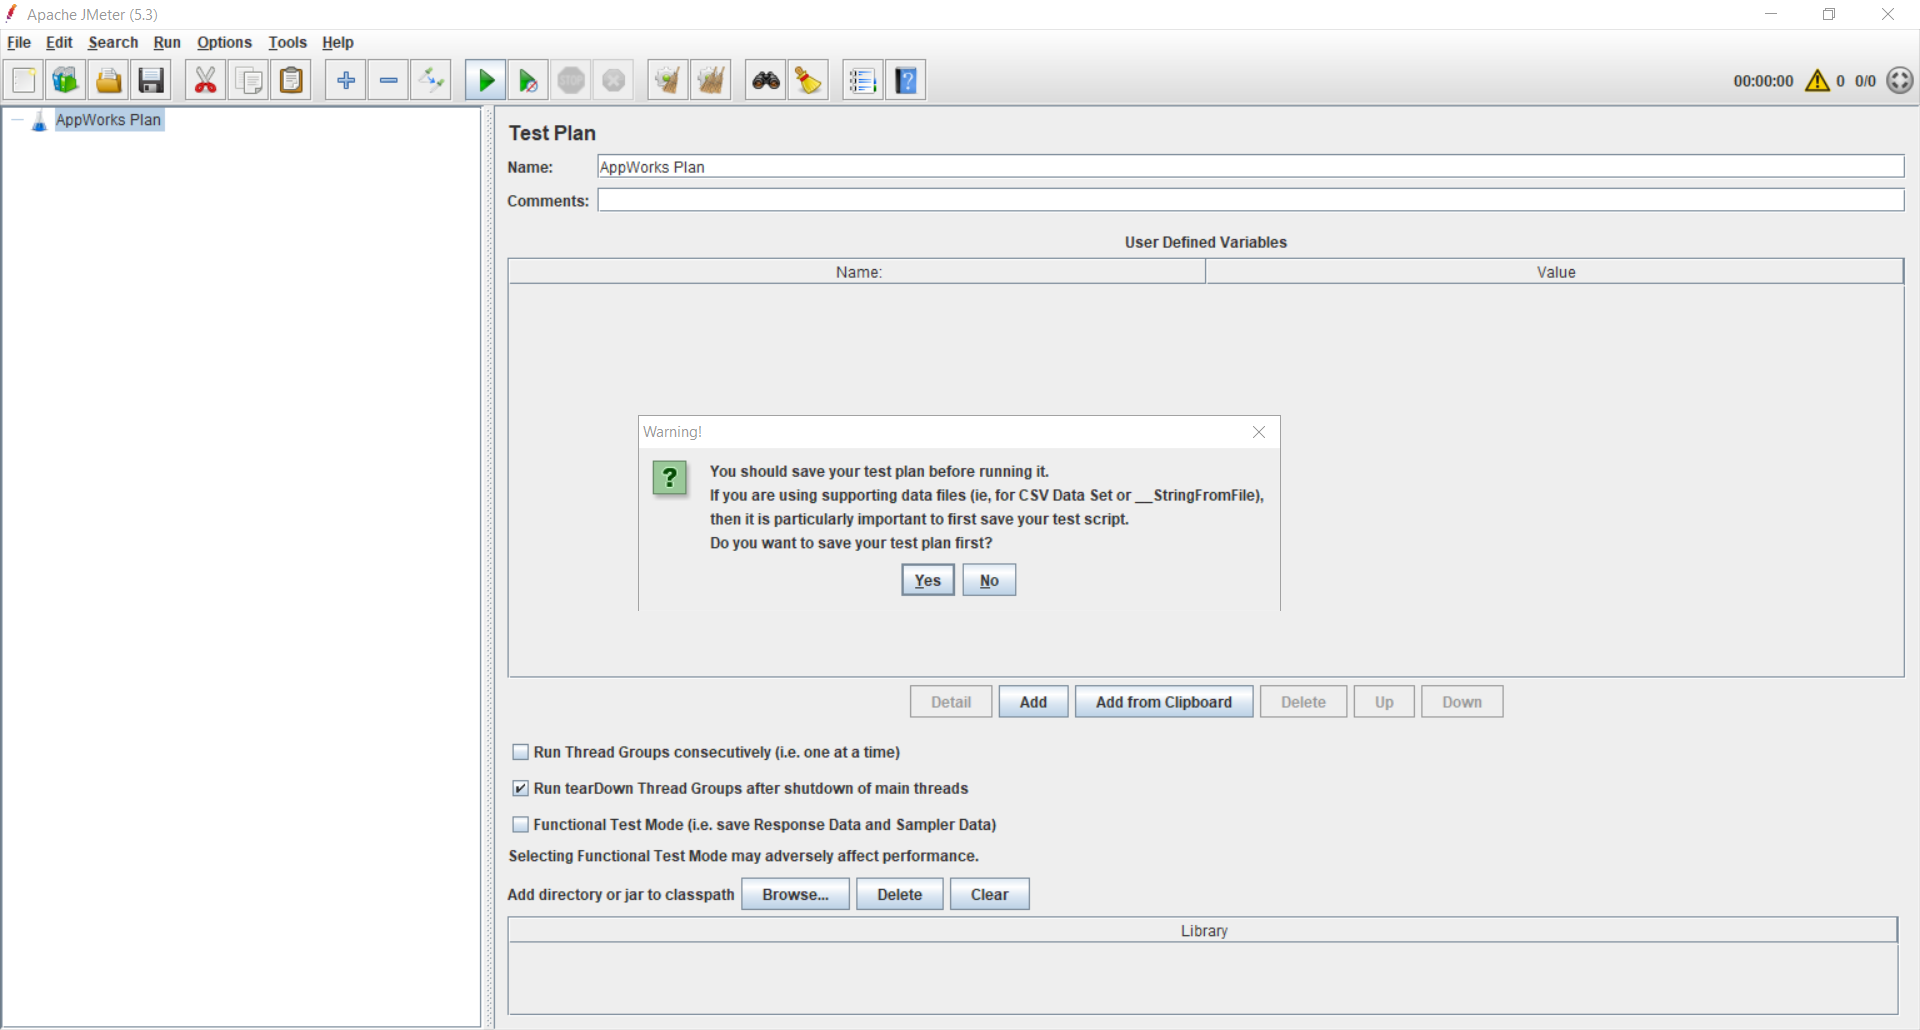
Give our ‘Test Plan’ a nice name like for example ‘AppWorks Plan’ and do a first run with that green play button. You’ll get a popup for saving things…just save this initial craftsmanship to your local storage!
Next thing you want to do is making some default configuration that will always be the same during our load testing. Like our server name and the port! For this we’ll create a new ‘HTTP Request Defaults’ element (right-click on our ‘AppWorks Plan’ for that context menu)
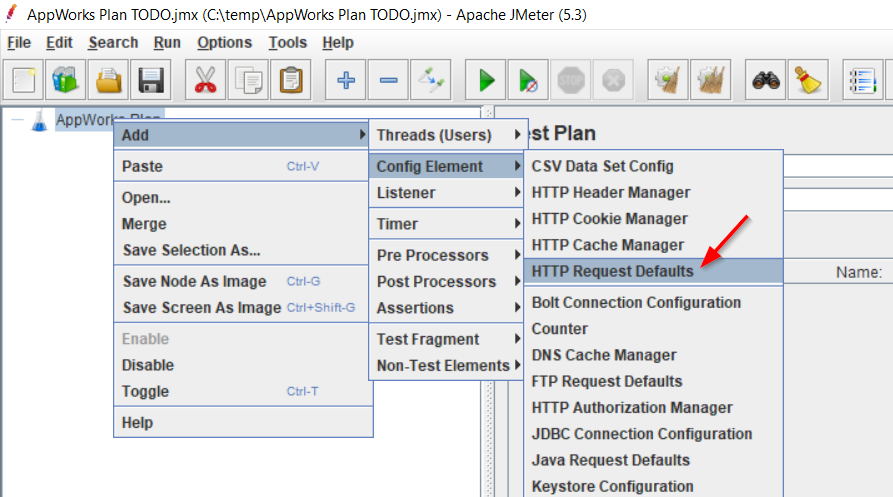
Just make sure you fill in the correct server information where our AppWorks runtime can be found. All the requests after this config will use this as it’s default!
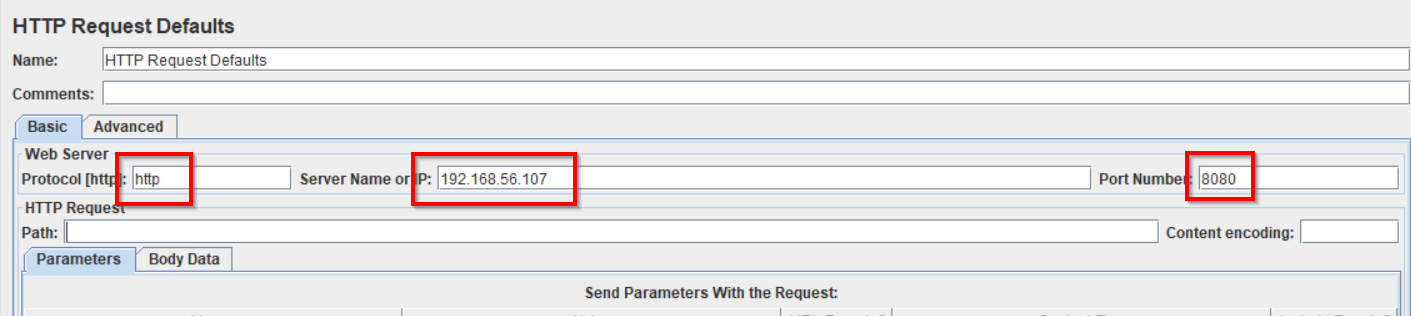
- Protocol: http
- Server name/IP: 192.168.56.107
- Port: 8080
Now it’s time to create a first ‘Thread Group’!
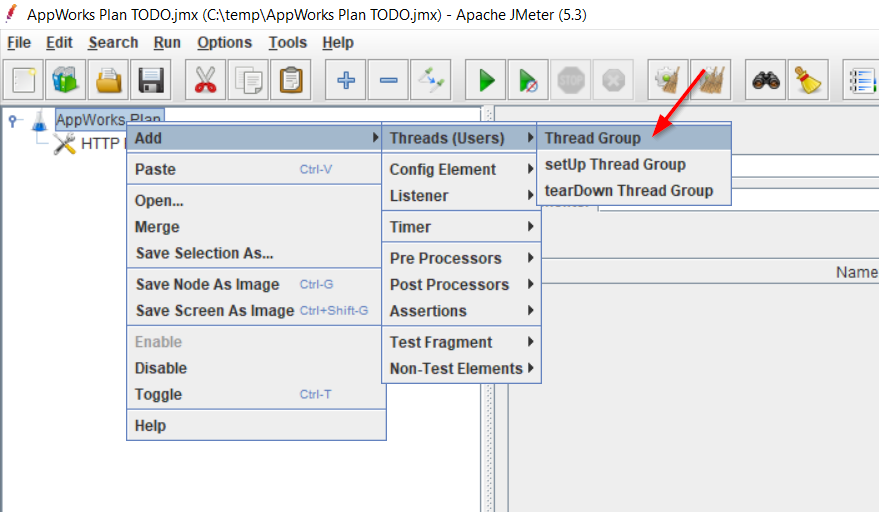
This element makes sure we can run our requests under ‘load’ with multiple users…That is the power of multi-threading! Running our tests parallel with different users in 1 run!
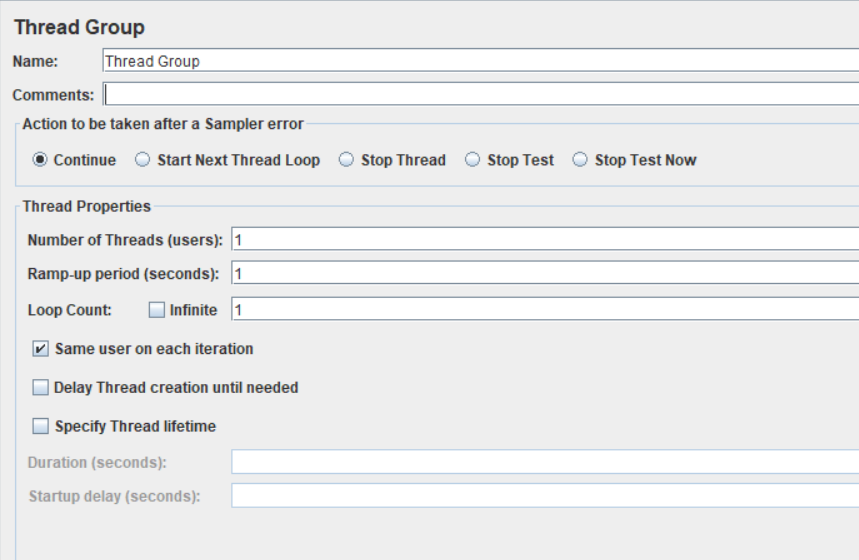
We leave the settings as is for now; later on we’ll play with the settings:
- Number of Threads: The total number of users we’ll run our tests with
- Ramp-up period: How fast these users will starts working after each other. So, with 6 users and the ramp-up period of 60 they will start working every 10 seconds!
- Loop Count: How many times our users will run the created test cycle
Next…
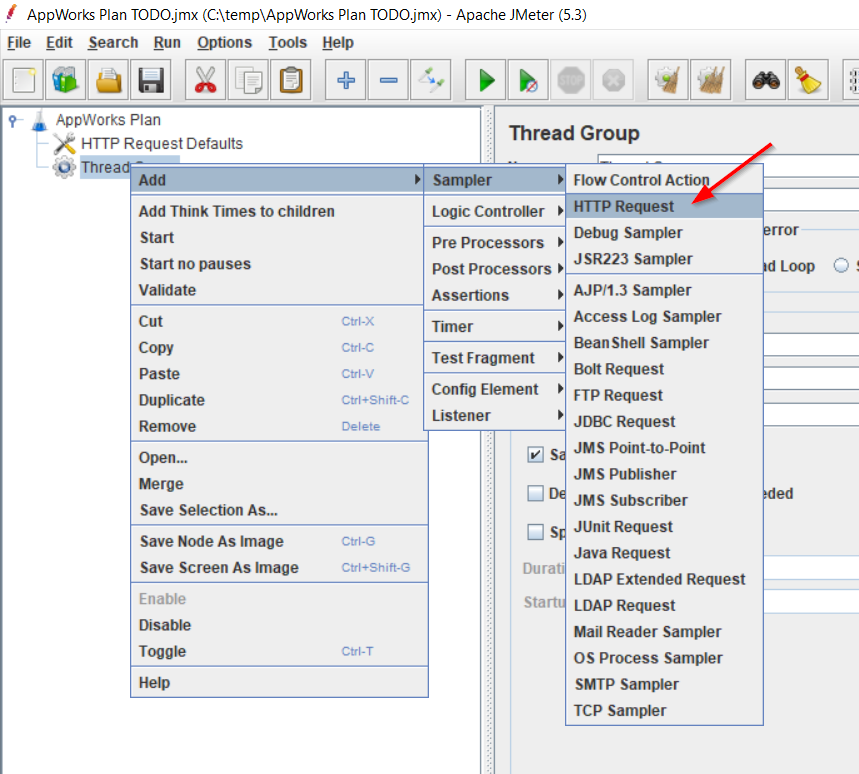
‘Sampling’ is key here…
That will be our first ‘sampler’ that needs to do something; In our case that will be an HTTP request to the AppWorks runtime to see it’s up and running!
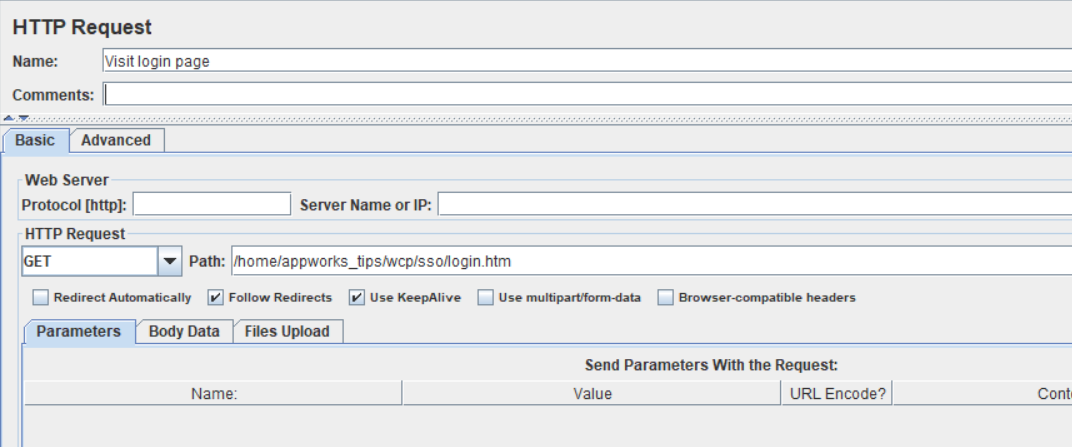
Give the sampler a nice name like ‘Visit login page’ and fill in the path for the HTTP request end-point /home/appworks_tips/wcp/sso/login.htm
The other server configuration fields can be left empty as they will be used from our default HTTP request configuration element!
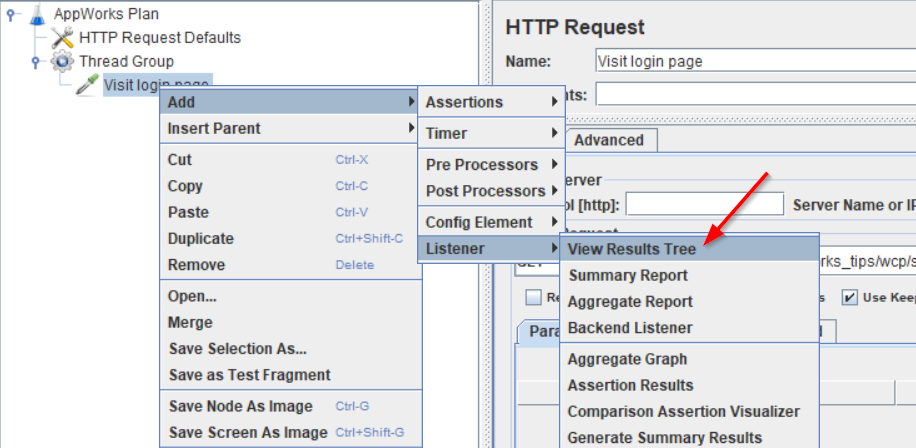
On this HTTP request we also want to view the result when it’s done. We can do this by adding a ‘View Results Tree’ element on the HTTP request element.
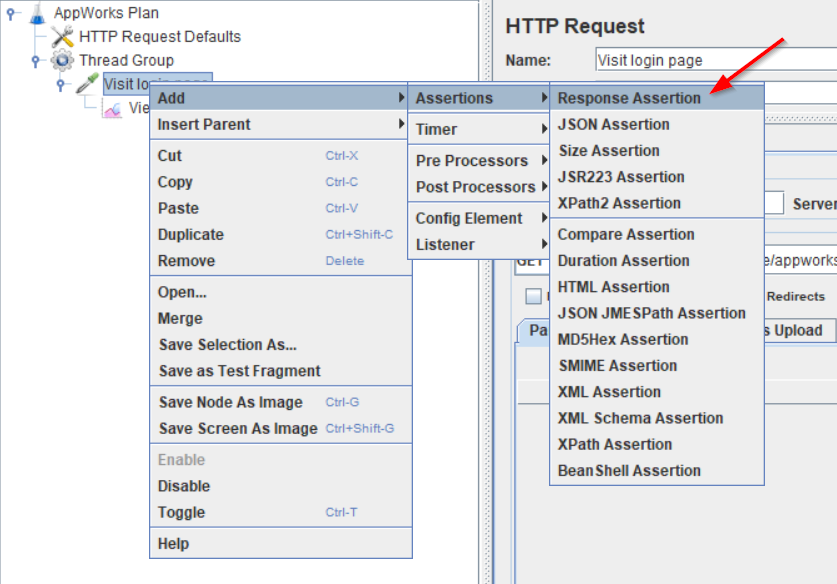
And we also add a ‘Response Assertion’ on our HTTP request to do some validation on the HTTP response we get back.
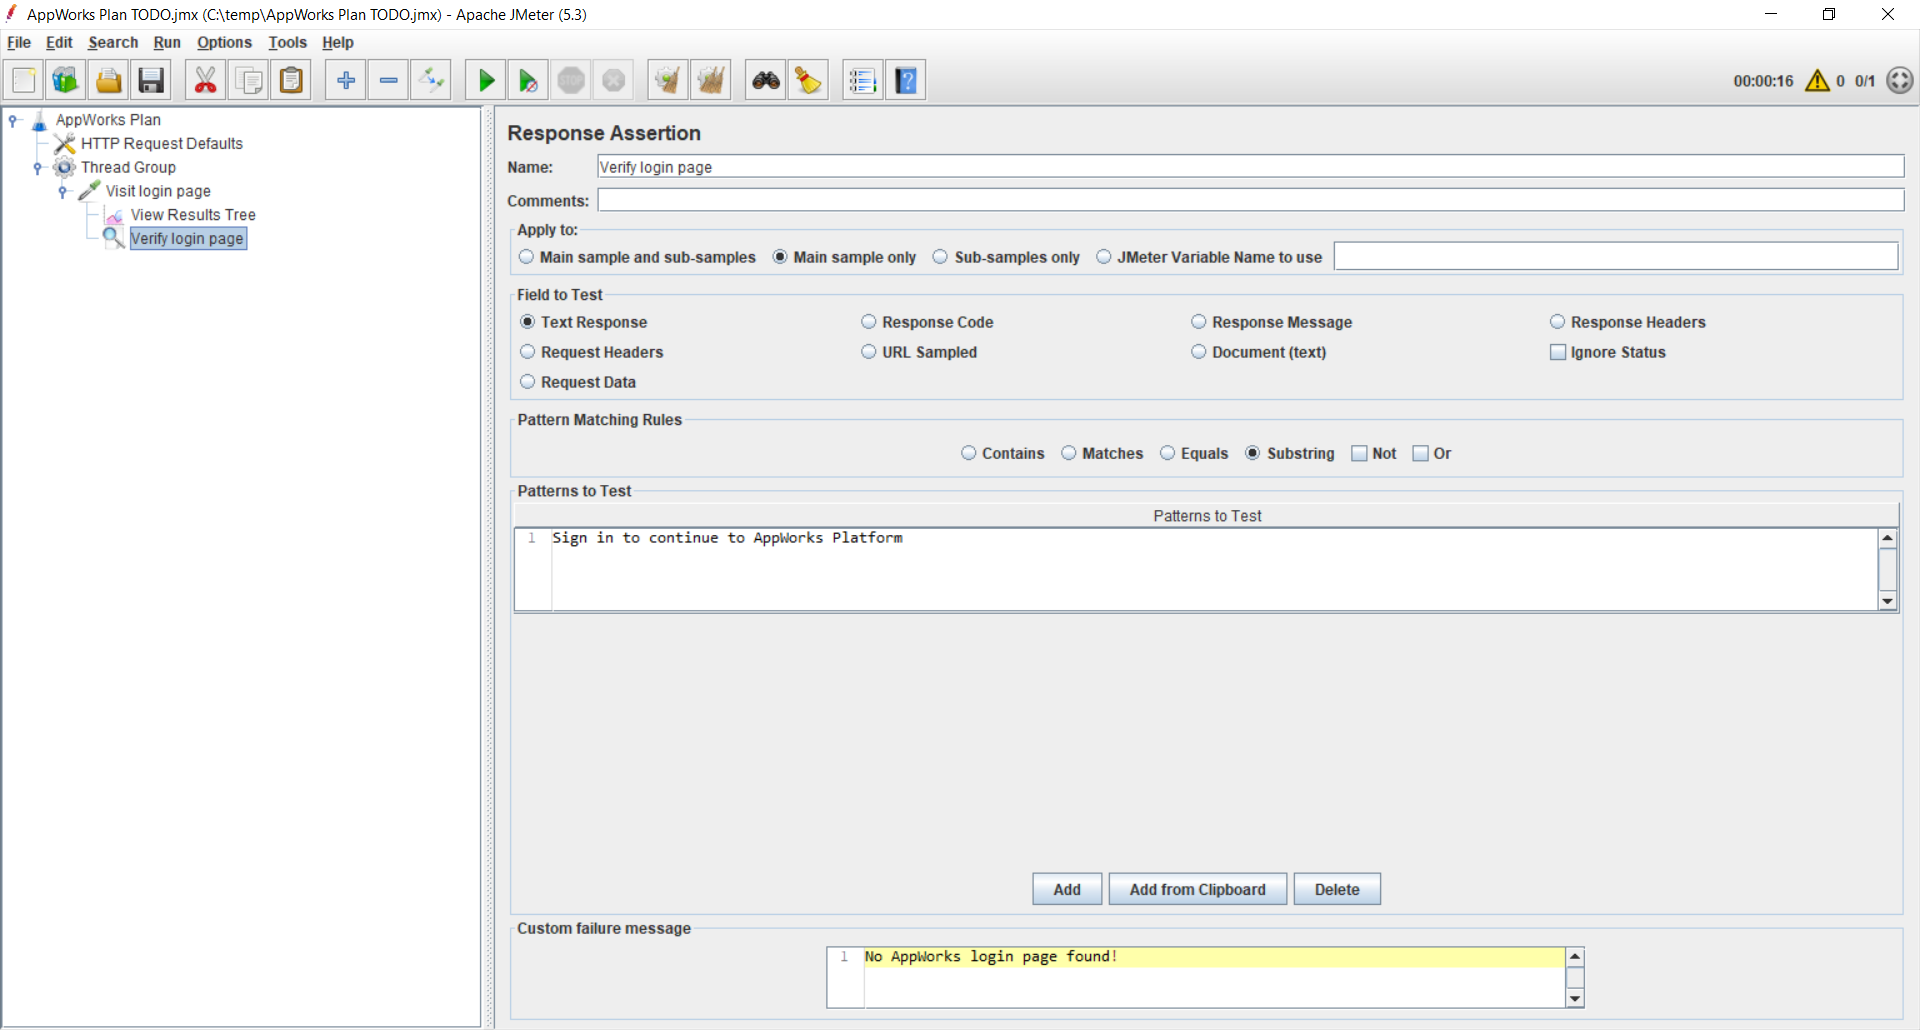
This will be the end-result so far where we give the assertion a nice name, a pattern to search for, and a failure message when the response is invalid.
Let’s do a first run…shall we!?
Our first real run
Hit that green play button like a pro…
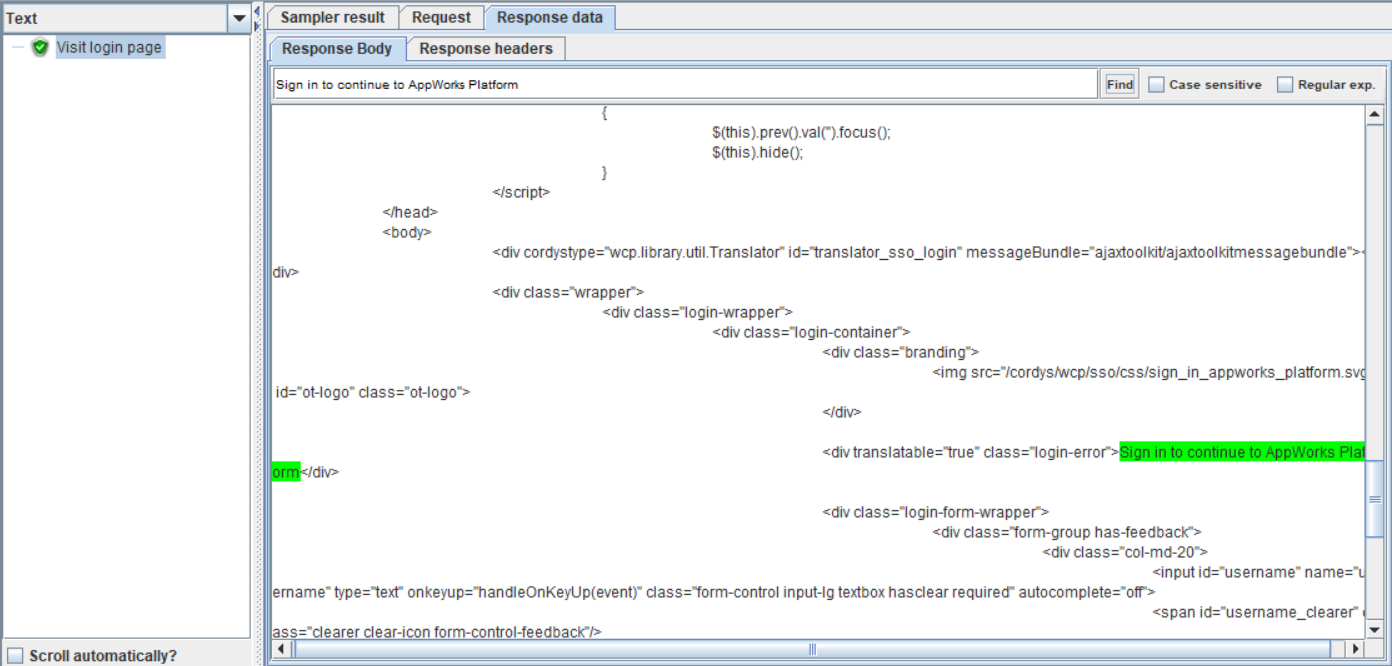
After this first run you can check the results on the ‘View Results Tree’ element we’ve added…
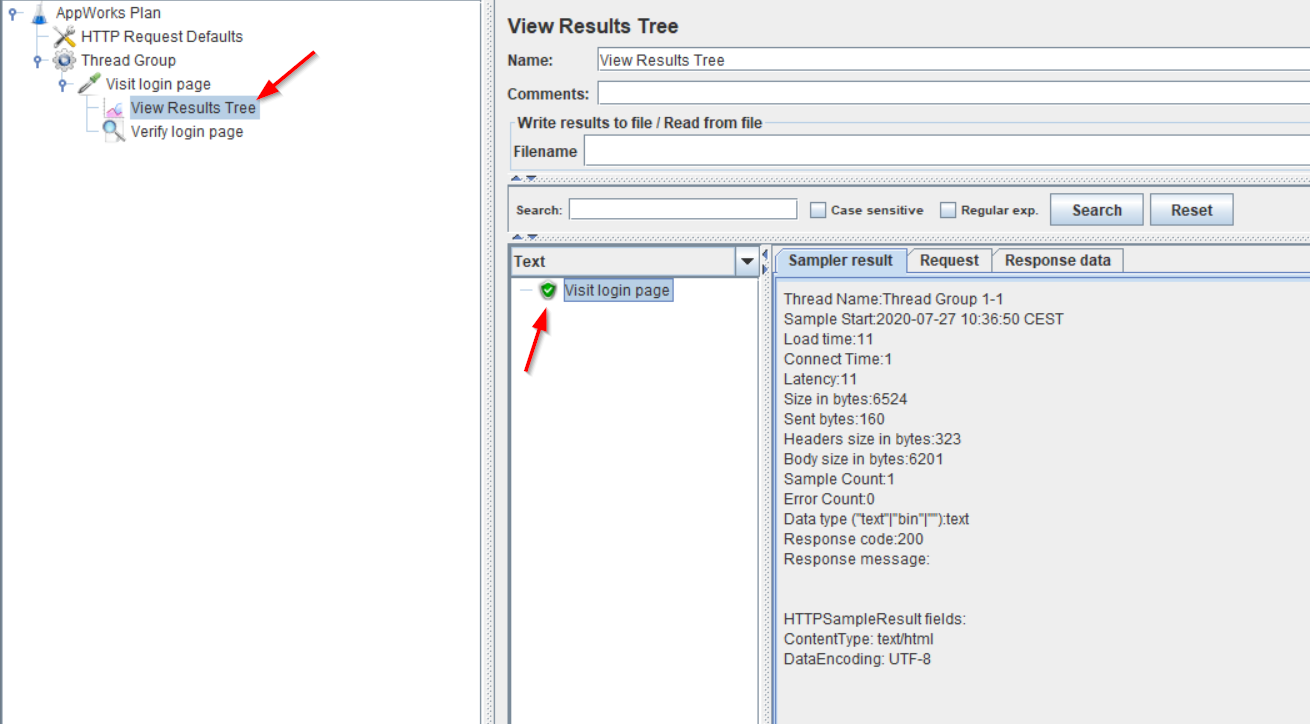
With that green shield you can check that you’re doing great! Check out the ‘Response data’ tab where you should see some output that matches the assertion we’ve created!
You can ‘clean’ the results by right-clicking the ‘View Results Tree’ elements and hit the ‘clear’ option!

First step in done…Next request!
Better a good copy than a bad original
Let’s make it ourselves easy and ‘duplicate’ our just crafted HTTP request element (check the right-click menu for that option)
Let’s update the duplicate with these settings:
HTTP Request Element:
Name: Logging into AppWorks
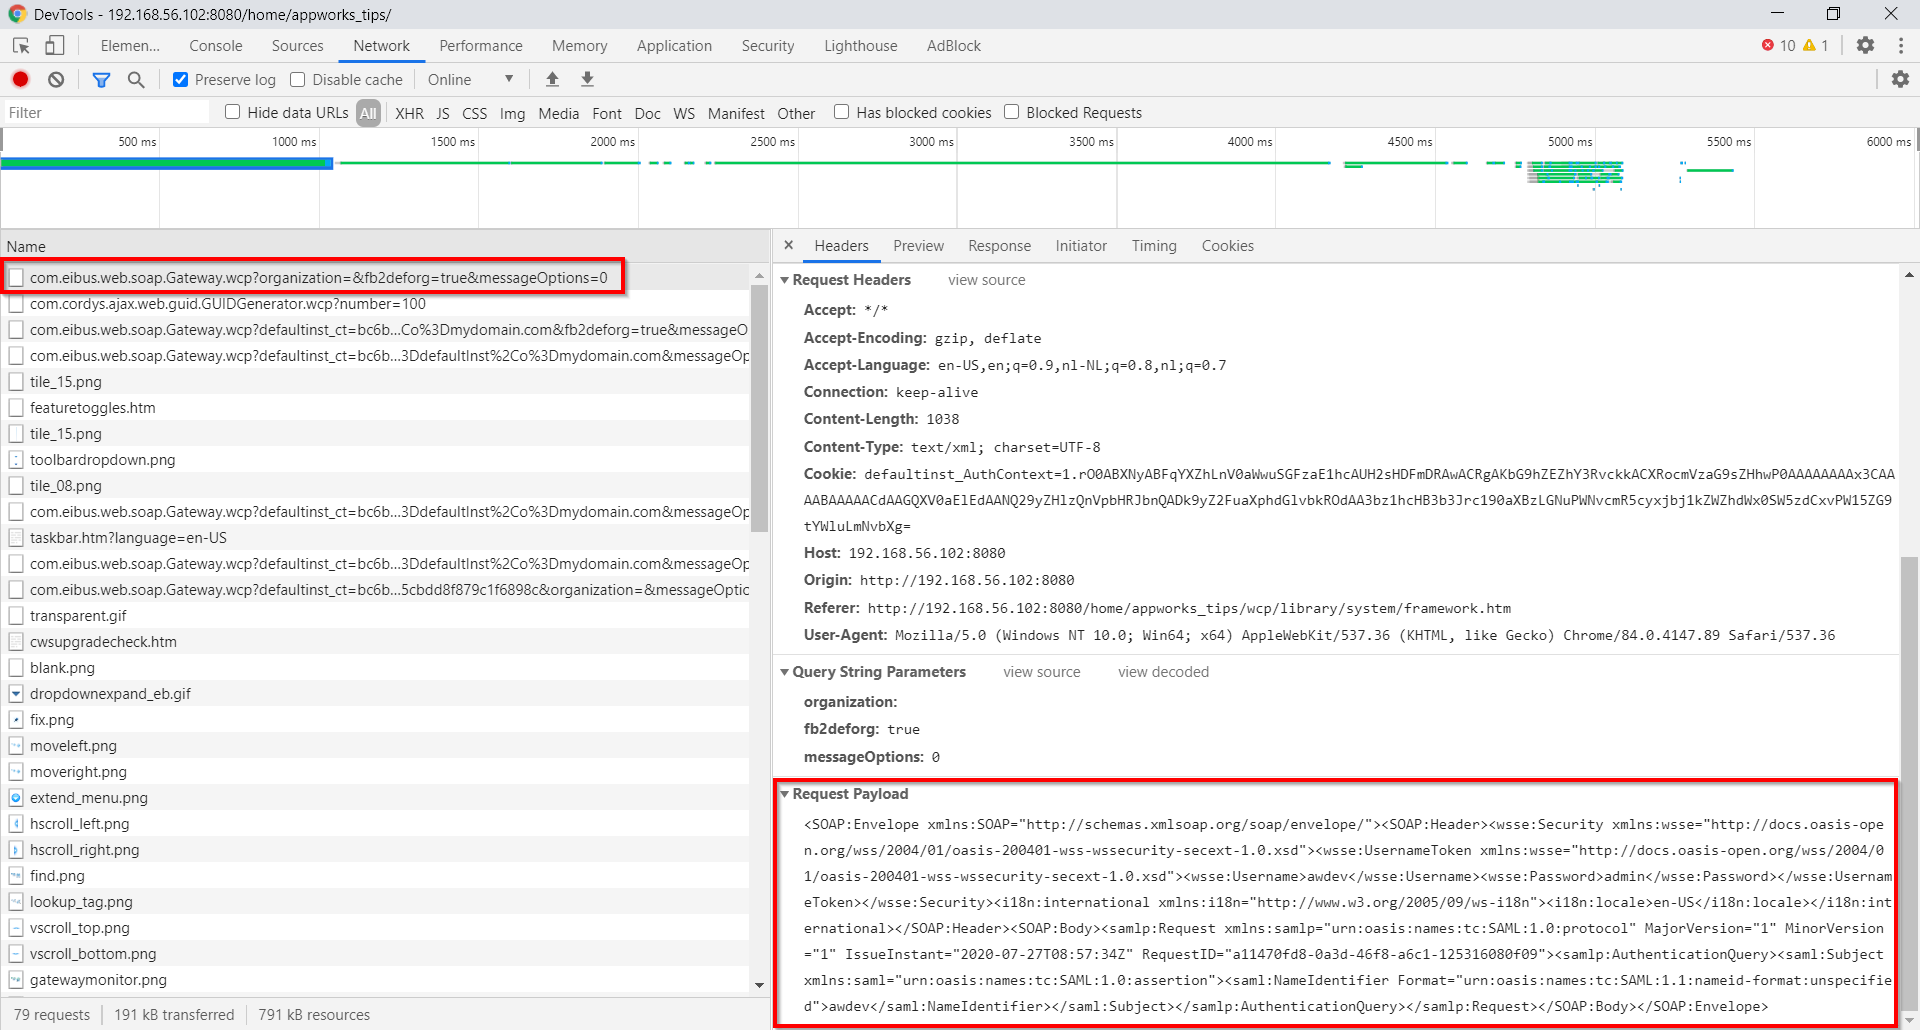
Request: POST (You can also see in developer tools below the request is a POST variant!)
Path:
/home/appworks_tips/com.eibus.web.soap.Gateway.wcp?organization=&fb2deforg=true&messageOptions=0Body Data: It’s an XML part where you need to use your own credentials for those
UsernameandPasswordelements!1
2
3
4
5
6
7
8
9
10
11
12
13
14
15
16
17
18
19
20
21<SOAP:Envelope xmlns:SOAP="http://schemas.xmlsoap.org/soap/envelope/">
<SOAP:Header>
<wsse:Security xmlns:wsse="http://docs.oasis-open.org/wss/2004/01/oasis-200401-wss-wssecurity-secext-1.0.xsd">
<wsse:UsernameToken xmlns:wsse="http://docs.oasis-open.org/wss/2004/01/oasis-200401-wss-wssecurity-secext-1.0.xsd">
<wsse:Username>awdev</wsse:Username>
<wsse:Password>admin</wsse:Password>
</wsse:UsernameToken>
</wsse:Security>
<i18n:international xmlns:i18n="http://www.w3.org/2005/09/ws-i18n"><i18n:locale>en-US</i18n:locale></i18n:international>
</SOAP:Header>
<SOAP:Body>
<samlp:Request xmlns:samlp="urn:oasis:names:tc:SAML:1.0:protocol" MajorVersion="1" MinorVersion="1" IssueInstant="2020-07-24T09:53:04Z" RequestID="a558f3bf5-050d-40b3-9c8e-909fe245fc2f">
<samlp:AuthenticationQuery>
<saml:Subject xmlns:saml="urn:oasis:names:tc:SAML:1.0:assertion">
<saml:NameIdentifier Format="urn:oasis:names:tc:SAML:1.1:nameid-format:unspecified">awdev
</saml:NameIdentifier>
</saml:Subject>
</samlp:AuthenticationQuery>
</samlp:Request>
</SOAP:Body>
</SOAP:Envelope>
Where did I get all this knowledge from?
Well…Open your runtime URL with the developer tools (<F12>) panel open in the ‘network’ tab and do a normal login action in runtime!
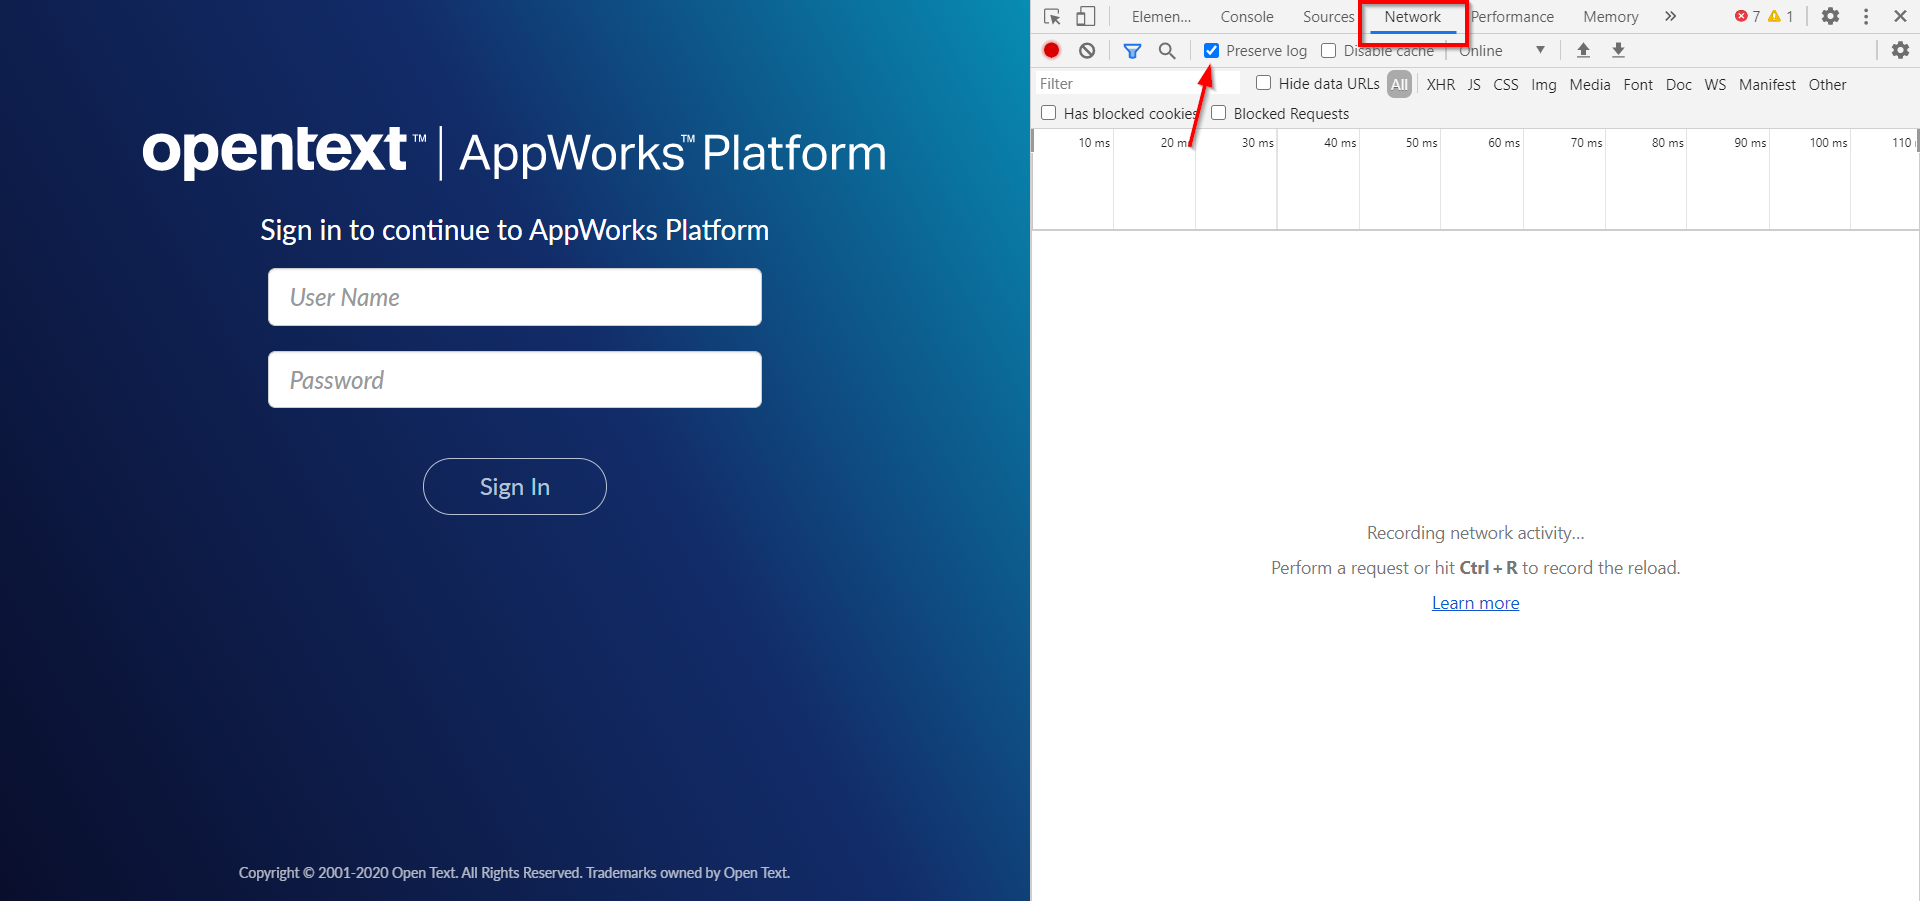
Make sure you mark this ‘Preserve log’ option otherwise the request will be gone before you got the opportunity to check it out!
After login, you will see this network traffic passing by…
Next we have the assertion element to update…
Response Assertion Element:
- Name: Verify SAML artifact
- Pattern: AssertionArtifact
- Failure message: No SAML artifact found!
The response we’ll get with our HTTP request has this data in its body:
2
3
4
5
6
7
8
9
10
11
12
13
14
15
16
17
18
19
20
21
22
23
24
25
26
27
28
29
30
31
32
33
<Signature xmlns="http://www.w3.org/2000/09/xmldsig#">
<SignedInfo>
<CanonicalizationMethod Algorithm="http://www.w3.org/2001/10/xml-exc-c14n#" />
<SignatureMethod Algorithm="http://www.w3.org/2001/04/xmldsig-more#rsa-sha256" />
<Reference URI="#A0800273b-f379-a1ea-b3fa-2dcf7ab4281b">
<Transforms>
<Transform Algorithm="http://www.w3.org/2000/09/xmldsig#enveloped-signature" />
<Transform Algorithm="http://www.w3.org/2001/10/xml-exc-c14n#" />
</Transforms>
<DigestMethod Algorithm="http://www.w3.org/2001/04/xmlenc#sha256" />
<DigestValue>wPtxtLv/2Z9gnm4PrarActxZ773UWrqZESOwPTgVYok=</DigestValue>
</Reference>
</SignedInfo>
<SignatureValue>JrWHHMZRvMnkia0YOErDRC6/lvtOn1PRCZHT02CdKEJRULmNo3nU/C0pRjNyV+jYRus0UCYQd7xb
i4/nPMLSkK136o2a7v8jKqolYke0bppC4JDOqYtKyMYhFuvI/Asqgl9qXemsnwdFcK3VGzKDMxuf
/TobPbnJR1iNCNeAlPl75wKzSqjCbxL96kVc5wDygaT5K49XSVgeRyeRuC8qn9ITTNuagyPdU8in
2G8gwivzH7MqcJGUBbUQTUq92RkpT7NV6ZNZvjGwRoFWwSajcOyUOprKmbO0WP2JLnet97v9RRC0
pgmdp4AhnlbAvR6uJML7rOxxTtkMqGxcFRs/Gw==</SignatureValue>
</Signature>
<samlp:Status>
<samlp:StatusCode Value="samlp:Success" />
</samlp:Status>
<saml:Assertion xmlns:saml="urn:oasis:names:tc:SAML:1.0:assertion" AssertionID="A0800273b-f379-a1ea-b3fa-2dcf7ab4281b" IssueInstant="2020-07-27T09:08:20.187Z" Issuer="https://www.cordys.com/SSO" MajorVersion="1" MinorVersion="1">
<saml:Conditions NotBefore="2020-07-27T09:03:20.186Z" NotOnOrAfter="2020-07-27T17:08:20.186Z" />
<saml:AuthenticationStatement AuthenticationInstant="2020-07-27T09:08:20.186Z" AuthenticationMethod="urn:oasis:names:tc:SAML:1.0:am:password">
<saml:Subject>
<saml:NameIdentifier Format="urn:oasis:names:tc:SAML:1.1:nameid-format:unspecified">awdev</saml:NameIdentifier>
</saml:Subject>
</saml:AuthenticationStatement>
</saml:Assertion>
<samlp:AssertionArtifact>e0pBVkEtQUVTL0dDTS9Ob1BhZGRpbmd9beLksiMLNwxHjRwNV2WJvzL+HVub1lBOEi7AaIBmequDQVIwA8D5eMyoiGTXiDhzzdnyvOqG57+pDn6igjElIXkFGW1E7lJEzlgce47LKg22tR25Z59750dyKYKbbYw=</samlp:AssertionArtifact>
</samlp:Response>This shows us that the AppWorks works with SAML artifacts for all the other HTTP requests after we’ve done a login request! You also see the ‘AssertionArtifact’ is a valid assert to verify!
Ok…Now what?
Well, let’s grab that SAML artifact String and save it in a variable as we need it for our future requests!
Add a new ‘Regular Expression Extractor’ element onto our HTTP request:
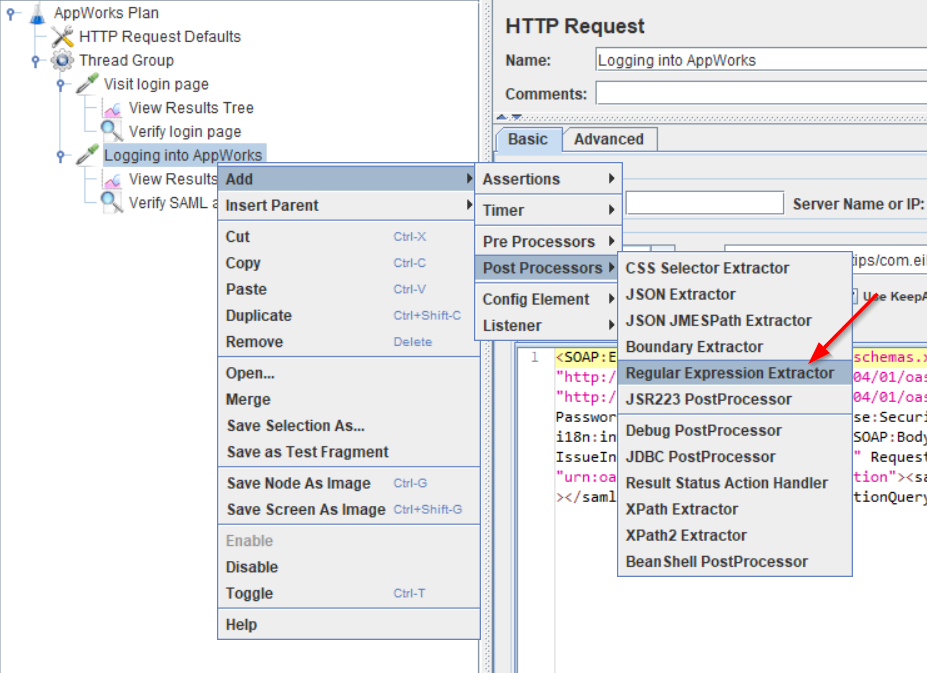
This should be your end-result with that ‘RegEx’ in place:
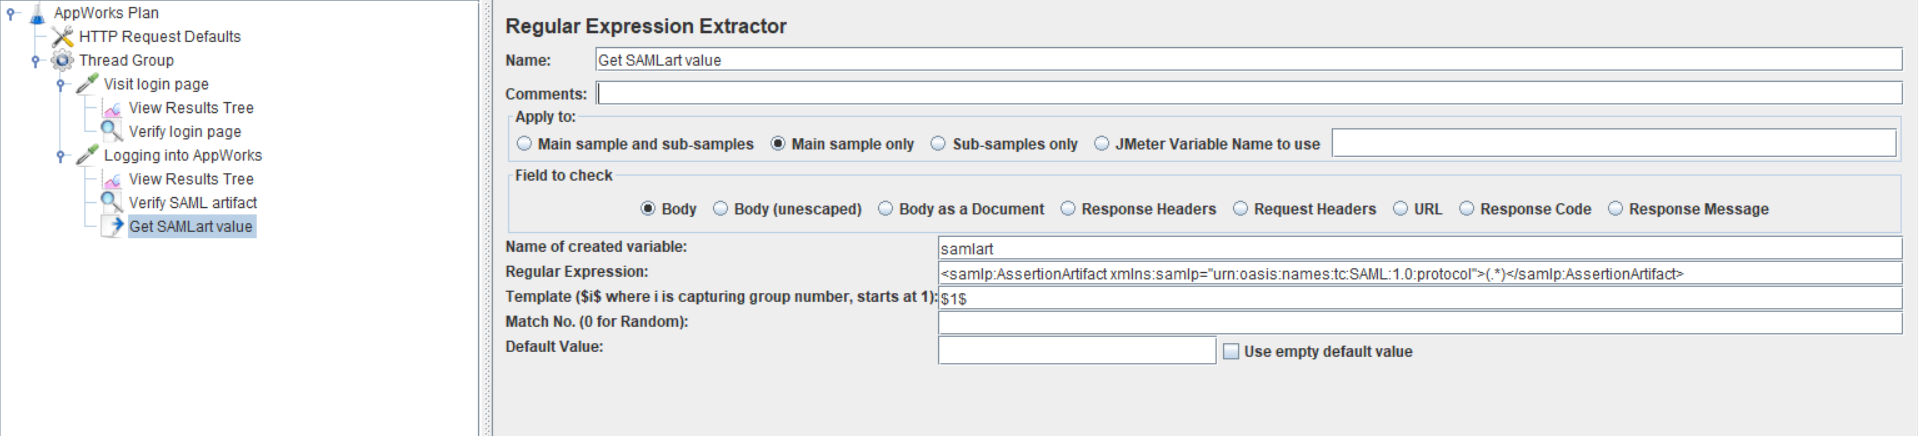
- Name: Get SAMLart value
- Variable name: samlart
- RegEx:
<samlp:AssertionArtifact xmlns:samlp="urn:oasis:names:tc:SAML:1.0:protocol">(.*)</samlp:AssertionArtifact> - Template: $1$
To play with regular expressions: https://regexr.com/
Just copy the result from the HTTP request in the editor and start typing your expression in the top field till it meets your requirements

In all the future HTTP requests we can now use the ${samlart} variable that contains our SAML artifact ID!
For this authentication step I also followed this short video that helped me on my journey!
Next step…
Grabbing user details and further steps…
Let’s do a simple new POST HTTP request to the next call we see in the developer console of our runtime environment.
It’s a call to a URL that looks like this:
1 | /home/appworks_tips/com.eibus.web.soap.Gateway.wcp?organization=o%3Dappworks_tips%2Ccn%3Dcordys%2Ccn%3DdefaultInst%2Co%3Dmydomain.com&fb2deforg=true&messageOptions=0&SAMLart=${samlart} |
With this body text in the request which gets some user details:
1 | <SOAP:Envelope xmlns:SOAP="http://schemas.xmlsoap.org/soap/envelope/"> |
We’ll duplicate the last HTTP request ‘Logging into AppWorks’ with the result tree and assertion elements (the RegEx element can be removed for this call)
Per element I crafted the next information
HTTP Request Element:
Name: Grab user details
Request: POST
Path:
1
/home/appworks_tips/com.eibus.web.soap.Gateway.wcp?organization=o%3Dappworks_tips%2Ccn%3Dcordys%2Ccn%3DdefaultInst%2Co%3Dmydomain.com&fb2deforg=true&messageOptions=0&SAMLart=${samlart}
Body Data: It’s the above XML part to get the user details!
Note the path where we add
&SAMLart=${samlart}in the end of the URL. For now, it’s OK, but it would be better to add an “HTTP header manager” config element that you pass in with future request and where the SAMLart value is re-used. I want to point you to this knowledge article from OpenText on how to build this header element!
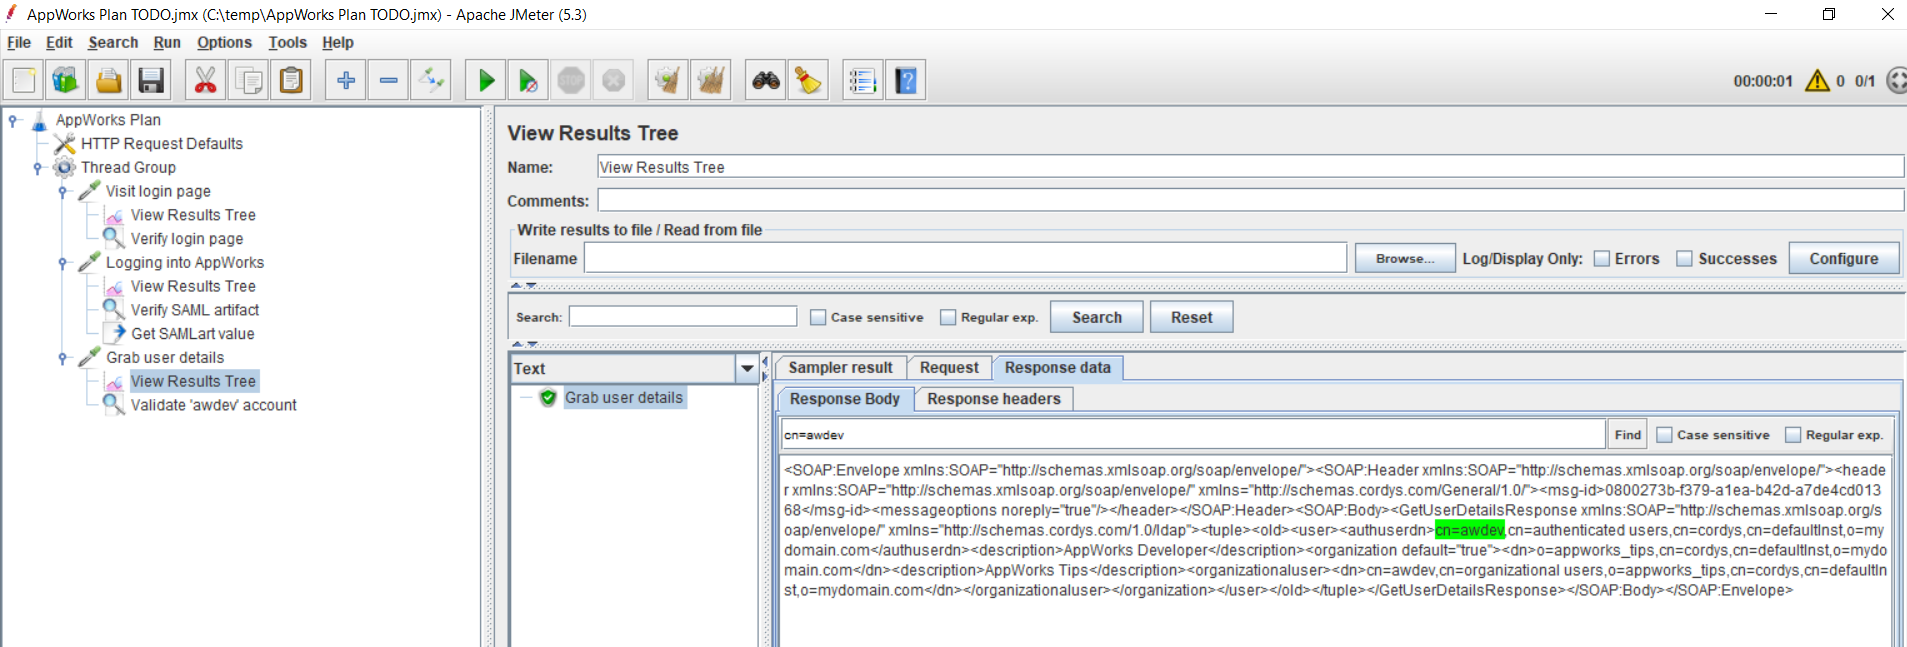
Next we have the assertion element to update…
Response Assertion Element:
- Name: Validate ‘awdev’ account
- Pattern: cn=awdev
- Failure message: User ‘awdev’ not found!
Do a retest where you will get a result like this…
Well, we can continue these steps as described, but maybe it’s better to just give you my final JMeter plan that is crafted for my load test for this post. You probably see the steps we’re doing every time. It’s just watching the developer console in runtime and recompose those calls in JMeter. Nice stuff as you get better knowledge and inside on what is really happing in your application!
The plan can be imported and opened from the file menu in JMeter. You might need to tweak it a little for your own hostname/IP address and the correct credentials, but it already gives you a head start on your load testing on the AppWorks runtime solution. 💪
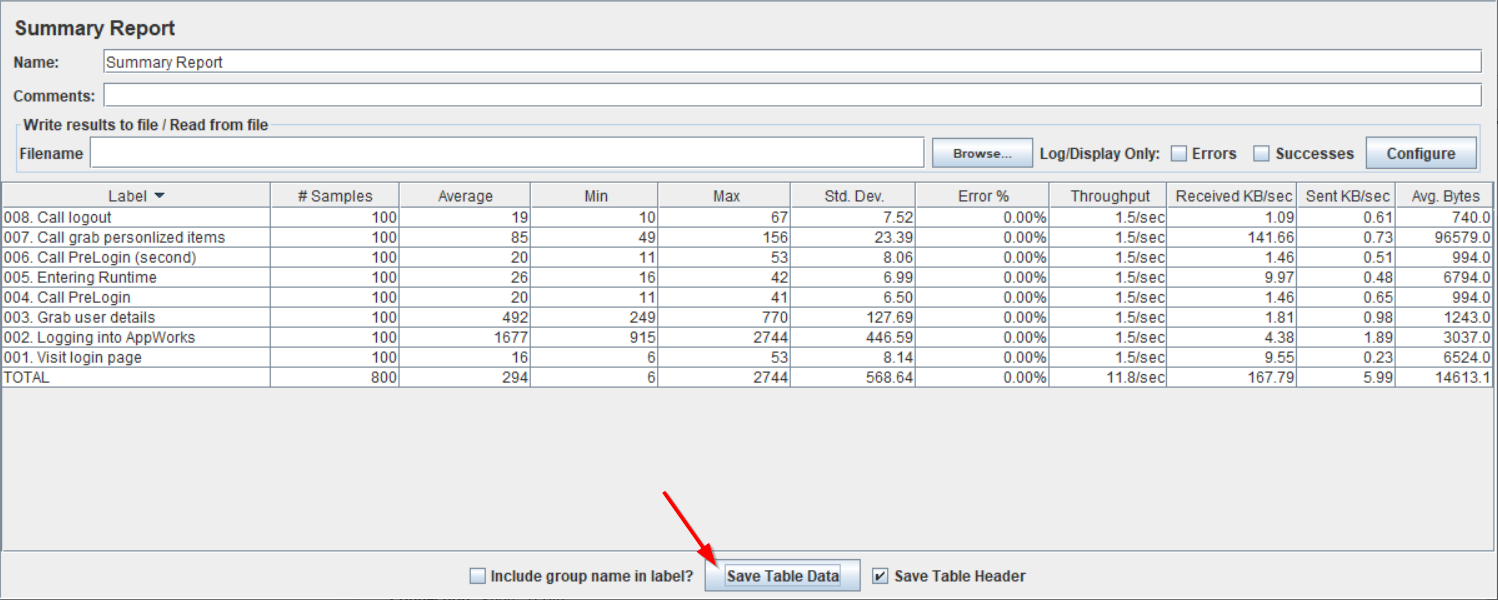
What I also did in the ‘Thread Group’ is updating the values for the number of users that are used. I will start 10 sessions over a time span of 50 sec; that’s 1 user every 5 seconds with a test loop count of 10. That will make your laptop blow some vans!! 😅
This is my end-result that you can also download here in CSV format.
How to open a CSV file in Excel?
- Open a new Excel document and navigate to the Data tab
- Click Get Data - From File - From Text/CSV
- Navigate to the CSV file you wish to open and click “Import”
- Load it into the current sheet
As final cherry on the cake I give you the reference list of URLs I used during this kind of work:
To format JSON: https://jsonformatter.curiousconcept.com/
To format XML: https://www.freeformatter.com/xml-formatter.html
To play with regular expressions: https://regexr.com/
And that’s all folks for the basic introduction to JMeter load testing on our beloved AppWorks platform. I give it a “DONE” where we learned a lot about all the technical calls that are done before we ‘really’ enter the runtime environment. With this we also learned more about the SAML artifact that handles our authentication. That’s also valuable information when you want to craft your own tools that require a connection to the AppWorks platform. What we also learned that there is a ReST API available (http://192.168.56.107:8080/home/appworks_tips/app/entityRestService/Elements?namedFilter=ArcheType) once we are logged in into runtime that sends back JSON data that we can consume! Well, that should give you a really good week-end…correct?…Cheers…I see you in the next great post on AppWorks Tips!
Don’t forget to subscribe to get updates on the activities happening on this site. Have you noticed the quiz where you find out if you are also “The AppWorks guy”?
