
Hi there AppWorks fans,
Welcome to a new installment of AppWorks tips.
Today is the day we’ve all been waiting for. Because today we do our Docker installation for AppWorks and if you read the latest posts from OpenText you might have seen that the Docker support for AppWorks is also ready for your production environment. So, now it’s the best time to show you how it’s done!
Let’s get right into it…
And the first thing we need to do is…Installing Docker? and make sure it’s running fine. Yes, but before you install Docker it’s good to know that Docker requires some settings to be enabled on your laptop/desktop!
Also, in the meantime you can request a license file for 20.2 on the OpenText support site if you don’t have that license file already. 20.2?…Yes, I know we are in the 20.3 era, but the post was written during the 20.2 era and it will not be that different. In previous posts we already described how to make this license request. Make sure you request and use a license for AppWorks version 20.2 (or 20.3 if you like) as the license is version specific! The FullQualitiedDomainName information is also still in place, but you’ll see that later in this post.
Enable Virtualization BIOS setting
This might be a tricky one as not all users have access to the BIOS of their hardware. So, it might be the case that you need to ask your administrator to help you on this setting.
If you are in control of your own hardware you should be able to enter the computer’s BIOS by hitting <F1> , <F2> or other key during startup of the computer. It depends per manufacturer, but look at google with a search like enter bios key {manufacturer}
When you are inside the BIOS make sure to enable the option called ‘Virtualization’. I found this URL where several manufacturers are explained too!
Enable Windows features
Then we need to enable some windows features. For this we open the ‘run’ command with short key <Windows-key> + <R> and in the run panel we type optionalfeatures

In the ‘Turn Windows features on or off’ screen you need to enable these features:
- Containers
- Hyper-V
- Virtual Machine Platform
- Windows Hypervisor platform
Click OK to install them and do a restart of the system!
What I also did, but not sure if it is required are these 2 commands from an ‘Administrator’ command prompt:
dism.exe /Online /Enable-Feature:Microsoft-Hyper-V /All
bcdedit /set hypervisorlaunchtype auto
Installing Docker
Now for the Docker installation. It’s easy…Just go ‘Docker Desktop’ and download the package. For me it’s the Windows package with the name ‘Docker Desktop Installer.exe’ that is almost 1Gb is size!
Start the installer and follow the screens:

Hit OK on that first screen

Some unpacking and installing….

Hit Close….that’s all!
On your desktop you will see that bright and shining Docker logo icon that lets you start the Docker platform on your desktop! In the taskbar of Windows you’ll see a small Docker icon too that is telling us that the platform is starting…You can get a coffee! ☕
And wait for this screen:

No need to login or create any account in this screen! You need it when you want to save/share your own images on Docker hub (like GitHub for code, but this hub is for Docker images.)
Now open a command prompt or PowerShell prompt and type docker version for some result like this:
1 | Client: Docker Engine - Community |
Docker play time
Now you have Docker up and running take an hour to play with it. It’s not hard, but you need to learn the basics, so you understand how the platform works with Images, Containers, Volumes and Networks. These 4 components will be used in the AppWorks containerization package too!
You first shot would be to start with the ‘Get started’ part on the documentation.
The next part on other components (like Docker Compose) is the general documentation
Once you know about the Dockerfile, how to build an image, create a container out of it and how to start and reach it you’ll be on the correct path of knowledge…If you already read some information about ‘Docker Compose’ too it gives you some benefit and you can continue this post!
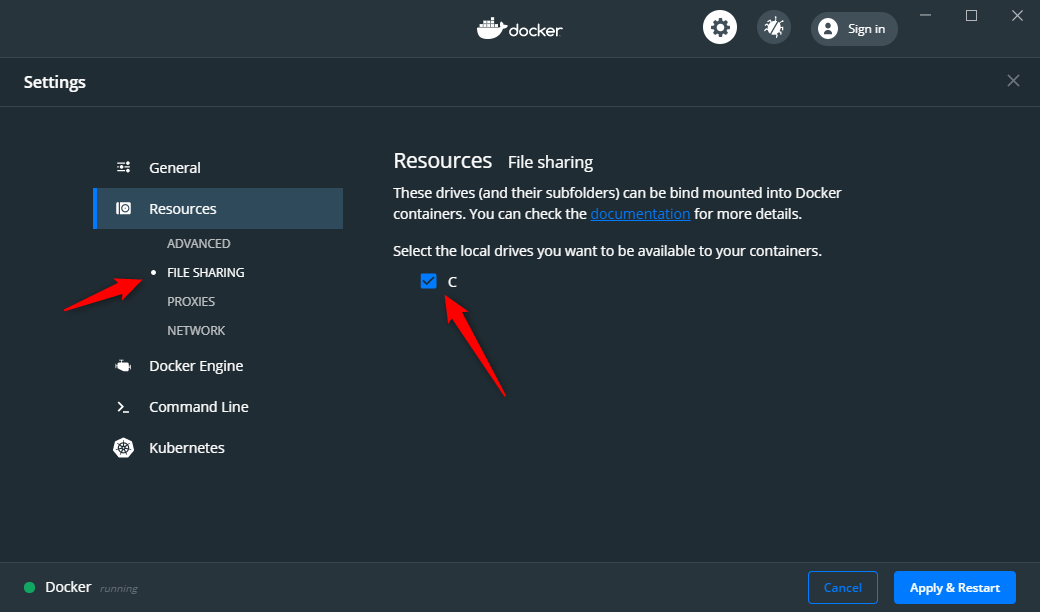
Enable Docker “File sharing”
A feature we need to enable is ‘file sharing’. You can enable this feature in the Docker settings which is accessible from that small icon in the Windows taskbar. Apply the change and restart docker with that blue button.
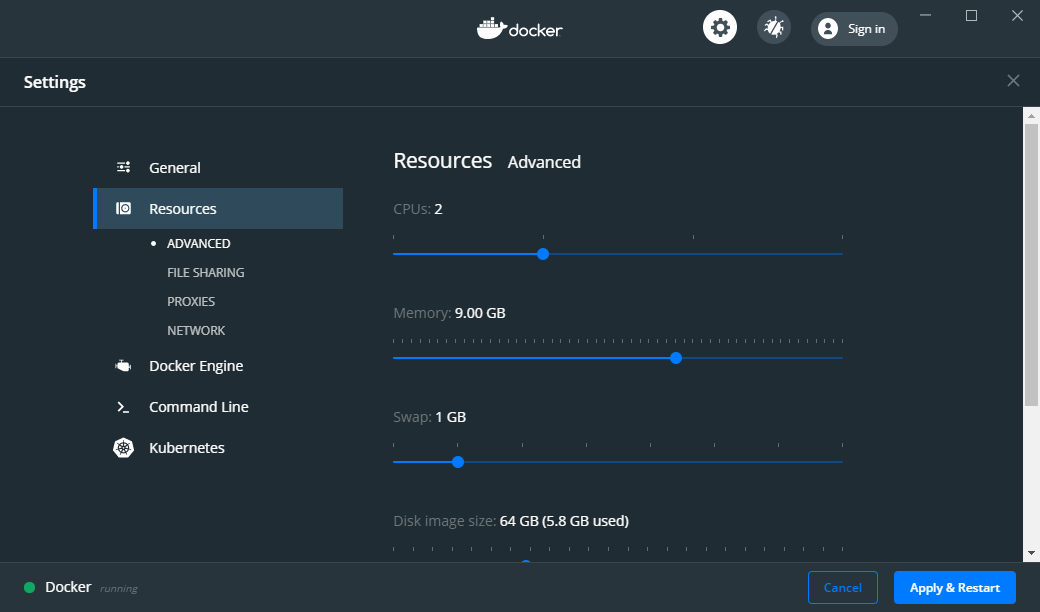
Docker memory settings
As we are in the Docker settings make sure Docker can claim enough resources from your system. For the AppWorks platform I claim 9Gb from my current 16Gb available. With a pre-run this was enough as I also require resources for my local Windows machine! You can play with these settings based on your system hardware. Also apply these changes!
Download the Docker package
Yes, now we are ready for the AppWorks docker installation files. This can be found here (In the ‘AppWorks Platform’ section and not the whole ‘Suite’ section!) Also, only the platform is containerized and not OTDS or other related services (like the Gateway software). This is the same link, only directly to the download file!
Once you’ve downloaded the (330Mb) file ‘appworks-platform-20.2-containerization.tar.gz’ you can extract the content to a new folder on your local machine. I use 7-Zip for this…This gives you another file ‘appworks-platform-20.2-containerization.tar’ that you can also extract.
The end folder should have this content available in the end…Yes…There is our ‘Dockerfile’ and ‘docker-compose.yml’!

Update the resources
Some files in this extracted folder need an update based on your license file…There you have it! 😜
You license file has some values we need to add in the Docker package
1 | CustomerName= {Name of the customer} |
Now edit the ‘.env’ file with a notepad editor like Notepad++ and update these fields
1 | LICENSE_CUSTOMER_NAME={Name of the customer} |
Then we need to edit the file ‘/env/secrets/LICENSE_KEY’ where you can just paste in the whole license string.
In that same ‘secrets’ folder you can also find database password files. You can keep them as they are except for one and that is the ‘PLATFORM_PASSWORD’. I changed it to ‘admin’ just for my convenience.
You can also update the other passwords too, but keep in mind that some passwords have restrictions in size and characters that need to be used! That was my lesson learned once I changed all the passwords to ‘admin’ and continued my Docker journey…It was a failure!
Save those updated files and let’s go to the next step…
Build and run
Ready, set?…Go!
Make sure you Docker desktop is running as the real magic will start now!
Open a PowerShell or command prompt to the directory where those Dockerfile and docker-compose.yml files we just updated are located.
Start with this command: docker-compose -f docker-compose.yml build. It will build the Docker images from scratch!
You see a lot of output happening on the screen where each step (total of 63) can be seen. This is my output.
Now see what images are create with docker images
1 | REPOSITORY TAG IMAGE ID CREATED SIZE |
Next step is to build the required containers out of our images with this command:
docker-compose -f docker-compose.yml -f docker-compose-openldap.yml -f docker-compose-postgres.yml up -d
Also here my output.
Now see what images are created with docker container ls with their health status. docker ps will give the same result!
1 | CONTAINER ID IMAGE COMMAND CREATED STATUS PORTS NAMES |
Now you need to grab a coffee and wait for around 15 min. to get 3 healthy containers…Trust me, it happens eventually…If you followed the procedure! 😎
If you can’t wait and want to see some logging during your coffee you can do use this command
docker logs {container_id} --follow --since 10minand use the container id of the ‘appworks/platform:20.2’ image!Wait for these messages in the appworks/platform:20.2 container:
2
/home/system/app/mp/health/ready HTTP/1.1" 200 1171
The ‘AppWorks’ playground is open
After you get those nice messages go to this URL from your local browser:
http://localhost:8080/home/system

Use these credentials to login:
- Username ‘sysadmin’
- Password ‘admin’ -> We changed it in the PLATFORM_PASSWORD file…Remember!?
Other stuff
If you want to investigate any of the running container you can do this command to start a Unix bash command prompt:
docker exec -it {container_id} /bin/bash
This should look familiar to you:
1 | appworks@appworks:~$ ls -ls /opt/appworks/ |
Same for this one:
1 | appworks@appworks:~$ ls -ls /usr/local/tomee/webapps |
To stop the platform containers you can give command (from the directory where those Docker files are extracted!)
docker-compose stop
This only stops the main ‘appworks/platform:20.2’ container and docker-compose start will start it again…This startup takes again some time!
You can also stop the other containers like this:
docker container stop|start {container_id}
Is there more…? Yes…There is!
There is a very nice manual here called ‘AppWorks™ Platform Cloud Deployment Guide’ where you can find much more information about:
- Creating images with your solution applied!…This is the core of containerization. So, no package deployment with manuals, but just building a new image, running a container out of it and you are ready!
- Using other databases as we are now (by default) using the pre-configured PostgreSQL database, but maybe you already have something fancy database up and running.
- Deploying on Kubernetes…For more scaling…Nice stuff too!
- Administration tasks on the containers like log levels, HTTPS, CORS, SSL and remote debugging.
Removal/Cleaning up
This section is when ^&%(&^% hits the fan or if you just want to clean up your Docker components (except the images!)
docker-compose down
And if you also want to delete the related volumes you can do docker-compose down --volumes
If you want a full clean of all your Docker components (incl. images) do these steps:
- Stop all running containers
docker stop $(docker ps -a -q) - Cleans stopped containers, images, and networks
docker system prune -a - Cleans the left-over volumes (not in used any more)
docker volume prune
This is also a great resource for removing Docker components!
To view if it’s all gone
1 | docker images |
And that concludes our Docker installation on the AppWorks platform with a nicely earned “DONE”. And believe me…This is the future for the platform where you see that the DevOps way of working is also getting close. You see how easy you can generate new images (with or without a prepared solution) and generate new containers out of it that are scalable, maintainable, and consistent in structure! Pretty important keys for managing a large platform with high-availability, fail-over and a Development Test Education Acceptance Production architecture!
A lot of information learned again from this post. Leaves me by sending you away with a bright and sunny day…Have a good one and don’t forget to subscribe to get updates on the activities happening on this site.
Have you noticed the quiz where you find out if you are also “The AppWorks guy”? Great stuff!
