Hi there AppWorks fans,
Welcome to a new installment of AppWorks tips.
Today starts our coverage for the property creation on entities. We’ll see what kind of properties can be created and how they can be configured with extra options. Properties on an entity give more ‘life’ or ‘character’. The entity gets more descriptive with properties on it. The more properties you have on an entity the better you can find/filter it out of the bulk of instanced entities but don’t overdo things. Start small and expand overtime. Remember that it is harder to change properties in the end than add new ones afterwards. These properties are used everywhere in the solution and changes to it might break other building blocks. Thinking small is key!
Some tips up front from my experience:
- Use a naming convention with a prefix
- Use an ‘ID’ property. I know we also have business ID’s and item ID’s, but a customer always wants something special.
- Start with a small spreadsheet where you define the first properties for discussion
The ‘Property’ building block falls in the ‘Structure’ category.
Let’s get right into it…
Back to those pro-tips first…
Naming convention for the entities
This is the list we’ll use for our ‘ToDo’ solution
| Entity name | Prefix |
|---|---|
| category | cat_ |
| member | mem_ |
| member_developer | mem_dev_ |
| member_reviewer | mem_rev_ |
| member_tester | mem_tst_ |
| project | proj_ |
| project_secret | proj_sec_ |
| todo | todo_ |
| task | task_ |
The ID property
We already applied these ‘ID’ properties on the several entities in a previous post about entity identification. On every entity (except the sub-typed entities like project_secret) we have 1 ‘id’ property with the above prefix already in place.
A small spreadsheet for the first properties
Can be downloaded here
You might have noticed in the Excel that we don’t use any reference/linked id’s (like we use foreign-keys in databases) to entities when they are related to each other. This is also not needed as this is done with the relation building block.
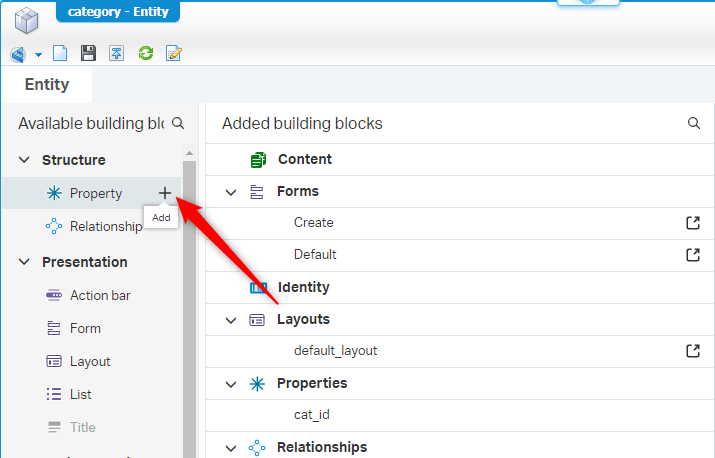
And now as always, spin up, login with ‘awdev’, open de workspace with the project and start with the first entity. In my case the ‘Category’…And click on the bright and shiny ‘plus’-sign for a new property building block.
The next panel shows us something like this where we already filled in the data. Take note of the naming convention!
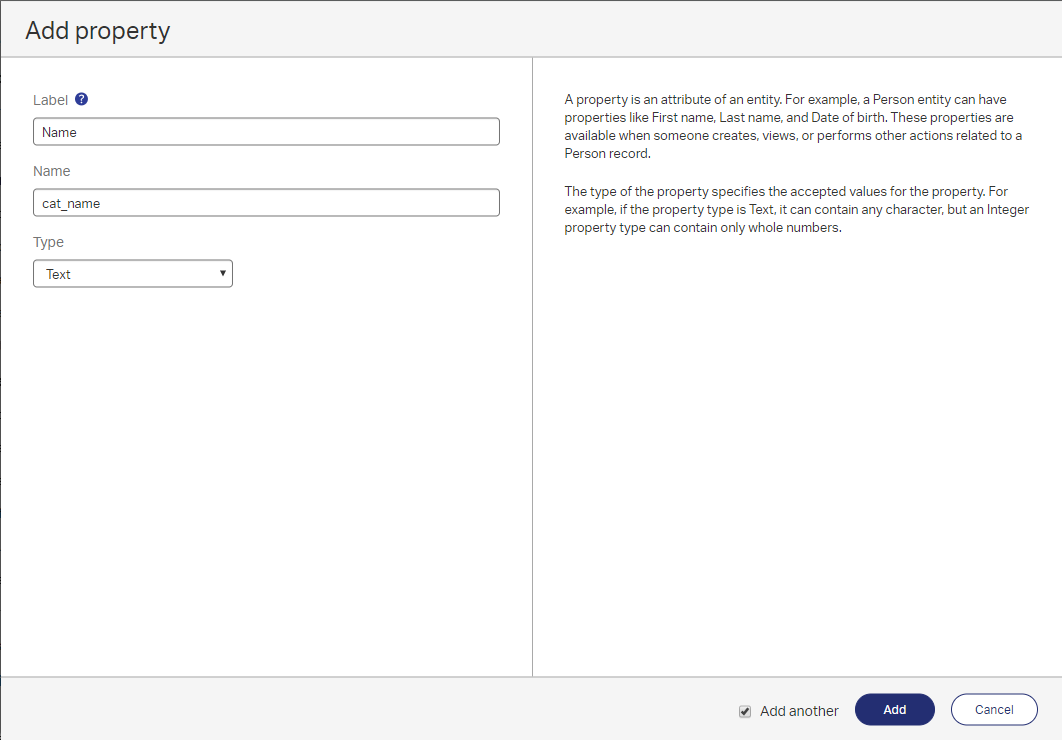
Mark the ‘Add another’ and then click ‘Add’ to also add the other properties based on the Excel. Make sure you select the correct type for your property.
When done this should be the end-result:

A small descriptive list of the several types you can use for a property
- Boolean
- The logical operation where a value can be TRUE or FALSE
- Currency
- Used for ‘money’ related properties and a currency kind selection like for example ‘Euro’
- Date
- A date related property without time
- Date and time
- Also, a date related property, but this time with a time selection
- Decimal
- Values with a decimal mark where can restrict what is possible before and after the mark
- Duration
- How long it may take. Based on this value we can show progression bar and play with deadlines
- Enumerated integer
- A static/dynamic list of values of type ‘Integer’ where the use can select from. It works with labels (for the end-user) and values (for the database)
- Enumerated text
- Same as the ‘Enumerated integer’, but this time for a ‘Text’ type
- Float
- Also values with a decimal mark, but with no restriction behind the decimal mark. Range of approximately -1038 to +1038
- Image
- Used to save an image to an entity. Like an avatar or a profile picture.
- Integer
- Saving a number to a property with a range of ‘-2.147.483.648’ to ‘+2.147.483.647’
- Long text
- For saving longer descriptive values where you also want to use word-wrap and
<Enter>keys.
- For saving longer descriptive values where you also want to use word-wrap and
- Text
- Just a normal text field with a proper value length
Let’s continue the configuration option for the now available properties on the ‘Category’ entity
Hit the ‘cat_description’ for a new panel on the right side:
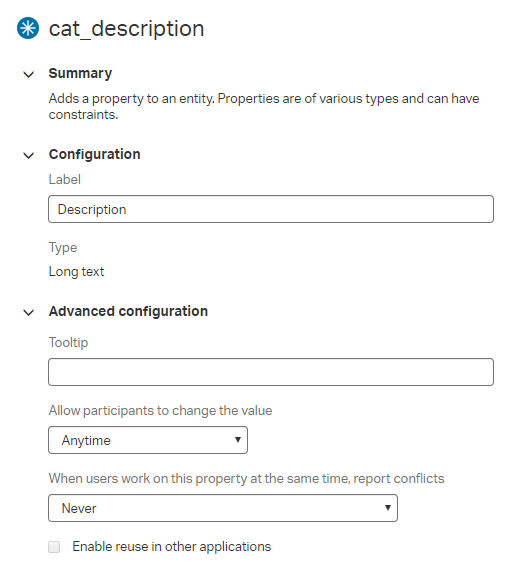
What do we see and what can we configure?
The first 2 categories ‘Summary’ and ‘Configuration’ are straight forward, but what about the ‘Advanced configuration’?
‘Tooltip‘ gives us the opportunity the help our beloved end-user with some extra information when he/she is hovering over the property when it’s used on a form
There are 3 possible values for the ‘allowed participants to change the value‘. Note that we can still update the value from the back-end via a process. So, this only prevents changes on the front-end for the end-user.
- Always…You get the point I guess?
- On first creation is a nice feature as sometimes you only want to be able to add data to a field on first creation that is never supposed to change in a later state
- Never is used for static information that is saved on the entity but may never be updated by the participant
Then ‘report conflicts‘ when users work on the property the same time. Also called ‘conflict detection’
- When the change is made by another user
- The last person opening the same form with the field to be updated will get a notification that someone else already provided a new value to the field and he/she needs to confirm whether to continue of not.
- When changed to the same or different value
- When both enter the same value, it is also detecting a conflict and you are notified. But are they both notified or only the last person?
- When changed to a different value only
- When both persons update the field with the same value it’s should be fine, but when it’s different you get notified. Also, here…are they both notified?
- Never
- No detection, so the last person who saved the form updates the data in the database that was on his form.
- When the change is made by another user
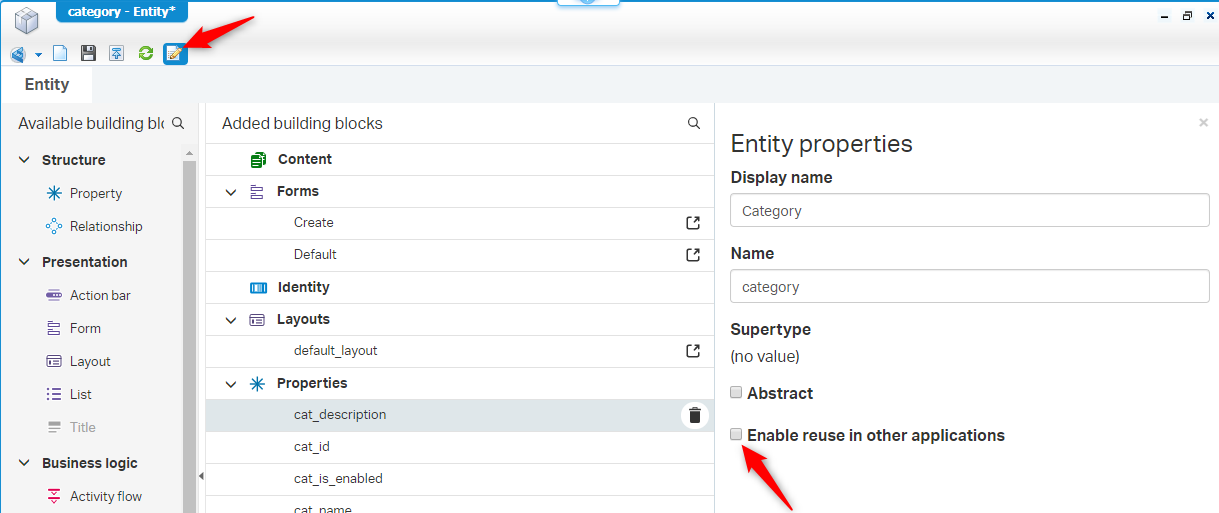
‘Enable reuse in other applications‘ is only available when on the entity properties this option is marked ‘Enable reuse in other applications’. This option makes it possible to reuse the entity on other applications when this solution is packaged (as a .cap file) and imported into a brand-new application. It’s another feature we’ll cover in another episode on AppWorks Tips!
![prop_005]()
Question that is also covered in a separate post: “How is it reporting the conflict and what happens with the data to save in those cases?”…We’ll do a test on that feature!
Another question pops-up…How long is a ‘Long text’ on our PostgreSQL database? For this we take a deeper dive on database level to check it out…Just placed on the backlog!
Continue to the properties…
We skip the ‘cat_id’ for now as it was already created (Text with default length 64) several posts ago. Let us just go to the ‘cat_is_enabled’ that we created as a ‘Boolean’ type
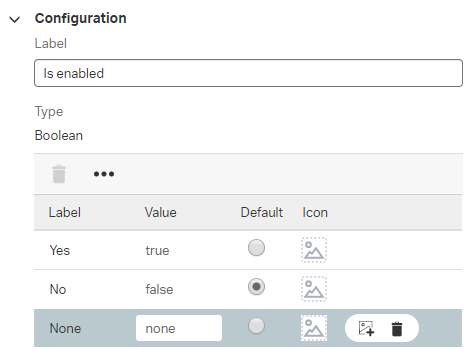
Start by modifying the labels and you can remove the ‘none’ value by hitting that trash-bin. A simple Yes/No option is enough to be enabled.
Also, nice to add some green-flag for the ‘Yes’ and a red-flag for the ‘No’ option.
First find a nice icon from on iconfinder.com and upload the icon/image to a nicely created ‘assets’ folder.
Also FamFamFam.com has a great icon set (all 16x16 sized) for you to use…for free!
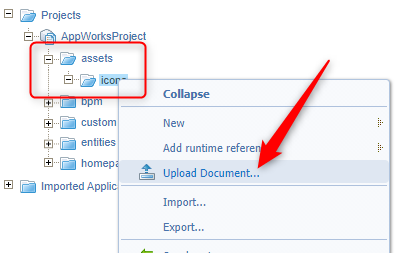
The uploaded icons can then be used on that Boolean-typed property!
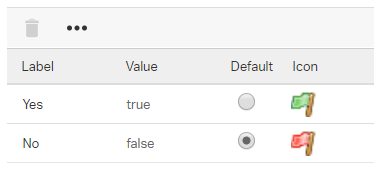
Next is the ‘cat_name’ of type ‘Text’
Hit the property so you see the panel getting refreshed for the cat_name. You will see 3 new fields that we didn’t see before:
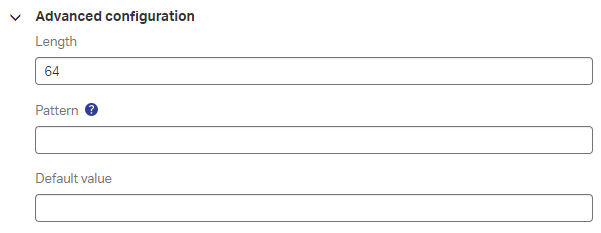
‘Length’ is the max. length of a value that can be stored in the database…But what about special characters (diacritical signs) and other ASCII characters? My experience is that this always causes problems in length. Let’s dive into this from another post.
‘Pattern’ gives a restriction on what our end-user can fill-in. If you only want our users to fill in any letters and restricting any digit you need to provide this field with ‘Z’. For digits you can use a ‘9’. Note that this also requires the user to fill-in the field as the pattern tells you to do. Including the length!!
ZZZZZZZZZZRequired the user to fill-in exact 10 characters. ‘a-z’ and ‘A-Z’9999999999Required the user to fill-in exact 10 digits. ‘0-9’+99 (9) 99 9999999For a telephone number formatted like ‘+31 (0) 11 2408901’9999 ZZFor a postal codeZZ99 ZZZ 9999 9999 99For an IBAN code like this ‘NL12 ING 0023 4432 21’
For a bit more flexibility you can apply a ‘Rule’ building block where you can check a value based on regular expressions.
‘Default value’ will be the value that is already pre-filled when you open the form on first creation of the entity instance. This field can also be used to verify the provided ‘Pattern’ in design-time as you can only fill in a default value that matches the pattern!
Now our ‘Category’ is done…Let’s continue to our ‘Member’ entity. Where ‘mem_id’ is already in place, ‘mem_name’ and ‘mem_is_active’ are easy now (Make sure to add those flag icons too and remove the ‘none’).
Next is the ‘mem_salary’ that we create like this and because we live in Europe we add the ‘Euro’ as currency value. The ‘currency’ type is easier to calculate in terms of ‘money’.
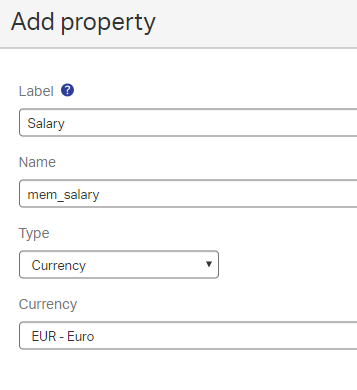
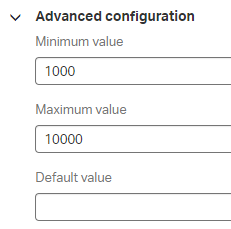
In the ‘Advanced’ panel you are allowed to add a minimal and maximum for the salary like this (These are example numbers on a monthly base). Note that a currency is a ‘Decimal’ in the back-end so a minimal value of ‘999.99’ is also valid!
Then we create our ‘mem_start_date’ of type ‘Date’. No advanced information to fill-in for this property. For a date property (not in this case) you might want to pre-fill it with a date from today!?…Yes…It’s a ‘Rule’ building block.
And about date-formatting?…That is part of form creation…we’ll cover this in another post.
Next is ‘mem_age’ of type ‘Integer’ where we can provide a minimal of ‘18’ and a maximum of ‘99’ (depends a bit on how old your members will get before they pass over…In that case we put the ‘mem_is_active’ to a ‘red’ flag…Or maybe a that is a good case for Boolean value of ‘none’…Who knows!?)
Our next property is ‘mem_role’
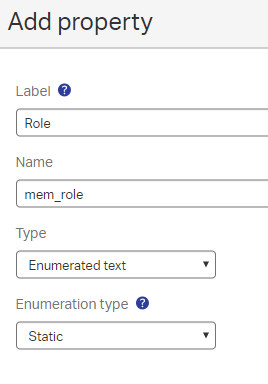
Make it a ‘Static’ type. We’ll learn about the ‘Dynamic’ type in a separate post…Yes…Just put on the backlog!
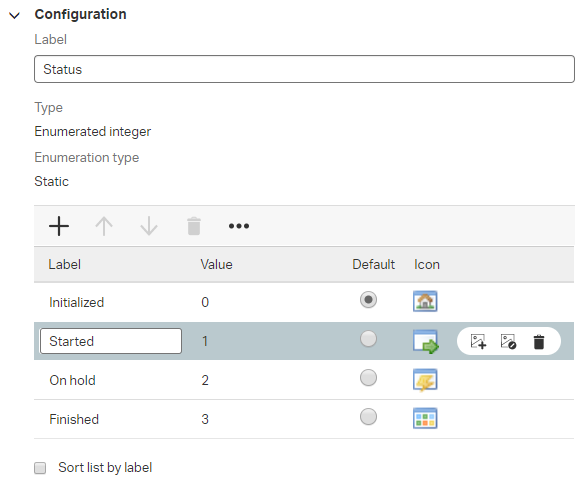
It’s a ‘Text’ type so the same config applies also here (like the length), but we can add a ‘Static’ list in the right panel that will look like this (don’t forget to mark that order-thingy)
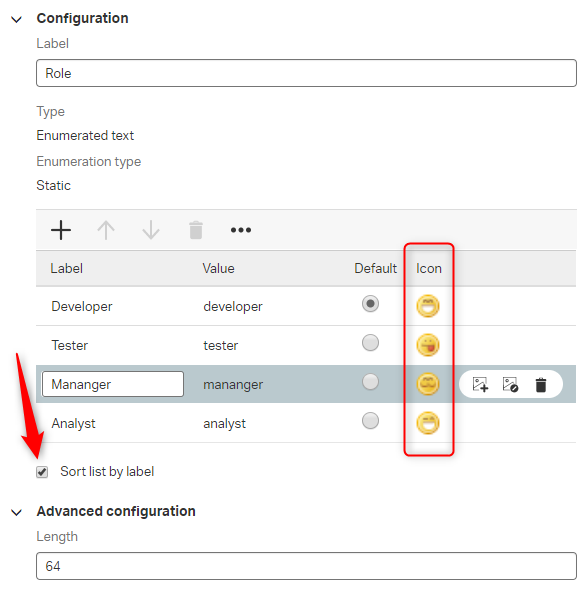
If you want to remove the default ‘none’ you first need to add 1 yourself, set it to default and then remove it…I know…Don’t ask the messenger!?
Add some nice icons as we already learned from a previous description and make sure your values from the list don’t exceed the length of the property defined!
The last property for the ‘Member’ entity is the ‘mem_avatar’ where we can add an image to the member. Make sure to add a ‘Default’ image in case no image is selected.
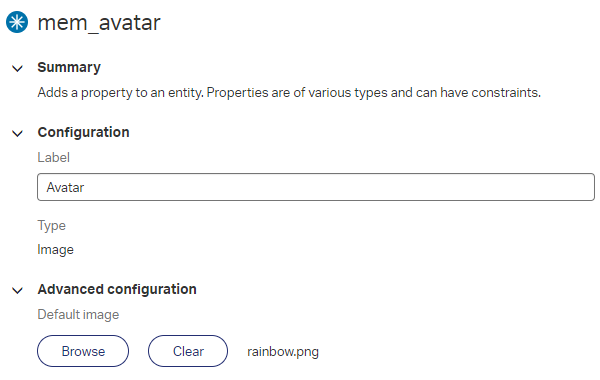
Let’s take a look on the ‘Project’ entity. Most of the things are already covered, but maybe some notes.
- ‘Date and time’ is the same as the ‘Date’ type only you are now able to also select, save and view a time with that date
- ‘Decimal’ let’s you restrict what can be used before and after the decimal mark
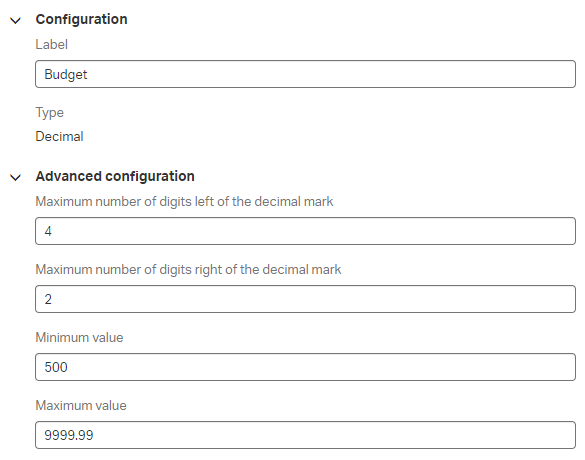
- ‘Enumerated integer’ is the same as the ‘Text’ variant only you are now saving ‘Integer’ values. This can also be made as a ‘Dynamic’ list but is covered in another post.
The last entity to provide with properties is the ‘ToDo’ entity. All common sense now. Only for the ‘todo_estimation’ where we used to ‘Float’ type. This works a little bit the same as the ‘Currency’ and ‘Decimal’. Where ‘Currency’ explicitly is used for ‘money’ valued properties gives ‘Decimal’ the restriction what can be put behind the decimal mark. ‘Float’ is the most flexible of the 3.
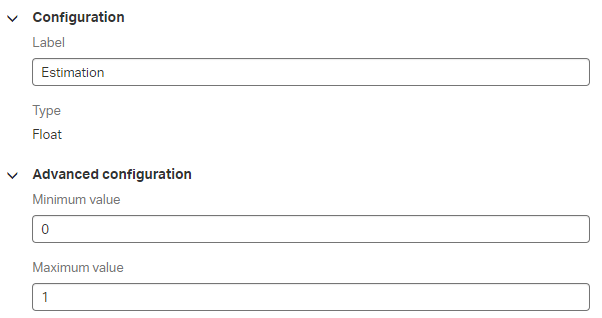
Any value between 0 and 1 will be valid like for example ‘0.118723’
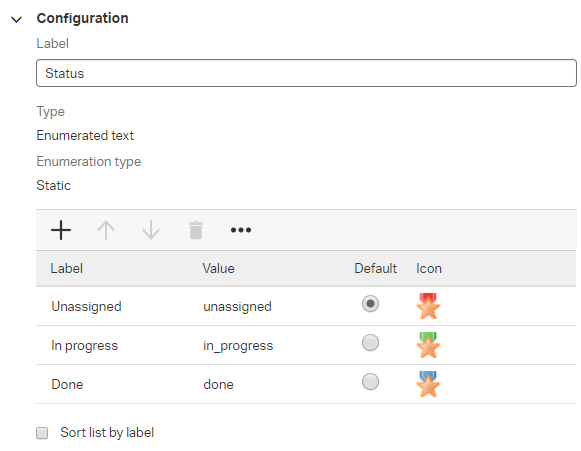
For the ‘todo_status’ we did some configuration like this
And for the last indirect entity called ‘Task’ that is related with an ‘Has Child’ type from the parent ‘ToDo’ entity.
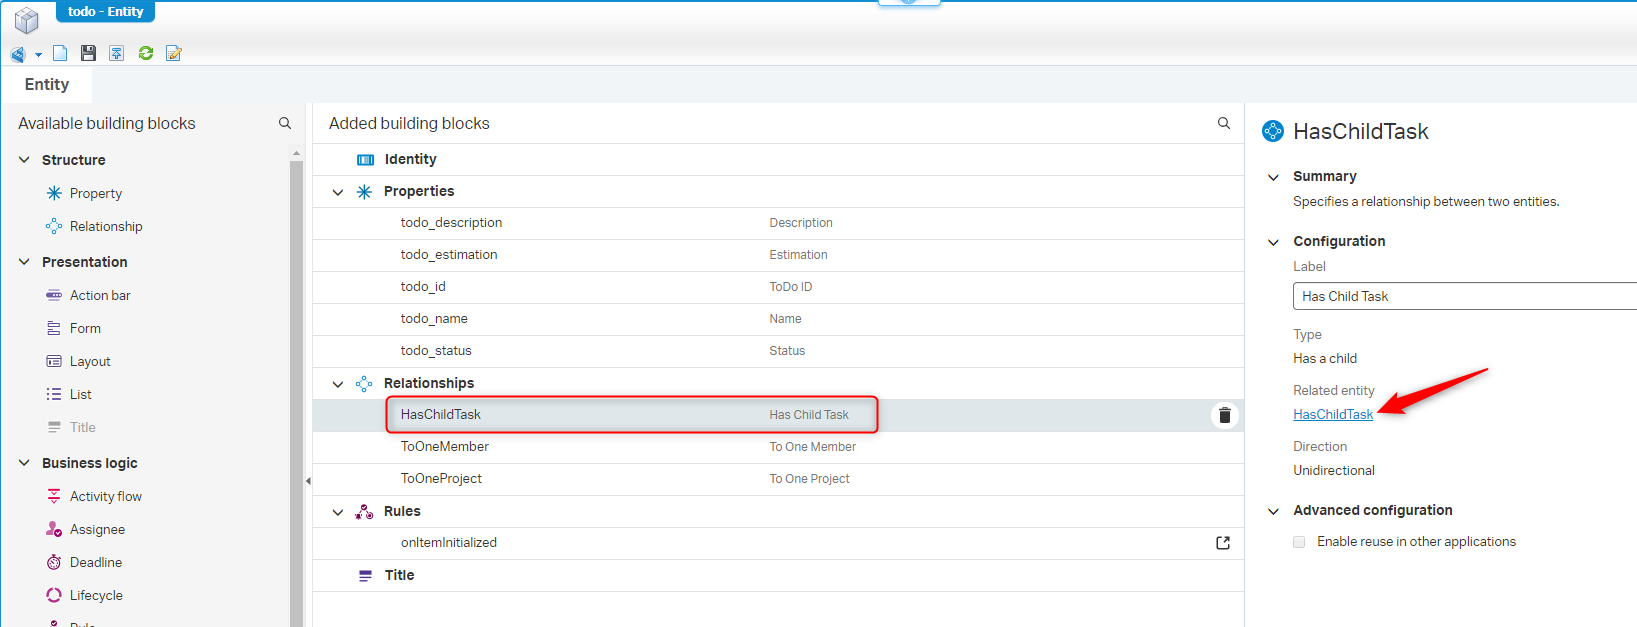
Most properties are also here straightforward where the ‘task_status’ can be configured with same values as we did on the ‘todo_status’ property.
The only new type is ‘Duration’ on the ‘task_duration’ property. This gives us new ‘Advanced configuration’ settings.
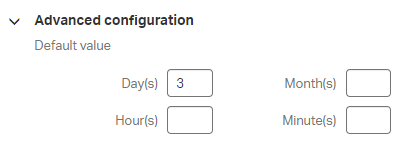
With this property in place we can do some calculation later so we can detect and view the progression (with a progression bar) to the end-user and also do things like ‘Deadlines’. We’ll see this later when we play with the ‘List’ and ‘Deadline’ building block.
And…’DONE’ …This give us a pretty good view on what kind of types can be used for the several properties we want to use on our created entities. More information then I was first intended to describe, but that’s OK. Also, some nice questions pop-up during our journey where we will get an answer on in future posts.
Also, a good thing to do before we forget it…Do a validation and a publish on the project…and…commit the changes to SVN as we also connected source control to our workspace! 😏
Keep up the good work and I see you in a new installment of AppWorks Tips. Don’t forget to subscribe to get updates on the activities happening on this site.


