Hi there AppWorks fans,
Welcome to a new installment of AppWorks tips.
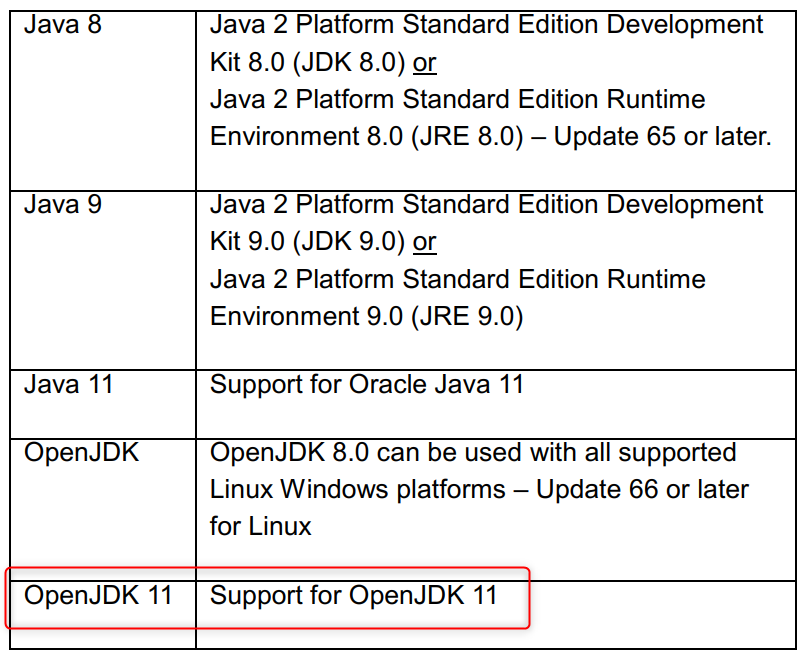
This guide will help you installing the Tomcat application server on our Java supported RHEL VM image. The instance of Tomcat is used to host the OpenText Directory Services that will handle the authentication for our AppWorks platform.
Let’s get right into it…
Start the Oracle VM VirtualBox tooling and start-up our image. Leave the image as is and make a connection with PuTTY.
Our VM already has a supported java version installed.

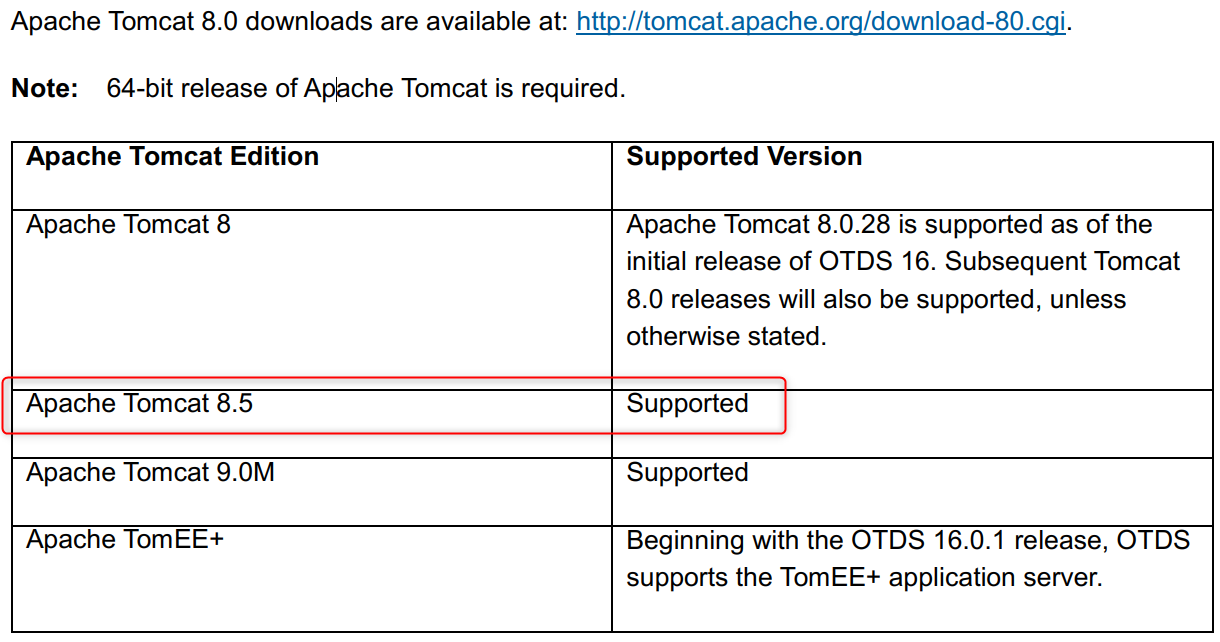
You can check with java --version. Also, Tomcat must be a specific version as the documentation (OTDS release notes) will tell us.
FYI: Since OTDS 22.1.X, we see an upgrade in Tomcat support to version 10 (
10.0.20in my case), and a move to a database to save data. Keep the installation manual ready on this one. Here some notes from my experience (during an AWP 22.2 installation):
- Database name:
otds_db- Make connection (you require that hostname!):
psql -U postgres -W -h appworks-22-2.mydomain.com otds_db- Database JDBC connection string:
jdbc:postgresql://appworks-22-2.mydomain.com:5432/otds_db- NO OpenDJ service since 22.1

Next, we need the URL from where we can download Tomcat. This can be found here (for the version 8.5 that is required for our image): Tomcat 8.5.43
wget https://archive.apache.org/dist/tomcat/tomcat-8/v8.5.43/bin/apache-tomcat-8.5.43.tar.gz
After the download is done, we need to extract the file: tar xvf apache-tomcat-8.5.43.tar.gz
Let’s move it all to a nice location with a service to start/stop it:
Create a directory:
sudo mkdir /opt/tomcatMove the extracted folder:
sudo mv apache-tomcat-8.5.43/ /opt/tomcat/Own the new folder by the ‘sysadmin’ user:
sudo chown -R sysadmin:sysadmin /opt/tomcat/Don’t be smart like me to use the ‘tomcat’ user as we did for the TomEE instance. OTDS is handling things differently!
Make a nice link to it:
sudo ln -s /opt/tomcat/apache-tomcat-8.5.43/ /opt/tomcat/latestDon’t use this link in any other configuration file like the tomcat.service or the system variables like the CLASSPATH as it fails in the OTDS installation…My own experience!
Create a cool service for it:
sudo vi /usr/lib/systemd/system/tomcat.service
Add this content to the new file
1 | [Unit] |
Now save the file :w and quit vi with :q
Next step is to change the default port numbers as we also have TomEE running on the already in use port 8080.
Edit the server.xml sudo vi /opt/tomcat/latest/conf/server.xml
Change the next port numbers:
1 | <Server port="8006" shutdown="SHUTDOWN"> <!-- was 8005 --> |
Save and quit the file :wq
Last steps…
- Reload the services daemon as we changed it with a new service:
systemctl daemon-reload - Enable the tomee service:
systemctl enable tomcat.service - Now the big moment where we all waited for:
systemctl start tomcat.service
Check if it’s all running fine by browsing with your local machine to the URL: http://192.168.56.107:8181
For log file monitoring use the tail command: sudo tail -f /opt/tomcat/latest/logs/catalina.out
Now let’s add tomcat users
Edit the tomcat-users.xml file: sudo vi /opt/tomcat/latest/conf/tomcat-users.xml
Add these lines just before the last end-tag </tomcat-users>
1 | <user username="tomcat" password="tomcat" roles="admin-gui,manager-gui,tomee-admin" /> |
Make sure the role names are is typed in correctly with the ‘-‘ in between
Make the ‘manager’ and ‘host-manager’ apps available for remote users (like our local machine!)
Create and edit a new file with the name ‘manager.xml’
sudo vi /opt/tomcat/latest/conf/Catalina/localhost/manager.xml
Add this content to it
1 | <Context privileged="true" antiResourceLocking="false" docBase="${catalina.home}/webapps/manager"> |
Create and edit a new file with the name ‘host-manager.xml’
sudo vi /opt/tomcat/latest/conf/Catalina/localhost/host-manager.xml
Add this content to it
1 | <Context privileged="true" antiResourceLocking="false" docBase="${catalina.home}/webapps/host-manager"> |
Restart tomcat systemctl restart tomcat.service and check the result on these URL’s. They should both give a pop-up for ‘HTTP Basic authentication’ where you can use the credentials as described in the tomcat-users.xml
http://192.168.56.107:8181/host-manager/html
http://192.168.56.107:8181/manager/html
As a final step is the proper way to add the correct environment variables for the Tomcat instance.
Edit the ~/.bash_profile again for the ‘sysadmin’ user: vi ~/.bash_profile
The final version should look like this for now:
1 | # .bash_profile |
When done reload your profile via the command: source ~/.bash_profile
Check if it’s all OK via: env | grep tomcat
And that’s a big ‘DONE’ for this installment of AppWorks tips where we installed Tomcat. This instance can now be used for hosting the OTDS instance we will install in the next post.
Let me know what you think in the comments and have a good one for today…See U next time!
Don’t forget to subscribe to get updates on the activities happening on this site.


