
Hi there “Process Automation” fans,
Welcome to a new installment of “Process Automation” tips.
This guide will help you create a new VM image on the previous installed Oracle Virtual Box. There are some certain settings that are required to do for a proper usable image.
This post is the second part of the series for ‘“Process Automation” installation in 10 great steps’
This is the list of ingredients we are going to use:
- The already installed ‘Oracle Virtual Box’ software from the previous post
- RHEL ISO file. Downloaded from: developers.redhat.com
- You are required to create a Red Hat account…You also need it later on for package downloading!
- I’m using a RHEL 9.7 image with the name
rhel-9.7-x86_64-dvd.iso; You can download it here. - Get yourself some information about the lifecycle of RHEL
Notes:
- In the past I used “boot” images like
rhel-8.7-x86_64-boot.iso, but that requires direct registration to download software from the Red Hat Content Delivery Network (CDN) during installation. With a simple “developer” seat, you will get the errorError: Attach operations are ignored in organizations using Simple Content Access- So, you need to install from local resources first (that’s the DVD-ISO) and register the VM later with
sudo subscription-manager register- I move to RHEL 9.7! Why? When you also want to play with xECM (version 26.1), you require RHEL 9.X! In the past, I had a terrible, time-consuming, but great eXperience running an OS upgrade from RHEL 8.7 to RHEL 9.2 via the “Leapp utility framework” following this post. Do I recommend? Nope…It’s a one-time life experience!
- OpenText documentation from the support site
Documentation is NOT available in the downloaded “Process Automation” software package! Basic documentation for version
26.2is found here.
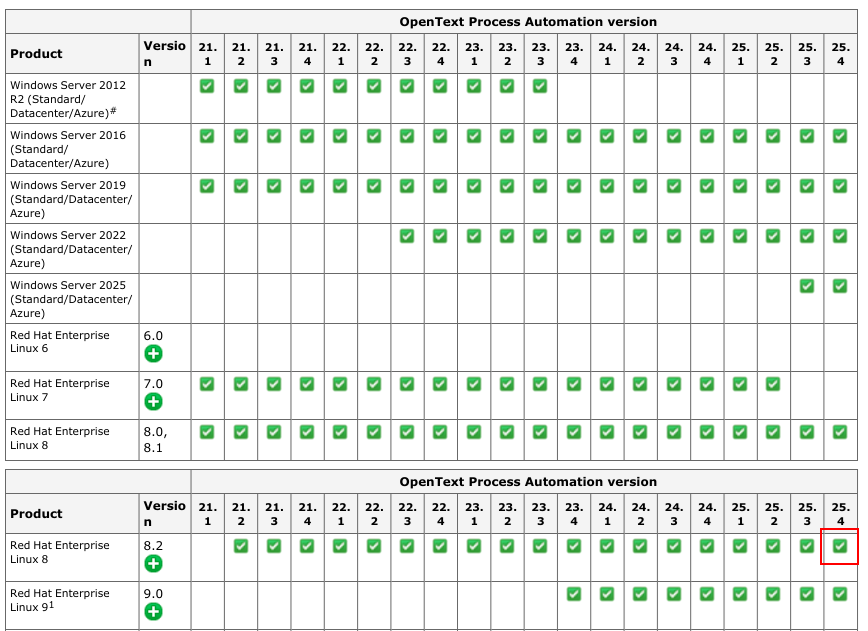
- In this result you can also find the PDF ‘OpenText Process Automation Supported Environments’ where we can see this information:
Interesting note about
chkconfigto also read;
Let’s get right into it…
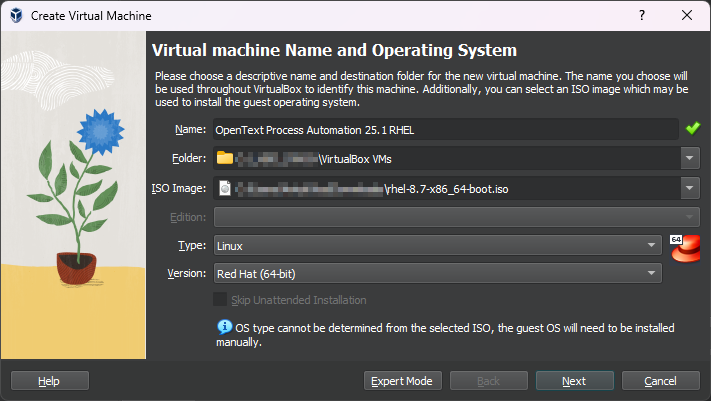
Let’s begin by starting up the ‘Oracle VM VirtualBox’ software and create a new machine by hitting <Ctrl>+<n> on your keyboard or from the menu bar selecting ‘Machine’ > ‘New…’
Make sure you are in the ‘Expert Mode’. This can be switched with button on the bottom. Now make these settings:
- Name: OpenText Process Automation {version} RHEL
- Machine Folder: C:\VirtualBox VMs (or another place!)
- ISO image: That’s the one we downloaded.
- Type: Linux
- Version: Red Hat (64-bit)
- Uncheck the “Unattended” option…we want to have control!
Open the ‘Hardware’ section for more settings:
- Memory size: 9216 (= 1024 * 9 for 9Gb)
- Make sure your local machine has enough memory available (I’m running on a laptop with 16Gb memory)
- Processors: Be careful on this slider (less is more!); Once I used 8, but after too much struggles on stuck CPUs, I leave it at max. 2! Also make sure to disable Hyper-V under your Windows features; Read all about it here. 2 CPUs is also fast enough for what one low-code-developer does; That’s at least my eXperience after some weeks of using it with a setting of 2 CPUs!

Finally, the ‘Harddisk’ section:
- Hard disk: Create a virtual hard disk now
- File location: leave as is
- File size: 250Gb
- Hard disk file type: VDI
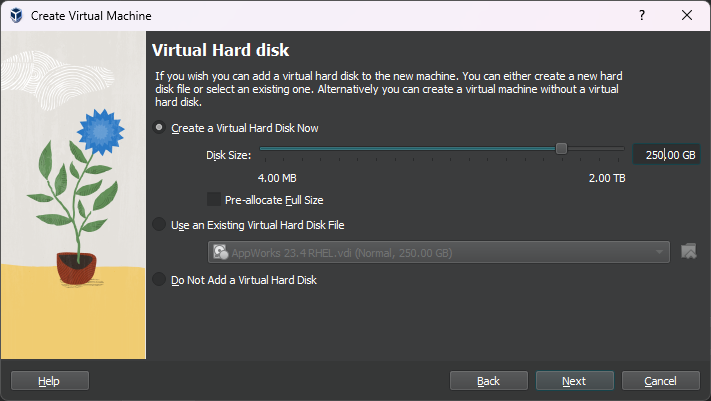
Hit ‘Finish’ to finalize the creation wizard.
…
Now it’s time to tweak the image setting. So, select the brand-new image and hit <Ctrl>+<s> on your keyboard or click on the menu bar ‘Machine’ > ‘Settings…’
General category:
- This is fine by default.
- It’s possible to change the clipboard options and drag & drop options on the ‘Advanced’ tab. This can be handy when you want to be more flexible to access your image directly with you copy/paste actions or moving files in/out your image.
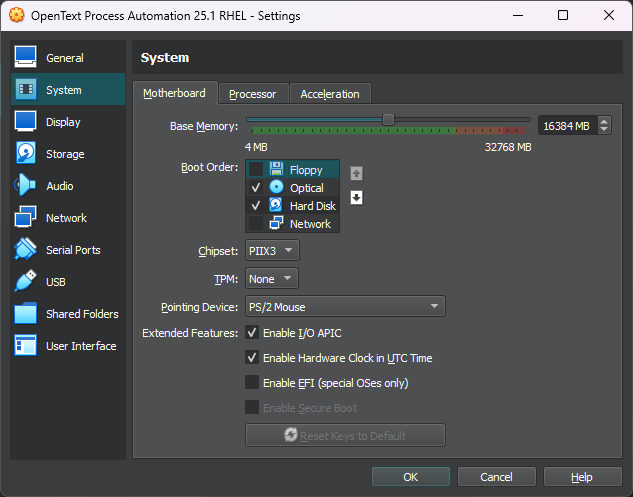
System category:
- Most of the setting are fine, but we can tweak a bit here
- On the ‘Motherboard’ tab you will see the memory settings set like you already defined. You can remove the ‘Floppy’ from the ‘Boot Order’ by unchecking it.
![image_creation_003]()
Display category
- Can be left as is.
Storage category
- Should be fine from the initial image creation!
Audio category
- Disable the audio.
Network category
- It is a good practice to add 2 adapters to a VM. The first one is to make connection from your local machine to the image (host-only). The second one makes internet available on the VM (NAT).
- ‘Adapter 1’ tab
- Enable it and attach it to ‘Host-only’ Adapter
- ‘Adapter 2’ tab
- Enable it and attach it to ‘NAT’
Serial Ports category
- Keep it disabled.
USB category
- Can be left as is.
Shared Folders category
- Can be left as is.
User Interface category
- Can be left as is.
This should be the end-result of all your hard configuration work! 💪

Give it a big ‘DONE’ for this post as we created a nice VM image we can use for our “Process Automation” installation. The next step will be to request a try-out license for “Process Automation”. CU next time on the following post on the series for ‘“Process Automation” installation in 10 great steps’ and have a great day!
