
Hi there “Process Automation” fans,
Welcome to a new installment of “Process Automation” tips.
First of all…Happy new year for 2026 where we continue our grind for the OPA platform; exploring the edges of the platform and delving into the depths of the overall system. The backlog all long from done, so we pick something nice to start with in the new year. It’s a topic about a “Garbage bin” implementation…There is a reason your Windows machine has it…So, why does our beloved OPA platform not have the possibility!? Is it hard to build? I don’t think so…We’ll just build it ourselves; Watch and learn…
Let’s get right into it…
…AND think about the concept of “garbage bin”. It’s simply “flagging” an instance as “garbage” which moves the instance to a separate list…right? Well, “Yes”, including a little security so not everyone can access it for restore. When I also look at the Windows way of deleting items, I get to this quick list of S.M.A.R.T. criteria/goals on the implementation:
1 | 1. As a case worker, I want to move wrongly created, spam, or “spoke” cases |
We leave the compliance rules with retentions periods out of scope for this post. That’s also a more “Archival” implementation part where this “Garbage Bin” implementation is more for “incorrect” created instances or maybe “spam” instances created from an external service call!? Let me know in the comments what you think as I can image you also have a use-case where you accidentally deleted something which wasn’t supposed to get deleted…
It’s time to get some dirty hands; Boot up the VM, and dive into your favorite workspace with corresponding project. Start with the creation of a new entity with this input:
| Name | Label | Type | Note |
|---|---|---|---|
| case_name | Name | Text | Length 64 |
| case_subject | Subject | Text | Length 128 |
| case_is_garbage | Is garbage | Boolean | “Yes”/true or “No”/false (default) |
| case_start_date | Start date | Date | |
| case_progression | Progression | Integer | Between 0-10 (default 0) |
| case_type | Type | EnumText | Length 16; “HR” (default), “Legal”, “Product” |
| case_priority | Priority | EnumInteger | “Prio1”, “Prio2”, “Prio3” (default) |
| case_avatar | Avatar | Image | |
| case_description | Description | LongText | |
| case_duration | Duration | Duration | Default 1 month |
Next to this list of properties, you can add/change these building blocks with these settings:
- Entity property: Set the name to
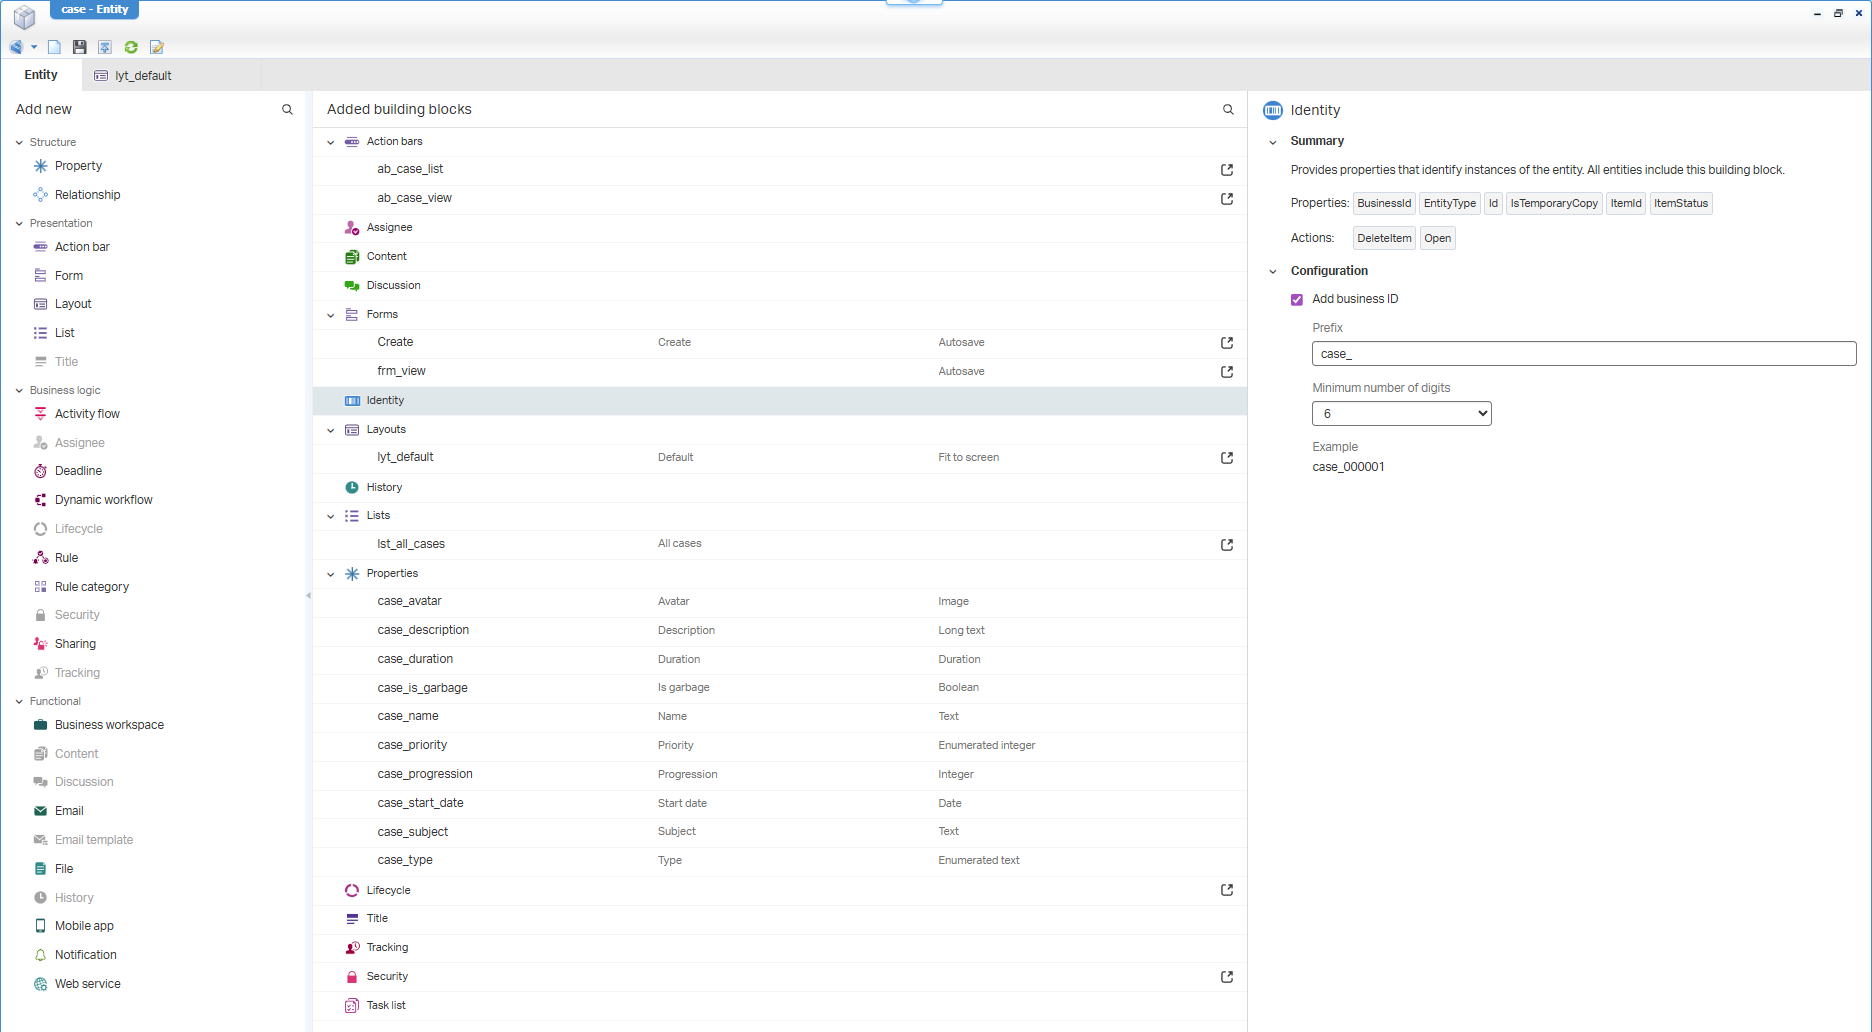
caseand display name toCase - Identity: Add the business ID with format
case_000001 - Title: Leave it generate by the system
- Create form: Make it nice and cozy for the creation phase (see screenshot below)
- Action bar: Create two of them;
ab_case_list(with only the “Open” action) andab_case_view(add any action, except the “Open” and “Delete”!) - List: Rename the default list to
lst_all_caseswith labelAll cases; Select the action barab_case_list; Set the default category toCMS; Limit the rows to max. 50 (a good practice!), don’t show in ‘Lists’ panel (we show it from a homepage!), and don’t allow to create new items (we use homepage buttons!). For the columns of the list, you can use whatever you like as long as it “smells” logic. - Assignee: On create, assign to a user with property
User.UserId(which is the same as “the creator”) - Tracking: Just leave as is
- Discussion: Just leave as is
- History: Create a new history log
Case historywith namehl_case_history; Don’t forget to save this one in the ‘configs’ folder of your project! Leave the other history settings as is - Content: Just leave as is
- View form: Add a second form with name
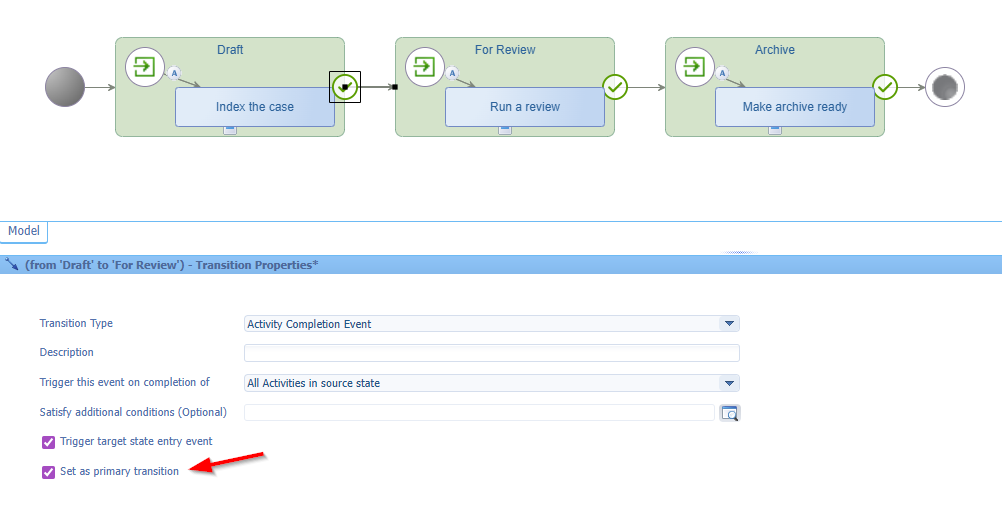
frm_viewand make it nice and cozy again; We use this one in the layout (instead of the ‘Create’ form!) - Lifecycle: Make a 3-step flow which starts on creation of a new case instance!…See below for a quick example.
- Layout: Rename to
lyt_default; Checkmark ‘Always show the firs tab’. Make the layout a shiny piece of art with all possible panels. Select theab_case_viewas action bar, select thefrm_viewas new form. You can stack panels on top of each other for creating tabs (like ‘Contents’, ‘Discussions’, ‘History’, and ‘Tasks’)! - Security: Add it as last step to configure all the previous building blocks. Add a new functional role
fun_case_workerwho also has all the permissions in place.
This is the lifecycle implementation where you don’t want to miss the ‘primary transition’ option for each flow:
Another great habit (which I always see going wrong…including myself!) is adding labels to the building blocks. Some BBs, you do almost instantaneously, but some require your special touch; double-check them!
You will now have an enriched ‘Case’ entity for publication:
FYI: I leave the related ‘LifecycleTask’ entity implementation out of scope for this post!
In runtime…WAIT…You can’t do anything (yet!) in runtime as we don’t have a homepage, and we also didn’t expose our list in the ‘Lists’ panel!
…
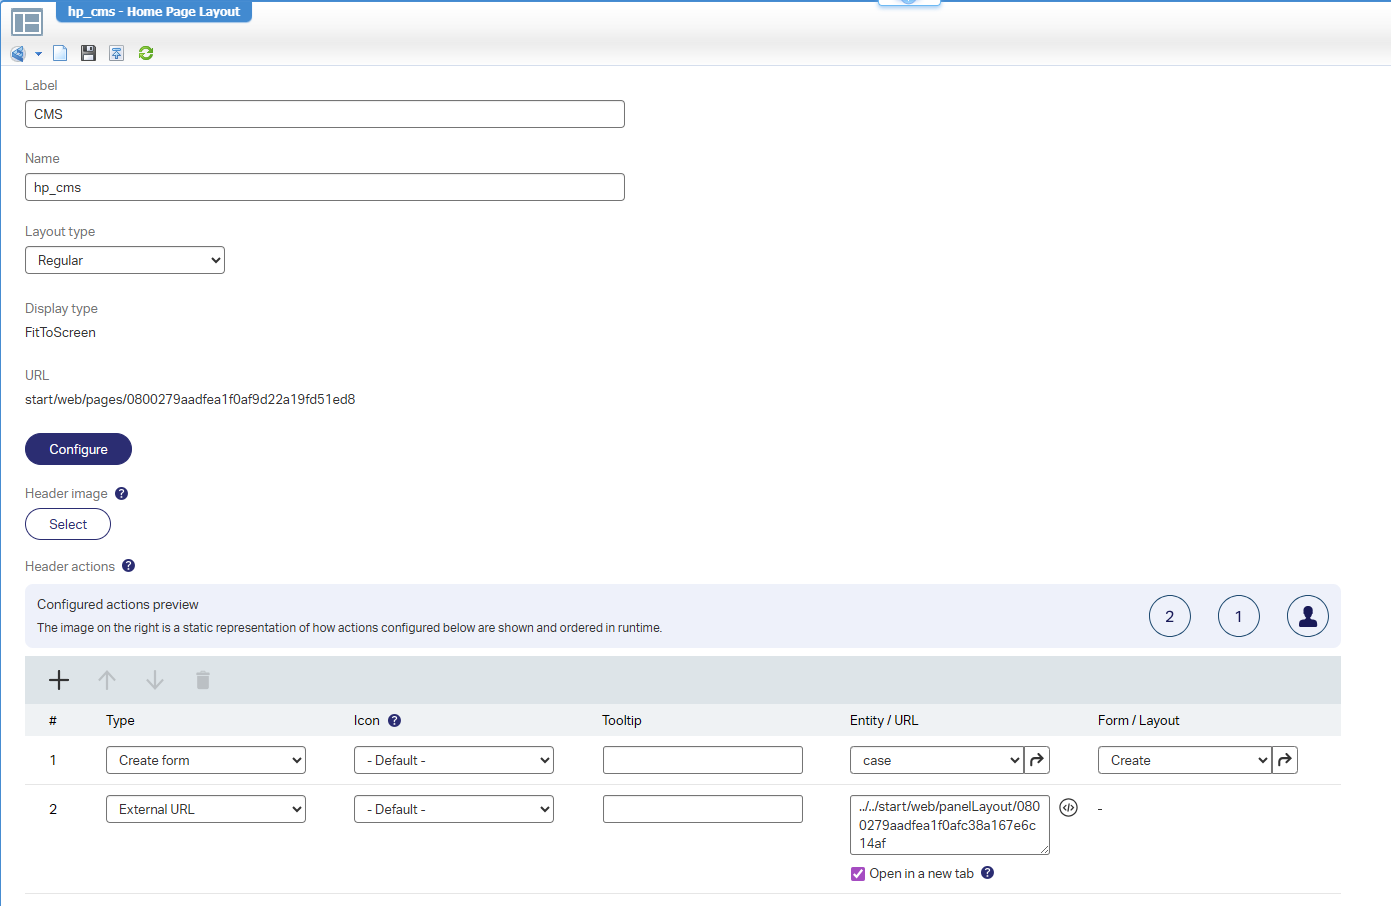
Add a new Homepage (it’s like creating a new entity) nicely in the ‘homepages’ folder of the project; name it hp_cms. Add a new action of type ‘Create form’ and select the ‘Create’ form of the ‘case’ entity (this is how we create new instances of our case). Now configure this homepage with one ‘Results’ panel showing the list All cases. Later, you can extend this with ‘My cases’, ‘Special cases’, or whatever list you would like to expose to your end users.
Save it, close it, and from the project view you can now set a runtime security to this new homepage. Add the fun_case_worker as ‘View’ permission on the homepage. Now do a publication for this homepage into runtime.
Finally, don’t forget to attach your test accounts with the role fun_case_worker from a the ‘User Manager’ artifact!
…
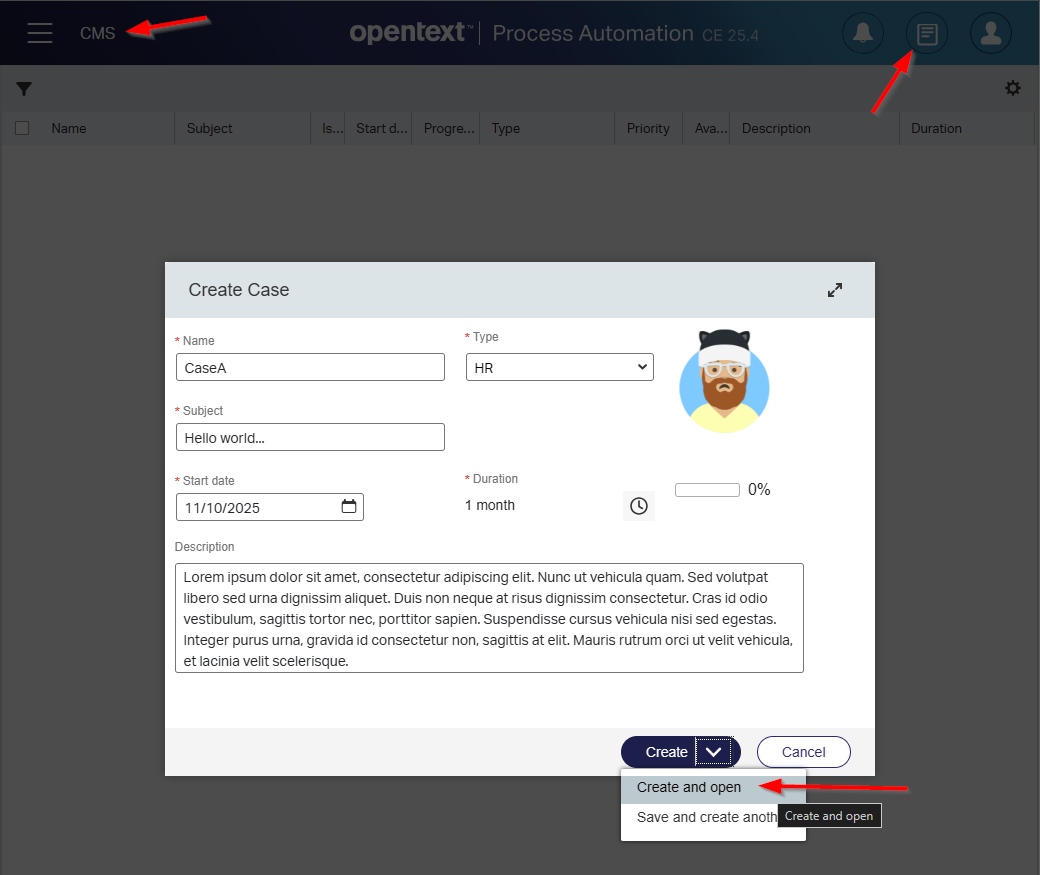
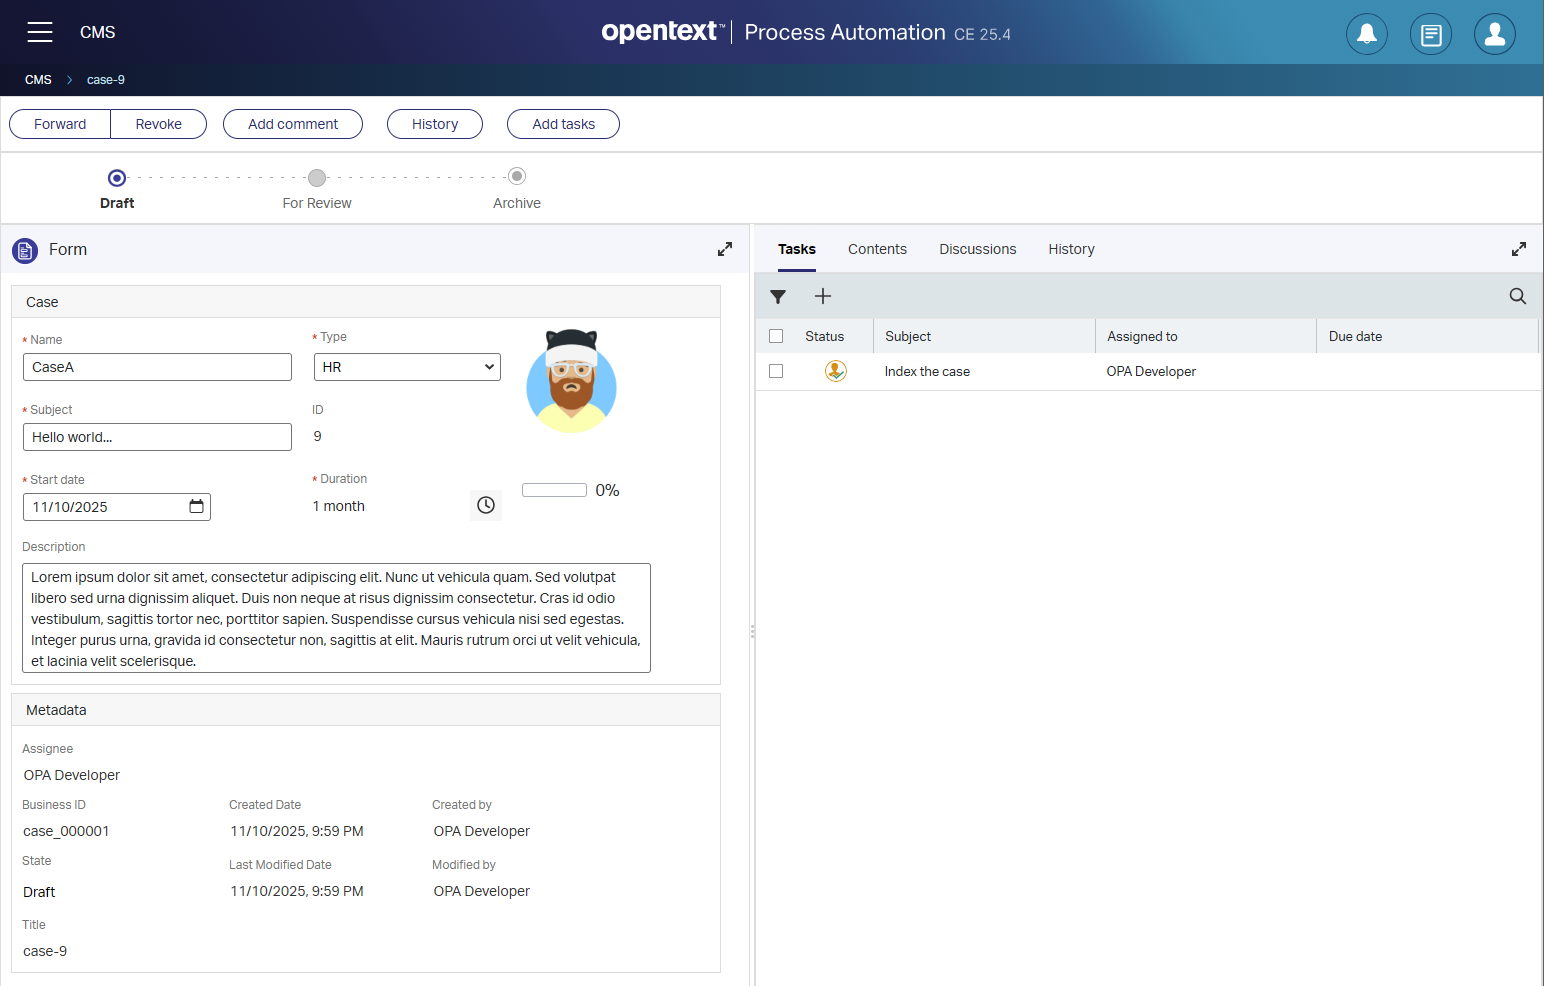
Now in runtime, you open the new homepage, and you can create a new instance of our ‘Case’ entity:
Resources for demo data:
- Get avatar images at getavataaars.com
- Generate “Lorum Ipsum” dummy text at lipsum.com
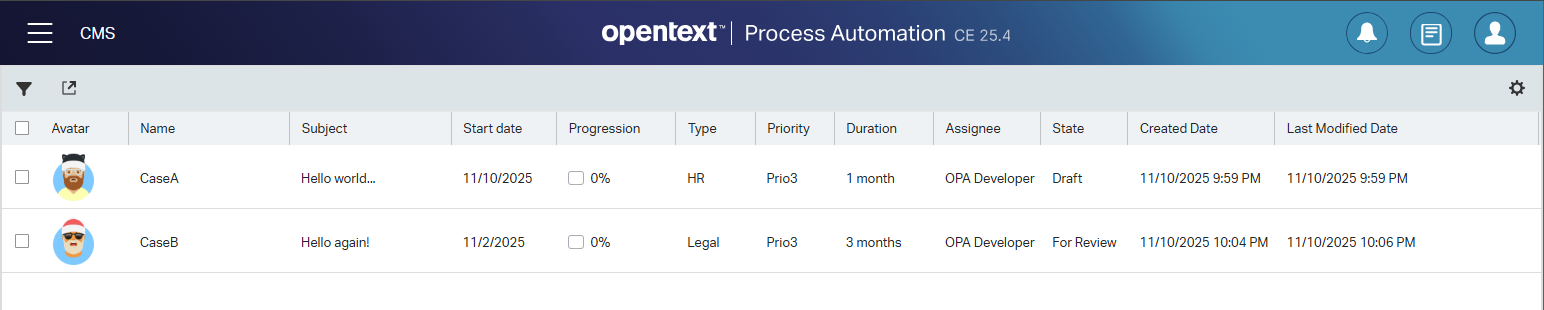
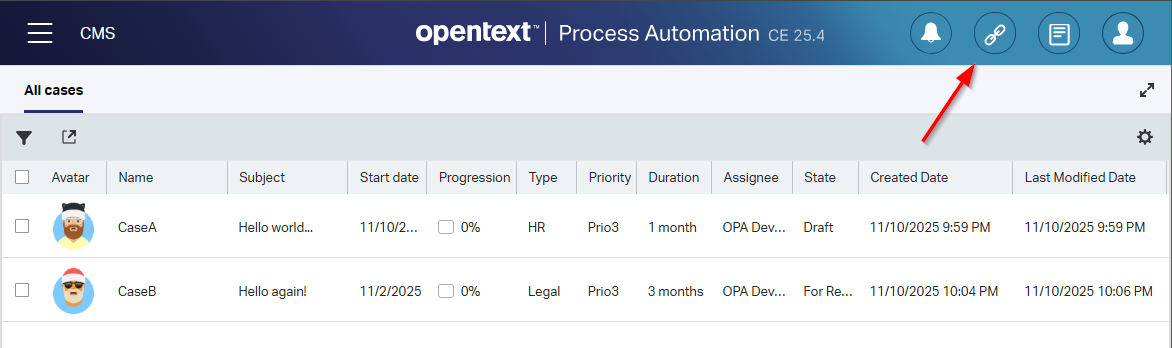
And after creation, you’ll have a view like this in the list:
And a view like this for the instance:
All basic stuff, you should be familiar with by now (if you follow my blogs for the last 7 years!) with a project overview like this:

The move for Garbage Bin implementation
You already saw a glimpse in the ‘Case’ entity with the property case_is_garbage. I removed it from all the UI as it’s a back-end property for us to filter out cases. So, the first thing we need to do is filter out the current ‘All cases’ list and add a new ‘Garbage Bin’ list.
This is the filter on the ‘All cases’ list:
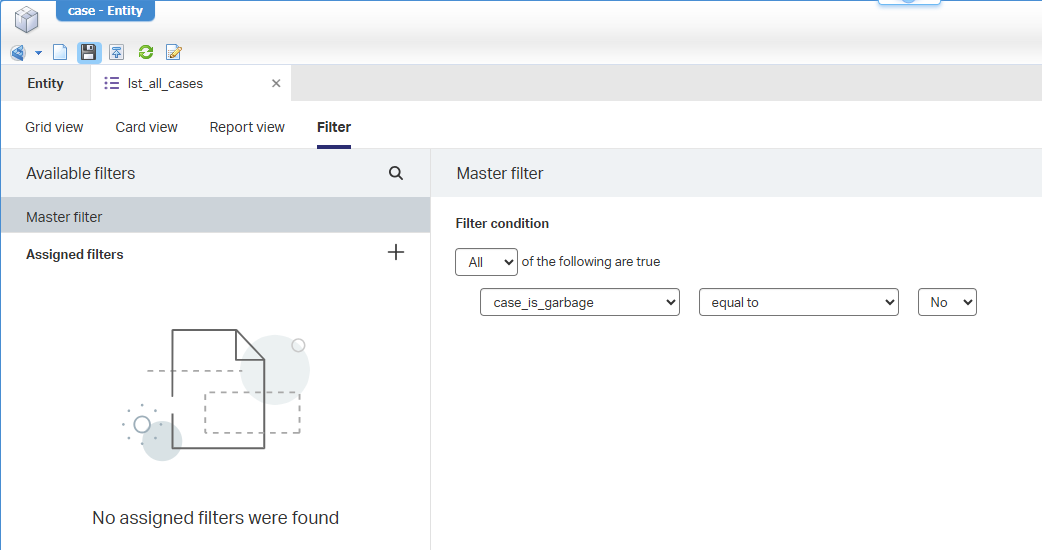
Our new list (as copy from lst_all_cases), will have the name lst_garbage_cases. It will have the opposite filter in place case_is_garbage == true. We don’t expose this list in any ‘List’ panel, BUT we should not forget to make it available from a ‘Security’ BB perspective for the fun_case_worker role; a task on your own.
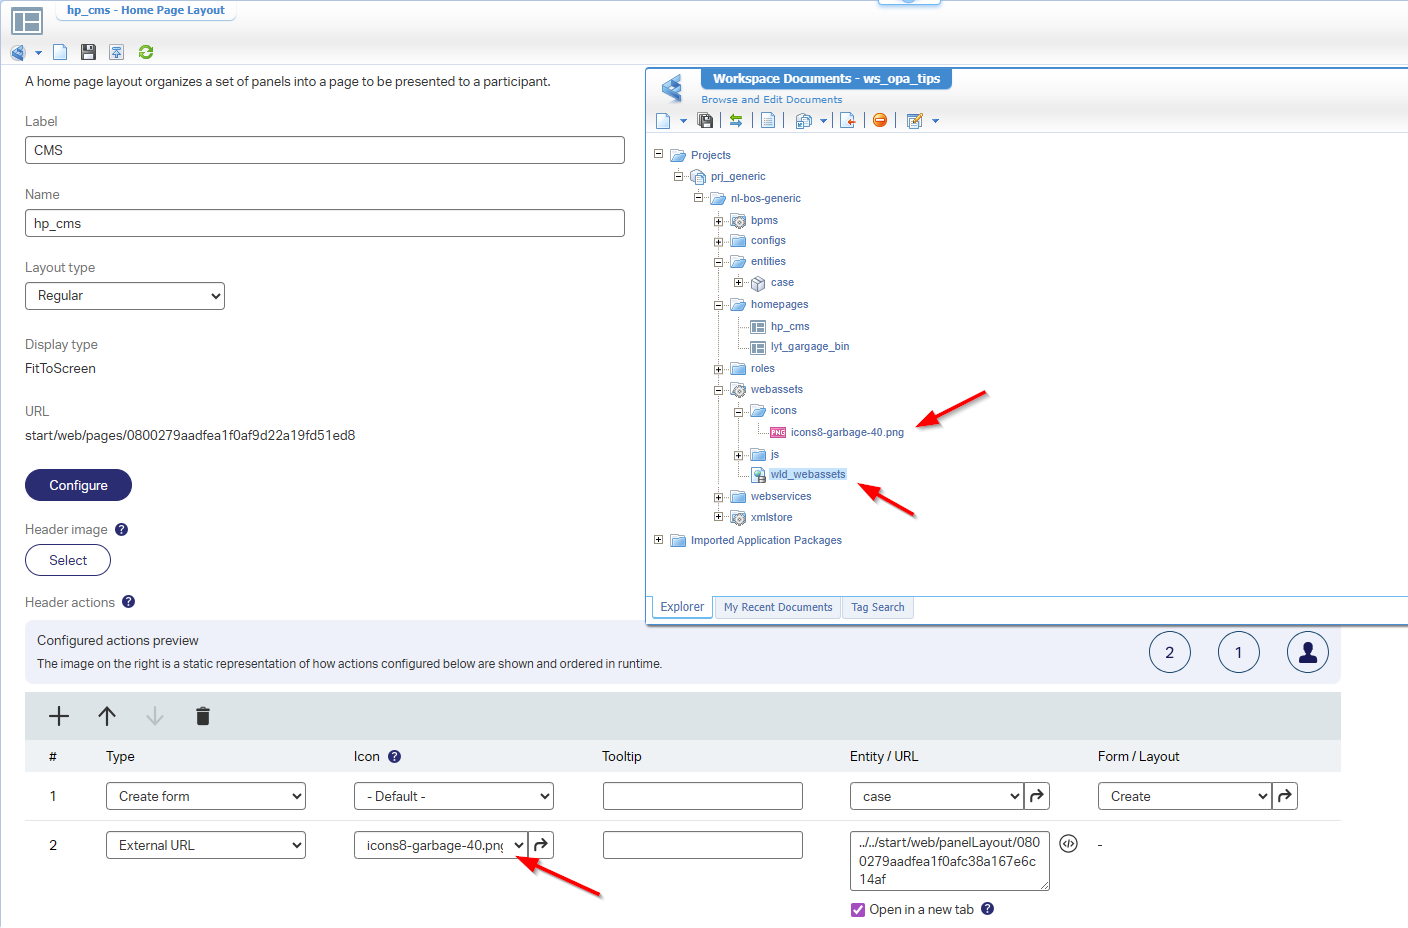
From the homepage perspective, we can now create a new action calling an external URL opening our list in a new tab:
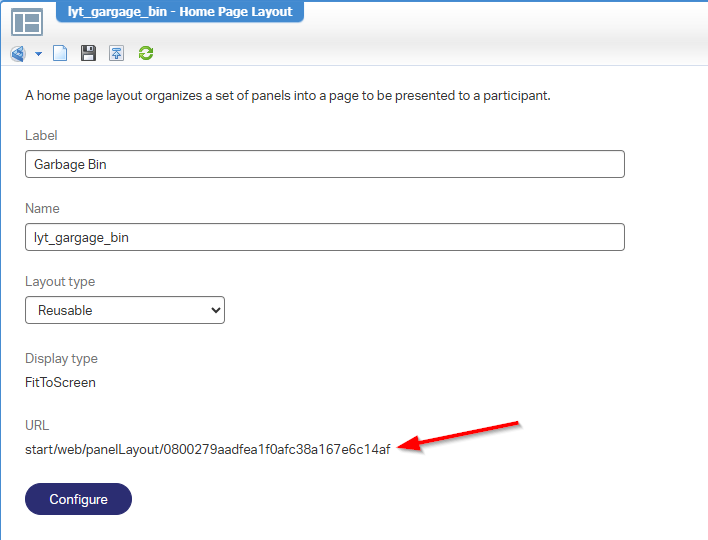
Now for that question: Where to get that URL value? Great, for this we create (again!) a new document of type ‘Home Page Layout’. We name it lyt_gargage_bin as it’s a reusable type of layout with a static URL:
Notes:
- I convert it to a relative path with extra
../../- Behind the ‘Configure’ button is only a ‘Result’ list panel showing the list
lst_garbage_cases- AND…Don’t forget the runtime security for this new layout!
After a publication, you can view the “Garbage Bin” from behind this link:
You can even change the icon (40x40) exposing it via a ‘Web Library Definition’
With the garbage bin link available, we can now craft the action to move a case to the garbage bin! That will be a new ‘Rule’ BB of type ‘Action’ with the name a_delete looking like this:
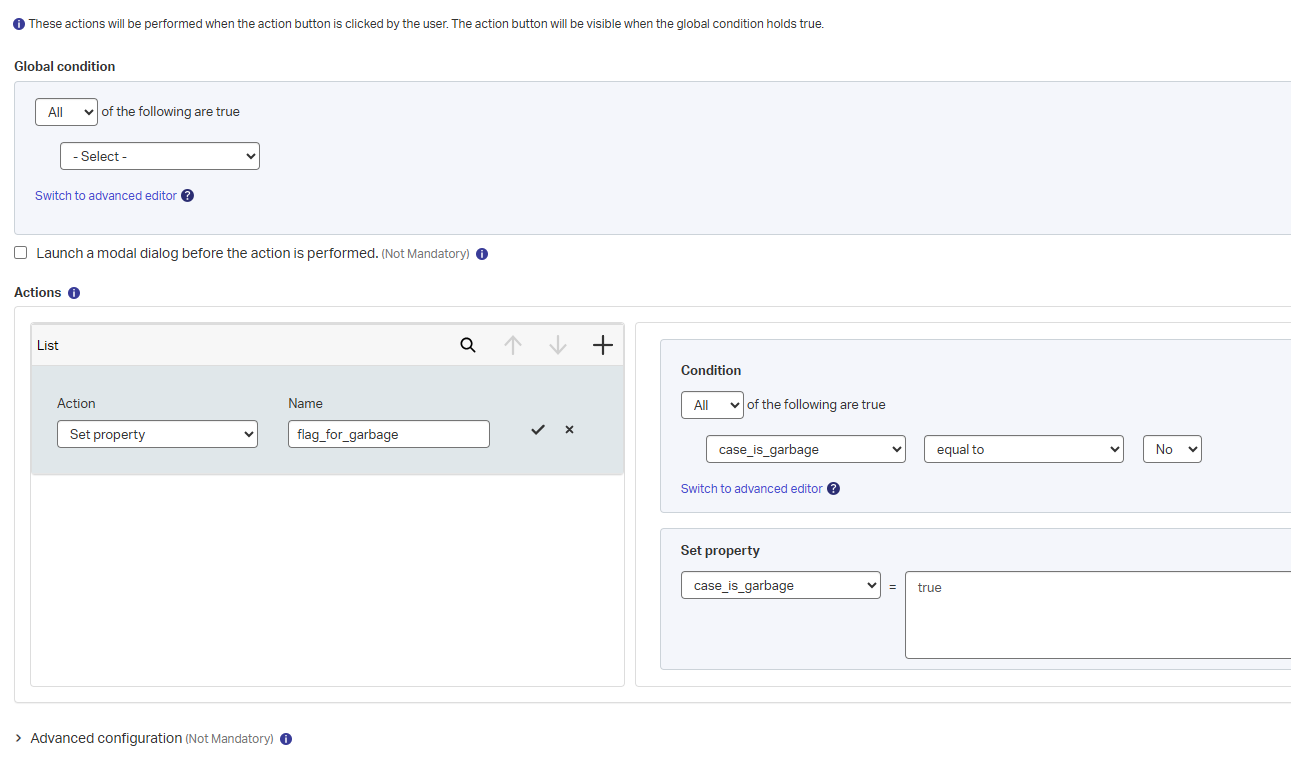
You can play with an extra “Cancelable” type of form to show an extra modal dialog with “Are you sure?”…I leave it with you.
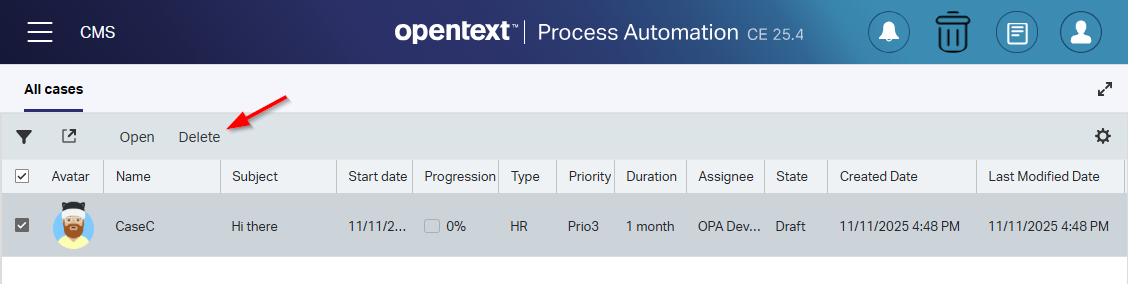
To make this action available, we’ll mark it in the ‘Security’ BB, AND we add it as action to both our action bars (ab_case_list and ab_case_view). After publication, you can “Delete” to the garbage bin:
To restore it, we need to create a a_restore action rule like this:

We can make (ONLY!) this new action available from a new action bar ab_case_garbage which we apply to the ‘List’ lst_garbage_cases. Now the only thing left is exposing this action from a ‘Security’ BB standpoint!
After publishing, deleting items, and opening the garbage bin, you can do things like this:
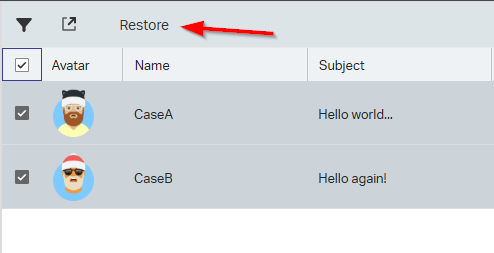
NICEEEEE! 🤠
One quick improvement we can add…The action bar ab_case_garbage will also have the “real” delete action available!
…
Looks to me like most requirements are implemented already…Except for this one:
1 | As an administrator, I want to configure how often the Garbage Bin gets |
Reading this carefully, gives me the conclusion of creating a schedule type of document running a BPM which loops over de garbage items, and call the ‘Delete’ operation of the ‘Web service’ BB of our entity…AHA!
So, in quick steps (as we did this stuff before):
- Add the ‘Web Service’ building block to the ‘Case’ entity
- Enable the CRUD operations where we only need the ‘Delete’ operation
- Add a new ‘Find’ operation with the name
FindGarbageCasesand add the filtercase_is_garbage = true - Update the ‘Security’ BB with the new ‘Find’-operation
- To support the entity services, you require a new service container of type ‘Application Server’. You can create it in the ‘System Resource Manager’ artifact with this input:
- Connector:
Application Server Connector - Group name:
sg_appserver - Web Service Interfaces: Mark the
Method Set Entity case(available after publication!) - Service name:
sc_appserver - Startup automatically
- Assign to the OS process (as recommended for each service container by OpenText support!)
- Connector:
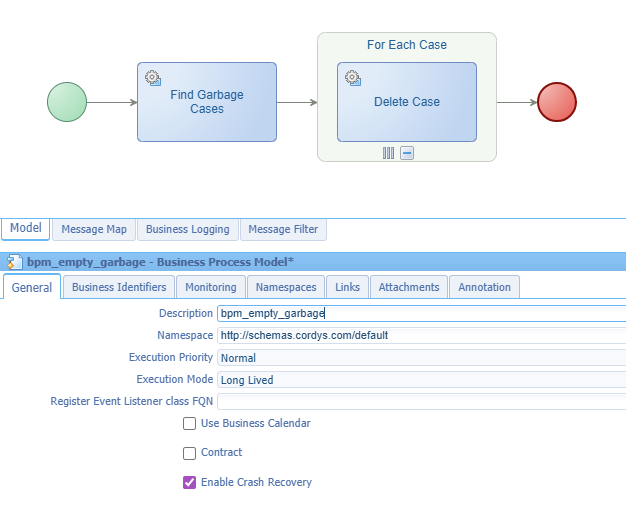
- Create a new BPM (see below) with name
bpm_empty_garbageand saved in the ‘bpms’ folder of your project. It will callFindGarbageCases, loops over the entries, and calls theDeleteCaseoperation for each entry.- You can leave this BPM to execution mode long-lived; If you make an action out of it, to clean the garbage bin on the flow, I will make it short-lived for the direct feedback in the UI
- Also, don’t forget to set the runtime security for this BPM!
- Create a new schedule type of document with name
scd_empty_garbageand call the new BPM over a self-defined period (that’s input from your administrator)! - From a ‘/system’ perspective, you want to start the ‘Schedule’ service container…If not already started automagically!
- Now you can deploy it all
- Finally, you can deploy your schedule (with or without time) from the ‘Schedule Manager’ and/or run it manually from the active schedules tab.
This is the BPM implementation:
With the consolidated view of the message mapping (nothing fancy this time):
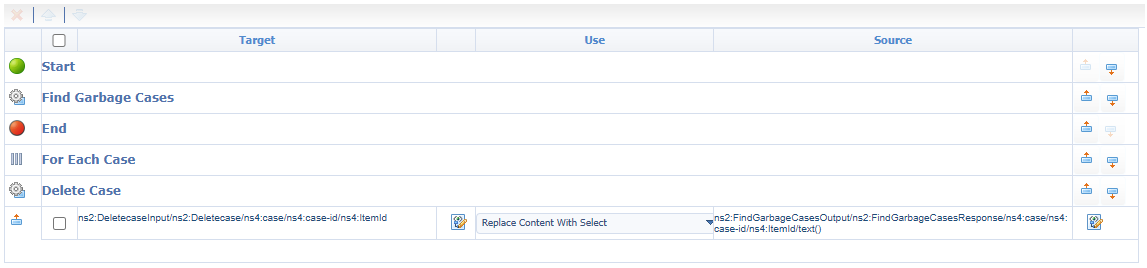
…
The end-result after running the schedules? Well, what do you think! 🙃
That’s a nice and easy to implement “DONE”. Now you see that low-code isn’t that difficult to implement nice features if you keep it simple. I always love to build these types of quick implementations and explore what edges of the platform you will face. This one was straight forward, but trust me…customers ask mostly for the impossible which is a different story. I leave it for now; Have a great weekend and CU next week in another topic about Process Automation Tips.
Don’t forget to subscribe to get updates on the activities happening on this site. Have you noticed the quiz where you find out if you are also “The Process Automation guy”?
