
Hi there “Process Automation” fans,
Welcome to a new installment of “Process Automation” tips.
We’ll continue where we left off last week…which was the basics of Node-RED. I hope you took the time to get yourself familiar with the tool as this post assumes you did some R&D yourself upfront. I explain much in this post, but a bit of extra knowledge is always good. The goal for this post? Well, that’s the creation of two executables (can be a separate flow, or one flow with two ‘inject’-nodes!):
- Calling OTDS to receive a SAMLart-token (read about it here). We save this token in a global variable within our Node-RED instance (or within the flow itself…it all depends!).
- Calling OPA specific web services (like we would also do with BPMs) using the SAMLart-token as current authenticated user.
Let’s get right into it…
Boot up your OPA VM and make sure you can login into your organization over OTDS! So, not via a platform account (like sysadmin). Make sure you also have Node-RED up and running (see post last week) and jump into your first flow adding your first nodes:

Open the first ‘inject’-node and change it like this:

This will create a new ‘input’ item to the ‘msg.’ context which is available for each flow (see it as JSON object). Our input item is of type JSON with this content part as variables we’ll use during the flow:
1 | { |
Next is the preparation of our ‘http request’-node. The ‘function’-node will prepare the payload for our POST request like this:
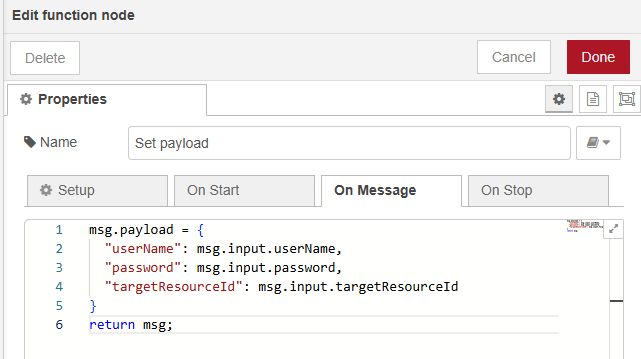
You can paste it from here:
1 | msg.payload = { |
Notes:
- The ‘msg.payload’ is a variable available out of the box during your flow.
- The value of each JSON key is a variable retrieved from our input JSON on the ‘inject’-node.
- You require the return statement; Just leave it.
- Don’t worry about the other tabs; We don’t need them for this post.
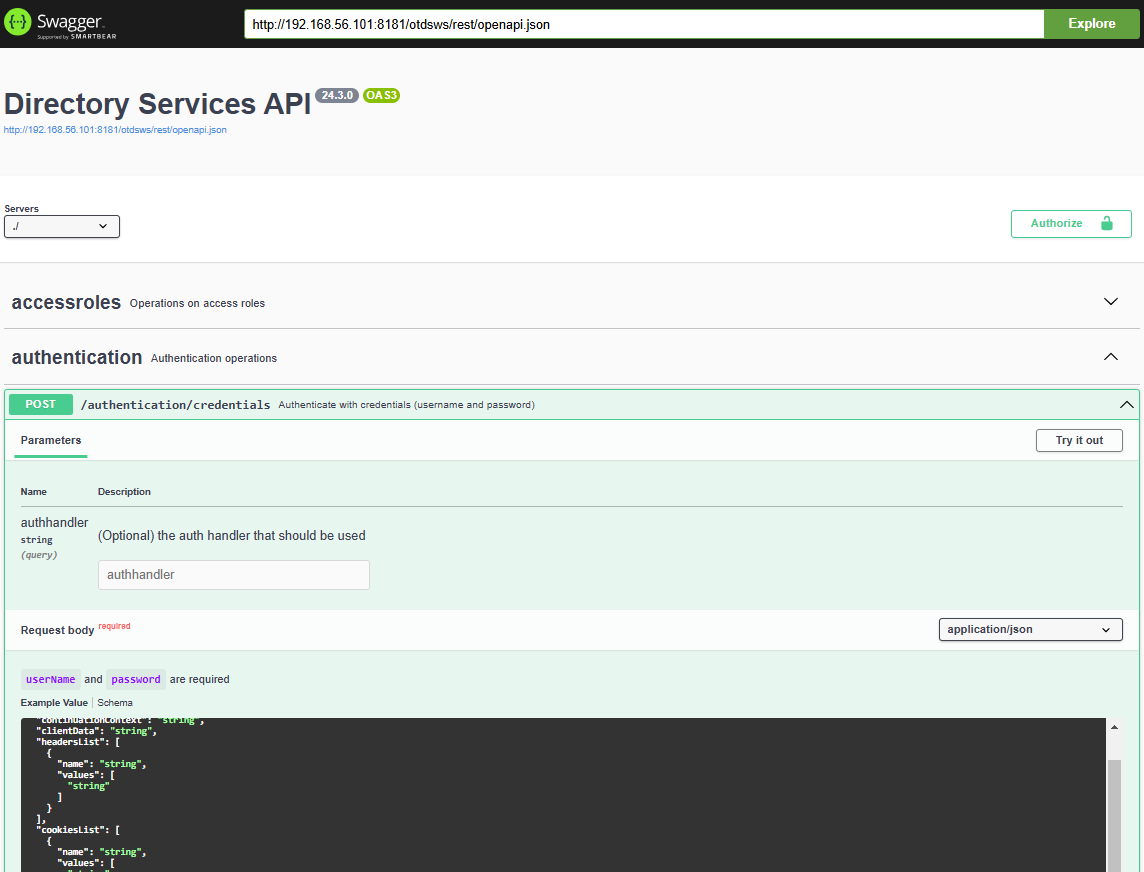
If you wonder where this JSON “payload” is received from, have a look at the OTDS API behind this URL: http://192.168.56.107:8181/otdsws/api/index.html#/authentication/authenticateWithPassword
Next is setting the correct URL for our HTTP POST request:
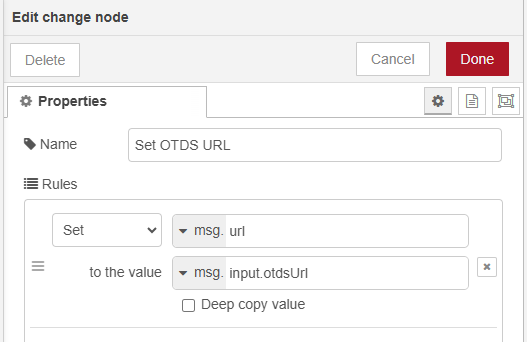
Notes:
- The ‘msg.url’ is available when you add the http-request-node into your flow…Yes, it’s magic!
- Why not set the URL directly in the ‘http-request’-node? Well, on that node you can’t use variables!? Don’t shoot the messenger…That’s how it works in Node-RED!
Now for our ‘http request’-node (where you leave the URL empty!):
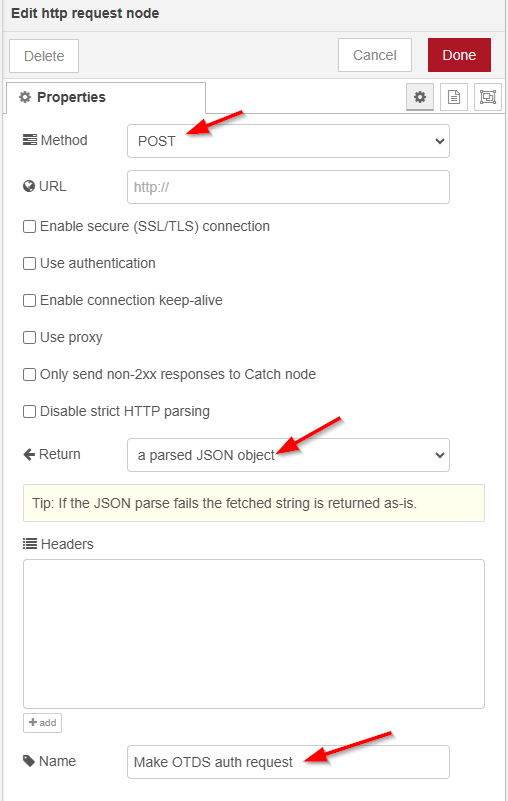
Don’t forget indeed to set the return value to JSON which makes it easier for the next step to read our OTDS ticket!
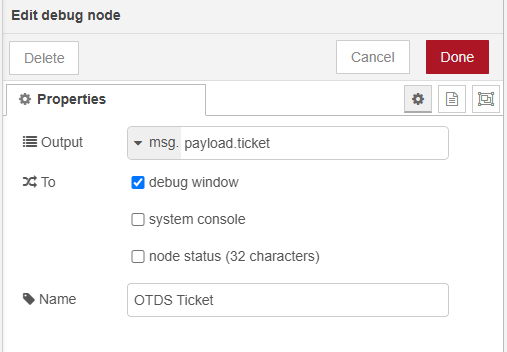
Finally, our ‘debug’-node as elegant as this (reading a JSON response!):
…
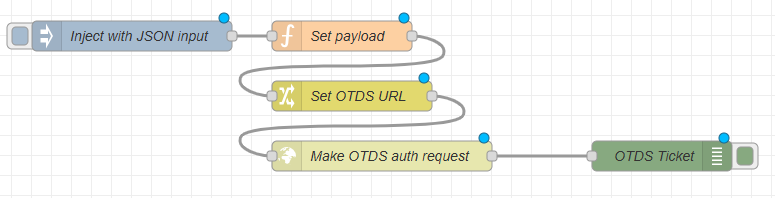
This is your first flow (after some restructuring):
Don’t forget to hit that red “Deploy” button in the top right. Once done, you can hit that small button in front of the ‘inject’-node where some magic will happen (with an OTDS ticket as a result!):
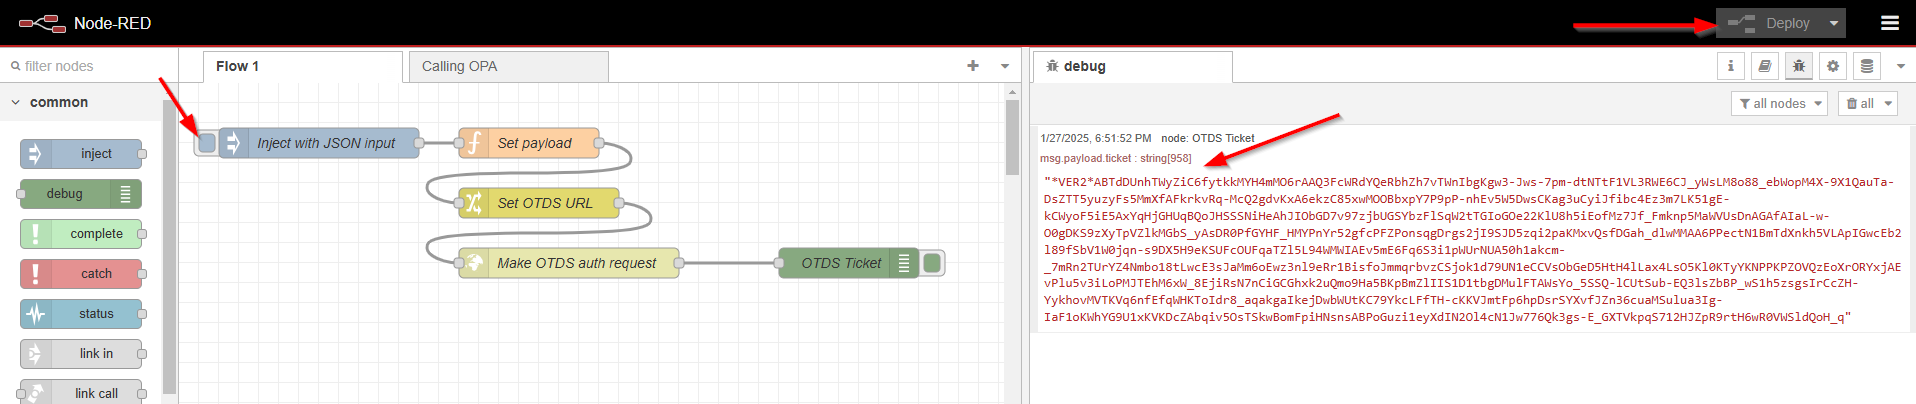
NICEEEEEEE! 😎 🤟
…
Next step is to convert the OTDS ticket to a SAMLart ID/token for further communication with the OPA platform. So, start with a copy of the middle three nodes and make sure to connect our last ‘http request’-node with the new ‘function’-node where we will set the payload (in the ‘function’-node) to this XML-part:
1 | <SOAP:Envelope |
Notes on this XML:
- User single quotes
'for the attribute values.- Linearize this XML into one long string; We need to put it between to double-quotes in the ‘function’-node!
- You see a variable in this XML
msg.payload.ticket; Make sure it matches the previous outcome.- Also watch the string
urn:api.bpm.opentext.comin this XML; Don’t make the mistake to use thisurn:api.ecm.opentext.com(which I see passing by at forums as well)! This last one will return an invalid SAMLart ID (ending with==…I guess it’s an encryption thingy!?) with this errorUnable to bind the artifact to a SAML assertion.as a result when you use it on any further requests!
Set the URL (in the ‘change’-node) for the request to msg.input.opaUrl and make sure the request itself is again a POST request, but with a UTF-8 string as return value (as we expect XML and not JSON!)
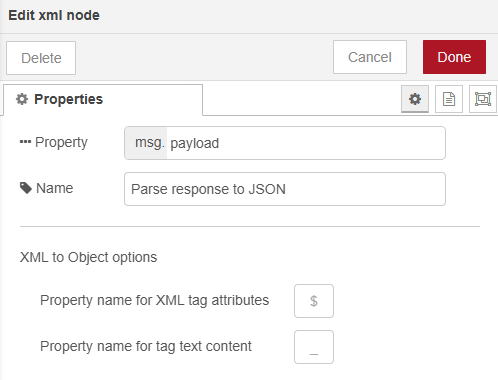
The power of Node-RED is JSON, so the response of the HTTP request is convertible from XML to JSON via the ‘xml’-node!
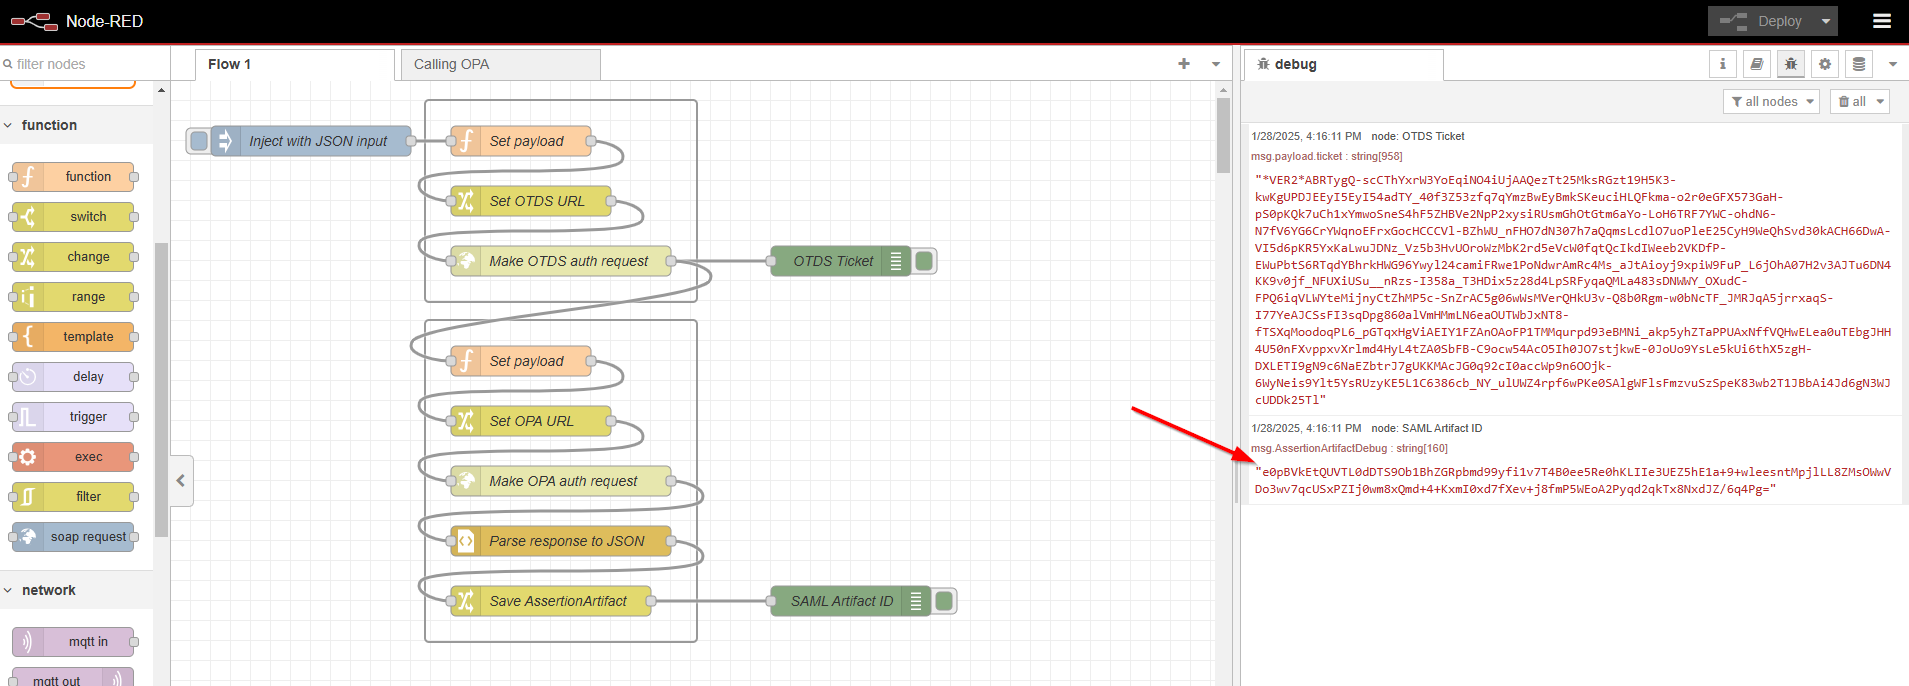
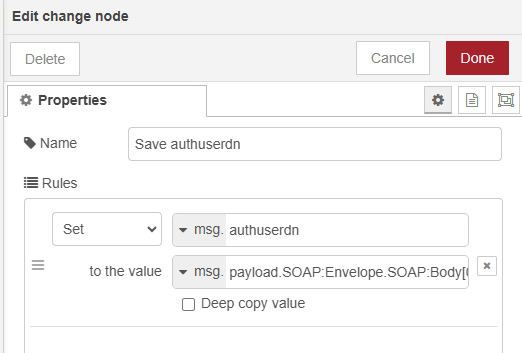
After this parsing magic, we need to get a grip on the SAMLart ID with a ‘change’-node like this (saving it into a global variable within our node-instance AND across flows; Or maybe better as variable within our flow when multiple users are using it…I go for the last one!)

Notes:
- Make sure you save it in the
flow.context!- This is the value to use (from the XML to JSON conversion):
payload.SOAP:Envelope.SOAP:Body[0].samlp:Response[0].samlp:AssertionArtifact[0]._- I also add a second rule to set a
msg.AssertionArtifactDebugvariable. Why? The next ‘debug’-node can only read from themsg.context…Don’t shoot the messenger again…That’s how it works in Node-RED!
Do your deployment and watch this as a result:
…
I’ll grab a drink first before we continue…
By the way; You can always add extra ‘debug’-nodes as “junction” on a wire between two nodes (from the right-click menu!). Highly efficient when you get stuck and need an extra pair of eyes! Have also a look at the options in the ‘debug’-node as you can also write to the console (which is helpful when your output is too long for the right panel!). “The console” is in your VM where you execute the node-red command.
Ohw…At the end of this post you can download our flow in JSON format which you can also easily import into your Node-RED instance! So, don’t worry to miss the boat! 🐳
…
Our next goal is calling an OPA service! I choose GetUserDetails without any parameters to get the current user details. If we can do this service, the other services are a piece of cake! The first choice to make is if you want to make it a new dedicated flow (reusing a global SAMLart ID across flows), but for this post we’ll add a second ‘inject’-node in the current flow.
Be aware that a SAMLart ID will expire over time; You can create some logic to check this, and to trigger you to create a new SAML ID…A task on your own!
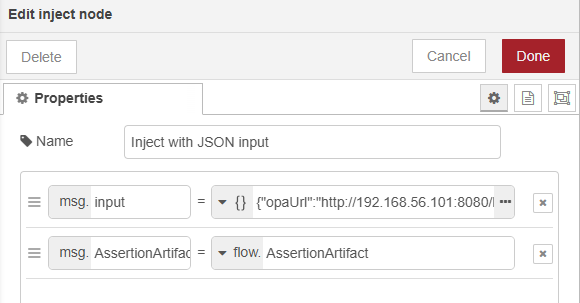
Now let’s make a copy of the last group of nodes and put a new ‘inject’-node in front of it where we only require the OPA URL as input:
1 | { |
We can also make this a direct variable, but I like to be consistent…That’s just me!
The ‘function’-node (to set the “payload”), will have this as a request (make sure you linearize it!)
1 | <SOAP:Envelope |
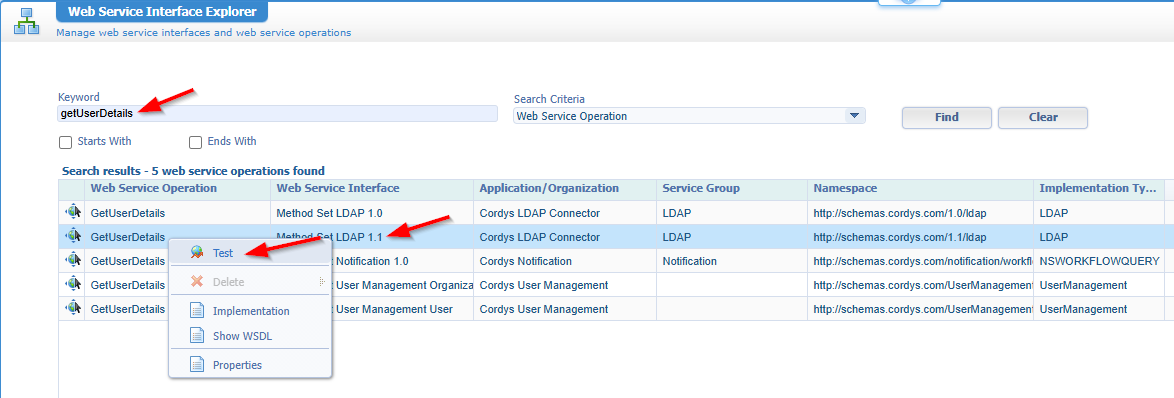
This is exactly as you would call it also from the ‘Web Service Interface Explorer’ artifact in our beloved OPA platform.
You can leave the ‘change’-node (to set the OPA URL) as is. That’s almost the same for the ‘http request’-node, but for this one you want to pass the SAMLart ID. Only, you can’t read it from the ‘flow.’ context in this node, so we work around this adding it as ‘msg.’ variable in the ‘inject’-node!
So, this is the ‘http-request’-node:
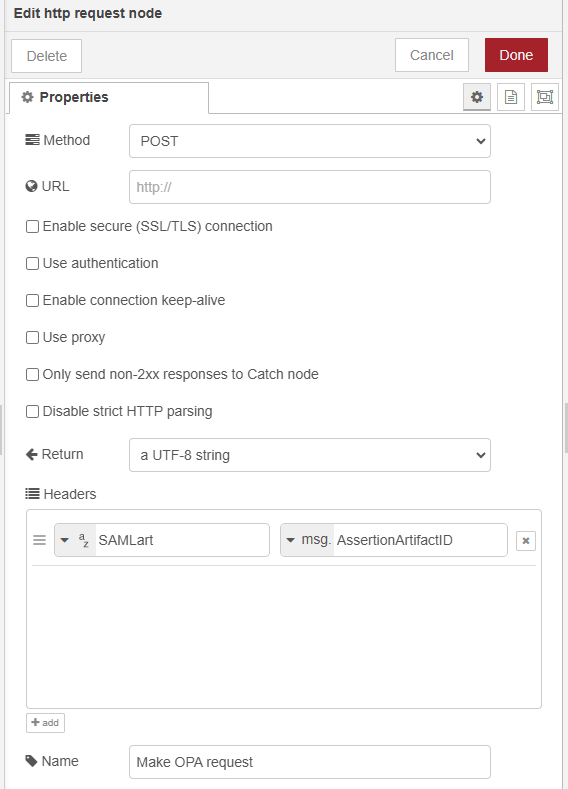
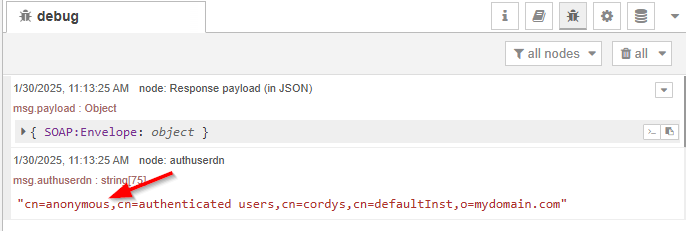
If you don’t pass the SAMLart in the header of the request, you call the OPA platform anonymously! This will work for our sample
GetUserDetailsrequest, but normally you will get an “access denied”! You also don’t want to access the platform anonymously…Read more here.
This is the ‘inject’-node update:
After the JSON parsing (you can leave it as is), we want to know if our request is non-anonymous! For this we save the ‘authuserdn’ from the response into a variable from the next ‘change’-node:
This is the string to grab the value:
payload.SOAP:Envelope.SOAP:Body[0].GetUserDetailsResponse[0].tuple[0].old[0].user[0].authuserdn[0]
Finally, we debug it all out with a result like this (after hitting our new ‘inject’-node):
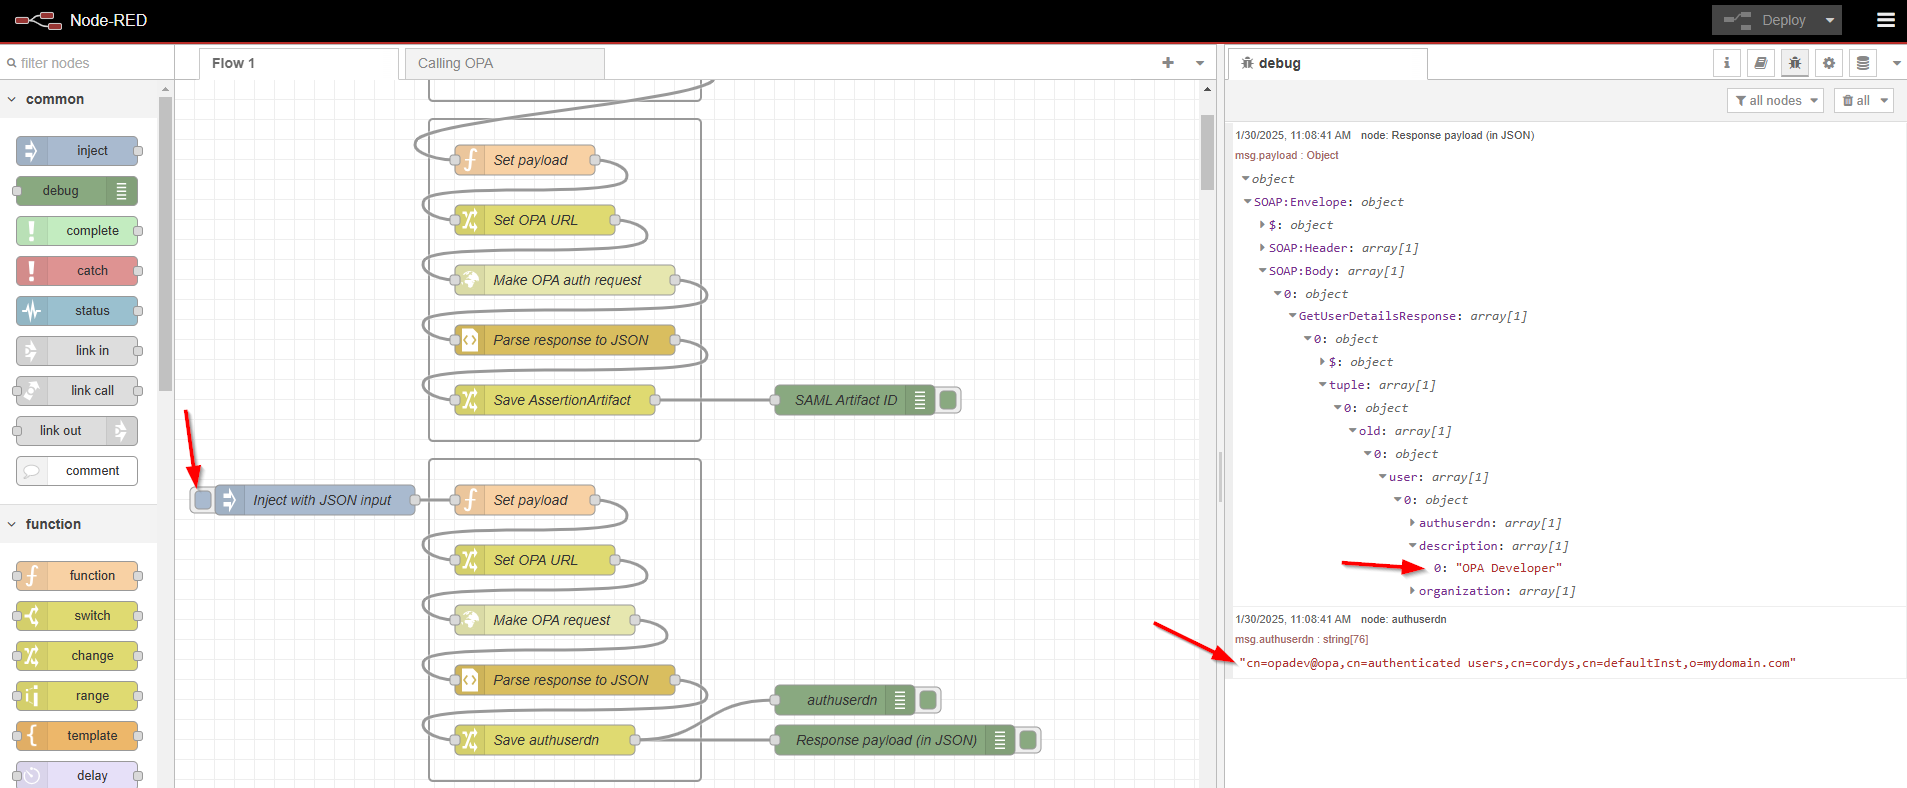
How nice…I hope you also start to see the power of Node-RED now!
This is the output on an anonymous call (with a missing SAMLart in the header):
…
Well, that’s it…Our first valid and authenticated call to OPA services via Node-RED. You can give the flow a name in the properties, and you can also export it as JSON for consumption/importing it into another Node-RED instance. Here is the implementation JSON-file (of this post) for you to download, and to import into your Node-RED instance!
We accomplished a great “DONE” where we learned a lot about Node-RED and the consumption of the OPA SOAP services of our beloved platform. I hope you now see the possibilities with this tool too. Next week we’ll continue our journey to see if we can call our Node-RED flow from an OPA point of view (so, from a BPM!). WHAT? Is this possible? Well, let’s see next week in another great post at “Process Automation Tips”…Cheers! 🍻
Don’t forget to subscribe to get updates on the activities happening on this site. Have you noticed the quiz where you find out if you are also “The Process Automation guy”?
