
Hi there AppWorks fans,
Welcome to a new installment of AppWorks tips.
I placed the “Java Message Service”-topic on my backlog a long time ago, but as my customer asks for it and we’re all very, very curious on the value it can bring to our beloved platform…It’s time…
1 | This is the moment, this is the day |
Continue your listening here
Let’s get right into it…
My first journey on Apache ActiveMQ starts here.
Apache ActiveMQ - Flexible & Powerful Open-Source Multi-Protocol Messaging
2
3
4
5
6
7
8
9
message broker. It supports industry standard protocols, so users get the
benefits of client choices across a broad range of languages and platforms.
Connect from clients written in JavaScript, C, C++, Python, .Net, and more.
Integrate your multi-platform applications using the ubiquitous AMQP protocol.
Exchange messages between your web applications using STOMP over websockets.
Manage your IoT devices using MQTT. Support your existing JMS infrastructure
and beyond. ActiveMQ offers the power and flexibility to support any messaging
use-case.
After some reading, understanding (which you can do on your own), and searching, I continue my installation following these steps. Also, this was a valuable post to read.
…
I install ActiveMQ next to my current AppWorks (incl. OTDS) installation on the same ‘Oracle Virtual Box’ VM. My OS is RHEL developer edition.
Boot up the AppWorks machine, login to your VM via MobaXterm (I have an account with name sysadmin) and have a double-check on your Java version (java -version); I run currently: openjdk version "17.0.6" 2023-01-17 LTS.
The next step is to follow some bash commands to install Apache ActiveMQ; I run version 5.18.2:
1 | wget https://dlcdn.apache.org/activemq/5.18.2/apache-activemq-5.18.2-bin.tar.gz |
That last command brings you into the root location to start and stop ActiveMQ:
- Start with direct console output:
./activemq console - Start as background process:
./activemq start - Stop ActiveMQ:
./activemq stop - Do a restart:
./activemq restart
Find more information on these and other parameters here
Before I start my ActiveMQ instance (as background process), I will make one extra change in the configuration where we can replace the ‘host’ value to 0.0.0.0; Why? Otherwise, the webconsole is not accessible from your local laptop and listens only on “localhost” (which is my minimal installed RHEL console):
1 | vi /opt/apache-activemq-5.18.2/conf/jetty.xml |
You can exit the VIM-editor with
:wq(Write/Quit)
…
Hmmmm, I also experienced a change in another file as well; Why? To avoid a ReST call exception (again from my “local” laptop to my “remote” VM) with error Origin null is not allowed to call this agent:
1 | vi /opt/apache-activemq-5.18.2/conf/jolokia-access.xml |
…
Now, start ActiveMQ with ./activemq start…Your laptop will do some fan-spinning-activity where we can do a double-check on these commands:
1 | netstat -tulpn | grep 61616 |
The ‘netstat’ commands should return both one result on IP 0.0.0.0; Port ‘8161’ is the admin webconsole; Port ‘61616’ is ActiveMQ itself! The last command is your eye on the monitoring part of ActiveMQ!
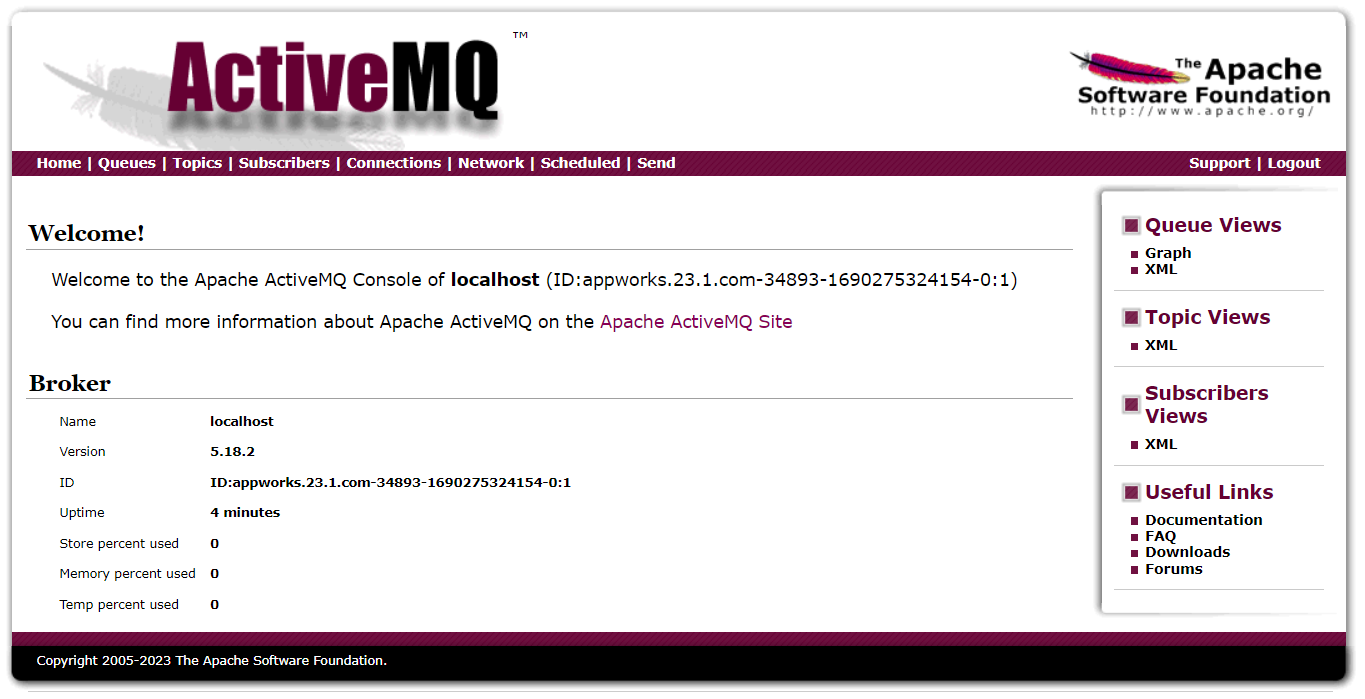
Now what to do? Well, let’s open URL http://192.168.56.107:8161/admin where you get prompted for these credentials:
- Username: admin
- Password: admin
Just for you to know; The ReST part (where we remove the ‘strict-checking’) of ActiveMQ is accessible via: http://192.168.56.107:8161/api/jolokia/list
Back to the admin webconsole…
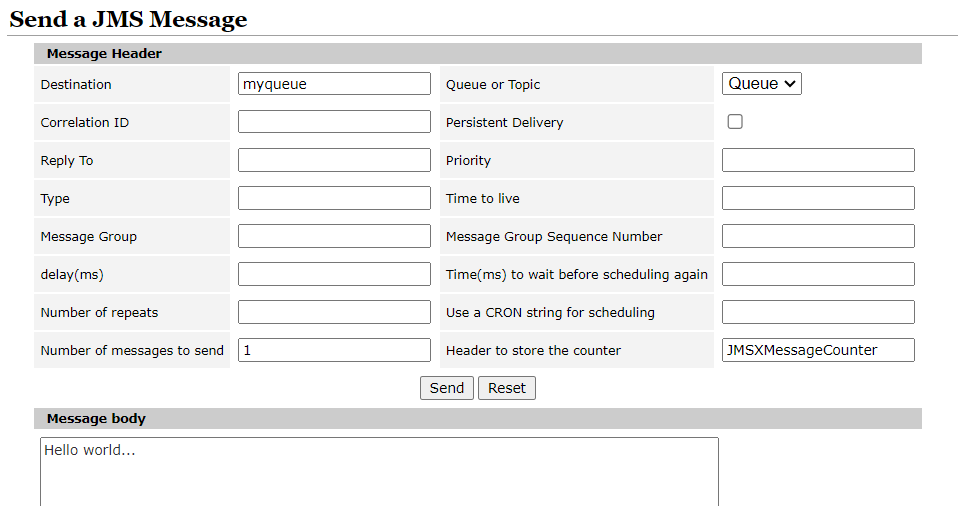
Now just follow these first grinding steps to test functionality:
- Navigate to “Queues”
- Add a queue name
myqueueand hit the ‘Create’ button - In the ‘Operation’ column for this new queue, hit the ‘Send To’ link to scratch a new JMS message…I only change the message body and hit ‘Send’
We have now one “pending” message on our queue, but we don’t have any consumers picking it up…And…That’s exactly where our follow-up post (next week), will continue!
One final question…What exactly is the difference between “Queues” and “Topics”? Read all about this one here; I’m already familiar with “Topics” from my interests of MQTT over Raspberry Pi…I whole new world to explore for IoT, home-automation, and ali-micro-electronics! Only, not for this blog-site! 😁
A fairly easily “DONE” which I didn’t expect; The only hard part was finding out the configurations for the ‘host’- and ‘strict-checking’-part. Well, it can’t always be difficult; What I always say: “If I can do it, you can do it too!”. Have a good weekend…Next week we’ll dive into the “OpenText JMS Connector” part!
Don’t forget to subscribe to get updates on the activities happening on this site. Have you noticed the quiz where you find out if you are also “The AppWorks guy”?
