
Hi there AppWorks fans,
Welcome to a new installment of AppWorks tips.
Boy-O-Boy, did I see a great demo from the Product Owner of the AppWorks platform himself! If you think the EIS connector is boring and an unusable feature, continue reading as it will turn your world up-side-down this time…
- Remember this post about creating an EIS connector yourself?
- Remember this post about an introduction on the “new way” of EIS connector usage?
Well, it looks like I missed the ‘power’-part in that last post where we generate EIS entities usable for our solution…And guess what! NO-coding!, and the EIS connector boilerplate code gets updated as you low-code your thing. WoW…Let’s see this in practice with a nice example where we initialize our own OpenAPI specified CRUD operations with Spring Boot and manipulate this exposed ReST endpoint with an EIS entity from the platform. Yes my friends…That’s the power of a ‘loosely coupled’ integration from external data into AppWorks!
Let’s get right into it…
After this great introduction it’s first time to initialize our OpenAPI ReST endpoint! I told you, no requirement for coding from the AppWorks point of view, but to make the EIS connector doing its trick we require a CRUD endpoint based on the OpenAPI specification. See it as the external legacy application somewhere in your network. Hard to do? Not if you follow this and this information.
The Spring Boot app initialization
I start at start.spring.io initializing my project with this input:
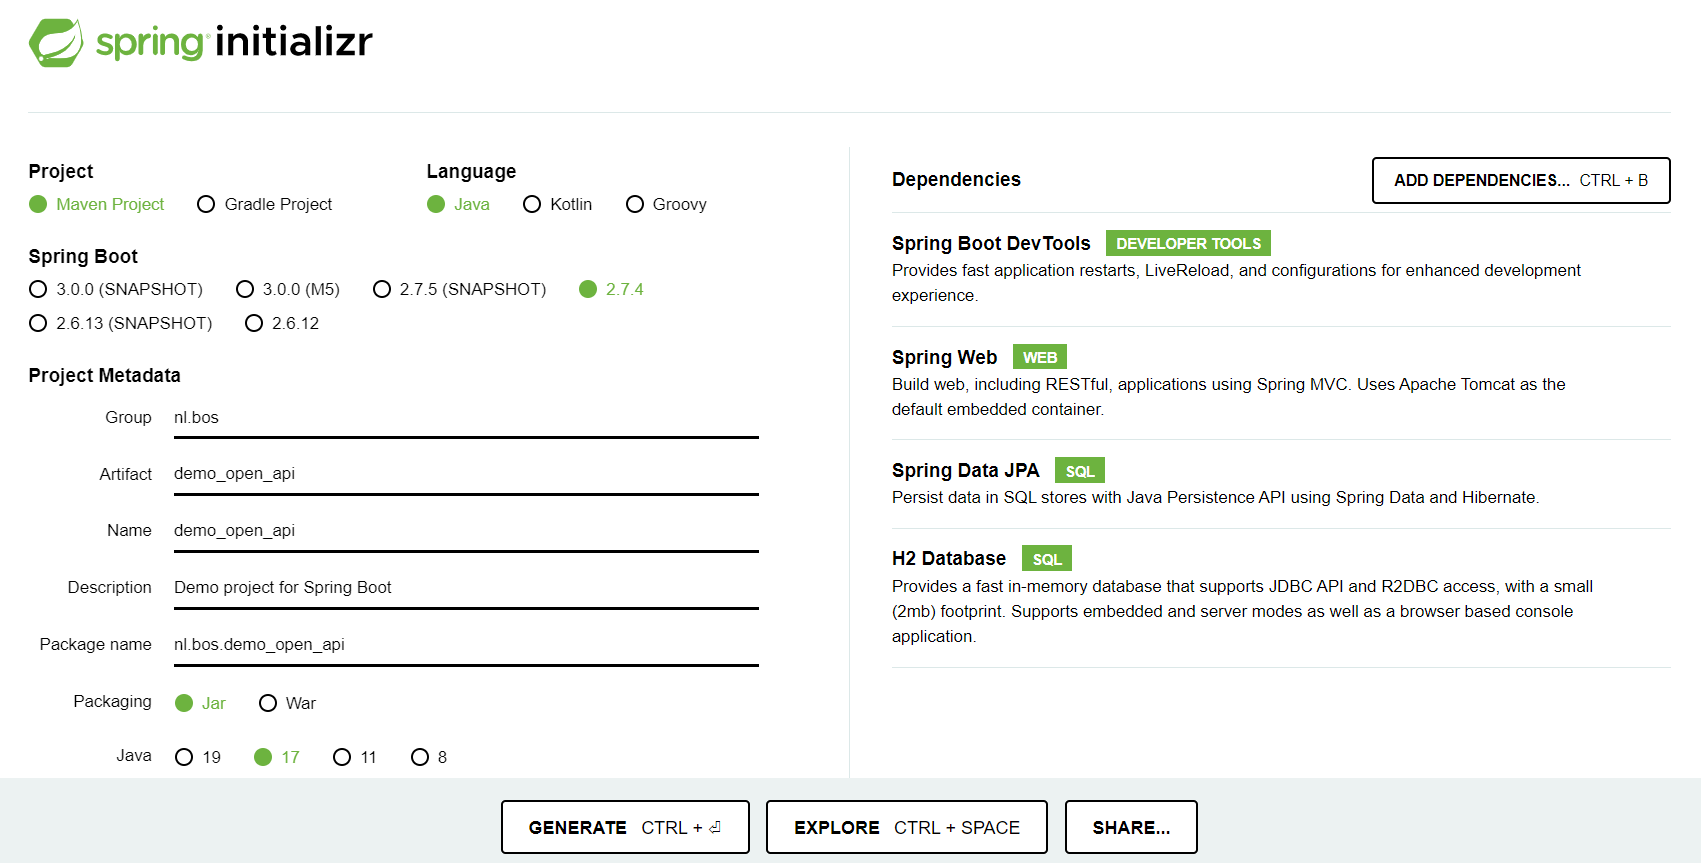
Download the ZIP, extract it, and open the sources with your own favorite IDE. I use IntelliJ opening the pom.xml file in the root of the folder. After this I edit the pom.xml file itself with a fascinating dependency:
1 | <dependency> |
With this dependency in place, it’s time to start the Spring Boot application (without any coding this far). After startup, we can open the OpenAPI description (required later in the post!) via the Spring Boot URL: http://localhost:8080/v3/api-docs/. It even includes the nice and popular ‘SwaggerUI’ documentation via URL: http://localhost:8080/swagger-ui/index.html
I built a JAR file out of my maven project which you can run via
.\openjdk-17.0.1\bin\java -jar .\target\demo_open_api-0.0.1-SNAPSHOT.jar. This JAR includes the ReST endpoints explained in the next section!
Implementing ‘Book’ CRUD operations
Time for basic coding!…Exposing new ReST CRUD endpoints for managing books! The application saves the pre-defined sample data of the books in an ‘In memory’ H2 database.
First we define the entity ‘Book’ with a ‘title’ and ‘author’ field. The ID generates itself in the database. Clean and simple like this:
1 |
|
Next step is to create a controller class managing the CRUD operations. Again, simple, and efficient like this:
1 |
|
Finally, we need a repository interface for our in-memory H2 database. How hard can it be:
1 | public interface BookRepository extends CrudRepository<Book, Long> { |
Is this all? Yes, my friend…that’s it!. All the magic happens in the CrudRepository object that beholds the power of Spring Data JPA! That’s the reason we can call those methods on the ‘repository’ object! Why the findAll() method? Well, it overrides the default findAll() of JPA which returns an Iterable object where we need a List object…That’s all.
What about all the ‘Swagger’ documentation? Well, restart you Spring Boot app, refresh the URL, and have a look at this screenshot…It’s magic!
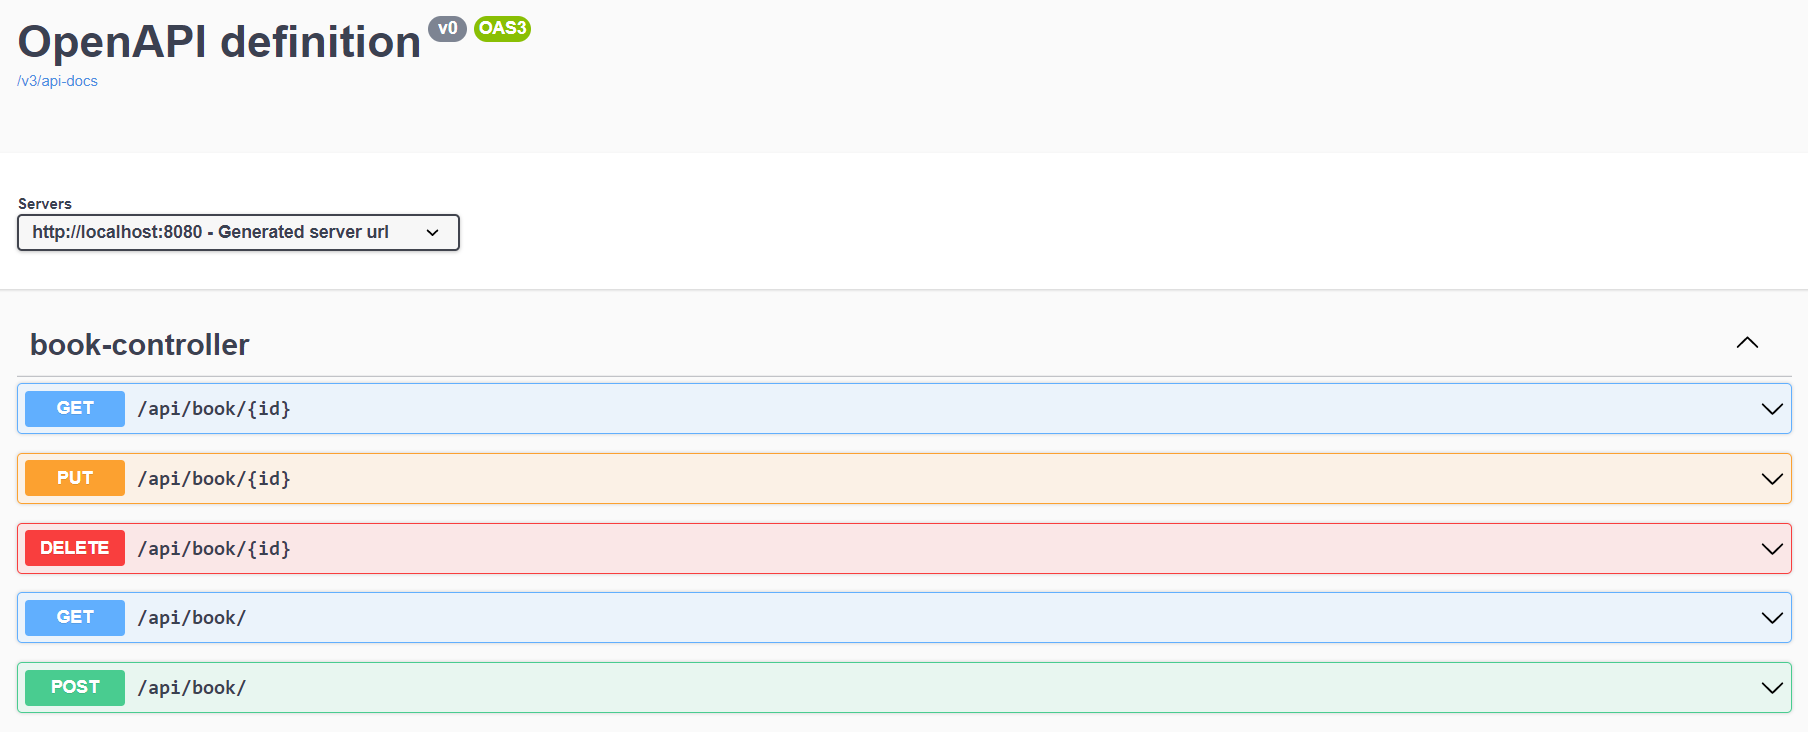
Isn’t this self-explaining documentation sufficient? Off-course you can add extra descriptions using annotations like
@Operationsand@ApiResponses…Read all about it here; not for now!
The EIS part of the post
Now the fun part of the post…Bring alive the EIS connector with some simple steps:
Enable the feature toggle (if AWP < 22.4)
The “New-way” of the EIS connector is behind a feature toggle which we can enable via these updates and commands:
1 | vi /opt/opentext/AppWorksPlatform/defaultInst/config/wcp.properties |

Next step…
EIS Connector document
In simple steps? Yes please…😋
- Create folder ‘eis’ in the “namespace” folder of your project
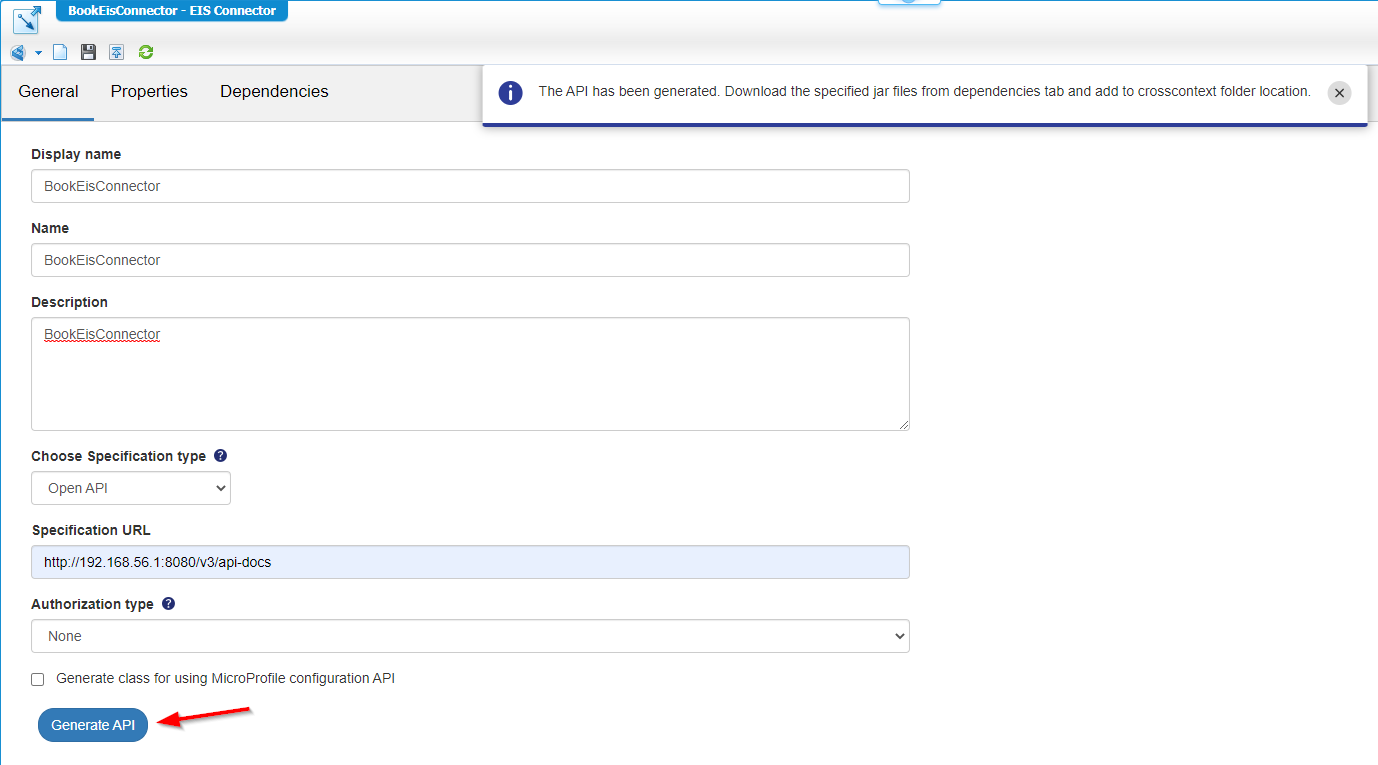
- Create a new document of type ‘EIS Connector’ is this brand-new folder with this input:
- Display name:
BookEisConnector - Name:
BookEisConnector - Description:
BookEisConnector - Specification type:
Open API - Specification URL:
http://192.168.56.1:8080/v3/api-docs(this is my local Spring Boot app URL accessed from the AWP VM!)
- Display name:
- Save it, and publish it
- Hit the ‘Generate API’ button!
- Check the root of the project
- Do not publish the new JAR definition yet as it misses dependencies on the server!
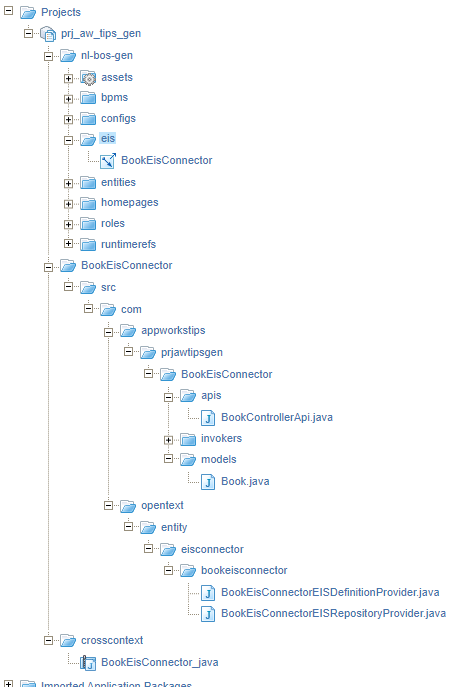
It’s all generated in the root of the project, but I don’t want to break things by moving those generated folders elsewhere! I don’t know (and don’t wanna know at this moment) what will happen when we regenerate it again when for example the API changes for an update feature!…I leave it up to you! YOLO! 🤠
Next one…
Download the dependent jars
The EIS connector itself depends on dependencies as well as the generated Java Archive Definition document. See for yourself:
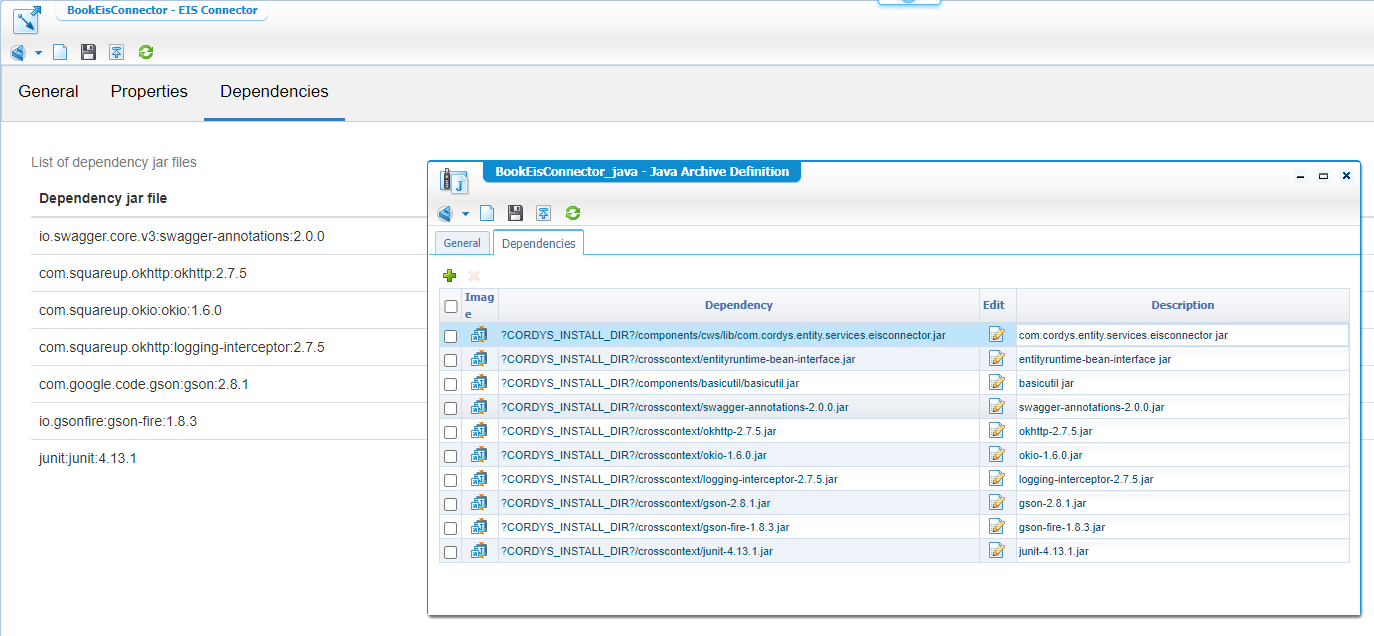
Time to download them all…Manually for now; normally via a nice Maven project! Check these locations on the interwebs:
https://mvnrepository.com/artifact/io.swagger.core.v3/swagger-annotations/2.0.0https://mvnrepository.com/artifact/com.squareup.okhttp/okhttp/2.7.5https://mvnrepository.com/artifact/com.squareup.okio/okio/1.6.0https://mvnrepository.com/artifact/com.squareup.okhttp/logging-interceptor/2.7.5https://mvnrepository.com/artifact/com.google.code.gson/gson/2.8.1https://mvnrepository.com/artifact/io.gsonfire/gson-fire/1.8.3https://mvnrepository.com/artifact/junit/junit/4.13.1
Upload the downloaded JAR files to the server in this location /opt/opentext/AppWorksPlatform/defaultInst/crosscontext and set the permission and security (“open for all”…we’re developers!):
1 | sudo chown tomcat:tomcat /opt/opentext/AppWorksPlatform/defaultInst/crosscontext/* |
Now you can safely publish the JAR definition of the EIS connector. After this, I also restart the whole VM again: sudo reboot…A TomEE restart should be sufficient, but just to make sure!
Next…
EIS Repository configuration
What is the EIS connector without an EIS repository configuration!? Yes, nothing…Just add it:
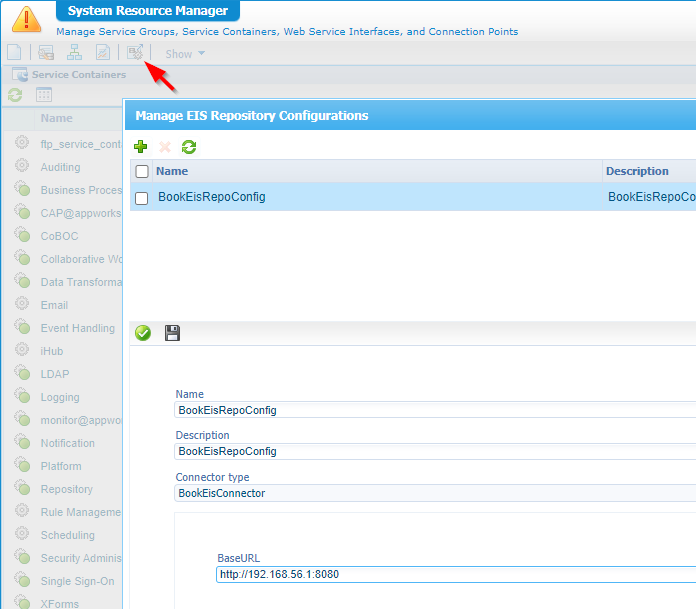
- From the ‘System Resource Manager’ artifact in your own organization, click the ‘Manage EIS Repository Configurations’ button in the top button bar…I know; it’s small, but it’s there…Add a new one with this input:
- Name:
BookEisRepoConfig - Description:
BookEisRepoConfig - Connector type:
BookEisConnector
- Name:
- Save it, and close the artifact
That’s it…next!
EIS Repository reference
Eventually you want to make your EIS feature/repository available in runtime via a reference (like you also expose runtime references when needed in runtime!).
- From the ‘eis’ folder, create a new document of type ‘EIS Repository Reference’ with this input:
- Display name:
BookEisRepoRef - Name:
BookEisRepoRef - Description:
BookEisRepoRef
- Display name:
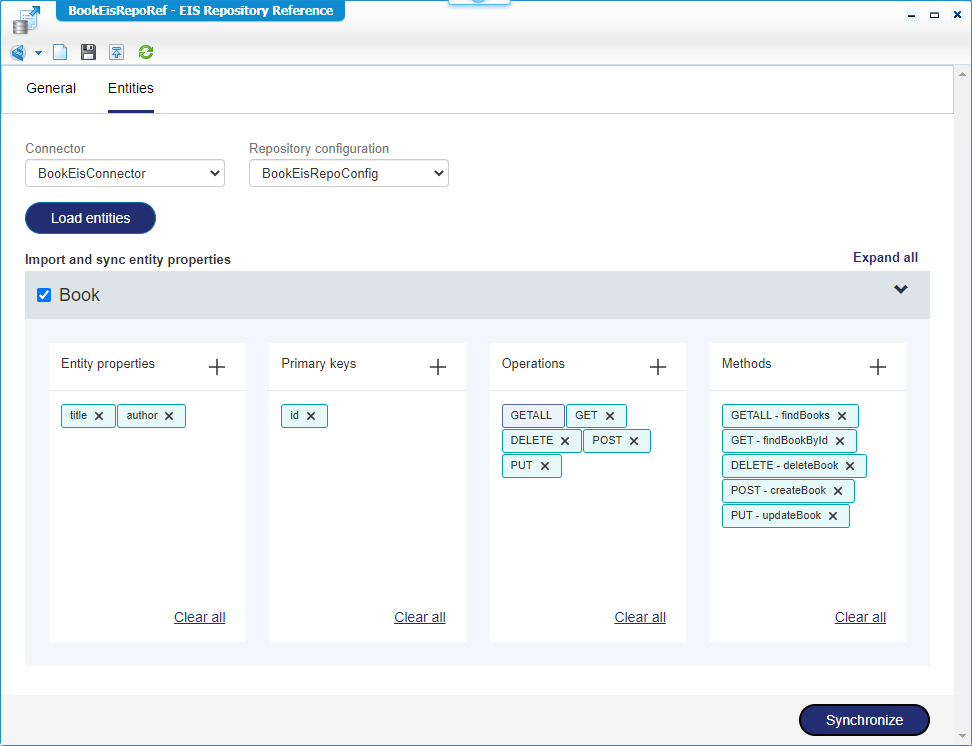
- Now go to the tab ‘Entities’ and follow the input:
- Connector:
BookEisConnector - Repository configuration:
BookEisRepoConfig - Load the entities
- Entity properties:
titleandauthor - Primary keys:
id - Operations: All CRUD operations
- Methods: Select the related methods for the correct CRUD operations.
- Entity properties:
- Connector:
- Save it, and publish it
Now hit the ‘Synchronize’ button and check the project for the new external entity ‘Book’! Also check the generated BBs and notice the entity is getting an update to save too. I just update default naming stuff:

I collapsed the ‘Functional’ components for the screenshot; the only available BBs are ‘History’ and ‘Web service’. So, no ‘Content’ or ‘File’ BBs (yet!?) for the EIS connector!
Now is the time to publish the ‘external’ entity as you would normally do in entity modeling land…I also publish the whole project again to just make sure!
Update EIS Repository reference (runtime!)
In runtime, you can now already see the ‘All books’ result list, but it will return an error because of one final setting:
- Open
http://192.168.56.107:8080/home/appworks_tips/app/admin - Select your deployed solution
- Open the ‘Repository references’, and select the ‘BookEisRepoRef’
- Select the ‘EIS connector’ and ‘EIS repository configuration’
- Hit the ‘Synchronize repository’ button now (although I don’t think it’s required!?)
- Check the entities tab to see your entity already…
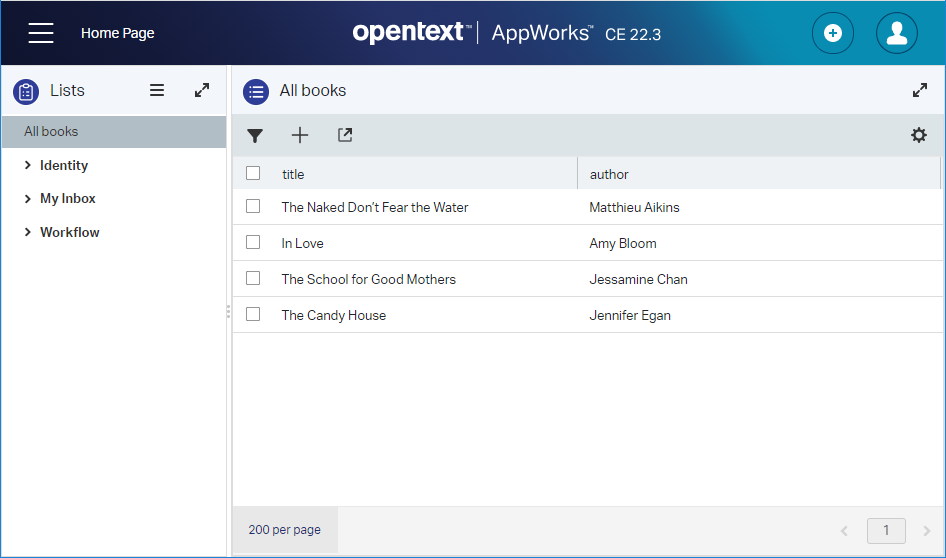
At this time, you can check the runtime for a valid EIS entity connection to your Spring Boot app receiving the ‘in memory’ book instances. You can even do all the CRUD operations (as configured in the ‘EIS Repository reference’!)
Isn’t this love at first site!? 😍 This is exactly why I love the platform so much:
One bug I found, but we’re in beta behind the feature toggle. After following all the steps, I get an error in runtime while viewing the result list on the entity:
java.lang.ClassNotFoundException: com.appworkstips.prjawtipsgen.BookEisConnector.apis.BookApi. A valid error as this class is indeed not there! I generate my class with nameBookControllerApi!?. After renaming the class toBookApiit was one big party to play with in runtime!
I also changed my controller class in the Spring Boot app fromBookControllertoBookand renamed theBookclass toBookEntity, but this gave problems during the method mapping of the CRUD operations in the ‘EIS Repository Reference’. “Stranger things”…
What a ride with a great “DONE”. We learned about the new way of using the EIS connector in a solution. This embeds external data directly into our beloved platform. A fascinating concept as from what I experience at projects there is always a legacy data system somewhere in your organization you would like to connect to. The connection will not get any closer than this with direct manipulation into runtime for your end-users. If this matches your use-case…The EIS connector is the way to go! Have a great weekend…I see you in the next one.
Don’t forget to subscribe to get updates on the activities happening on this site. Have you noticed the quiz where you find out if you are also “The AppWorks guy”?
