
Hi there AppWorks fans,
Welcome to a new installment of AppWorks tips.
This time an interesting one (as always!) about OTDS and synchronized partitions! Why? Well, because in almost every company sharing of user/group information can be done in a separate Lightweight Directory Access Protocol supported interface like for example ‘Active Directory’, but there are other software tools that implement LDAP. So, what we are interested in is how to consume this separated LDAP information from our platform? In other words…How to set up our own LDAP server, connect it to OTDS and make sure our users from our beloved AppWorks platform can be authenticated against it?
Well…watch and learn as this will again be a hell of a ride…
Let’s get right into it…
What do we need?…Well, an LDAP server?…Or better an interface that implements LDAP! Like ‘Active Directory’…wait!…Do I hear someone says “CARS”?? Very good!! Do we want to use it for our purpose? Well, I would say ‘no’ as it contains too much AppWorks specific data to play around with. We really want to keep things simple and clean! FYI, the back-end of CARS is just plain OpenLDAP! Aha…Now we’re getting somewhere! So, a Google search brings us to https://www.openldap.org/. After some further searching it also brings us to a nice installation manual on how to install OpenLDAP on our CentOS environment.
Spin up your VM and let’s follow that manual with our own interpretation…
First command: sudo yum install -y openldap openldap-clients openldap-servers
After this installation we also do a start: systemctl start slapd.service
And enable the service on server startup: systemctl enable slapd.service
Keep in mind we still have our CARS up and running also!! Remember this call:
systemctl status|stop|start cars-slapddefaultInst.serviceOur CARS / OpenLDAP will run on port 6366 and that new OpenLDAP will run on port 389 (or 636 secured over SSL)
If you use a tool like JXplorer you should be able to connect anonymously, but nothing is there to browse (yet)…

Add an OpenLDAP admin account
Give the command: slappasswd
1 | [sysadmin@WIN-5SKKMBURVO7 ~]$ slappasswd |
You need to provide a password (I just use ‘admin’), and the output will be an SSH encrypted string of the password…Save it for later usage!
Now, we will create a new file with the name ‘db.ldif’ to get you a heads start on the OpenLDAP configuration!
I give this command: vi db.ldif and pass in this content (Note that SSH encrypted string, and the ‘dc’ value where you can use your own name!):
1 | dn: olcDatabase={2}hdb,cn=config |
Note that LDIF does not like trailing spaced in the end of a line!!
After a save in the user home directory on the server we do a modification on our LDAP instance:
sudo ldapmodify -Y EXTERNAL -H ldapi:/// -f db.ldif
Use
sudo ldapmodify -hto get more info on all the other parameters for this call.
This should be the response output:
1 | SASL/EXTERNAL authentication started |
So, now we have a ‘ldapadm’ account in place…Let’s do a second try on the connection like this (that hidden password is off course ‘admin’):

Connection can be made, but still no entries to browse through (yet)!
Add new entries into our LDAP server
Ready?…Time for our first entries in LDAP.
vi base.ldif
Put this content into it (with your own ‘dc’ value!)
1 | dn: dc=mydomain,dc=com |
Now run the command to add new entries into our LDAP server:
ldapadd -x -W -D "cn=ldapadm,dc=mydomain,dc=com" -f base.ldif
The end-result from the JXplorer perspective will look like this:

A nice first setup to start with…All we miss are some users!?
Before we continue we need add some standard LDAP schema’s to consume from:
1 | sudo ldapadd -Y EXTERNAL -H ldapi:/// -f /etc/openldap/schema/cosine.ldif |
With these schemas you get a bunch of class types and attributes to be used on the new entries we create.
Now, let’s create a new LDIF file for a brand-new user:
vi adam.ldif
With this content:
1 | dn: uid=adam,ou=users,dc=mydomain,dc=com |
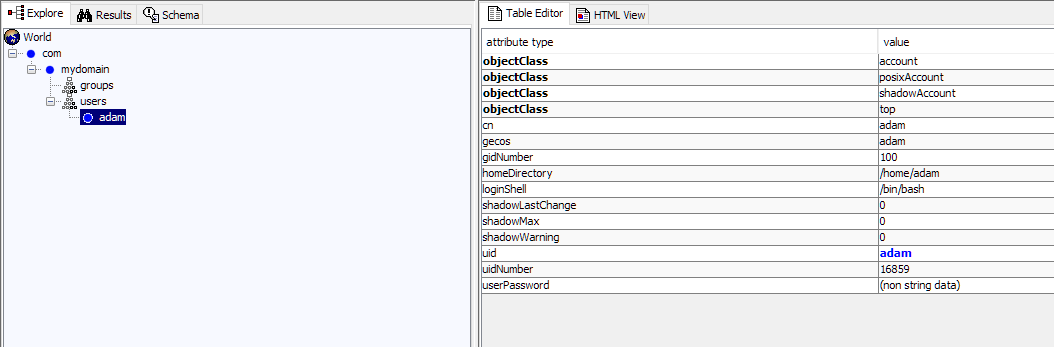
Add it to LDAP with this command: ldapadd -x -W -D "cn=ldapadm,dc=mydomain,dc=com" -f adam.ldif
In JXplorer we will start to see our new user account:
Time for a password for our ‘adam’ account:
ldappasswd -s welcome123 -W -D "cn=ldapadm,dc=mydomain,dc=com" -x "uid=adam,ou=users,dc=mydomain,dc=com"
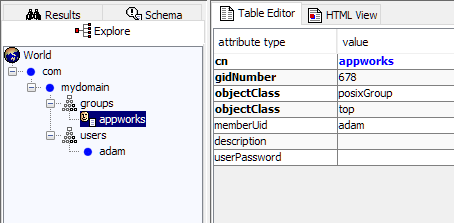
Now we have a user account…It’s time to also add a new group!
vi appworks.ldif
With this content:
1 | dn: cn=appworks,ou=groups,dc=mydomain,dc=com |
Add the entry to LDAP: ldapadd -x -W -D "cn=ldapadm,dc=mydomain,dc=com" -f appworks.ldif
Finally, we also add our user to this new group:
Create a new file: vi adamtogroup.ldif
Add content:
1 | dn: cn=appworks,ou=groups,dc=mydomain,dc=com |
Do a ldapmodify to execute: ldapmodify -x -W -D "cn=ldapadm,dc=mydomain,dc=com" -f adamtogroup.ldif
A double check will show you something like this:
That’s our first DONE! where we also learned some basics on the setup of an LDAP server…great!
Next…
Create a synchronized partition in OTDS
Hmmm…did I tell you upfront we need to have an OTDS instance up and running on our VM? 😜 Check the OTDS tag
Well, once you have it up and running, open the OTDS admin portal via: http://192.168.56.107:8181/otds-admin/ and go to the ‘Partitions’ category on the left side…And…Just create a new one! Make sure it’s of type ‘synchronized.

A new wizard is starting up that you need to follow with input on those fields…
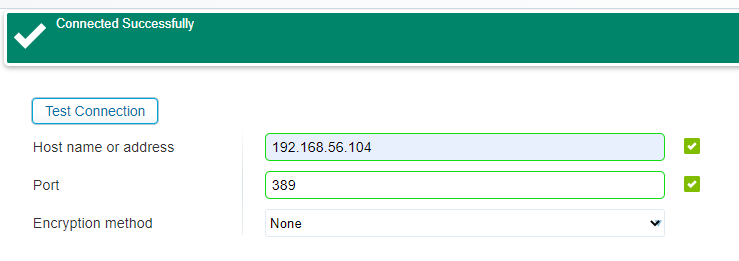
Use the correct host/port and test the connection…When OK, click ‘Next >’
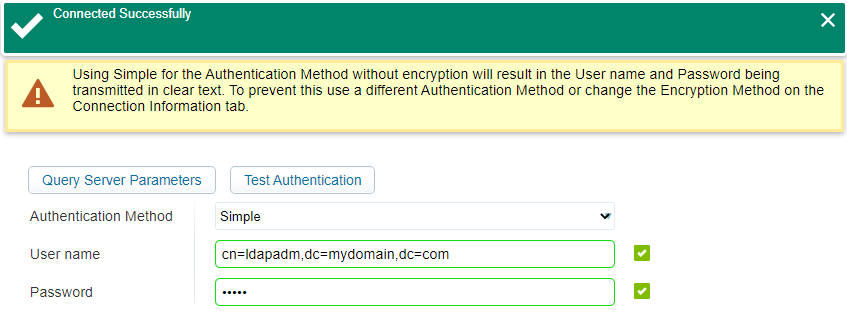
Make sure you use the same authentication parameters as we did in JXplorer, test the authentication…When OK, click ‘Next >’
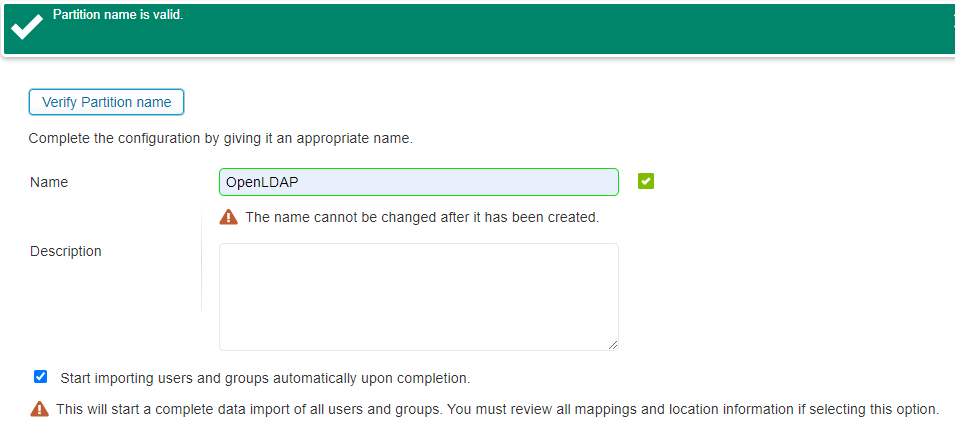
Give a nice name and verify it…Click ‘Next >’ when ready…
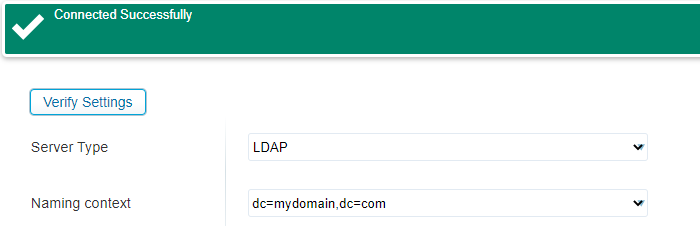
Just verify those server settings and click ‘Next >’

Make sure to apply the correct filters to grab the correct group entries from LDAP. Use the ‘Test Filters and Locations’ to get a result like this example:
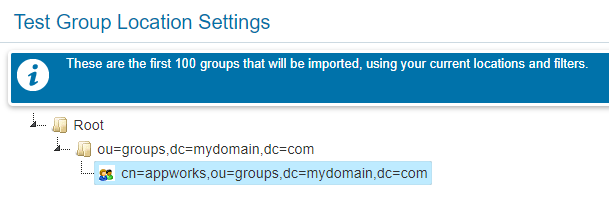
How do I know those filters? Well, check JXplorer on that group entry!

When ready…Click ‘Next >’

We can do that same trick for our users…Test it and hit ‘Next >’ when ready.
Leave the ‘User mapping’ of the attributes as is, and we just click ‘Next >’
The same for those ‘Group mapping’ attributes…click ‘Next >’

I just leave the monitoring as is and click ‘Next >’
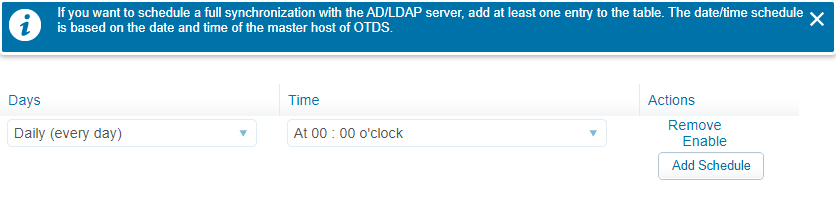
Also, the schedule settings I leave as is…hit ‘Next >’
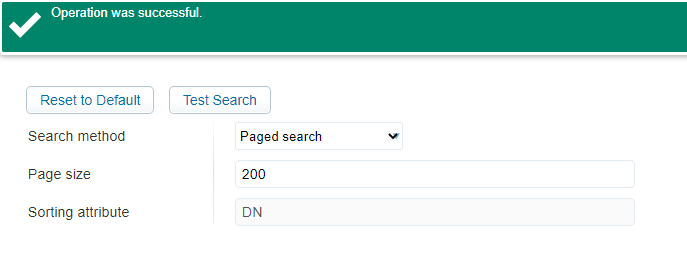
I just click ‘Test Search’ and hit ‘Next >’
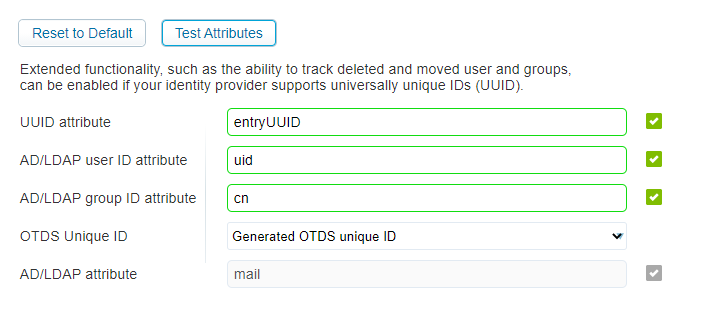
Again…Just ‘Test Attributes’ and hit ‘Next >’ on this last step.
Finally, we hit that ‘Save’ button for our synchronized partition.
The end-result?
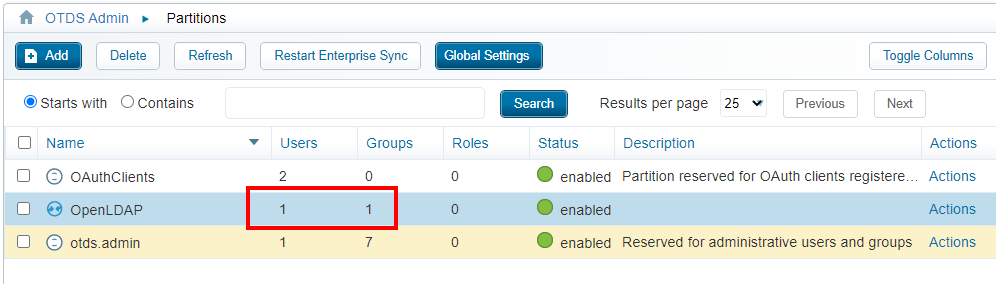
Exactly what we’ve expected! 👊
With a view on our member…
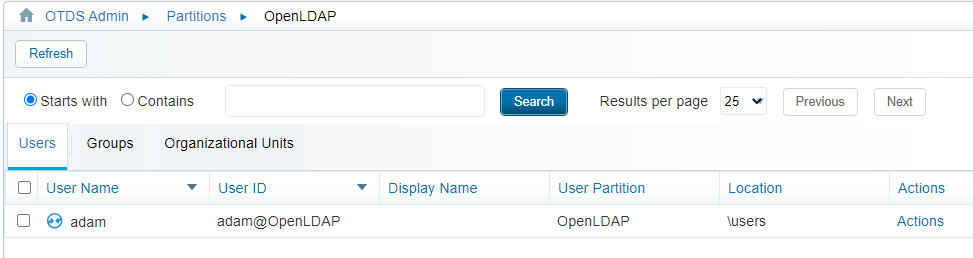
Verify our ‘adam@OpenLDAP’ account
Let’s see (just as double check) if we can make our brand-new synched account an ‘Administrator’ in OTDS and that we are able to login with it!
Go to ‘User & Groups’ in OTDS to edit the membership of our new account:
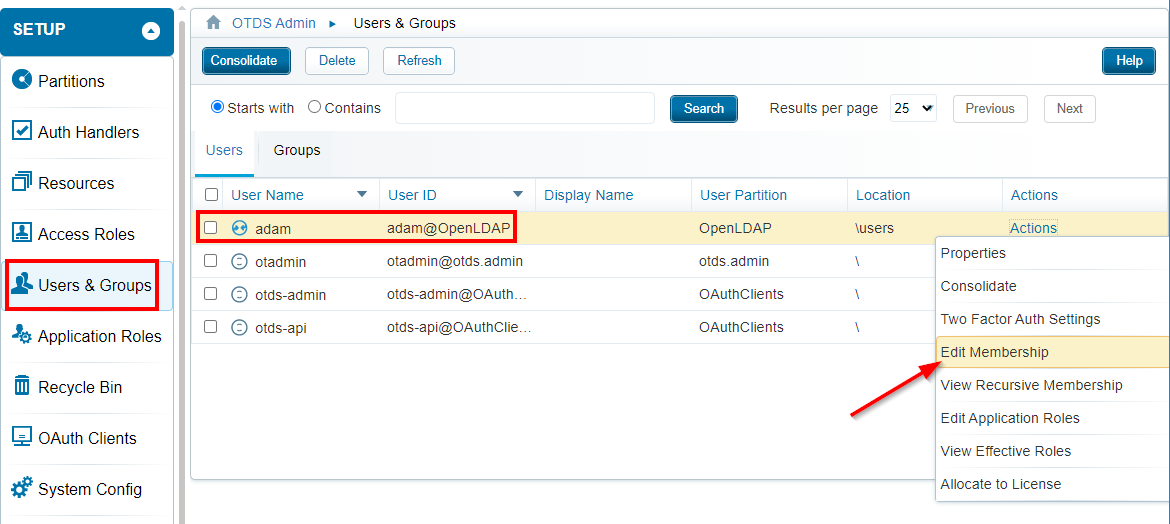
Hit the ‘Add To Group’ button in the top:

Select the ‘otdsadmins@otds.admin‘ group and add this group as member to the account. Close the panel, and you should see something like this:

Great…Logout from OTDS and login again!

Password? Well, in my case ‘welcome123’…As you passed as value during this command ldappasswd... (check back in the top of this post!)
Ohhhh Yeah…That’s a green light for me! 🚦
Next…(after reverting the last group assignment)
Make the Authentication from AppWorks happen
For this to happen we just follow the steps from this post
In short:
- Use our synchronized partition (Not a non-synchronized partition like in the suggested post!)
- Connect OTDS to our own organization instead of ‘system’
- Make ‘sysadmin’ part of our organization and add ‘OTDS Push Service’ role (needs to be done from ‘system’ in the ‘Organization management’ artifact!)
- Create a new resource in OTDS:
- Name: AppWorksPlatform
- Connector type: REST (Generic)
- OTDS Push service URL: http://192.168.56.107:8080/home/appworks_tips/app/otdspush
- Username: sysadmin (with ‘admin’ password in my case)
- Save to resource ID in the end (with NO “Verify Activation”!!)
- Create a new OTDS Resource in AppWorks (from the ‘Security Administration’ artifact)
- Use an organization configuration
- OTDS server URL: http://192.168.56.107:8181
- Provide the resource ID
- Save and activate the resource
- Create a new Authenticator in AppWorks (also from the ‘Security Administration’ artifact)
- ID: OTDS
- Type: OTDS
- URL and resource ID will be filled in already.
- Now verify the activation status from the OTDS resource. You should have a green light.
- Add http://192.168.56.107:8080 as trusted site in OTDS
- Disable http.negotiate as ‘Auth Handler’
- Add the ‘Synchronized partitions’ to the new ‘Access Roles’ in OTDS
- Don’t forget to save to make that first consolidate action happen to the AppWorks platform!
The end-result in AppWorks (with 2 basic roles applied manually!):

Finally, we will do a logout and login with our new consolidated user called ‘adam@OpenLDAP’…
Don’t for to login through OTDS with that ‘authID’ parameter in the URL: http://192.168.56.107:8080/home/appworks_tips/?authID=OTDS
Ohhh mama…!! Green lights everyone…How nice and what a thrill when a plan falls into place. 😍
“DONE” people…We made it till the end and what an experience again where we learned more about setting up our own LDAP server with a user that is connected to OTDS, pushed through ReST to our AppWorks platform and authenticated back against our OTDS identity provider. Great stuff to play around with, and now you also know how it’s done…Have a great week-end, and I see you in the next one, next week.
Don’t forget to subscribe to get updates on the activities happening on this site. Have you noticed the quiz where you find out if you are also “The AppWorks guy”?
