
Hi there AppWorks fans,
Welcome to a new installment of AppWorks tips.
Have you ever heard of it?…The ‘Northwind’ database!? Well, you might see it back in a lot of samples in the OpenText documentation. But what is the ‘Northwind’ database and what can we do with it? We’ll get an answer on that one as I’m as curious as you will probably be, so…
Let’s get right into it…
Let’s start with a retrieval from google on ‘what is the northwind database’??
The Northwind database is a sample database used by Microsoft to demonstrate the features of some of its products, including SQL Server. The database contains the sales data for Northwind Traders, a fictitious specialty foods export/import company.
Aha…So, it’s just some sample data to play around with, but it’s on a Microsoft SQL database…We run on PostgreSQL!? Lucky for us there is an interesting GitHub repository “Northwind database for Postgres”
And there we found the raw SQL script to build these databases for our own environment…How nice!
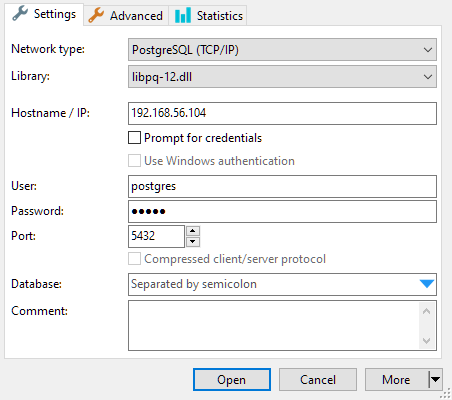
So, spin up the AppWorks VM and make sure you have the HeidiSQL tool locally available with a connection to Postgres (not YET! a specific database)…
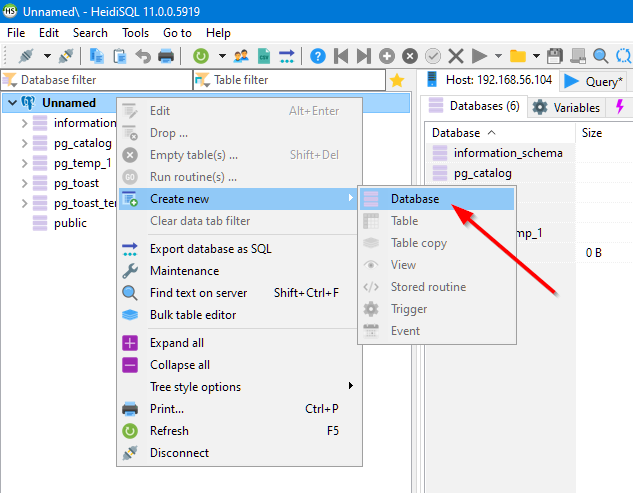
Now, right-click the top node and create a new database with the name ‘northwind’
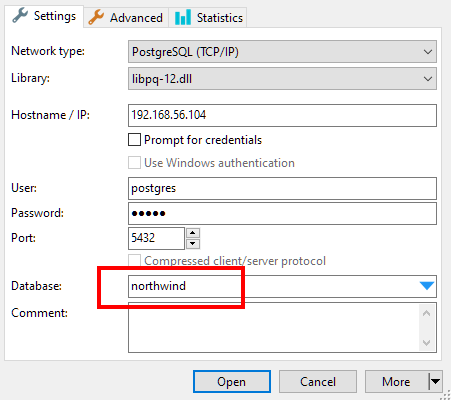
After that database creation you need to disconnect and reconnect again, so you are able to select that brand-new database:
Now that we’re connected to our ‘Northwind’ database it’s time to load some data into it. Hit that ‘File’ menu item and choose ‘Run SQL File…’
Select the downloaded raw ‘northwind.sql’ file and hit the ‘Open’ button to start importing all that data…
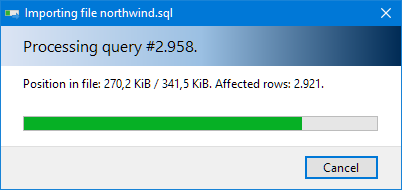
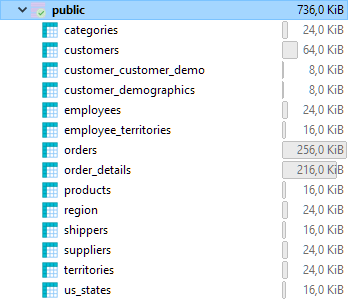
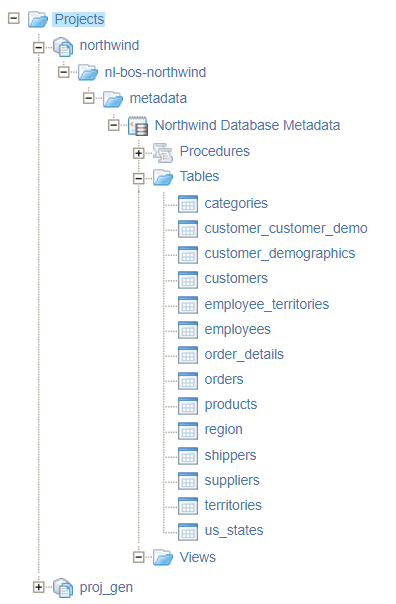
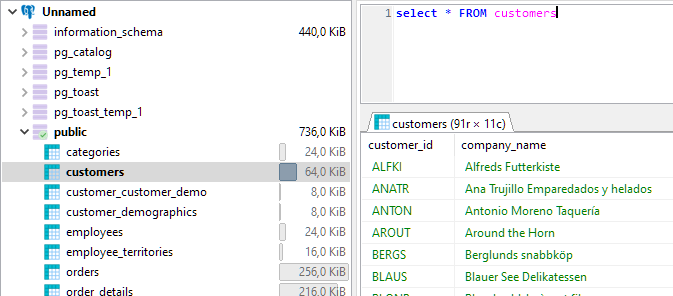
After a minute you will end up in this set of tables for you to consume from through our AppWorks platform:
Next…
Time for the ‘Northwind’ AppWorks project
If you already have a ‘generic’ project available like I have you can start creating a new project next to it, with the name of ‘northwind’…How logical!?
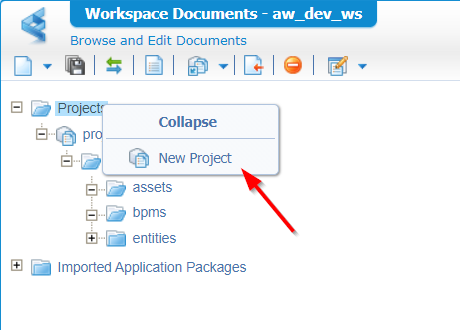
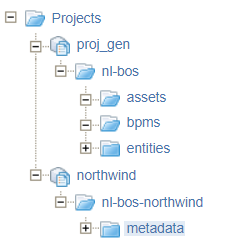
With that project we directly create some nice folder structure to start with!
Time for ‘the magic’ to connect our database to a service container that makes it possible to generate webservices out of our northwind data…What? Is that possible?
Watch and learn… 😎
The creation of the WS-AppServer service container
I don’t know if you already know the drill, but here you go…
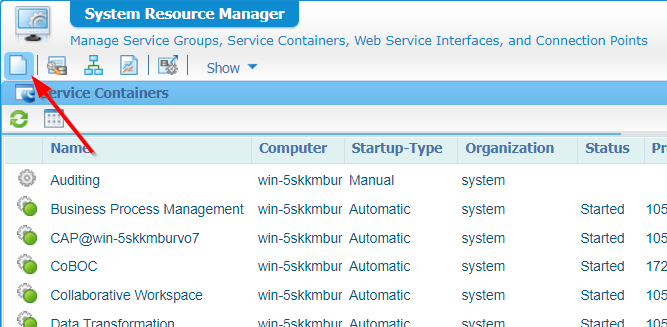
Open the ‘System Resource Manager’ (you need to be an administrator for this!) and create a new service group:
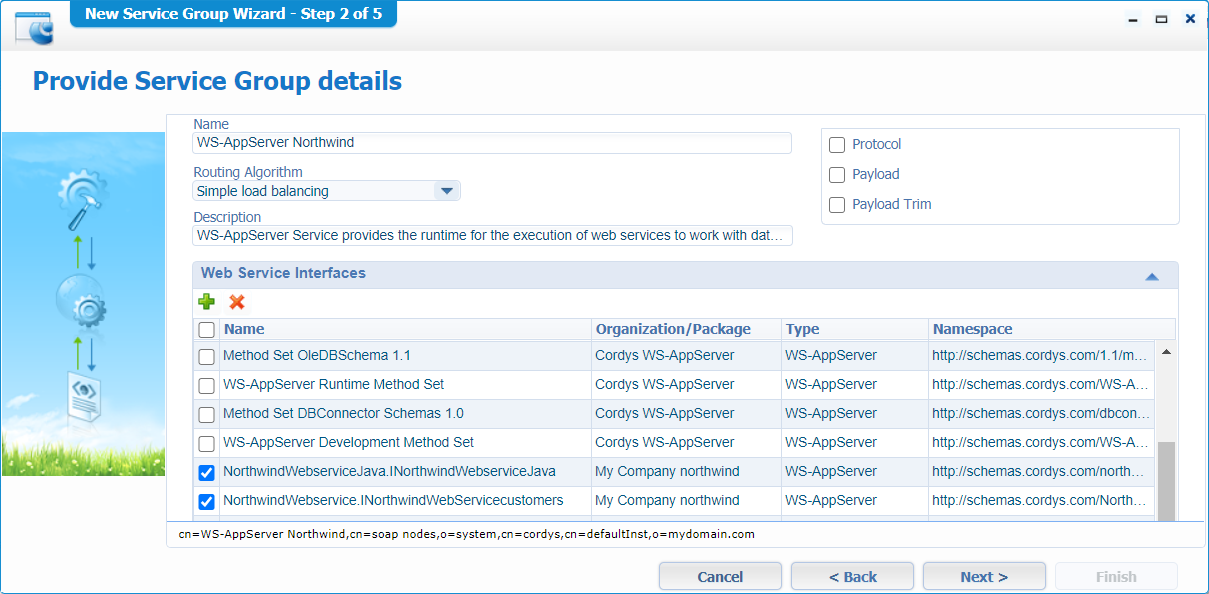
The wizard will start with this screen:
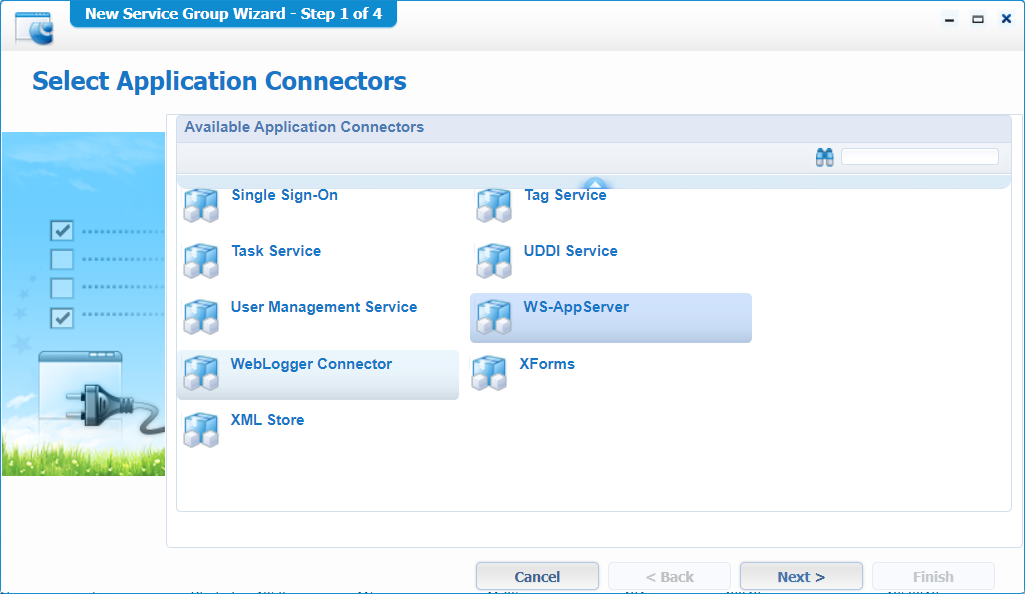
Select the ‘WS-AppServer’ connector and hit ‘Next >’
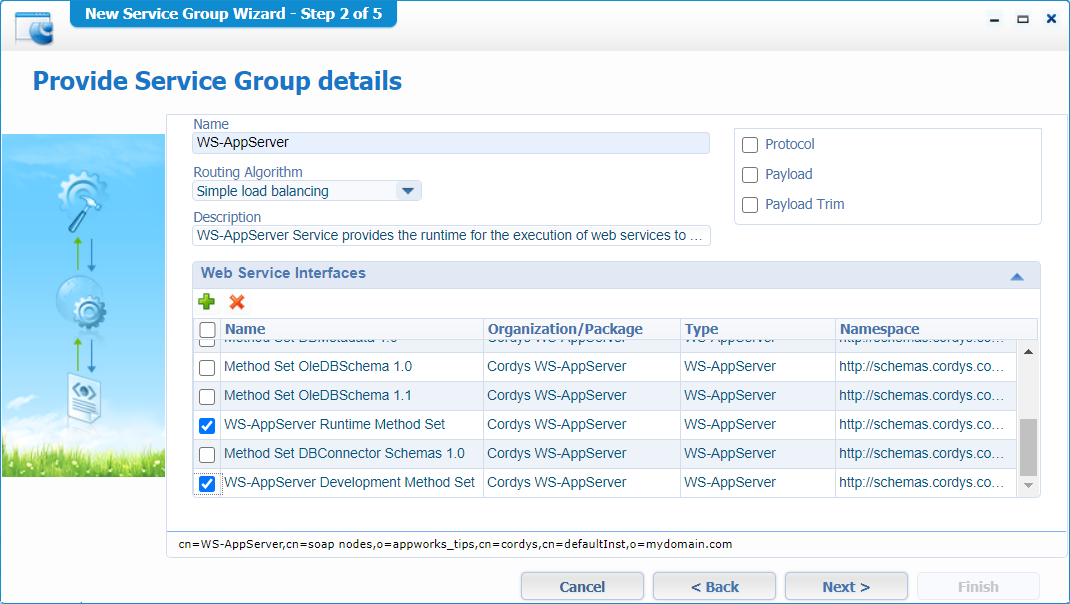
Give it a nice name and select those two basic service interfaces. And…Hit ‘Next >’

Make sure it’s ‘Automagically’ started and hit ‘Next >’
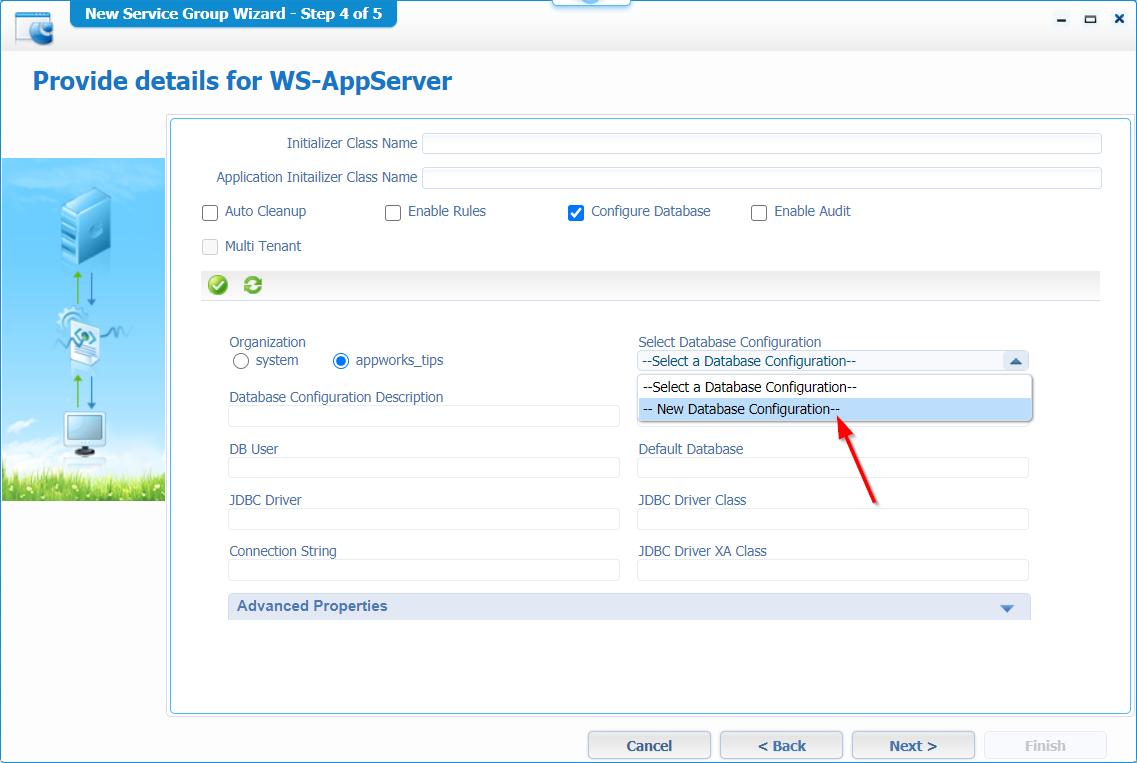
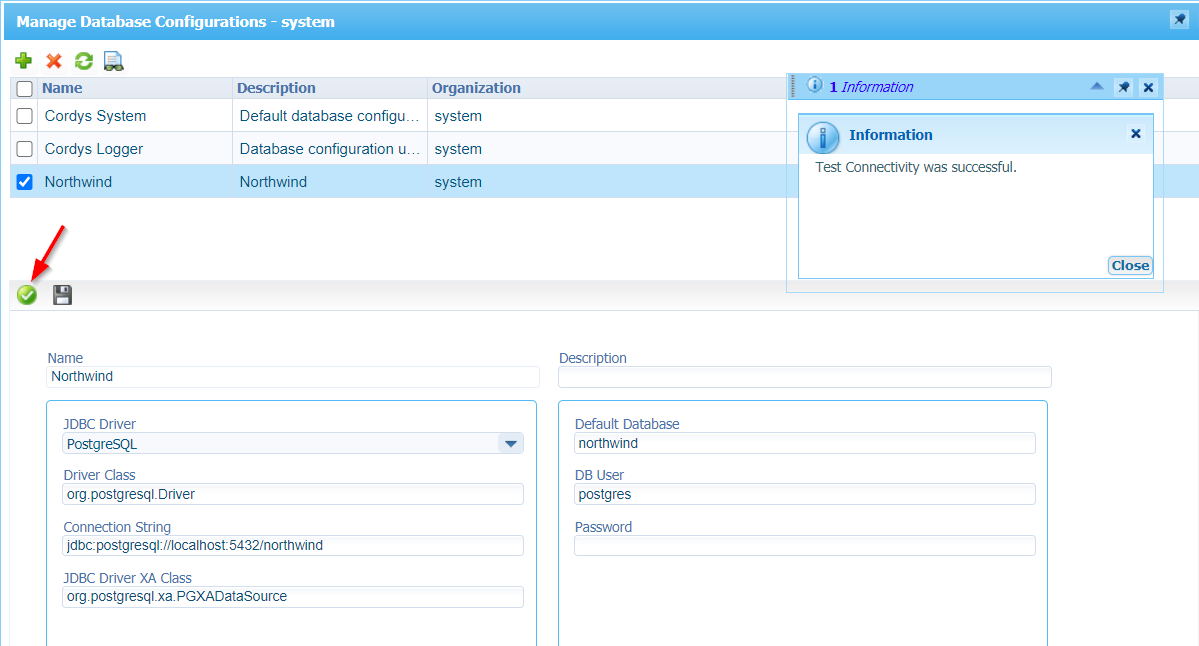
This is our ‘fun’ screen as we will create a new ‘Database configuration’ with this database configuration info
- Name: Northwind
- JDBC Driver: PostgreSQL
- Driver Class: org.postgresql.Driver
- Connection String: jdbc:postgresql://localhost:5432/northwind
- JDBC Driver XA Class: org.postgresql.xa.PGXADataSource
- Default Database: northwind
- DB User: postgres
- Password: admin (for my account!)

Make sure you test the connectivity before you save it all…When done, you’ll be back in that wizard for the ‘Next >’ step:

Hit that ‘Finish’ with a bright shining end-result like this
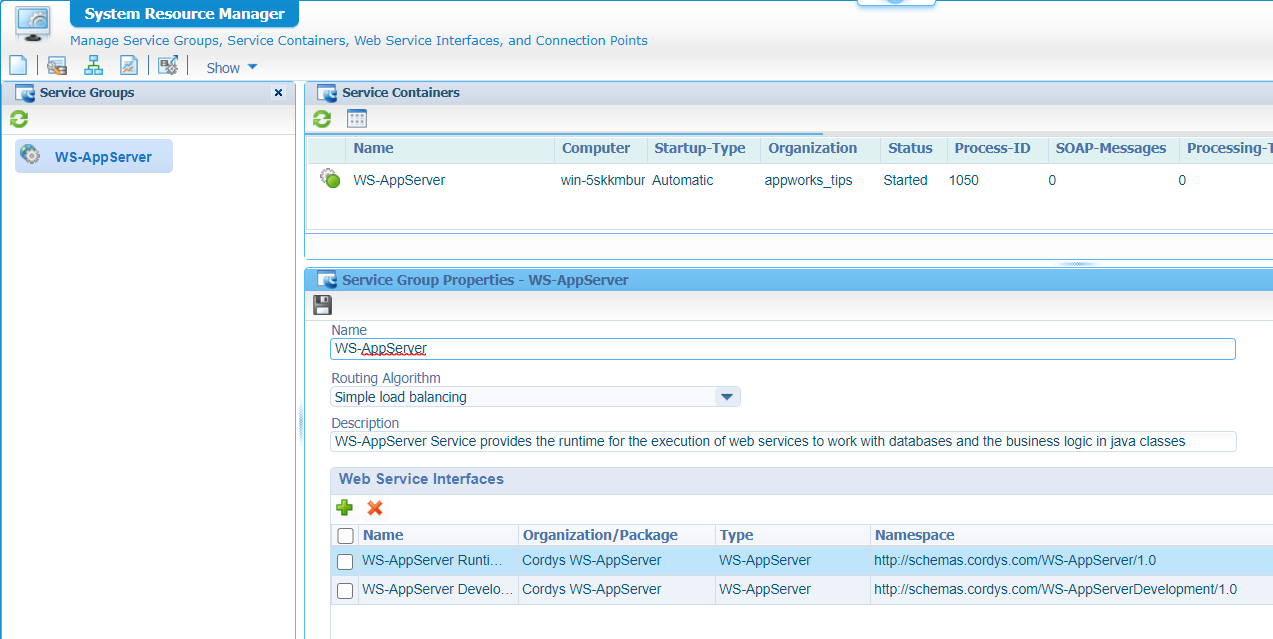
DONE…That was easy…next…
Your first ‘Database metadata’ document type
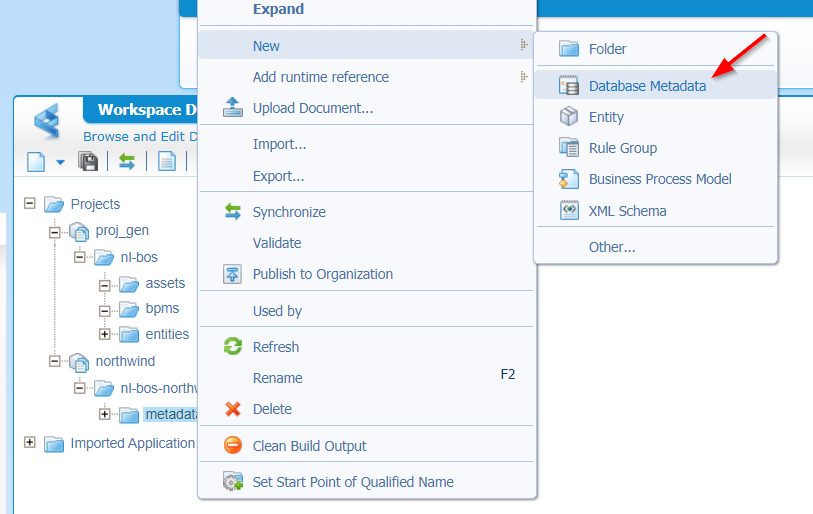
Right-click on the ‘metadata’ folder we’ve created for our ‘northwind’ project and create a new document of type ‘Database metadata’
It will bring you this screen:
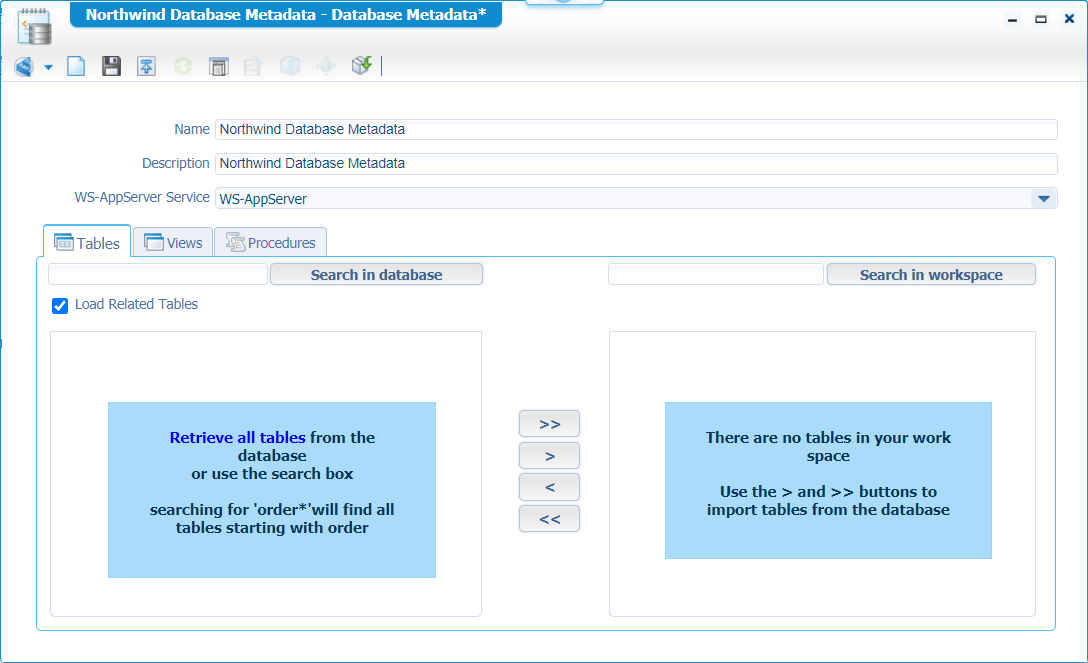
Give a nice name like I did and then hit that blue link called ‘Retrieve all tables’ to see some magic stuff happening!
…
Do you see what I see?
WFT…Holy Crap…What a platform…😍
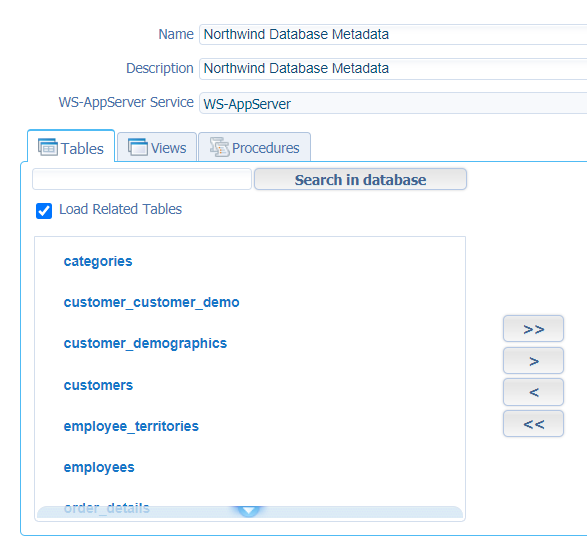
Let’s move all those tables to the right side of the panel and save it…Nice…Short break before we jump into even better stuff!!
…
We save and close all the panels and get back in our ‘northwind’ project…
Open the ‘Northwind Database Metadata’ document again and check out those interesting icons in the top!
The last one is called ‘Import Entities’, and we played with that one a long time ago. Check the search on ‘linked entities’. For now, we are interested in the ‘Generate Webservices Operations’:
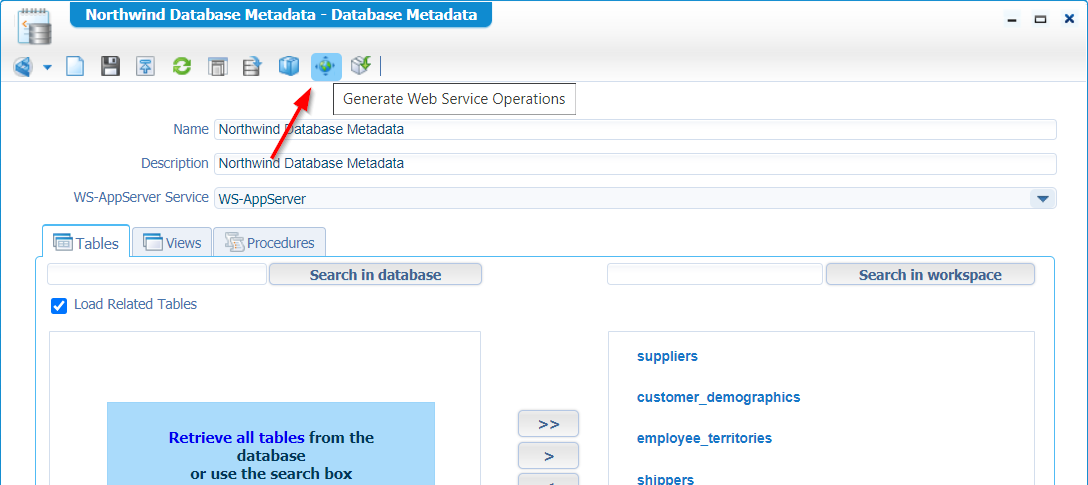
Hit it like a bro and make it all yours like the next screen!
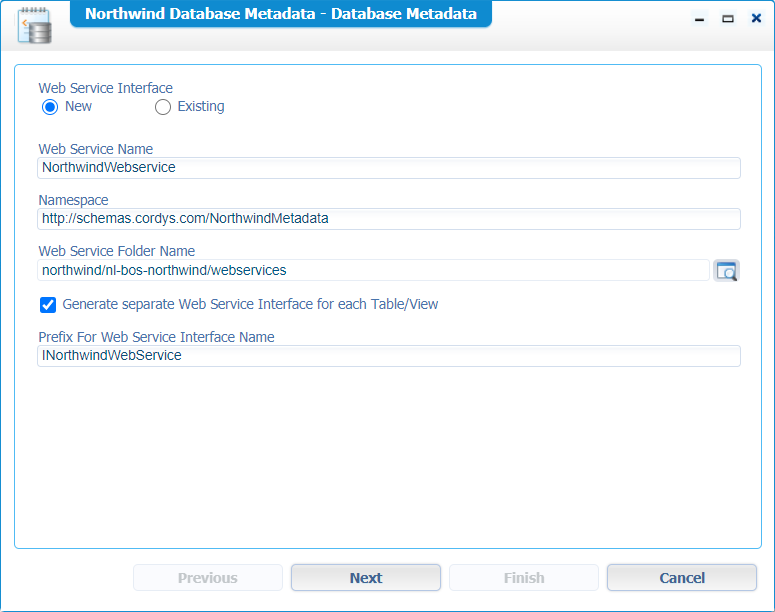
- Update the name to a nice and descriptive name
- Update the namespace to a more recognizable name
- Update that folder name, so it’s saved in the ‘webservices’ folder
- Mark that ‘Generate separate…for each table’ with an interface prefix name
When ready…hit ‘Next >’
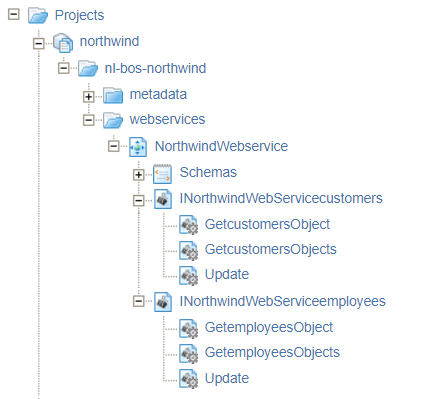
Select the tables you want to consume from via a service and click ‘Finish’. You can indeed select other options if you like, but it just generates more default services around that table entry like exposing ‘Create’, ‘Update’ or ‘Delete’ services…This is not needed for our post at the moment.
Back into our project…
Nice! Time to publish our ‘northwind’ project, and also time to test our first services:
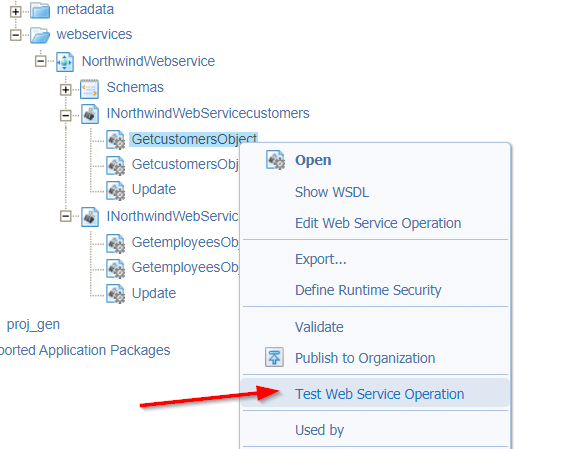
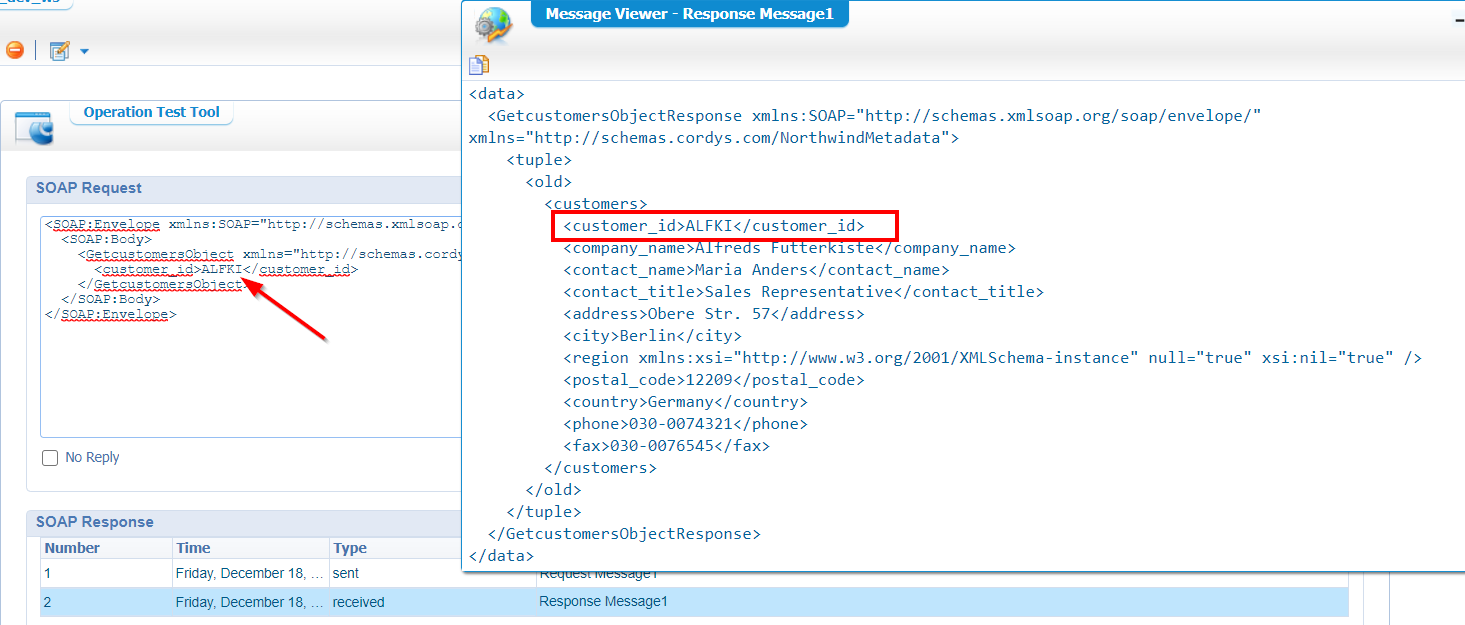
You will see a ‘clean’ SOAP request filled in:
1 | <SOAP:Envelope xmlns:SOAP="http:/schemas.xmlsoap.org/soap/envelope/"> |
Fill-in the customer_id…I have the HeidiSQL tool in the back-end, so I know that ‘ALFKI’ is valid input:
There you have it…Our hopeful response message! 🤪
Let’s try out another service:
1 | <SOAP:Envelope xmlns:SOAP="http:/schemas.xmlsoap.org/soap/envelope/"> |
That’s a bingo again with a result of multiple employee elements. 🍺
Now that we are on the services track…Let’s generate a custom service based on our own query!
For this we go back to our tables in the project, and we can right-click for example the ‘employees’ table where you will find the action called ‘Generate Custom Web Service on SQL Query’…
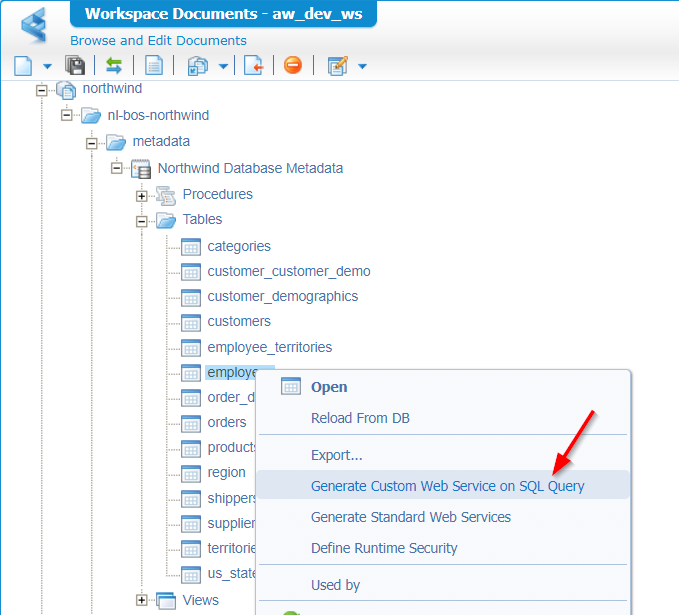
Hit it like a bro and see that nicely input panel for building, testing, and generating your own SQL service! 👍
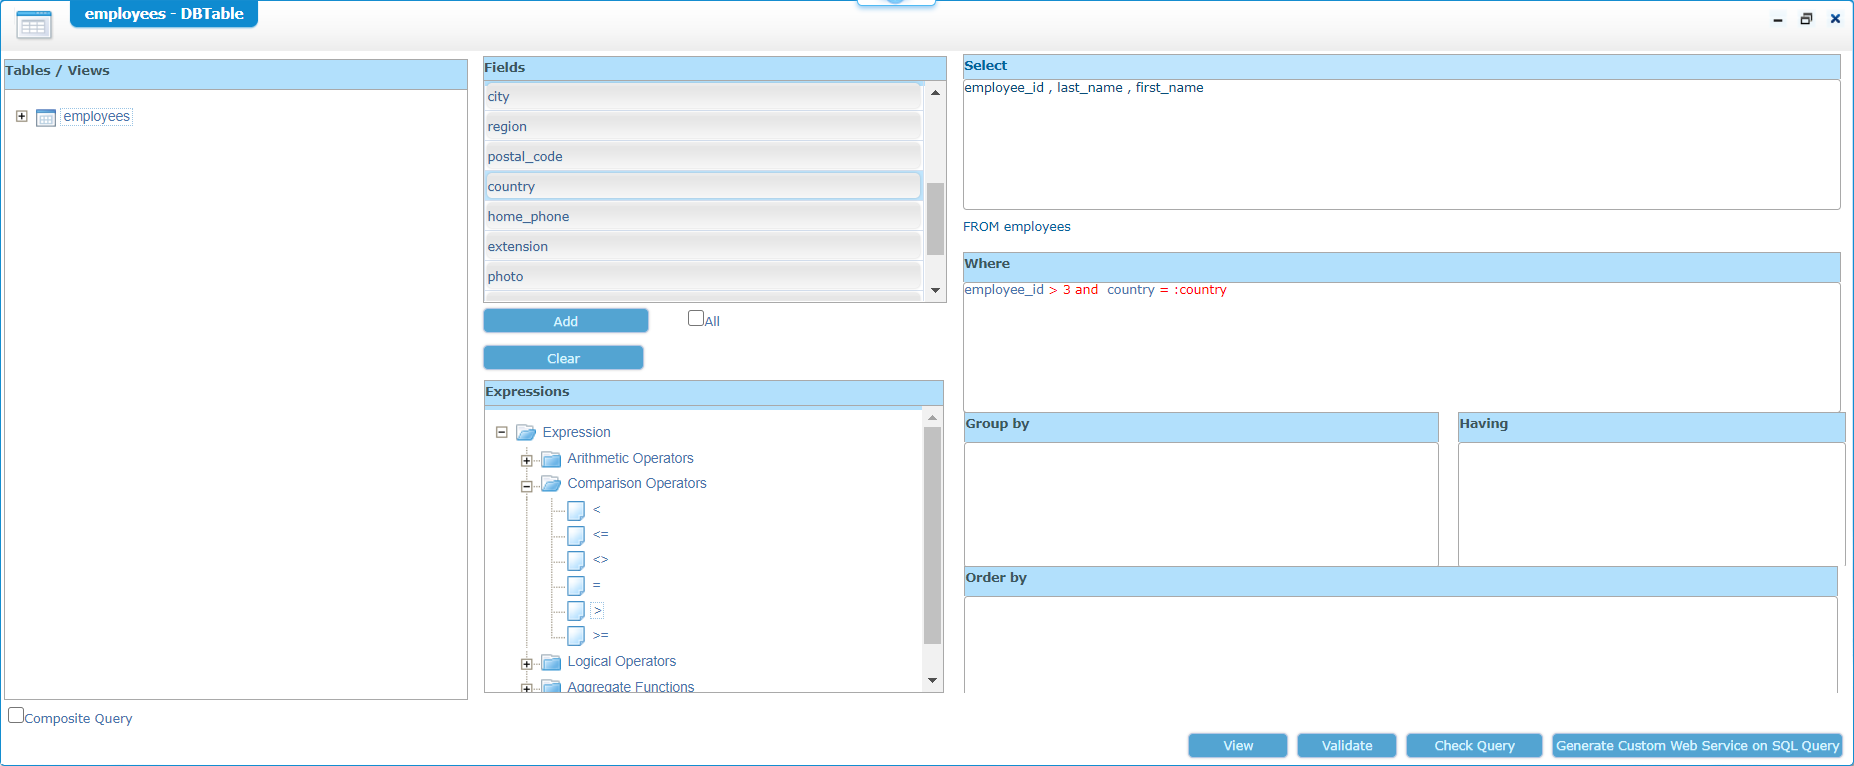
Play a bit around with those input fields and finally hit that ‘Generate Custom Web Service…’ button to generate a new webservice. Save it nicely in the ‘webservices’ folder with a descriptive name, and you will get an end-result like this where you can check your query that will be executed based on your selected input.
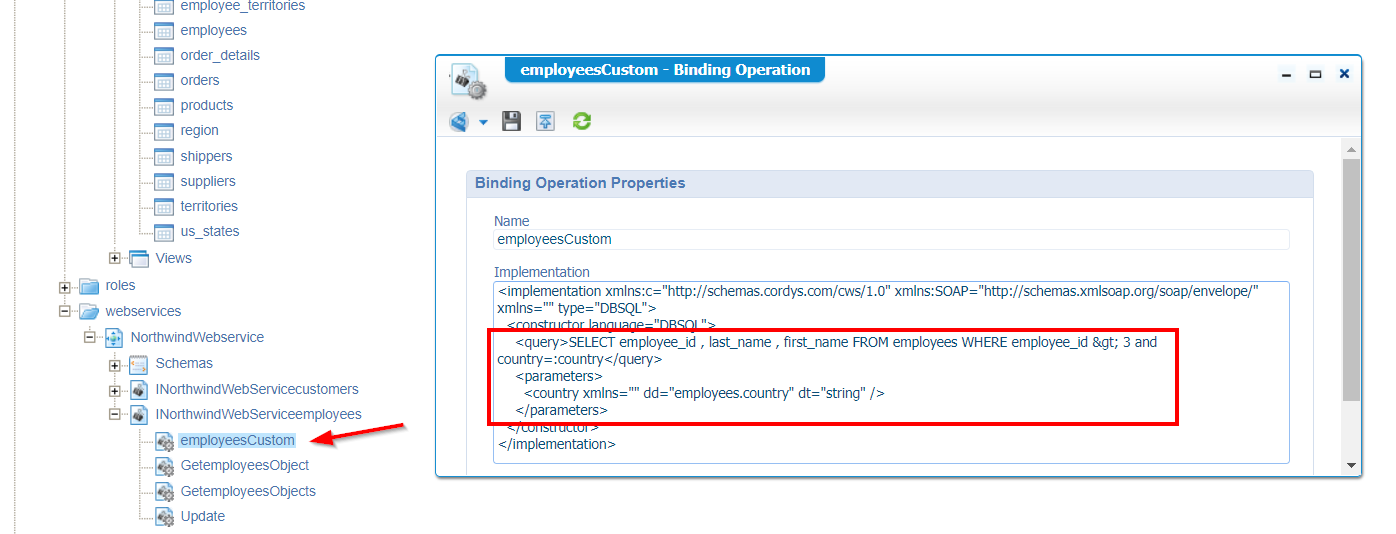
Off-course this one can be tested as well…After it is published!
This would be a sample of the SOAP request (Did you also noticed the ‘country’ parameterization trick?…Yes…watch those screenshots again!)
1 | <SOAP:Envelope xmlns:SOAP="http:/schemas.xmlsoap.org/soap/envelope/"> |
Now what?…Well…Consume, consume, and consume as these webservices can be nicely used by all the BPMs or maybe from other external services!? Endless possibilities I would say…
Yeah…sure! How about security and all my other organizations that want to consume this great stuff?
Aha…We have a smart guy in the room!! Let’s continue that grind for those smart people…
Security
When we talk about security on the those just generated webservices, we talk about the runtime security for those services. We as developers have the world at our feet, but a regular user (our ‘awuser’ account) is not able to just call a webservice from out of nothing!
Let’s try that out…shall we?…with these steps (No security updates at all!):
I build these steps in a separate project called ‘proj_gen’ in the same workspace, next to the ‘northwind’ project!
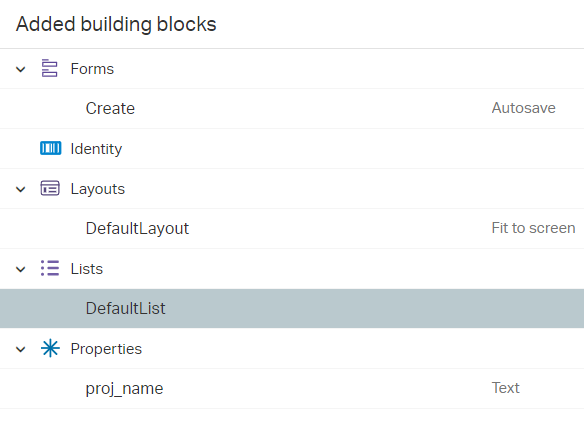
Create a simple ‘project’ entity with just one property, and the regular generated building blocks to start prototyping!
![northwind_026]()
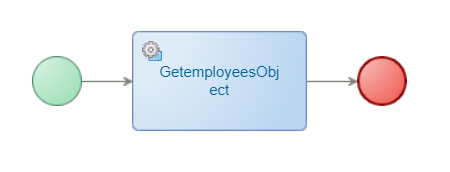
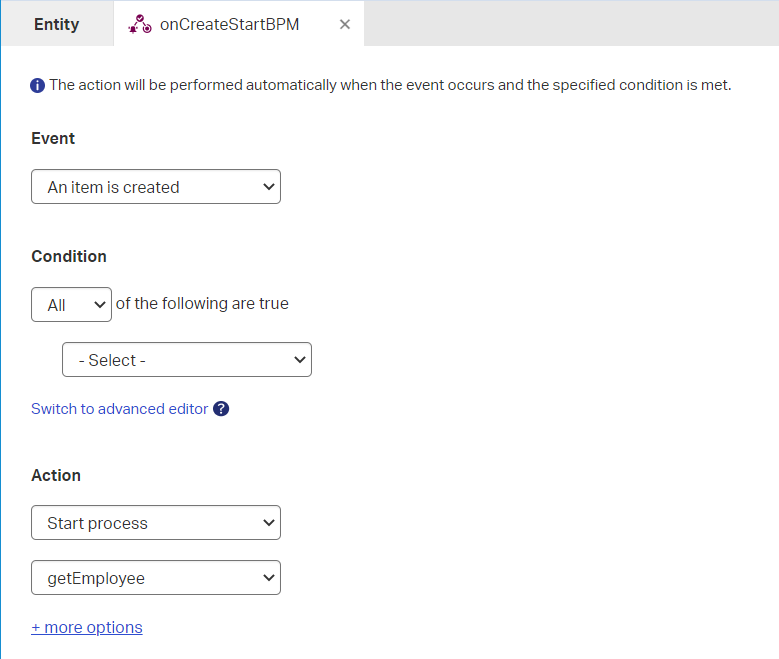
Create a BPM that triggers our service from a service activity!
![northwind_027]()
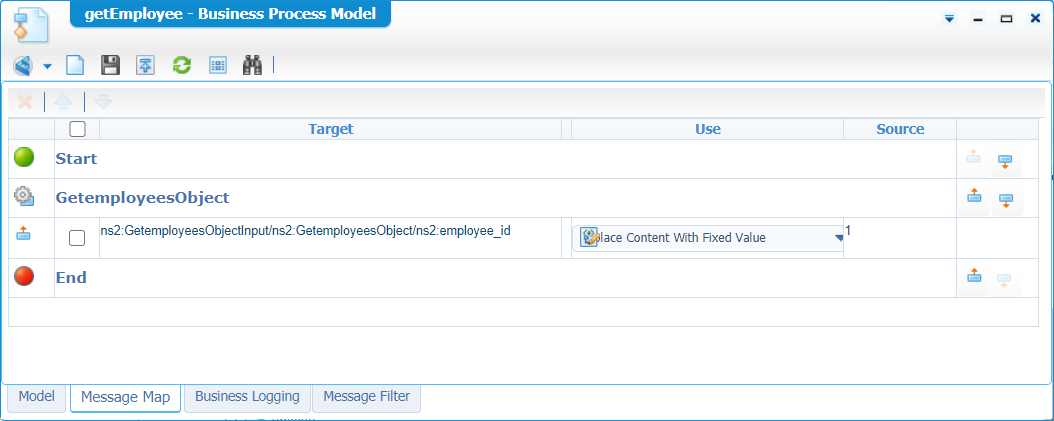
With a message map like this (it just retrieves one employee entry with id ‘1’):
![northwind_028]()
Add a Rule BB to the ‘project’ entity that looks like this…clean and simple…It just needs to trigger our crafted BPM.
![northwind_029]()
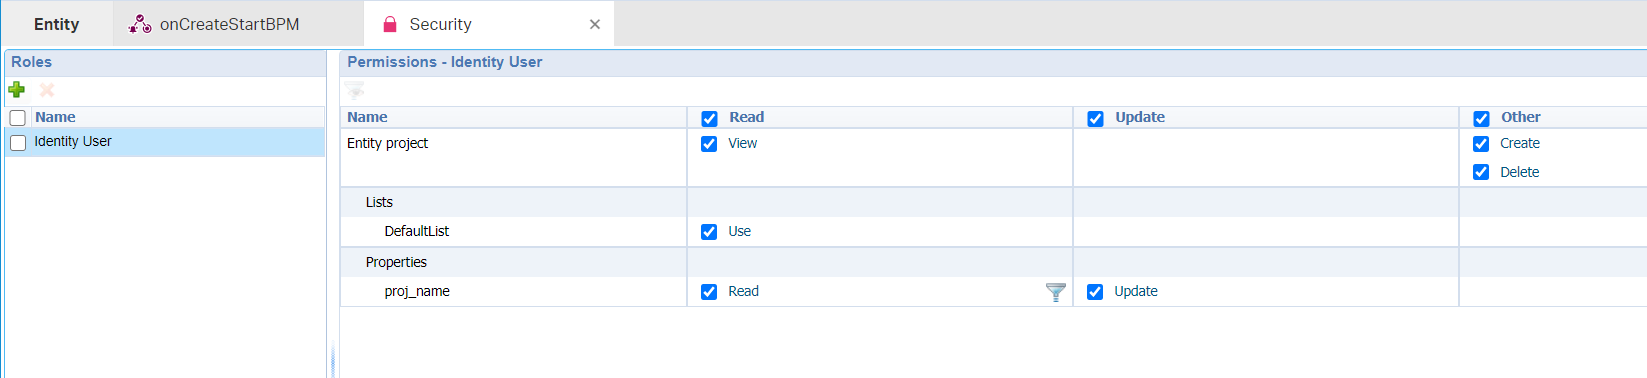
Add the Security BB to the entity and make sure the ‘Identity User’ role has access to the entity.
![northwind_030]()
When done…Publish the project, login with the ‘awuser’ account and create a new project…all in runtime.
The first error you will get is:
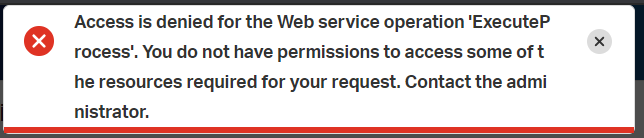
That’s correct as our BPM itself also needs some runtime security applied.
So, on our BPM…
Make sure the ‘Identity User’ role has the correct permission to start with the BPM:
After a save and publish you should be able to start the BPM with the ‘awuser’ account…
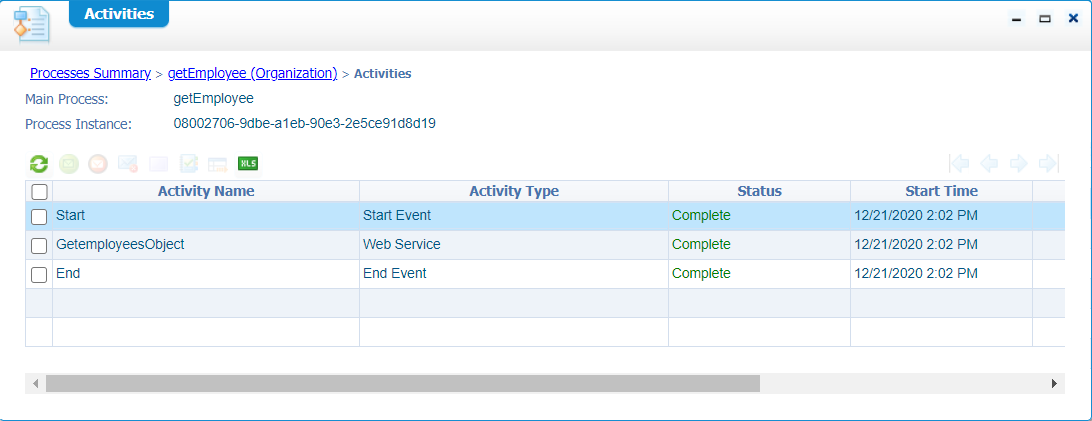
What about that BPM…Is it finished?
Let’s find out in the PIM artifact!

Well, that a negative / abortion!
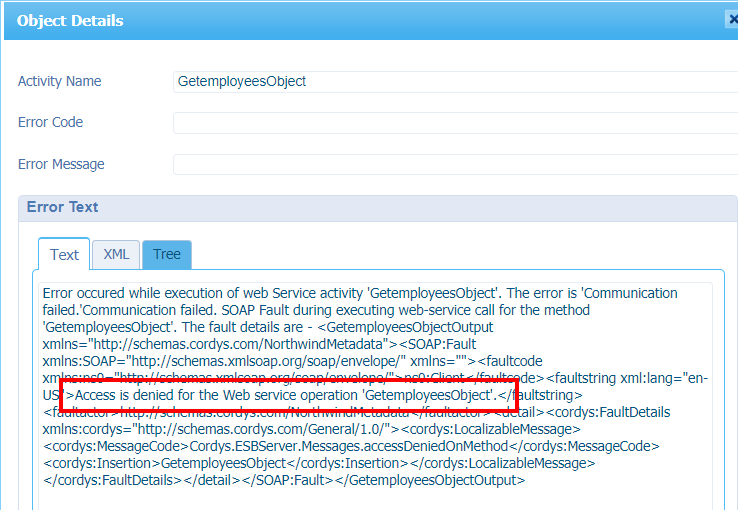
Why?…Well, open that aborted BPM and check the error on the ‘GetemployeesObject’ activity!
That’s a clear message for me…
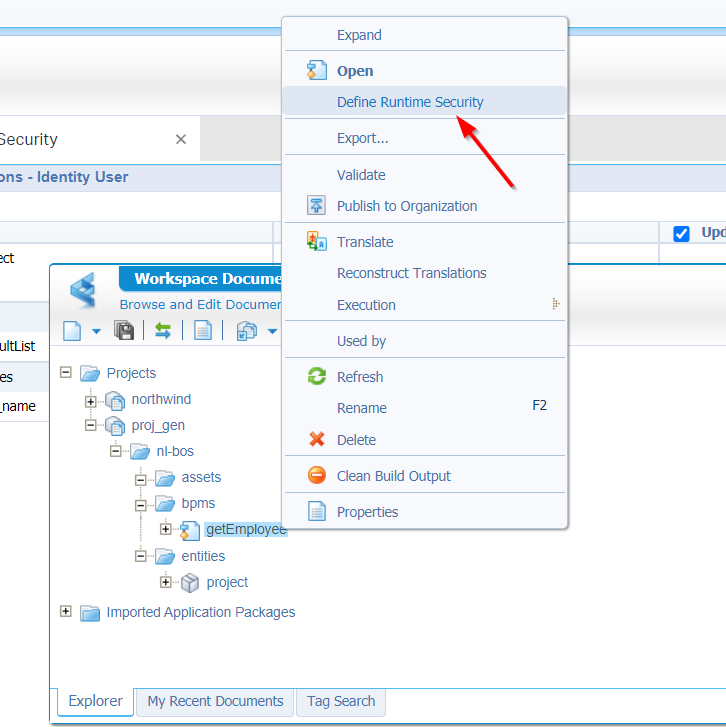
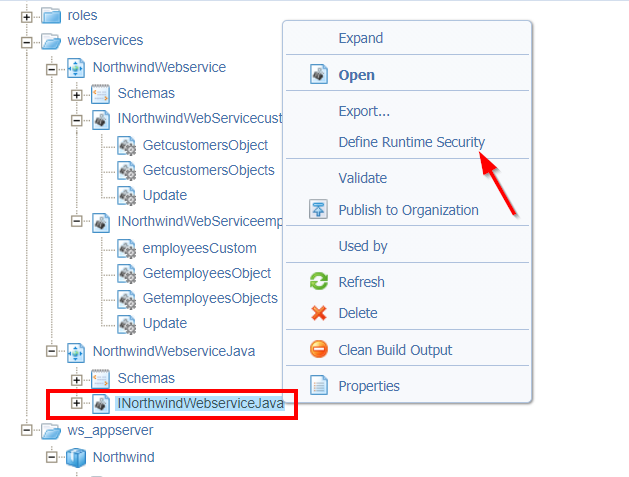
Hmmm…back to our service in the ‘northwind’ project!
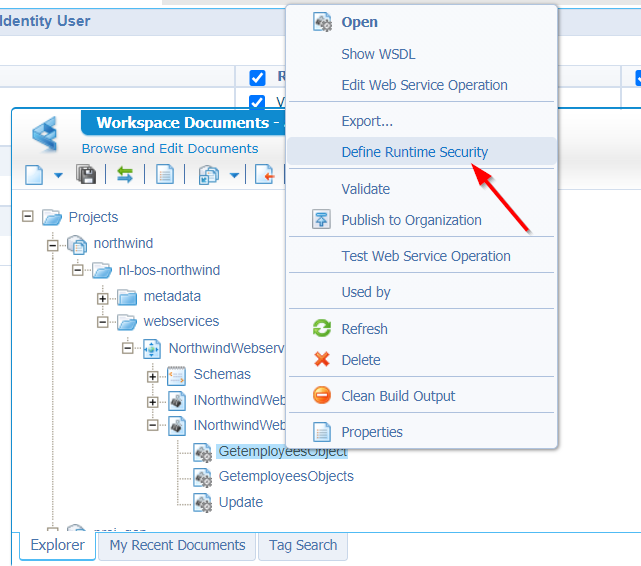
You end up with a blank screen without any roles!
Let’s just create a new one from within that screen…It will look like this (where the ‘Identity User’ is a sub role of the created internal ‘ServiceRole’)
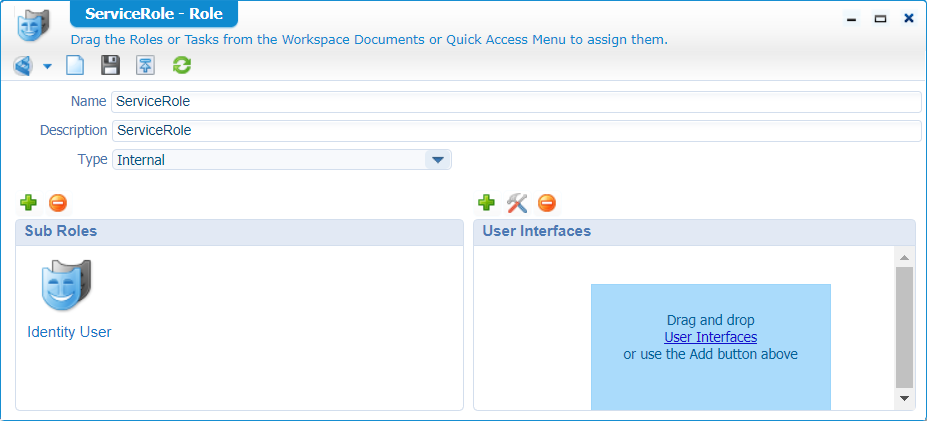
Save it…Nicely structured in a ‘roles’ folder of the ‘northwind’ project.
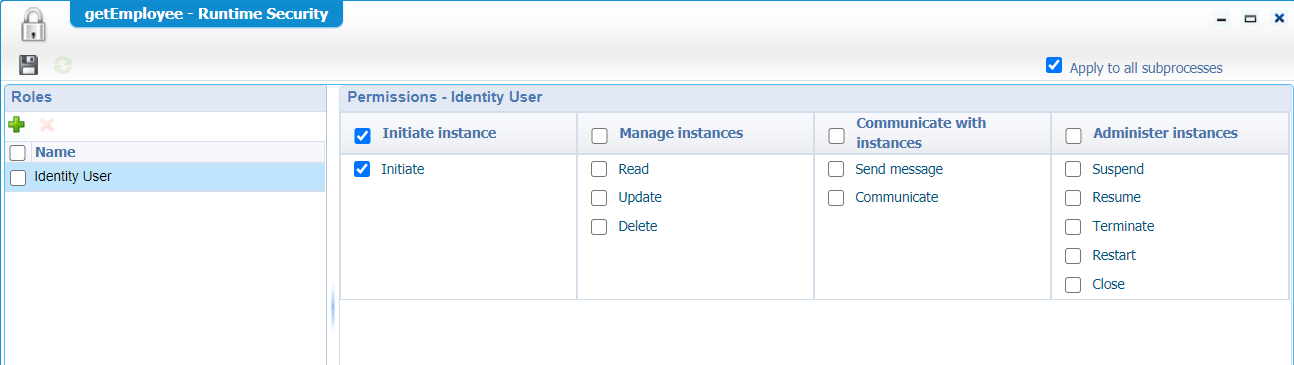
Don’t forget to select that newly created role for our runtime security, so you can give it ‘Execute’ permission on the service operation.
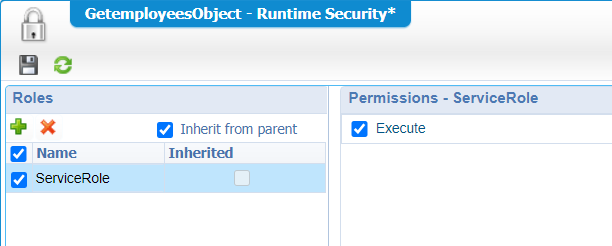
Save it all and publish the ‘northwind’ project to runtime again but wait for that test!
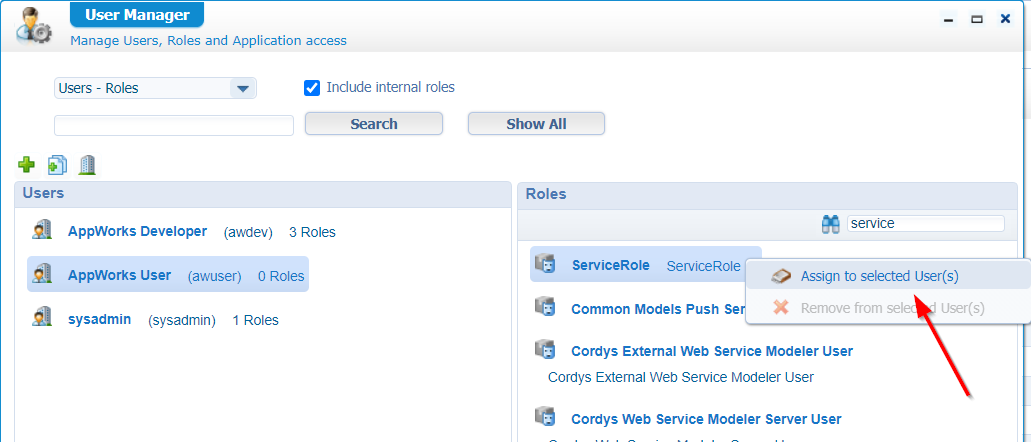
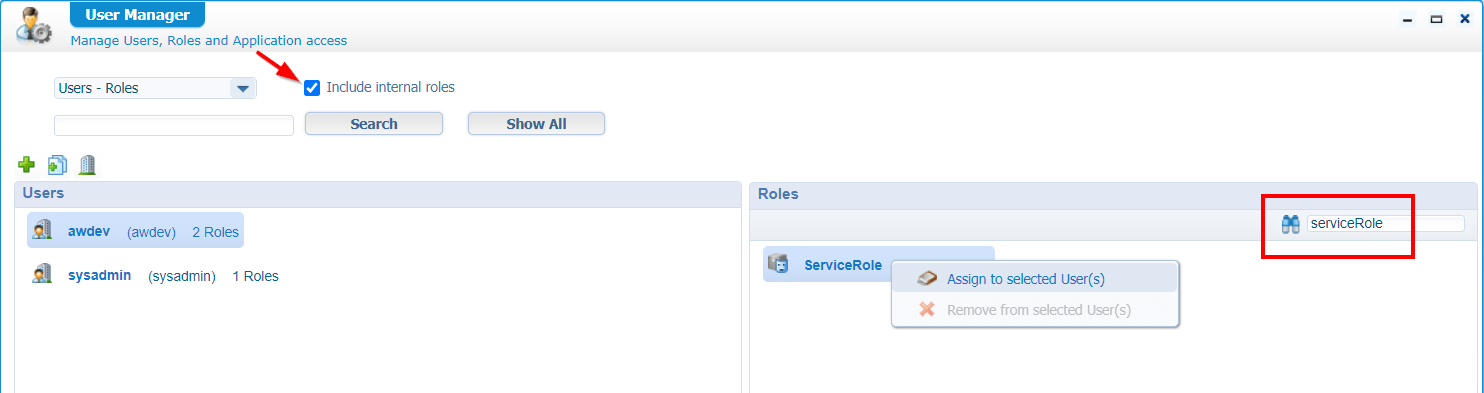
First make sure that our ‘awuser’ account is applied to that new ‘ServiceRole’ in the ‘User Manager’ artifact…
Now it’s time to test in runtime…
In PIM? Well…All fine:
That’s all for the security!
Next…
2.0 service generation with WS-AppServer Package!
Maybe you already read some information about the WS-AppServer…And maybe you also raised that valuable question to yourself: Why do we need a WS-AppServer package and what does it do? Well, what we saw in the previous steps is generating webservices in XML format, but when we want to be more flexible it might be a better choice to generate those same services in Java format which can also be easily changed afterwards! That Java services ‘mock’ generation is exactly what the WS-AppServer package is providing us!
So, back to our ‘Northwind Database Metadata’ for a right-click action that is called ‘Generate WS-AppServer Package’
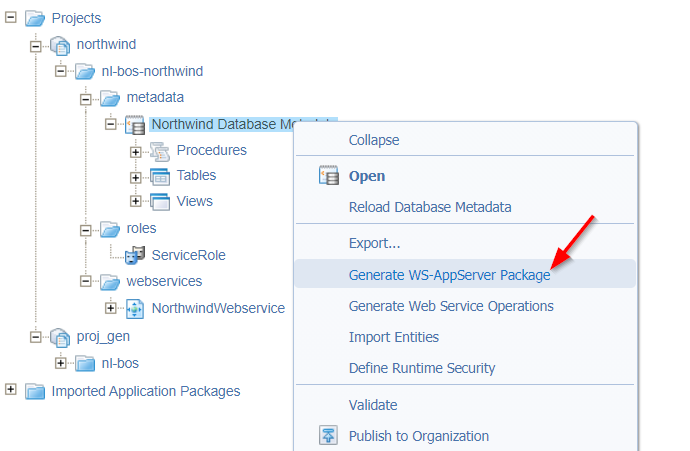
A new wizard is starting where you are able to select the tables that you want to use to create some magic stuff out of it!
Just like in the previous example we just select the ‘customers’ and ‘employees’ tables.
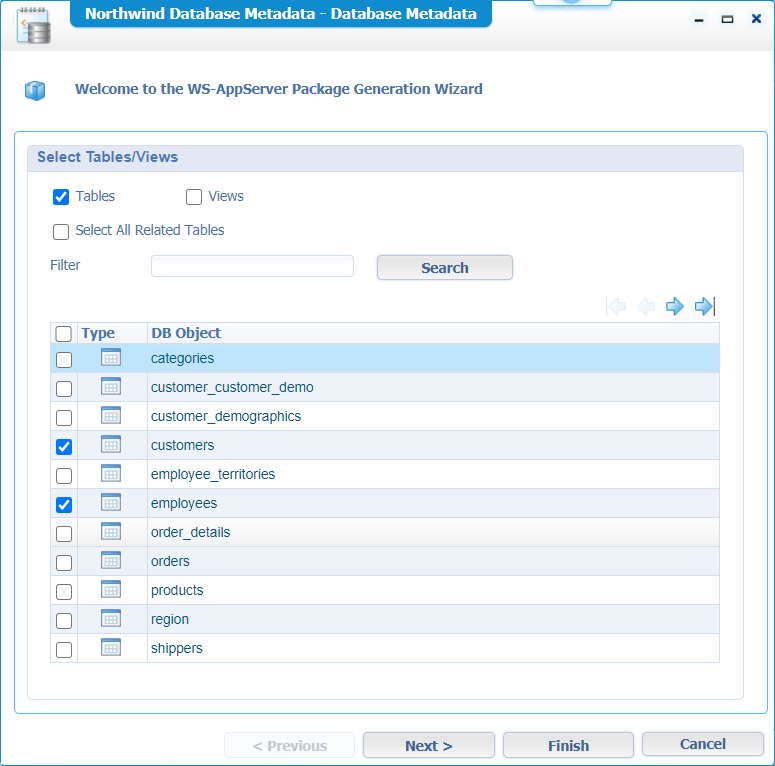
Click ‘Next >’
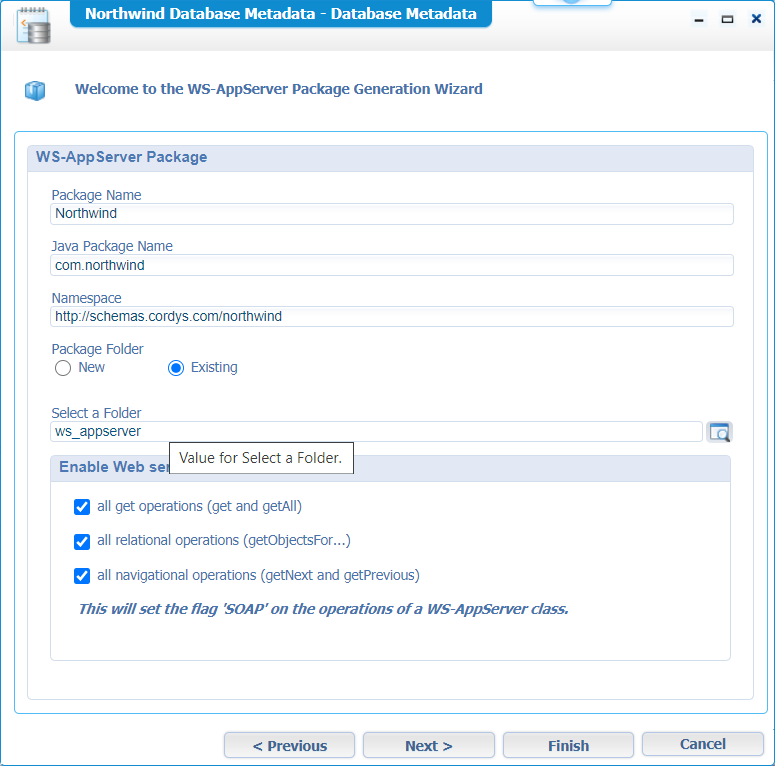
Fill in all those fields that describe your WS-AppServer package. Just enable all the operations, let it save to a new created folder ‘ws_appserver’ for structuring our project, and hit ‘Next >’
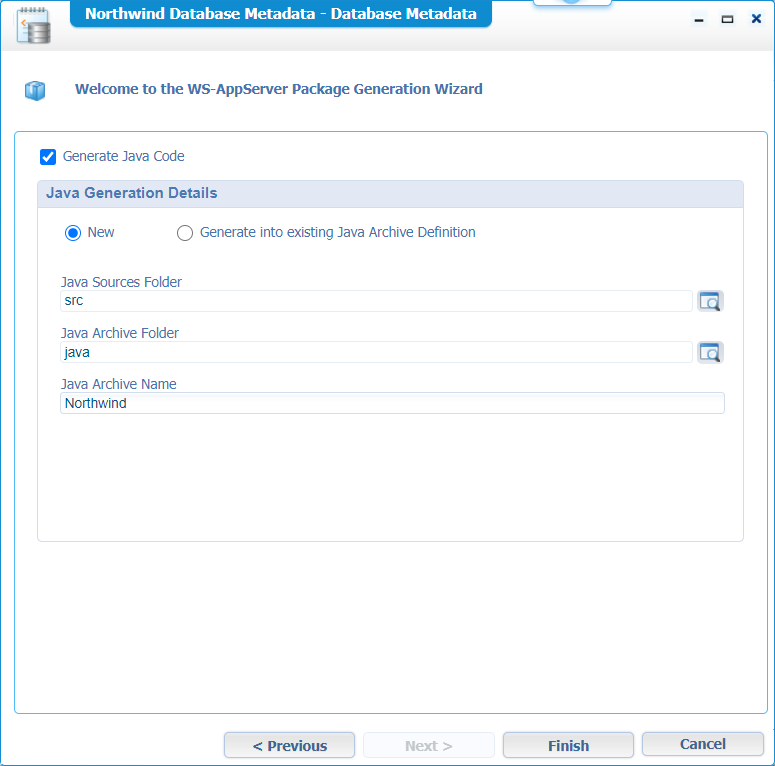
That last step is the creation of a ‘Java Archive Definition’. We learned already about this type of document…Remember!?…In short…It can generate a JAR file out of Java sources and save it on the server. That generated JAR file can then later be added to the class path of another service container from another organization…Do you see the trick now? So, basically we just generate static java methods from our database tables, compile it to a JAR for consumption in other organizations!
Hit that ‘Finish’ and check out the result in our project!
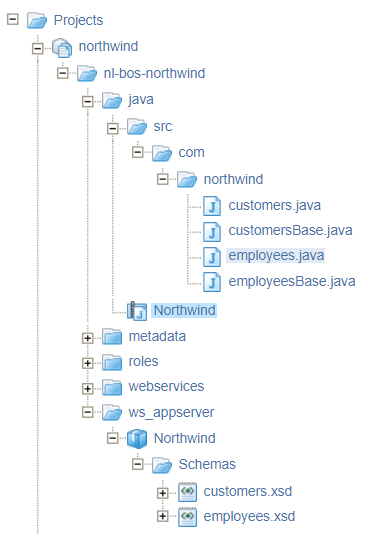
So, when you open for example that ‘employeesBase.java’ file you can find the method again that we tried out before…Only now in Java…How nice!
1 | public static com.northwind.employees getEmployeesObject(short Employee_id) { |
Note: As a Java developer I’m not always that enthusiastic on these type of code generation tricks, but you see that it can indeed save a lot of time when you quickly prototype the nice features of the platform.
When we publish that ‘Java Archive Definition’ you will start to see some stuff happening on the server!
HINT: sudo find /opt -type f -name Northwind.jar
/opt/opentext/AppWorksPlatform/defaultInst/bsf/runtime/deploy/organization/appworks_tips/Northwind.jar
Let’s also open the ‘Northwind’ WS-AppServer package document in the ws_appserver folder and see that you can also manipulate all the information that is connected to it. So, the table attributes as well as the java method parameters! Updates here are also directly updated in those generated XSD schema’s and in the Java source files. It is even possible to add new methods to the package, but that is for you to play around with…

Now what?…Well…Like we learned already! Time to generate (again) those valuable webservices, but this time from our Java services through our WS-AppServer package!!
Maybe you already saw those buttons in the top menu of that last screenshot!?
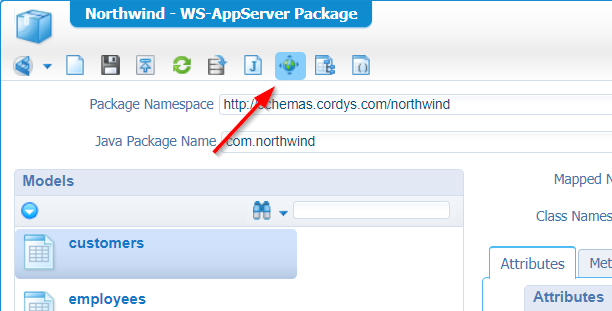
Well…What are we waiting for?…Hit it!
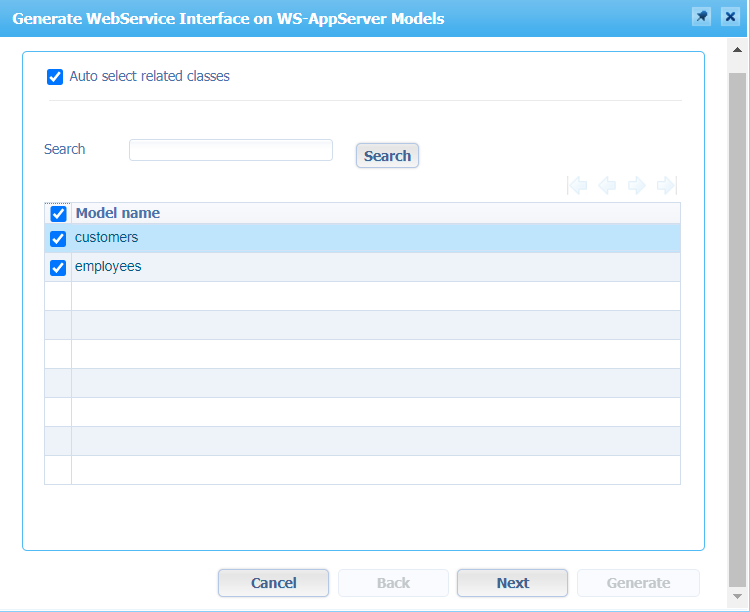
Select it all and hit ‘Next >’
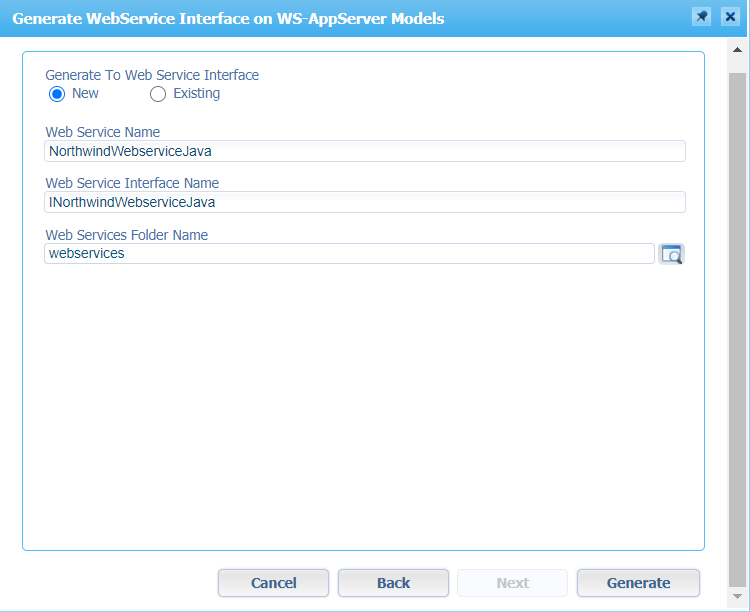
Update those fields to your own needs and save it all to our ‘webservices’ folder to keep that steady project structure! When done, you can just hit ‘Generate’ for some greatness to happen…
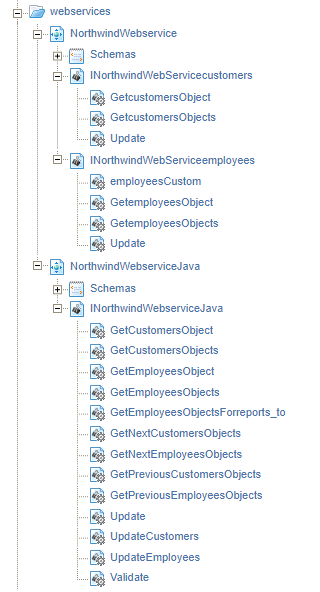
Ohw yeah…now we’re getting somewhere! 😜
The implementation difference?
Well…have a look…This is what we got (as XML) from the first webservice generation:
1 | <implementation xmlns="" type="DBSQL"> |
This is that same webservice, but now in 2.0 Java implementation!
1 | <implementation xmlns="" type="BsfJavaCall"> |
So, the logic is moved to another level and with Java we are a bit more flexible!
Well, publish it all and play around I would say…
Note: Also for these services, don’t forget to apply that runtime security for that ‘ServiceRole’ we’ve defined! You can do it also on that parent folder for all the services at once!
That’s it for the 2.0 service generation with a “WS-AppServer Package” type of document!
Next…Is there more to explore??…Sure!!
Packaging and deploying
Now that we have our ‘northwind’ project finalized and tested (after we’ve set the runtime security for all the other exposed services!) it is time to combine it all into a nice reusable package to be deployed to other organizations…how!?
Well, that’s what I’ll explain in this section…Watch and learn (again)!
It’s not that hard, and we explained it also in other posts…Right-click the ‘northwind’ project and open the ‘Package Properties’
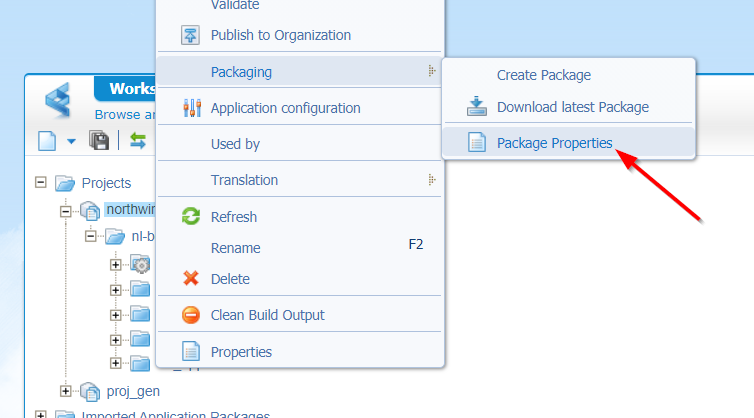
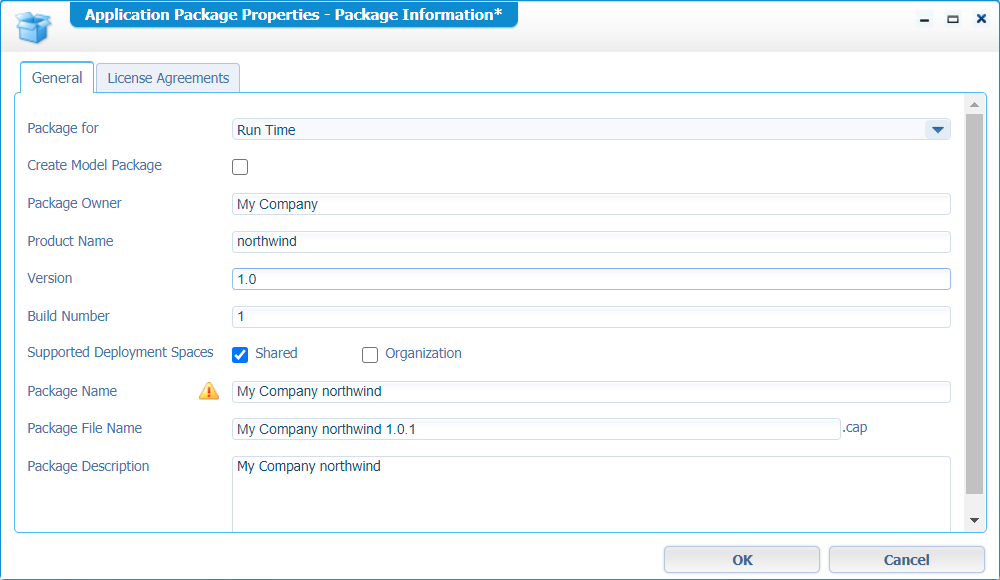
Make sure you make these settings (if that’s not already the case!)
- Make it a ‘runtime’ package as the ‘staging’ option is a more pre-packaging option (not for now!)
- Always set a ‘version’ and ‘buildnumber’ and update it also when a new release of the project is created
- Set the ‘space’ to ‘Shared’ as this ‘northwind’ project will be a reusable component for other organizations too!
Click OK to save it all and after those properties we can also create a new package:
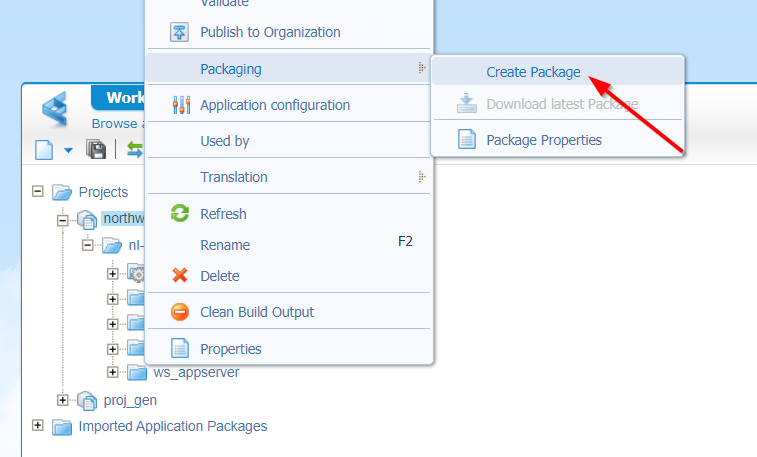
Everything will be prepared for the package and finally you will be able to download it:

Hit the ‘Download Package’ and save it somewhere on your local machine. Filename will be something like ‘My Company northwind 1.0.1.cap’
Time to deploy our package into the ‘system’ space (= ‘shared’) of our current (or new!) environment…
With my ‘awdev’ account I don’t have access to the ‘System’ organization, so I switch to the ‘sysadmin’ account to continue.
Now, open the ‘Application Deployer’ artifact…
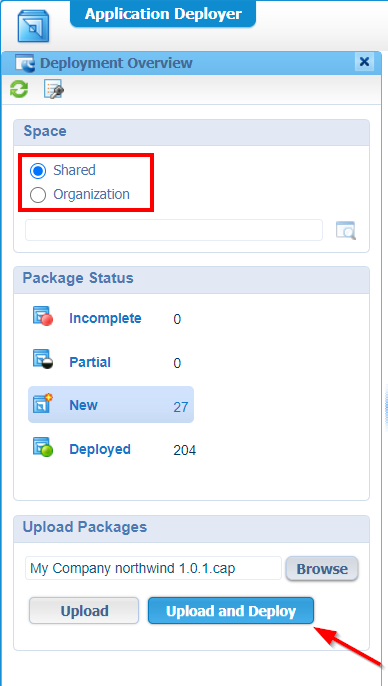
Make sure you deploy into the ‘Shared’ space, select that just downloaded .CAP file and ‘Upload and Deploy’
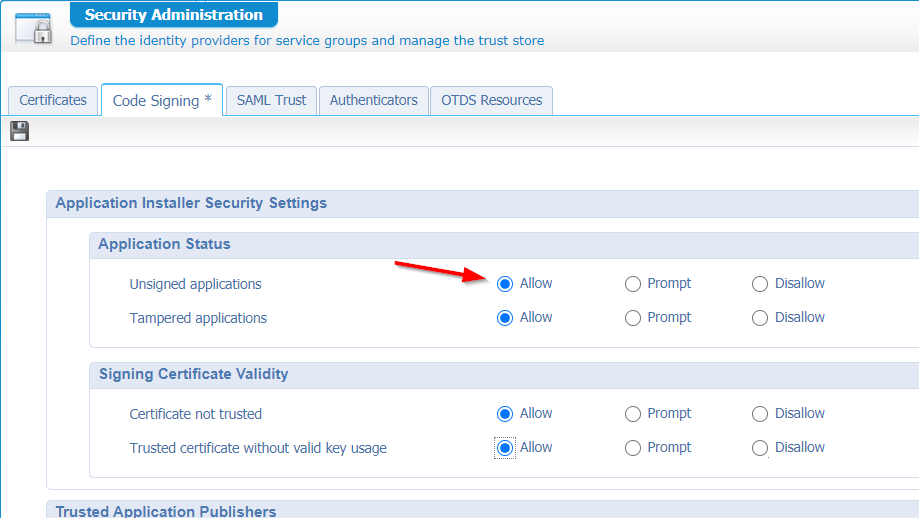
By default, the platform doesn’t allow you to deploy ‘unsigned’ package. To work around this for now it’s an option to lower that security barrier in the ‘Security Administration’…Don’t forget to save it!!
Your .CAP gets uploaded, and you will be directly redirected to the deployment wizard…No fancy stuff to screenshot from! I guess you can manage that one yourself…correct? In the last step I only set the ‘Revert on Failure’…just in case…
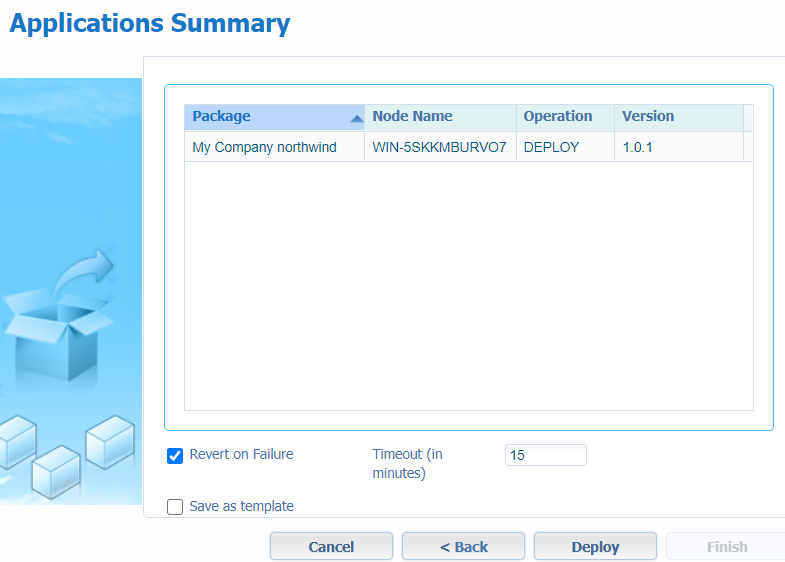
Hit that ‘Deploy’ and wait for that final result
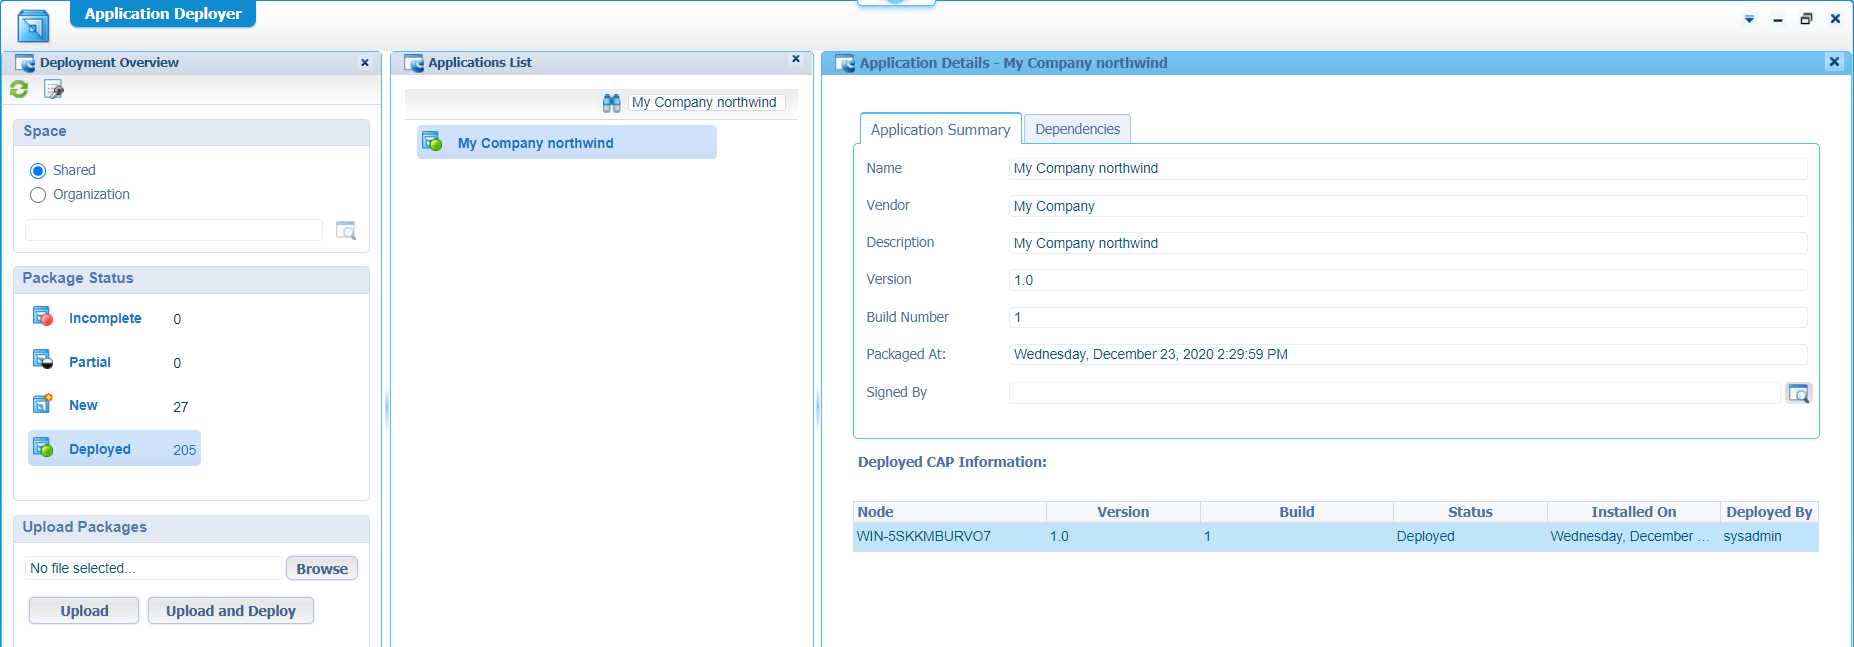
Ok…deployed…Now what?
Let’s create a new ‘WS-AppServer’ service container in the ‘System’ organization. For this you can just follow the same steps as we already did in this post for the organization where we ‘developed’ our ‘northwind’ project…Easy-peasy!
I gave that service the name of ‘WS-AppServer Northwind’…
During the ‘Web Service Interfaces’ selection we should be able to select the installed service interface from the package (in my case, 2 of them; The XML and Java variant!)
In the ‘Next >’ step, make sure to start the service container automatic and let it run in its own JVM (unmark the ‘Assign OS Process’ option). Make sure the JVM class path is updated with the JAR file that is deployed with our CAP package on the server in ‘probably’ a location like this (double check on your own VM!) /opt/opentext/AppWorksPlatform/defaultInst/bsf/runtime/deploy/organization/appworks_tips/Northwind.jar
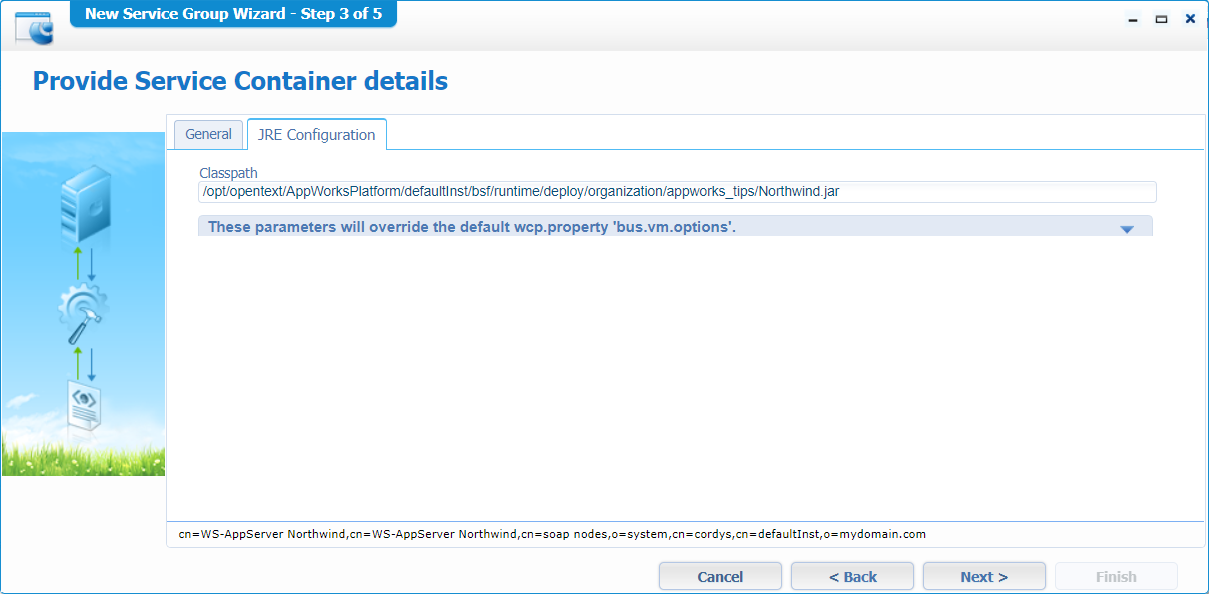
Hit ‘Next >’
Add a new database configuration (like you did in the ‘development’ workspace) with exactly the same database information (if that database is on the same server off-course…That’s your choice to make!).
In my environment the database connectivity test fails for some strange reason but check the next step (below)!
Finish the wizard, and you should have a new service container (nicely up and running with a green icon) with a corresponding service group (in the ‘Shared’ system organization).
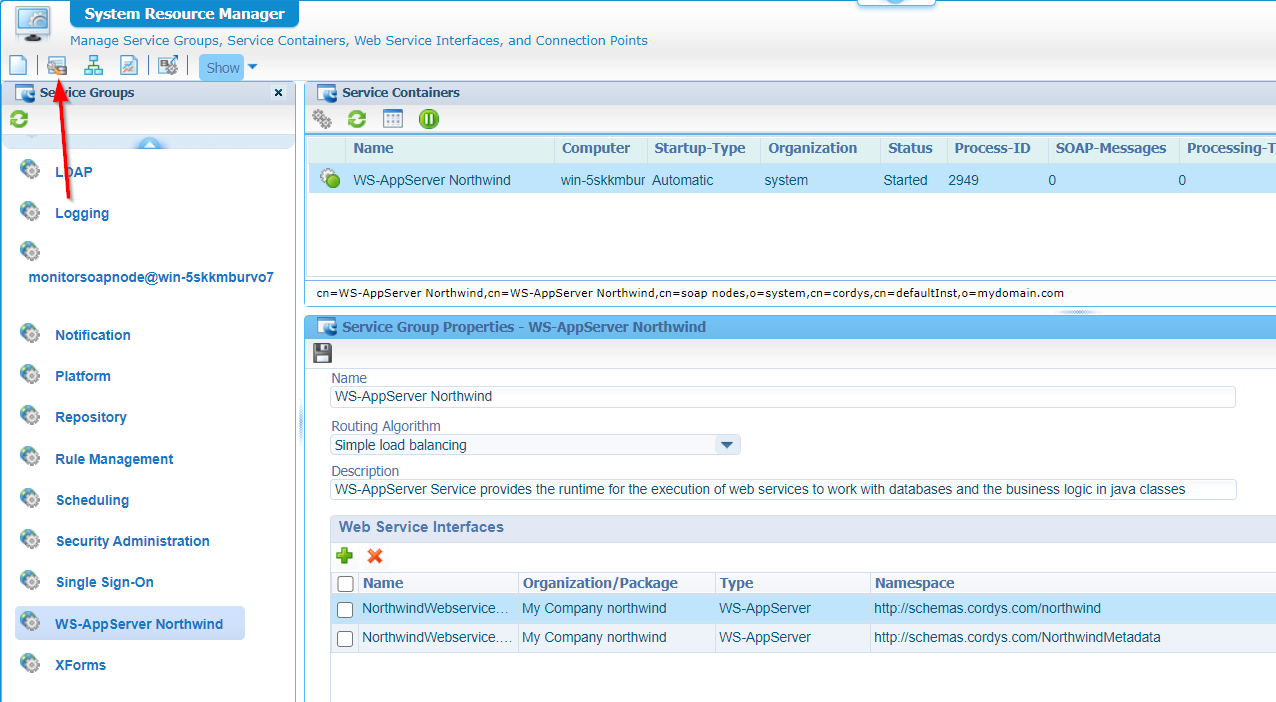
Yeah…You see that red arrow…Hit it…As this is where our database configuration can be re-tested (as it that test failed during the creation of the service group)
Back to the ‘System Resource Manager’ as we can also directly test our services from here…Check the ‘secret’ button…
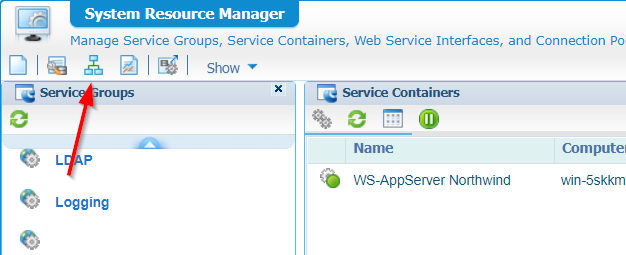
The ‘Web Service Interface Explorer’ will start up…
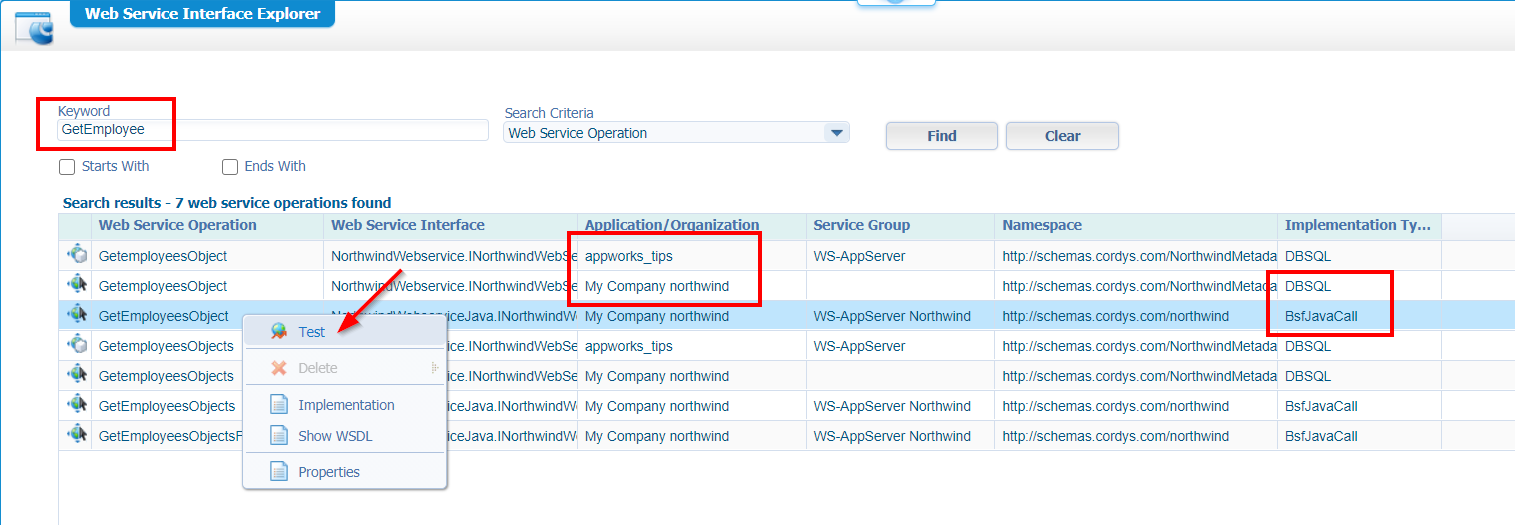
Search for ‘GetEmployee’, and you should get some results. We are the most interested in the ‘Java’ variant of the ‘My Company northwind’ application that came out of our CAP package!
Test it, and you’ll see (with the correct input parameter), you also will get back a result…😉
Well, the ‘Shared’ space is prepared now, so all our other organizations should be able to use the brand-new northwind project!?
So, just for the test we create a new organization…called ‘northwind_consume’. If you don’t know how to create a proper organization hit that search as this is explained long, long time ago (I can still remember). The ‘awdev’ account will be the administrator, and I also apply the ‘Developer’ role to it within that new organization…AND…Don’t forget to also apply that internal ‘ServiceRole’!!
Time to test those webservices again, but this time in our new organization with our just correctly assigned ‘awdev’ account…
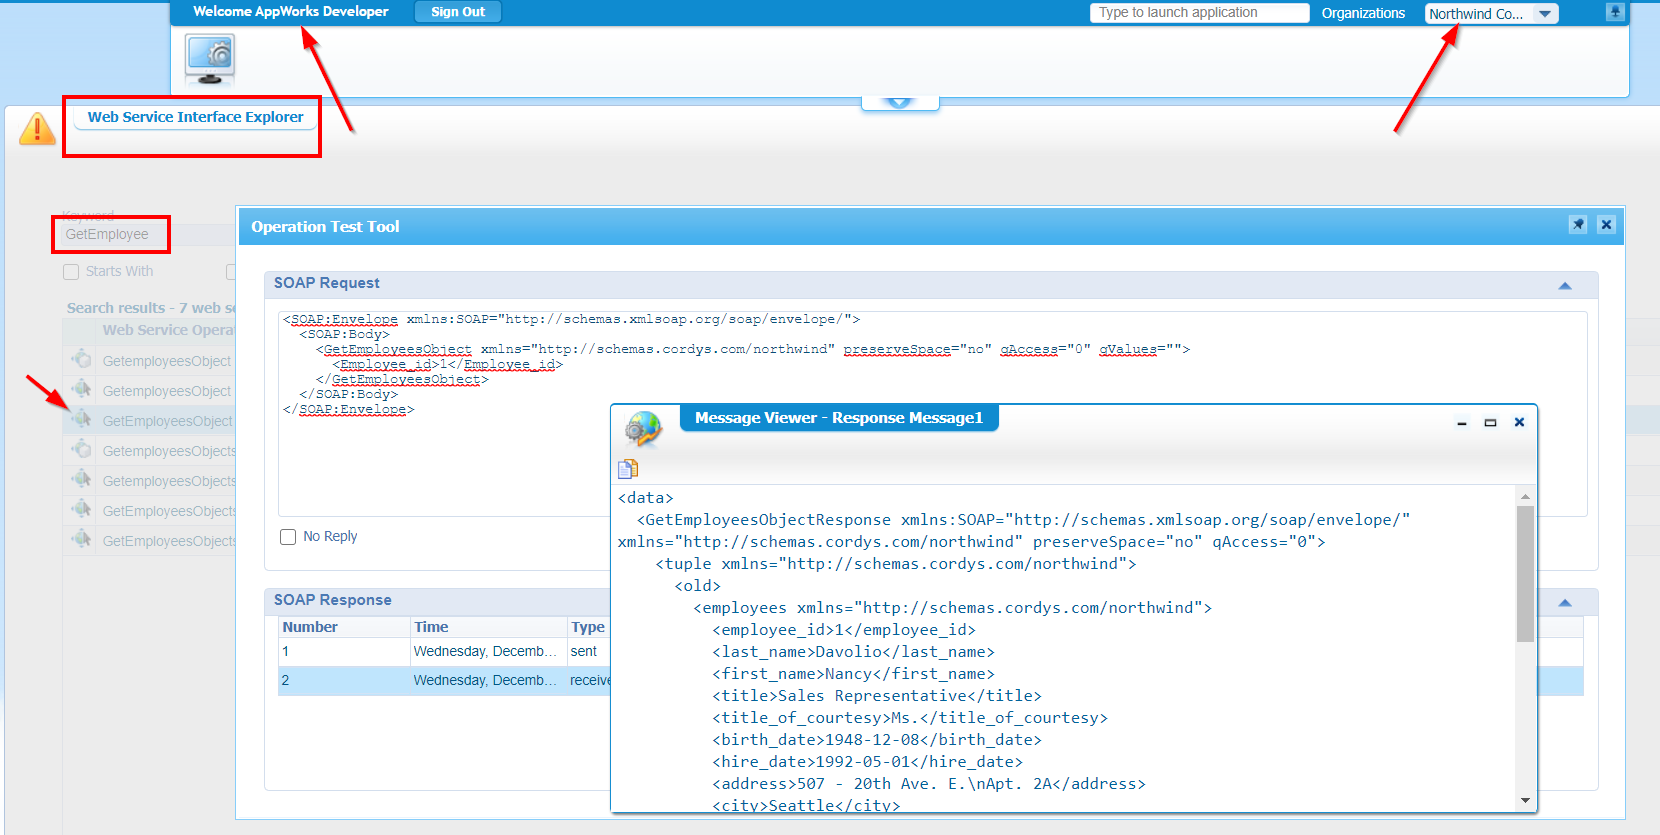
NAILED IT….hallelujah!! 👊
What else to say…”DONE”, “DONE”, “DONE”! Well, if you don’t know by now what the proper way is to consume any database information directly from AppWorks…Then I don’t get it!? Man…Where to start on what we’ve learned during this post!?
- Creating a new database
- Loading northwind data into it
- Creating a new project
- Adding a new WS-AppServer service container
- Playing with a Database MetaData document
- Generating XML webservices out of it (even custom webservices)
- Crafting a WS-AppServer package
- Generating Java webservices out of it (So we are more dynamic)
- Applying role-based runtime security
- Package and deploy it all into the shared ‘System’
- Consume it all from a brand-new organization
Yes…It’s just too much…Hopefully you can handle it. It’s good you have a full week-end in front of you. So, have fun with all this valuable information and see you in another great installment on a brand new AppWorks Tips post! 🍻
Don’t forget to subscribe to get updates on the activities happening on this site. Have you noticed the quiz where you find out if you are also “The AppWorks guy”?
