Hi there AppWorks fans,
Welcome to a new installment of AppWorks tips.
And for today…We will torture our brand-new Gateway web application with some mobile building block functionality on an entity. Not that hard to do so…I thought!
Let’s get right into it…
Spin up the VM, open the ‘Explorer’ interface with your workspace and the corresponding project. We now just pick an entity to play with…For me it’s the ‘Category’ entity (we use this one for most of our try-outs)
Open the entity and add the ‘Mobile app’ building block from the ‘Functional’ category

You get a create screen that looks like this:

Give the app a name like ‘AllCategories’ and hit that blue ‘Add’ button for the next screen.
The first thing you’ll see is the ‘readiness’ of the Gateway!

Make sure you get a ‘Green’ status. If not, you need to check the previous post where you add some properties in the AppWorks platform configuration with the CMC tool…remember that CMC tool from the previous post?!
Now we first need to make 2 other building blocks available.
1. A new list
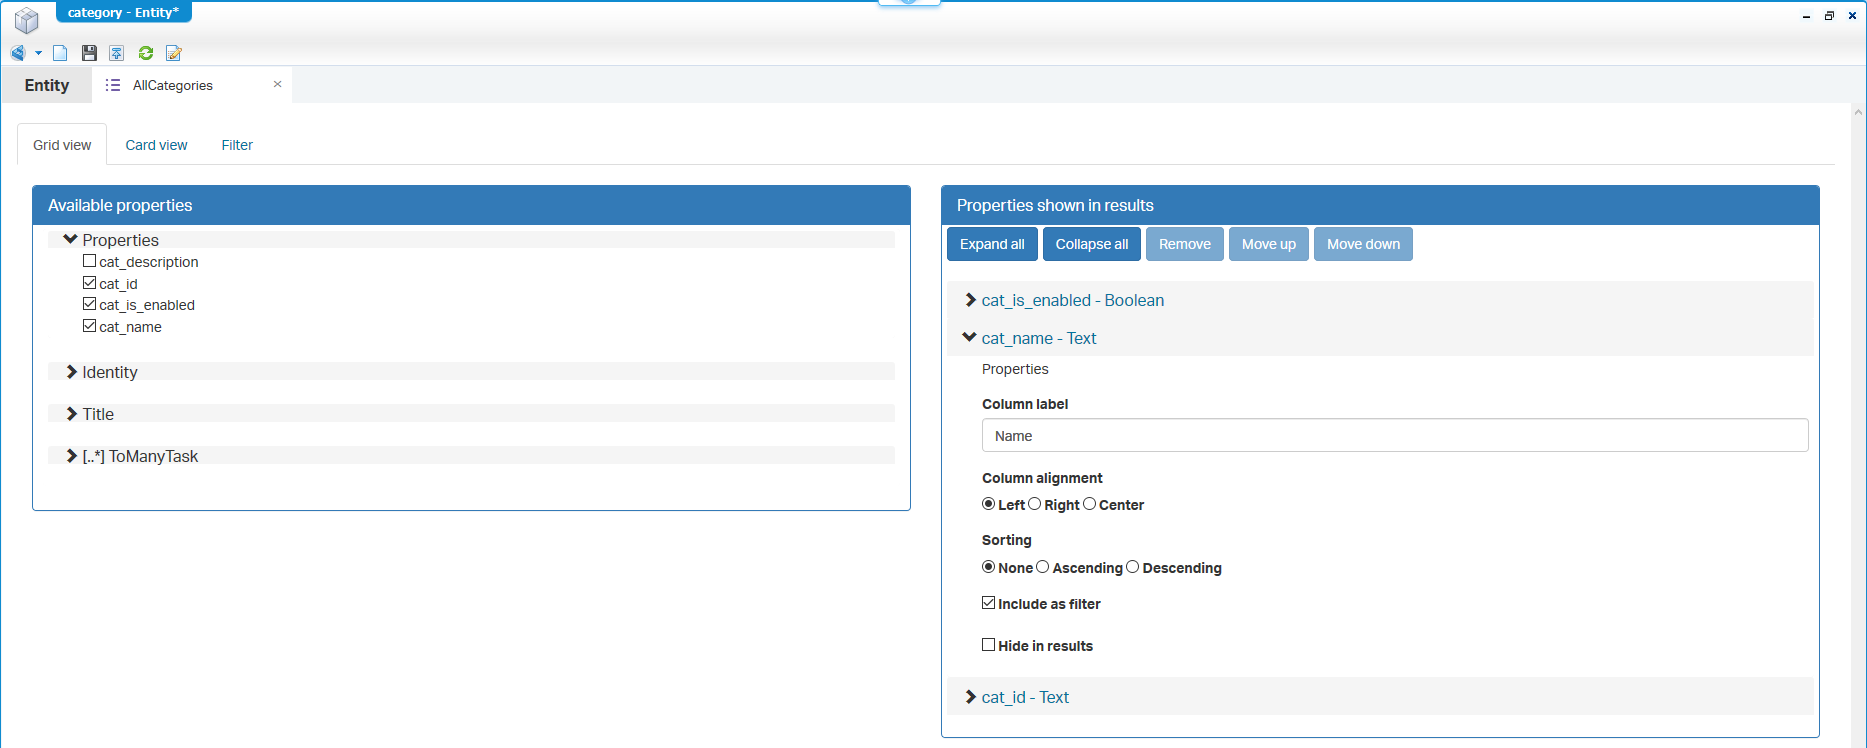
You probably have it already, but in case you don’t you can add a new ‘List’ building block with the name ‘AllCategories’ and just add some properties. This is how it looks in my environment.
2. A new layout
Next is adding a new ‘Layout’ building block. Give it the name ‘MobileLayoutAllCategories’

And hit that blue ‘Add’ button to continue crafting a new layout…great!
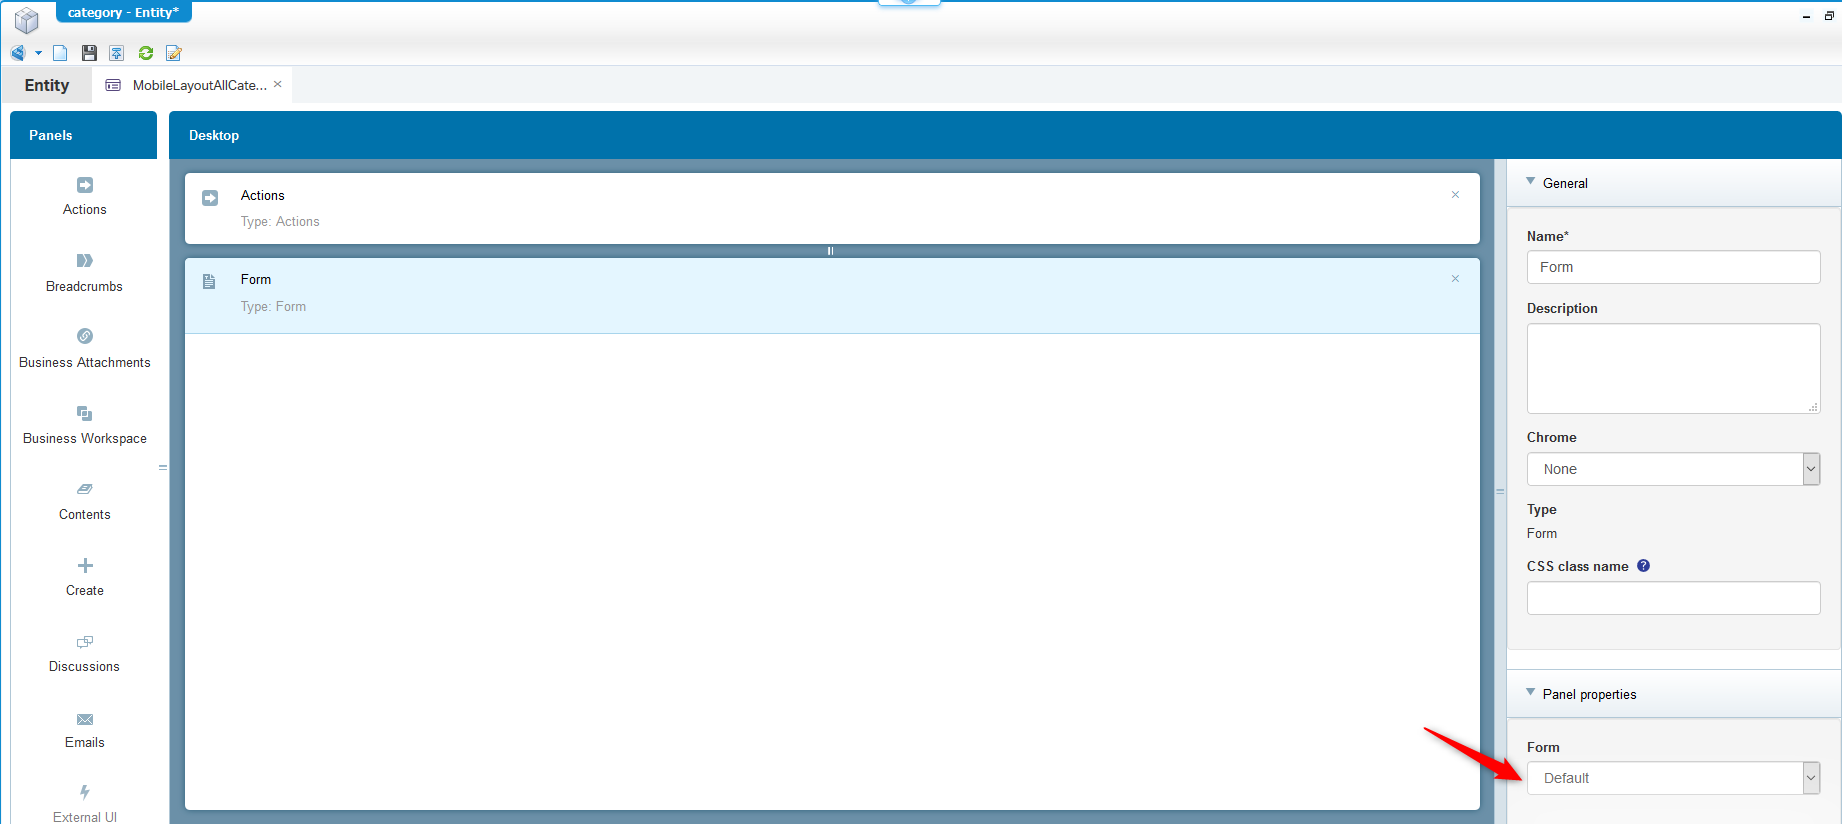
This layout is makes it possible to ‘Open’ our selected entity for viewing/editing, so we just add 2 panels for now.
First is a ‘Form’ panel that you can drag & drop in the middle of the screen and make sure you select the ‘Default’ form of the current ‘Category’ entity (if not available just create this one also, but you probably have it already!)
Next is the drag & drop of an ‘Actions’ panel on top of the ‘Form’ panel and you can keep the default settings for this panel.
The result should look a bit like this:
Save the layout and go back to the mobile app ‘AllCategories’ building block where you now can select the brand-new crafted ‘Layout’ and the already available ‘List’.
To make it all nice and shiny we’ll add a cool ‘App Icon’ to it.

But wait for the deployment…there is more to do to make it all work…
We are required to expose the CRUD services for the entity. So, add the Web service building block like this
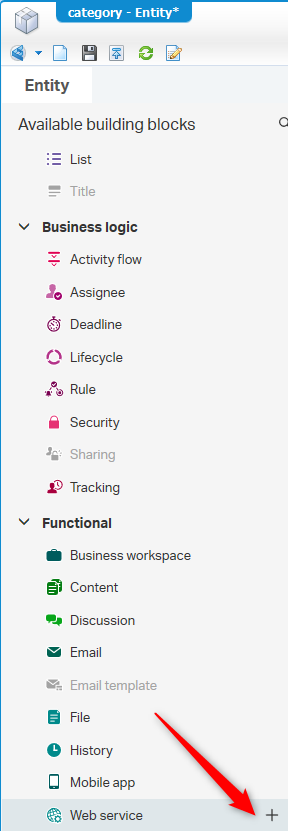
And make sure you expose all 4 operations!

Last step is to save the entity and publish the damn thing!
Now…the moment of truth!
Yes, go back to the mobile app configuration where you can hit that bright shining ‘Deploy’ button for some Gateway magic to happen and wait for the status change to ‘Deployed’

Ok…Let’s have a look on the ‘Gateway’…http://192.168.56.107:8181/gateway
Login with username ‘otag’ and password ‘admin’ and see our deployed application!

Note: don’t ‘enable’ the application from the gateway view with that blue button! Make sure you enable/disable the app from the mobile app building block…I saw strange things happening…trust me!
Now the big question…How do we view this app on our mobile device??
For that, my AppWorks friends, we’ll use one of the AppWorks Managed Runtime Clients for Android or iOS, There is also a desktop version (x86 and x64) available, but this client is not suitable for our application as it is deployed as a ‘mobile app’ and not a ‘desktop app’…Take a good look in de screenshot again (left corner of the app, under the ‘Enable’ button)
But…For the mobile part you need to have your VM image ‘reachable’ on my mobile device…agree?
What we also can do is to simulate a mobile device on our local Windows pc! A great tool for this is BlueStacks. Just install it and let it run. Provide it with a google account so you can access the play store.
The google play store will bring you to the correct app with the name ‘OpenText AppWorks 16’

Click the google app and install it on the current running BlueStacks instance.
When installed you can open the app.

Just give it an ‘Allow’

Fill in the correct gateway URL http://192.168.56.107:8282 and hit that black mark in the top right corner to save and continue.

Now you get a login screen…This is (and should be) an OTDS login screen (You know because there is an ‘forgot password’ option available)! So, fill-in credentials for OTDS to get access and hit that ‘Sign in’ option.
The ‘normal’ screen would look like this, but this is not working for me!
You see that we’re getting close to and end as we see our application now

Hit the plus-sign to ‘add’ the application to you ‘App Library’.

Now you can use it…Hooray!
The next section is about the struggles I had during my app deployment as it might give me/you some headache!
1. Login URL validation
Check the result on this gateway URL http://192.168.56.107:8282/v3/admin/auth/loginurl
With this json as result where you need to make sure the ‘loginUrl’ value is correct and accessible from your desktop client/android/iOS gateway app!
1 | {"loginUrl":"http://192.168.56.107:8282/otdsws/login","clientId":"otag-otagOAuthClient","supportsAnonymousAccess":false} |
If not, you can update this URL in the gateway console

2. Gateway admin status
This URL is also an interesting one http://192.168.56.116:8282/v3/admin/status to see if ODTS is on your side! with a result like this
1 | {"dbSetup":true,"dbConnected":true,"embeddedOtdsIncluded":false,"derbyIncluded":false,"otdsSetup":true,"otdsConnected":true,"developerMode":false,"tenantMode":false,"tenantId":""} |
3. App setting
Another thing I noticed is the app settings itself after deployment!

You’ll see these settings where you need to make sure the URL’s are correct!

4. OTDS Authentication end-to-end
Make sure you have a proper OTDS user available that has access to these bullets
Be an Entity Runtime User role within your organization
- You can do this in the user management artifact with an administrator user like ‘sysadmin’
Make sure the correct OTDS Resource ID is used
- In the deployed app
- But also, in the AppWorks properties
com.opentext.appworks.OTDSResource(with the CMC tool!)
Make the AppWorks partition accessible to the OTDS OTAG partition!
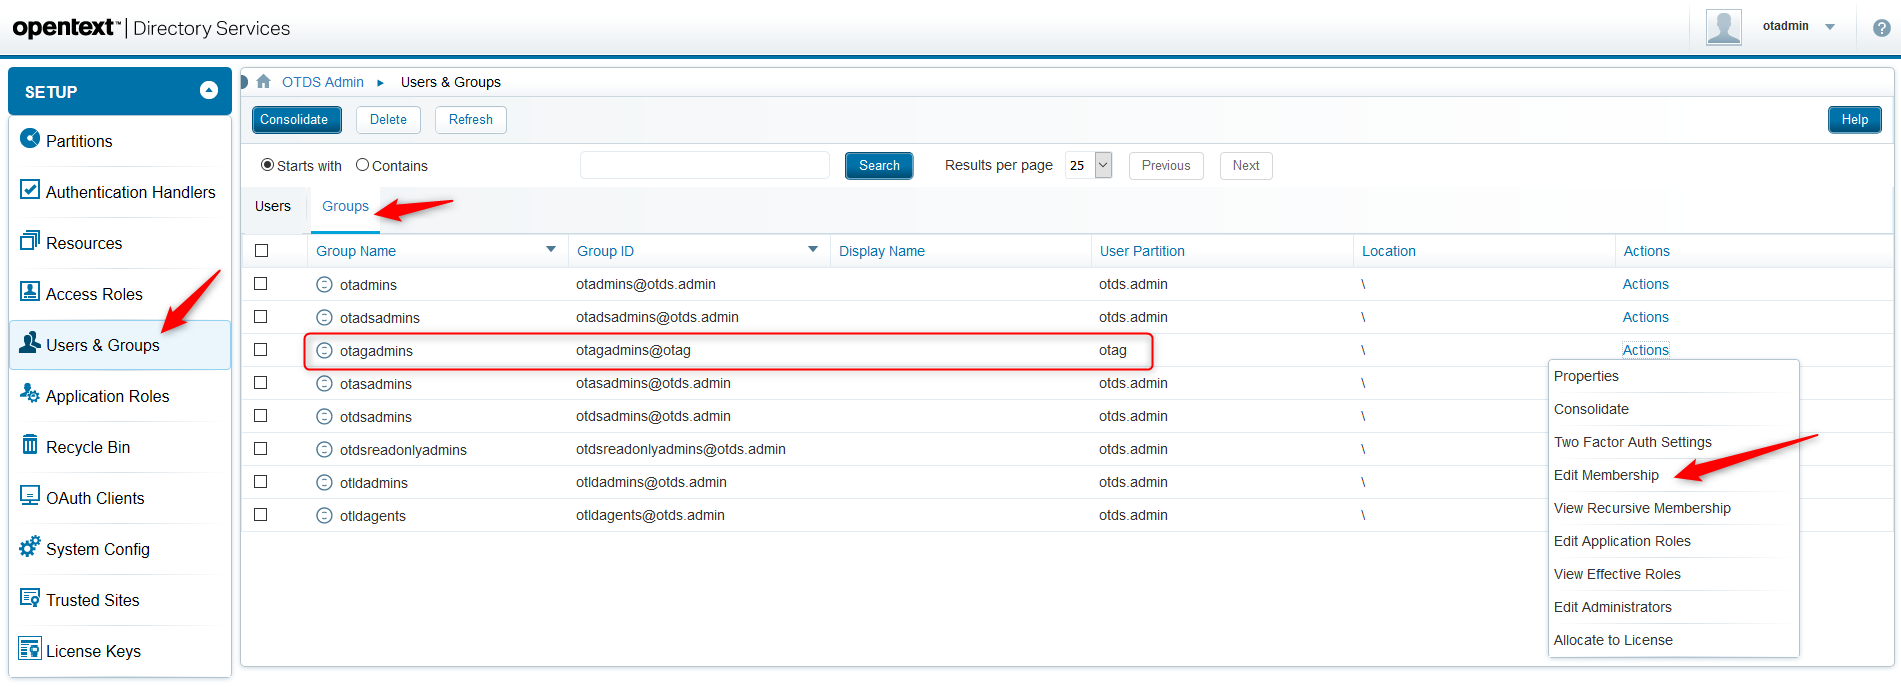
- This can be done in the otds-admin console…don’t forget to hit that ‘save’
And make the OTAG partition accessible to the OTDS AppWorks partition!
- Also, from the same otds-admin console (with the ‘save’)
![mobile_021]()
What I also did was adding my OTDS user also to the otagadmins group
- This let you login to the gateway with this user (probably not required, but it might help you!)
![mobile_022]()
5. Application end-to-end
Also make sure you pin-point these bullets
- Save your entities and make sure they are deployed.
- This is to make sure you CRUD webservices are available in runtime!
- Make sure you can create some entity instances with the OTDS user account in the /app/start front-end
6. Logging
And last but least is off course the logging (the eyes of your system!). And in this case the gateway logging!
Set the gateway log level to ‘debug’ in sudo vi /opt/tomcat2/latest/gateway/WEB-INF/classes/log4j2.xml
1 | <Root level="debug"><AppenderRef ref="OTAG"/></Root> |
After this you can monitor this file
sudo tail -f /opt/tomcat2/latest/logs/gateway-otag.log
Also, this file did help me on my way!
sudo tail -f /opt/tomcat2/latest/logs/localhost_access_log.<date>.txt
7. Other resources
During my journey I also used this resource: The “OpenText™ AppWorks™ Gateway Installation and Administration Guide”. Not part of the AppWorks suite documentation, but we downloaded it here
Update and lessons learned on a second, third and fourth try!
RTFM…again and again!
In the final comments you can read that I finish the post with an error about authentication. After reading the “Gateway Installation and Administration Guide” documentation again (and after an insider’s tip) I noticed this note:

That’s an option you need to enable in the gateway settings.

And restart your gateway instance systemctl restart tomcat2 in my case.
This helped me to login into the app itself in BlueStacks
Now you will also see the ‘normal’ (non-OTDS) login screen again and the OTDS authentication happens in the next step!

With a result like this…indeed…an empty app!?

But why not creating some instances of the ‘Category’ entity!?….Trust me, they’re created with the same user in the /app/start front-end! And that made me…
Change the organization in the app settings

But this change still gave me no results in the app…Even after cleaning the app cache in BlueStacks!
Back to the eyes of the system…our logging!
As OTAG and OTDS are passed, our next logfile would be the TomEE where AppWorks is running!
sudo tail -f /opt/tomee/apache-tomee-plus-8.0.0/logs/localhost_access_log.<date>.txt
And there we see some interesting stuff passing by…Where the first should (as I would think) give back some items…
1 | /home/appworks_tips/app/entityRestService/Elements(6550dfdcfc863508a5afbc5ceff0a9de.F8B156B4FF8F11E6EE191FD794C6571A)/ResultItems?Identity.Id=327681&Identity.ContextId=82B840A98FA64175BBAECA4667661BFD&Identity.PanelId=82B840A98FA64175BBAECA4667661BFD |
Why is there no result in the items array “items”:[] from the first URL?
Looks like we need a fifth session…damn!
…A weekend is passed, and a light was shining again in the far end of the tunnel!
We expose webservices on the entity and that also means we need a service that make them executable/reachable…For this we need an ‘Application Server’. Or in other words the AppServer service container! And in my ‘restored’ environment this service is missing.
This can also be checked by testing the service with the ‘Web Service Interface Explorer’ artifact that is available for us low-code people! Check the screenshot for input and the expected error!

To solve this, we need to expose an AppServer service container to our solution!
You can follow the post ‘Creating a WS-AppServer service container the proper way’ on this site, but this time we don’t need a ‘WS-AppServer, but an ‘AppServer’ with an end-result like this where you also added the ‘Method Set Entity category’ to the Web Service Interfaces.

Save it all and start the service container. You are now able to test the service properly with a sample request like this and get a result back:
1 | <SOAP:Envelope xmlns:SOAP="http://schemas.xmlsoap.org/soap/envelope/"> |
And?…After restarting my TomEE with systemctl restart tomee, cleaning app data in BlueStack…No result!!?? Even no result when I add all users ‘Allowed’ in the security settings of the AppServer Service Container…!

I don’t get it…It should not be that hard to complete this feature, but it’s still not working.
This is the end of the updates where it took multiple sessions to make it all happen. We’ll get closer and closer to a result, but it’s still not a final DONE!
I notice the post is a bit un-structed, but now you also see that things are not always as bright as they are pretended to be.
OK…You’ll probably guessed it and I will admit that I was not able to open the app without this annoying error!
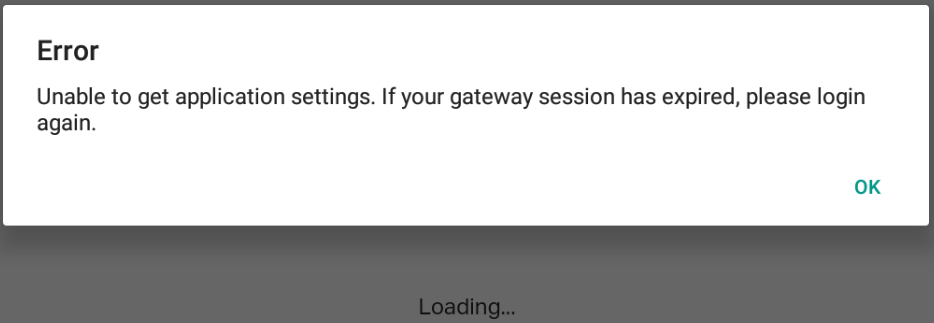
Please note that there is an ‘Update and lessons learned on a second, third and fourth try!’ in the last section of this post also several actions we tried out. We got closer to a result, but still no final DONE!
It all has to do with authentication from the Android side that tries to access this Rest URL /v3/admin/settings?appName=AllCategories with a 401 HTTP unauthorized response error. Really strange because the same user account was able to access the gateway URL and opening the application settings without any problem!
But as we all want to continue with our life I just wanted to share as much information that I struggled with to give this post a ‘DONE’ for now. I’ll give it a final try in the future (it’s on the backlog)…I see you in the next one…Have a nice weekend!
Don’t forget to subscribe to get updates on the activities happening on this site. Have you noticed the quiz where you find out if you are also “The AppWorks guy”?


