
Hi there AppWorks fans,
Welcome to a new installment of AppWorks tips.
The last several posts made a big step in the direction of connecting a CMS as back-end storage for data that is created on AppWorks platform. For this we installed Documentum as a CMS and made a connection via CMIS from the AppWorks platform to the Documentum platform. This way we can synchronize our data from AppWorks to Documentum where it is saved in a structured way.
What we already saw with the connection in place is that only the content is synchronized to the Documentum platform and not (yet!) the metadata that is available on the AppWorks side. Would it not be a nice thing do make a small step in that direction so we can see what is possible.
Let’s get right into it…
We can make this step in several directions.
- We can make a call again through the CMIS service to update metadata
- We can also deploy the ReST layer of Documentum to update the metadata
- We can make some small Java class that does the trick for now
For now, we go for option 3 as first we don’t have the ReST layer of Documentum in place already and second is that CMIS and ReST require authentication that I want to avoid explaining in this post. It makes the post more complex than required, but we will cover it in another post because it’s nice approach to try out.
So, option 3 (the Java class)…what does the class need to do?
- Make a connection/session
- Do some magic…like:
- Getting the Documentum object based on the entity path (we saw this path in a previous post)
- Parsing the Entity instance input data
- Update the object in Documentum with the parsed data
- Release/close the connection
With this information we came up with a small jar-package that can be downloaded here
If you know a bit of Java it is possible to pick a tool like JD-GUI and see what we exactly do in the class under package location: nl.bos.appworks.DocumentumServices
In the jar you can find a setting.properties. Please update the information to the correct username, password and repository name if you did not follow the steps in the posts on this site. The file can best be edited with 7-Zip tool, so the JAR file will be intact when you are done editing.
The same kind of update should be also be done for the dfc.properties file in this JAR. Point to the correct Documentum server with the correct information. Please leave a note in the comment if you require extra information!
Now what?
There is one extra part of information you need for this jar as we told you that we need to parse some entity instance data. The data should be in this format subject::mySubject||title::myTitle||object_name::myObjectName
These are key/value pairs where the key is the Documentum (dm_document) property (So, the content object that was synched from AppWorks to Documentum). The value is retrieved from the entity instance…Maybe it makes no sense at this moment, but it will fall once we start with the AppWorks side…What do we want to do now?
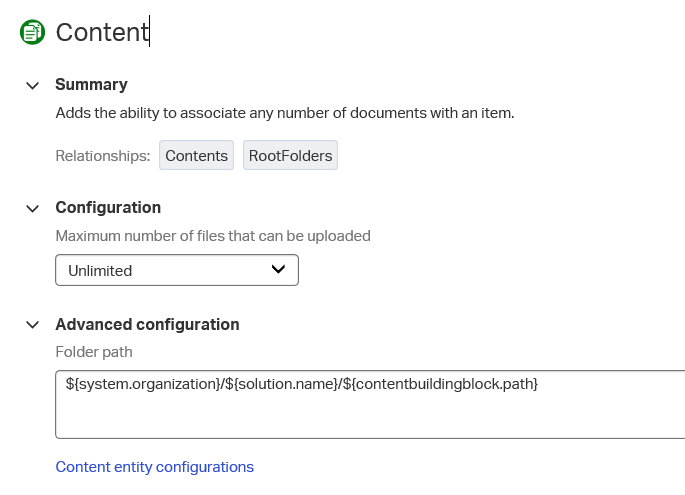
Well, maybe you remembered that we created a ‘File’ building block on 1 of the entities (in my workspace it was the ‘Member’ entity) and maybe you also saw the ‘Content’ building block too and asked yourself the question why not use that one?
Well, we are going to use it for this post…But ‘Content’ is slightly different from ‘File’ as where file can be only 1 file where content can be multiple files. Like a ‘folder’ with multiple content files in it. This also required a different approach on end-user side, but that is what we will see when we are ready for testing!
Configure an entity with a ‘Content’ building block
Let’s open another entity (for example the ‘Category’) where we don’t have any ‘File’ or ‘Content’ building block available, but where we do have the ‘Create’ form available! On that entity add a ‘Content’ building block which opens a panel like this:
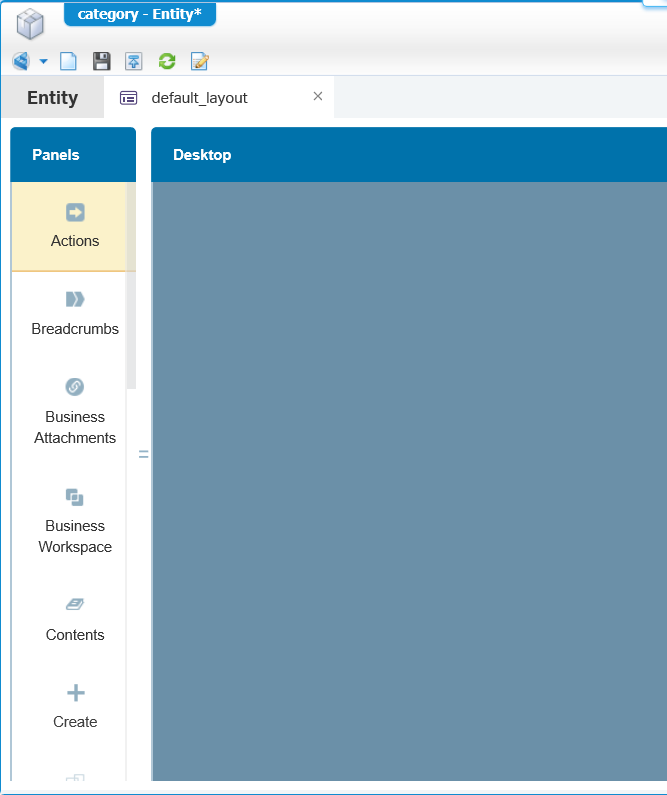
And after this ‘Content’ block also add a new building block ‘Layout’ with the name default_layout. After hitting the ‘Add’ button you see something like this:
From the left panel add these panels: The ‘Actions’ on top of the screen, the ‘Form’ on the left side and the ‘Contents’ on the right side. Play a bit on how you can stack and snap to the corners. The end will look like this:
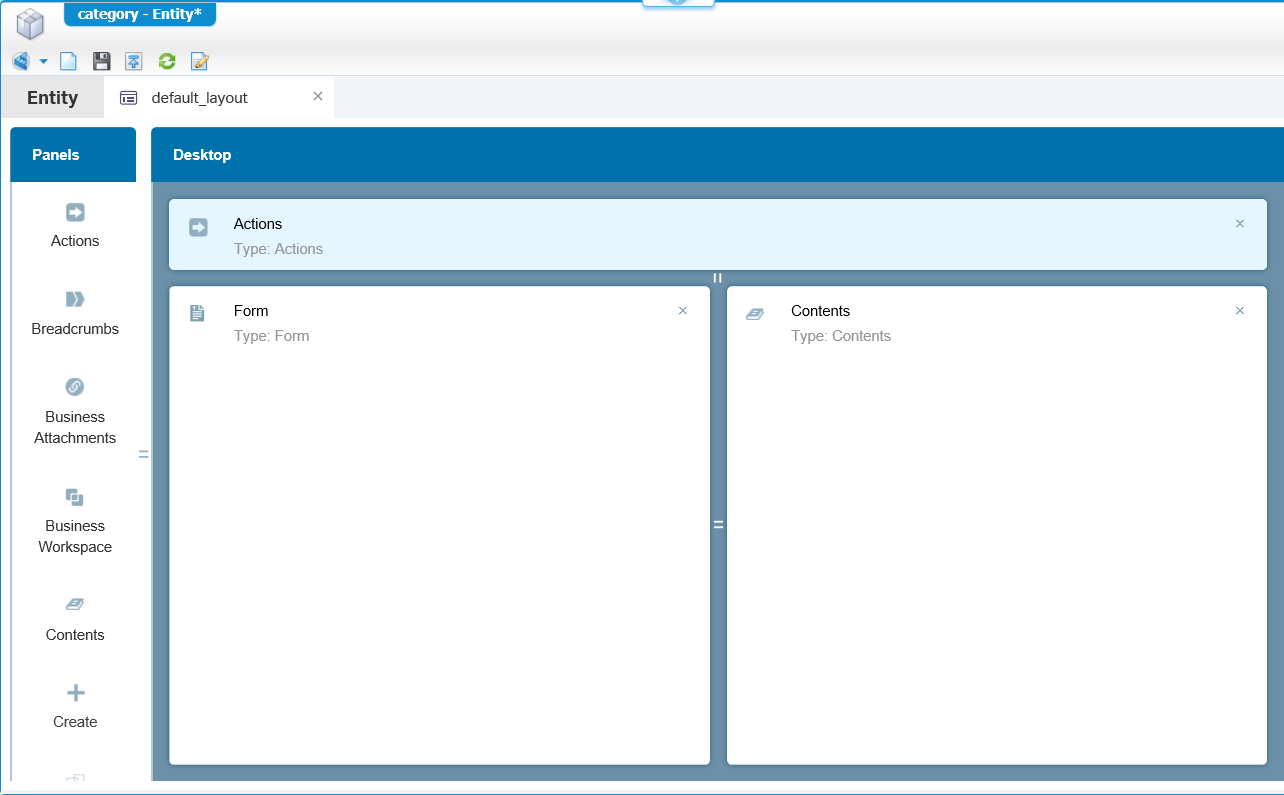
Now, for the ‘Form’ panel you should make these setting on the right-side. Select for the Chrome option ‘Full’ and a little bit down you see you can select your ‘Default’ form to be shown.
For the ‘Contents’ and ‘Actions’ panel just set the Chrome-option to ‘Full’. It just makes things look nicer.
Now close the layout editor and go back to the overview of the building blocks and click on the ‘default_layout’ where we make these 2 configuration changes:
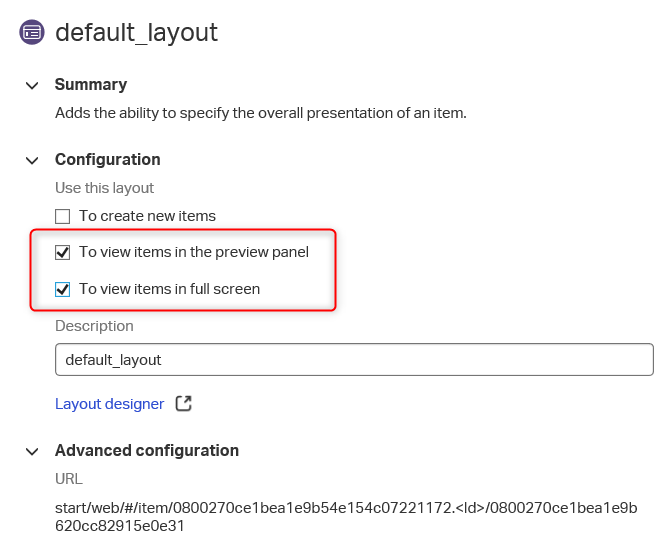
This makes sure that this layout will be shown once we ‘Open’ an instance of the entity and this then overrules the opening the entity with the ‘Default’ form…How nice!
Now, let’s save and deploy this change. When we create and open a new ‘Category’ your screen will look a bit like this:
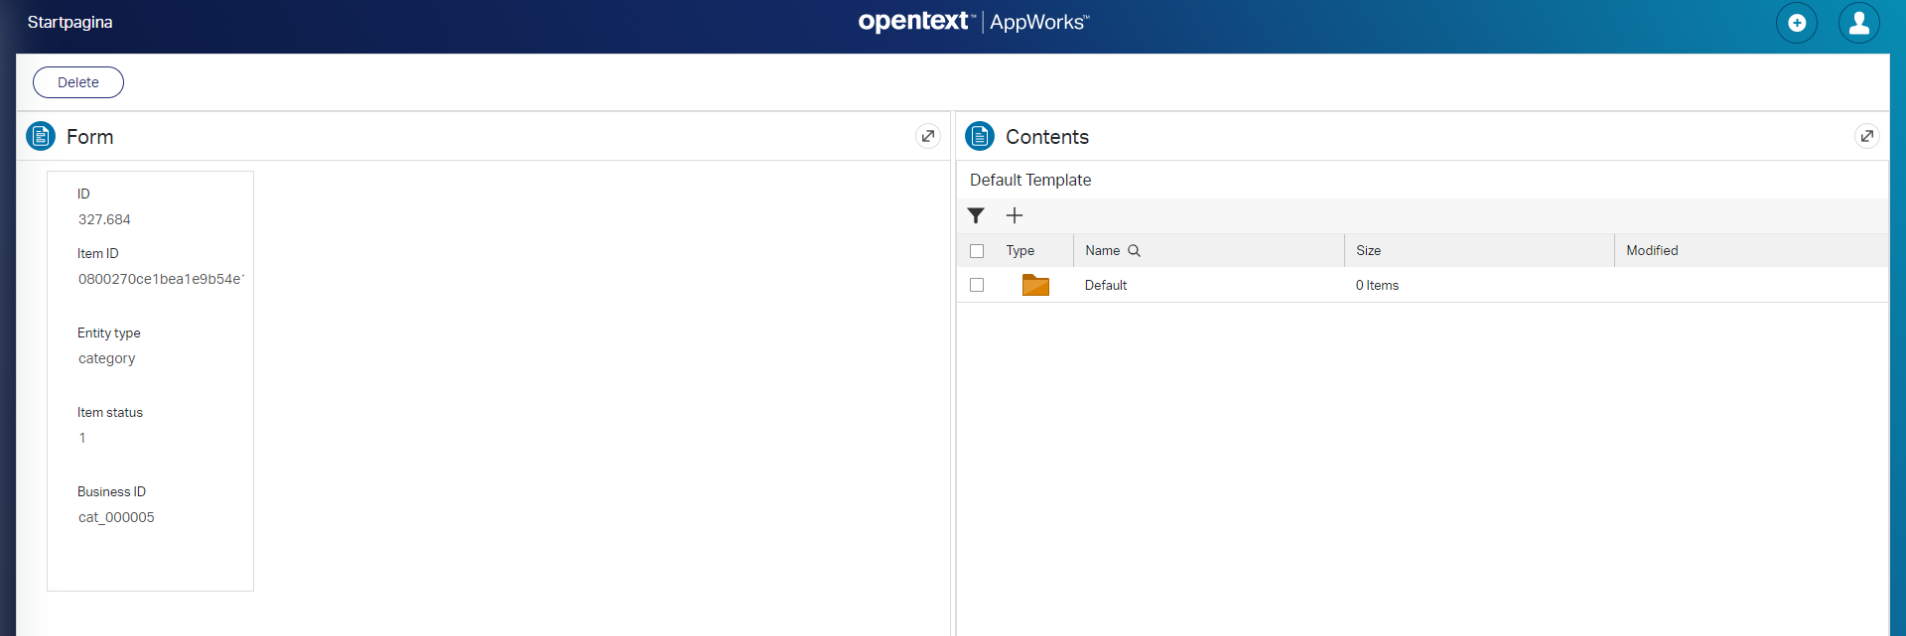
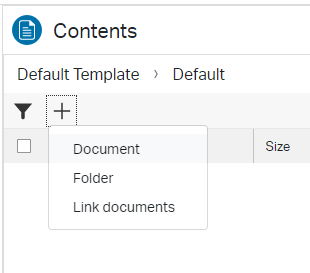
So, no fancy ‘Upload’ button, but a nice new ‘Contents’ panel on the right side!
Hit that ‘+’ sign now to add new content to this ‘Category’. After uploading you will see the same actions available from the ‘content’ object like we saw on an uploaded ‘File’
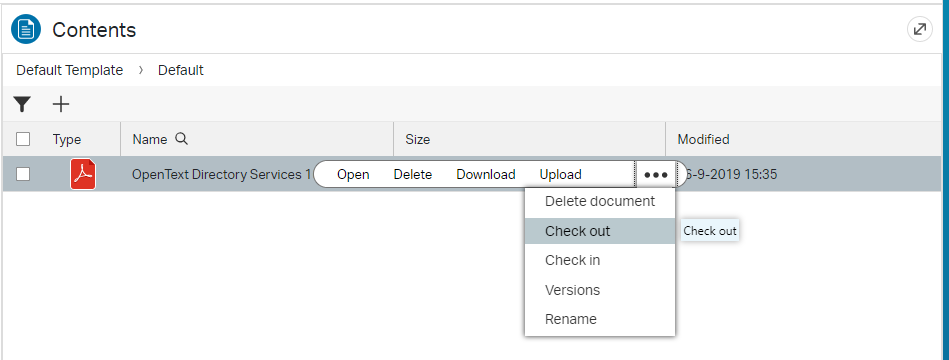
Now, see if the content part is saved in Documentum. You can use the tools explained in the previous post (I used DA for now)

Now that this part is working, we get to the ‘Trick’ part of this post where we need to go back to our ‘Category’ entity ‘Content’ building block and might have seen a small link…Let’s hit it like a bro…
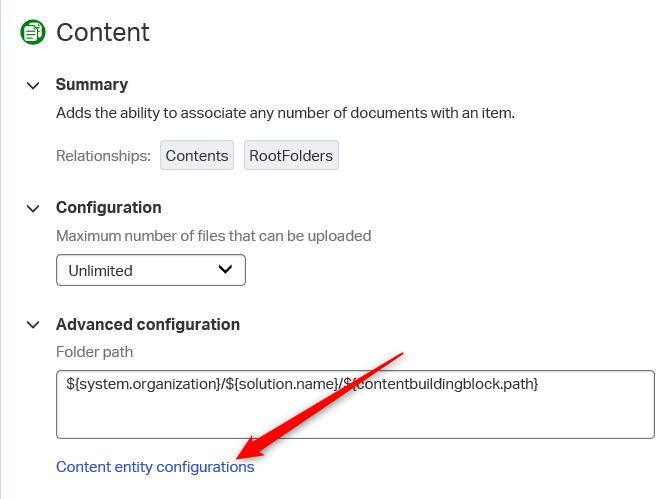
And what do we see now…How nice…A full set of building blocks available for our content!
Now we’re getting somewhere as we are now as flexible as we want. Even so flexible that we can create a new ‘Rule’ building block on the content that ‘when the content is created’ we start a ‘Process’ and guess what that process is going to do…Is the quarter falling now on its place on what we try to do here?
The process is going to call our downloaded ‘JAR’ component with its custom code and makes sure it’s executed!
And that my AppWorks fans is the theory! 😜
Let’s see if we are also able make it a practical journey…
We just execute this journey step by step!
Check the WS-AppServer service container availability (see the previous post!)
We need this because our JAR file (discussed in the beginning of this post) has some executable Java methods that can only be executed when a JVM is available. This configuration makes a JVM available for our custom Java code and makes sure the code is made (generated) available as a webservice…Isn’t that nice!
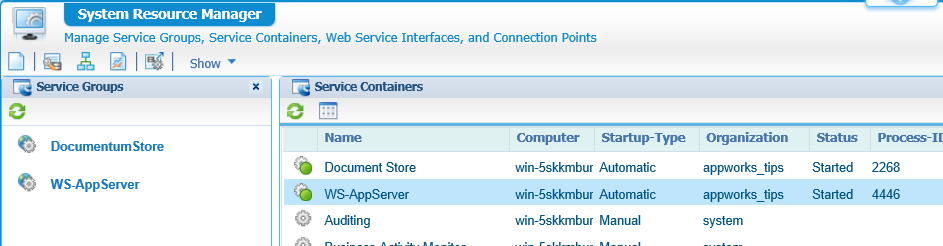
Now open the AppWorks Explorer with the ‘sysadmin’ user in your created organization and open the ‘System Resource Manager’ artifact.
Verify that it is started with a ‘green’ icon.
Upload the JAR and update the WS-AppServer classpath
Now open a terminal session with MobaXTerm to the VM and upload the downloaded JAR file to the ‘otadmin’ home folder.
Create a new folder with the name ‘custom’ in the AppWorks instance location: sudo mkdir /opt/opentext/AppWorksPlatform/defaultInst/custom
And let the ‘tomcat’ user own this folder sudo chown tomcat:tomcat /opt/opentext/AppWorksPlatform/defaultInst/custom/
Copy the uploaded JAR file to this ‘custom’ folder sudo cp ~/DocumentumServices-1.0-SNAPSHOT.jar /opt/opentext/AppWorksPlatform/defaultInst/custom/
And because this JAR depends on a Documentum DFC connection we need to copy some JAR files from our Documentum installation
sudo cp /opt/documentum/dfc/aspectjrt.jar /opt/opentext/AppWorksPlatform/defaultInst/custom/sudo cp /opt/documentum/dfc/certj.jar /opt/opentext/AppWorksPlatform/defaultInst/custom/sudo cp /opt/documentum/dfc/commons-lang-2.4.jar /opt/opentext/AppWorksPlatform/defaultInst/custom/sudo cp /opt/documentum/dfc/cryptoj.jar /opt/opentext/AppWorksPlatform/defaultInst/custom/sudo cp /opt/documentum/dfc/dfc.jar /opt/opentext/AppWorksPlatform/defaultInst/custom/sudo cp /opt/documentum/dfc/log4j.jar /opt/opentext/AppWorksPlatform/defaultInst/custom/
You might also have noticed that the dfc.properties in the downloaded JAR had an entry pointed to dfc.data.dir=/opt/documentum/appworks
Create this folder location: sudo mkdir /opt/documentum/appworks
And let it also own it to the ‘tomcat’ user: sudo chown tomcat:tomcat /opt/documentum/appworks/
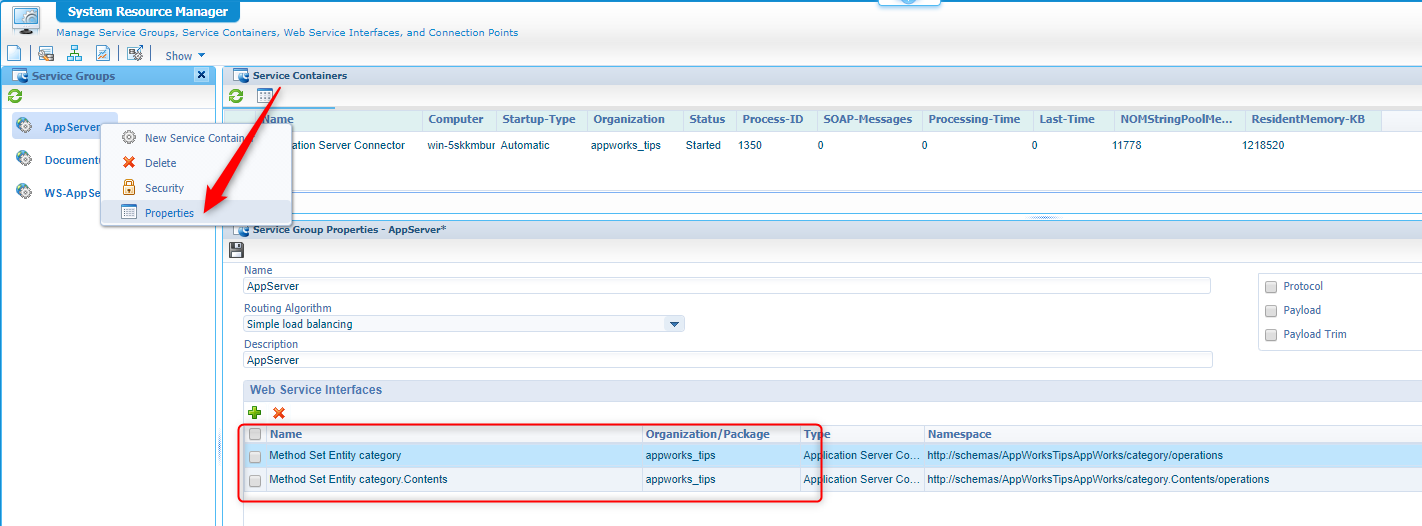
One last thing is telling the WS-AppServer to search for these files JAR files from its classpath…Remember where we could configure this?
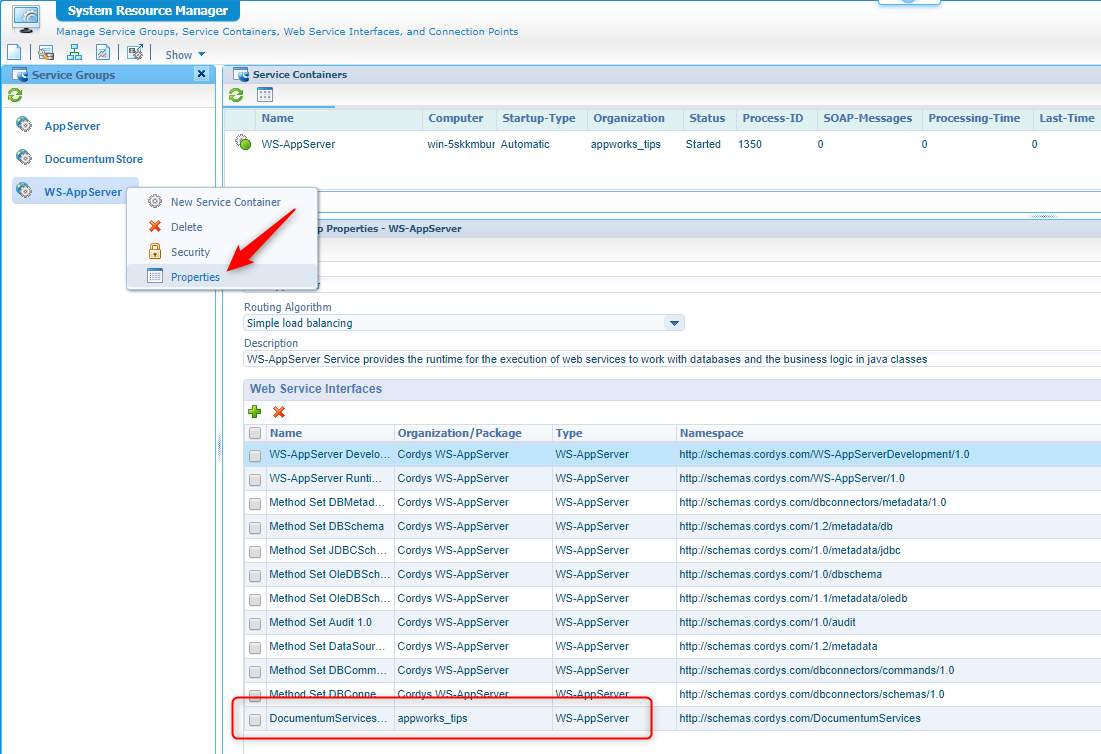
Correct!…The ‘System Resource Manager’ artifact in AppWorks where we get the properties on the ‘WS-AppServer’ service container:

Maybe a bit small, but this is the string to pass in: /opt/opentext/AppWorksPlatform/defaultInst/custom/DocumentumServices-1.0-SNAPSHOT.jar:/opt/opentext/AppWorksPlatform/defaultInst/custom/dfc.jar:/opt/opentext/AppWorksPlatform/defaultInst/custom/aspectjrt.jar:/opt/opentext/AppWorksPlatform/defaultInst/custom/commons-lang-2.4.jar:/opt/opentext/AppWorksPlatform/defaultInst/custom/log4j.jar:/opt/opentext/AppWorksPlatform/defaultInst/custom/certj.jar:/opt/opentext/AppWorksPlatform/defaultInst/custom/cryptoj.jar
Restart the TomEE instance with systemctl restart tomee
And monitor when it’s back in the air (‘Server startup in X ms’): sudo tail -f /opt/tomee/latest/logs/catalina.out
Also check if the ‘WS-AppServer’ server container is still green!
Generate a service out of the prepared JAR
Now logout from the ‘sysadmin’ account and login with the ‘awdev’ account to open our workspace where we crafted all our entities.
Just open the project so you see all the folders like ‘assets’, ‘entities’ and ‘homepages’. Add a new folder with the name ‘custom’.
Right-click the ‘custom’ folder again and this time we create a new -> other… document of type ‘Java Class Metadata’
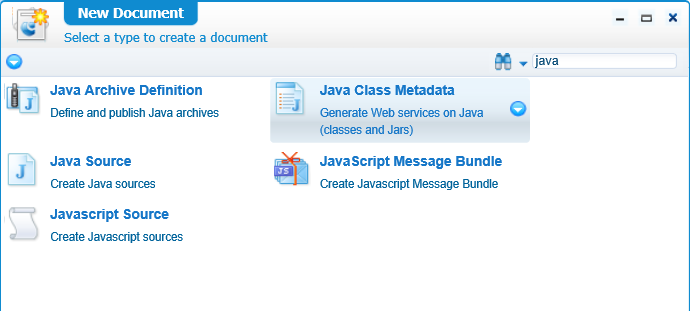
Fill in the form like this:

After saving you see the next result in the project folder
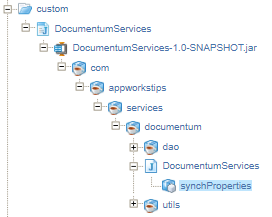
Now open the ‘DocumentumServices’ class (the one just above the ‘synchProperties’ method).
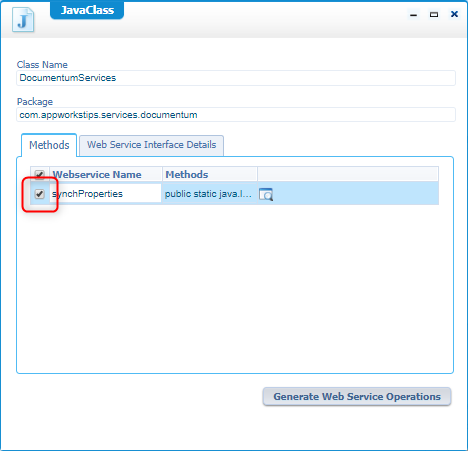
Select the method from where you want to generate new WebService Operations and hit that button to execute the action!
This action is executed on the WS-AppServer service connector that we created earlier…Logging?
tail -f /opt/opentext/AppWorksPlatform/defaultInst/Logs/appworks_tips#ws-appserver#ws-appserver.xmland:
tail -f /opt/opentext/AppWorksPlatform/defaultInst/Logs/Application_Server.xmlThe log level can be changed in the properties of the WS-AppService service container in the ‘System Resource Manager’ artifact
To see what happened now you need to close the JavaClass screen and get back to het project structure where you can find the generated webservices.
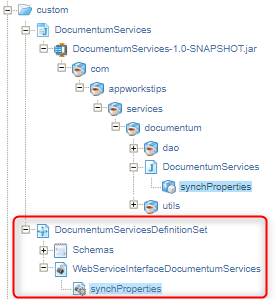
Double-click on the ‘WebServiceInterfaceDocumentumServices’
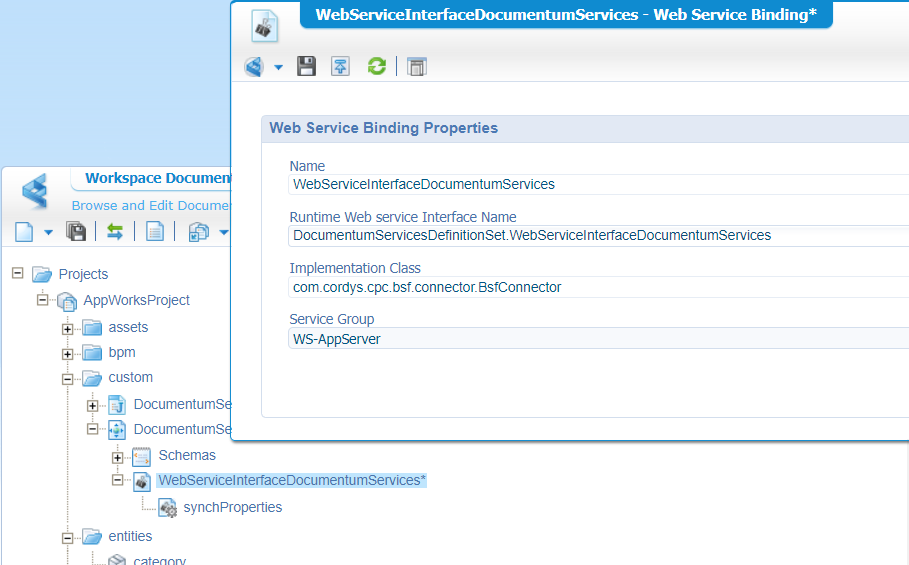
Select the correct ‘Service Group’. Now the generated service knows where to execute.
Save it and ‘publish’ it to the organization.
This is the thing I was not able to select when I created the ‘WS-AppServer’ in the ‘System’ organization. Maybe a thing/setting on my side, but it’s also strange that this is not selected by default during generation of the webservice interface.
After this selection you will also see the method being available in the WS-AppServer service group in the ‘System Resource Manager’ artifact
Test the generated service
Right-click the ‘synchProperties’ service and call the action ‘Test Web Service Operation’ and modify the SOAP request like this:
1 | <SOAP:Envelope xmlns:SOAP="http://schemas.xmlsoap.org/soap/envelope/"> |
stringParam = is the path of the object saved in Documentum
stringParam1 = is the key value pair where key is the property on the Documentum object referred to in the ‘stringParam’ and behind the ‘::’ we pass the value. It’s now static, but later we’ll retrieve it from the entity in AppWorks!
Now hit the ‘Invoke’ button and see what magic will happen!
Open the ‘received’ response message that should look like this:
1 | <data> |
Also see the logging here sudo tail -f /opt/tomee/latest/logs/catalina.out as the JAR also logs some basic information so you know where things fail:
1 | INFO [http-nio-8080-exec-2] nl.bos.appworks.DocumentumServices.synchProperties Passing parameters entityPath: /otadmin/appworks_tips/AppWorksTipsAppWorks/category/327683/Contents/Default/Directory_Services_16.6.1_Release_Notes.pdf, properties: subject::mySubject||title::myTitle |
Great work so far…Ready for the next step? 💪
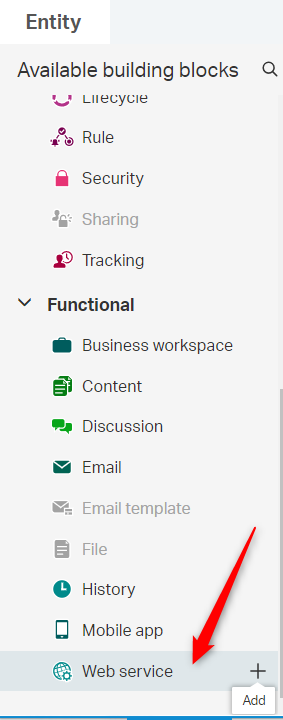
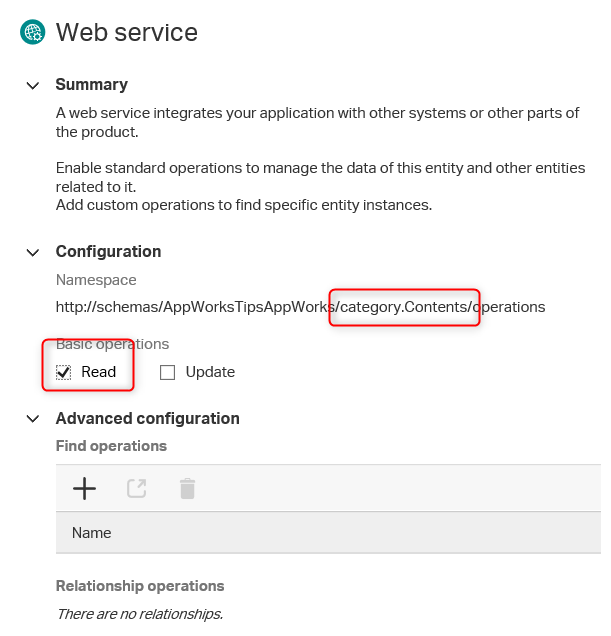
Expose webservices for an entity
Now open the same ‘Category’ entity where you also added the ‘Content’ building block.
And add a new building block with the name ‘Web Service’
From the right panel select the ‘Read’ operation to be available on this entity
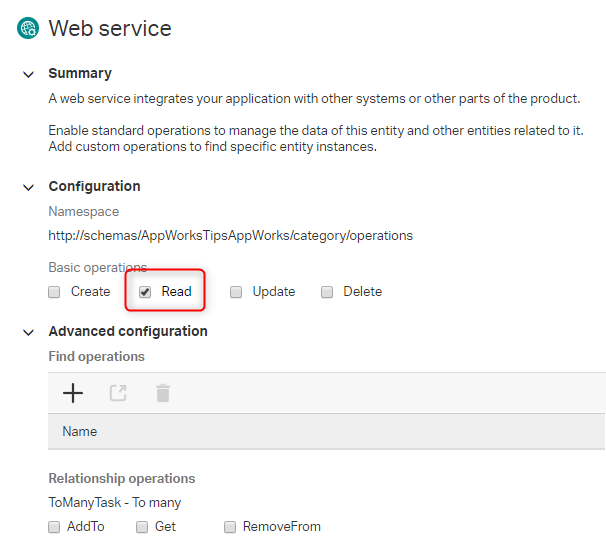
Now we are getting somewhere as this read operation from the whole CreateReadUpdateDelete set can be used for retrieving the entity information in the call to our custom webservice…Cool!
And off-course we also want to expose webservices for the ‘Content’ building block of the ‘Category’ entity. For this we first open ‘Content entity configuration’ on the right panel once you selected to ‘Content’ building block for the entity. Also here add the ‘Web service’ building block and make sure you expose the ‘Read’ operation
Close the panels and save the entity…Let’s go for the next step.
There was a problem during my testing when these methods were triggered, and it told me that there was no ‘Application Server Connector’ available to execute these methods. I assumed that my WS-AppServer would pick them up, but that was not the case!
So, I created a new ‘Application Connector’ of type ‘Application Server Connector’ in the ‘System Resource Manager’ artifact. I also connected this one to the ‘Application Server’ OS process.
If it’s correct to have 2 service containers pointing to 1 and the same OS process is a question for me too? We’ll see if this choice will change in the future!
This should be the end-result:
Create a BPM process that calls the services
Go back to the project overview (still as a developer role) and create again a new folder. This time with the name ‘bpm’ on the same level as ‘custom’ and ‘entities’.
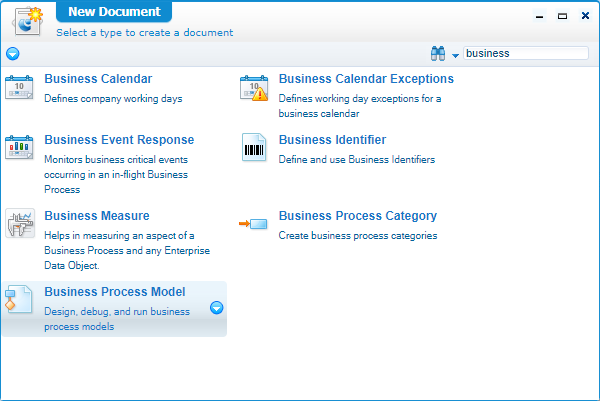
Right click the ‘bpm’ folder and create a new document of type ‘Business Process Model’
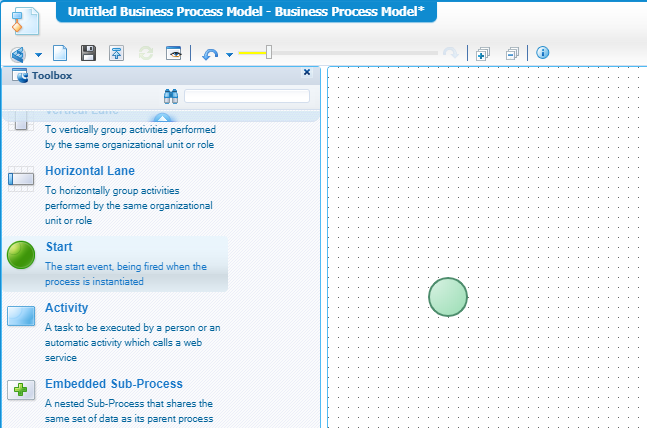
From the left panel drag a green ‘Start’ event.
Then on the bottom of that same left panel you see a second tab with the name ‘Insert’. Open it…
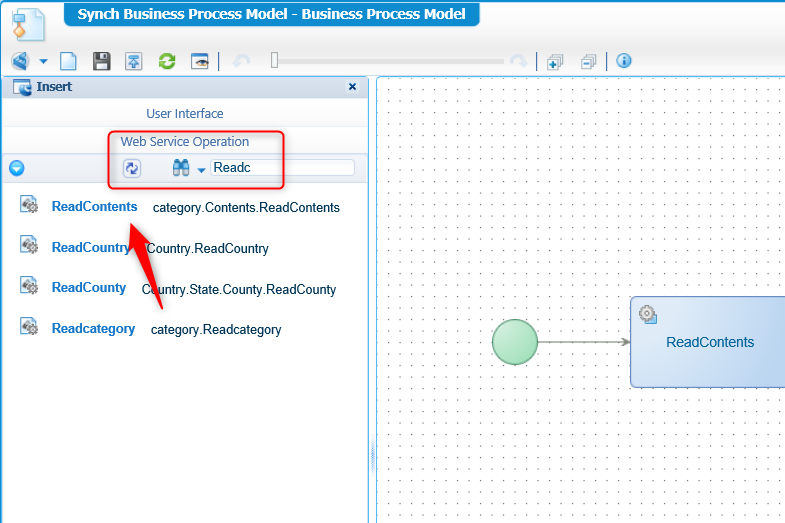
Search for the ‘ReadContents’ service and drag it in.
You also see a ‘Readcategory’, but we don’t need this for now. Later (maybe an exercise for yourself!?) you can use this service to retrieve the ‘real’ non-content entity instance and pass its data into the next step where we execute a synch to Documentum (with our custom service!).
Do the same for the generated ‘synchproperties’.
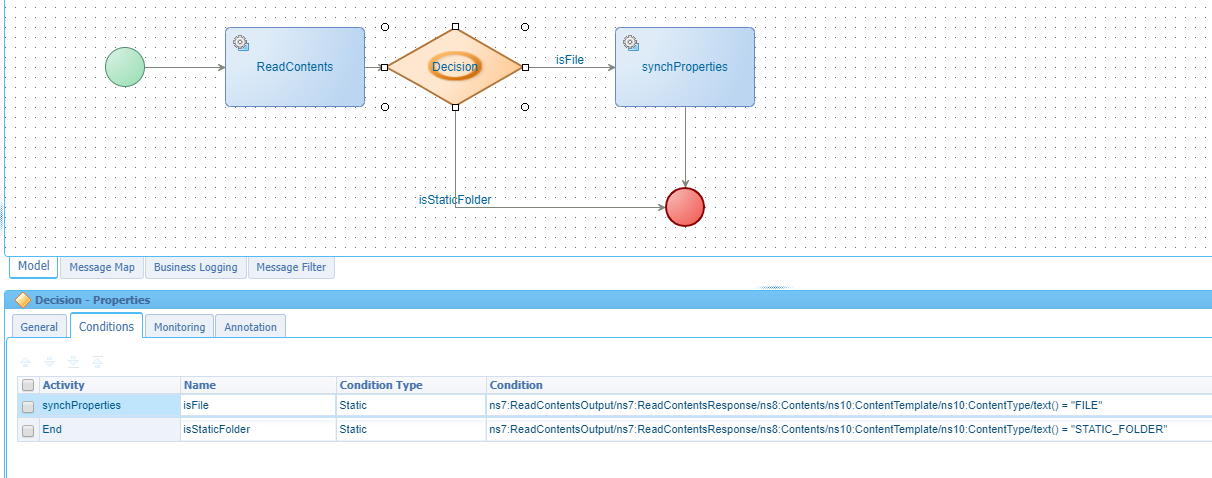
This should be the end-result for now:

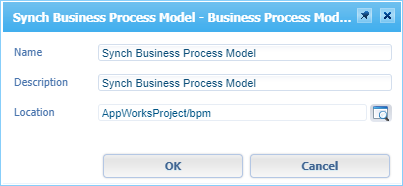
Save the process with name ‘Synch Business process Model’
Pass the entity data to the synch method
First we need to ‘save’ the entity ID in a separate massage for reusability within the process model. With the process model still open we can go to the ‘Message Map’ tab.
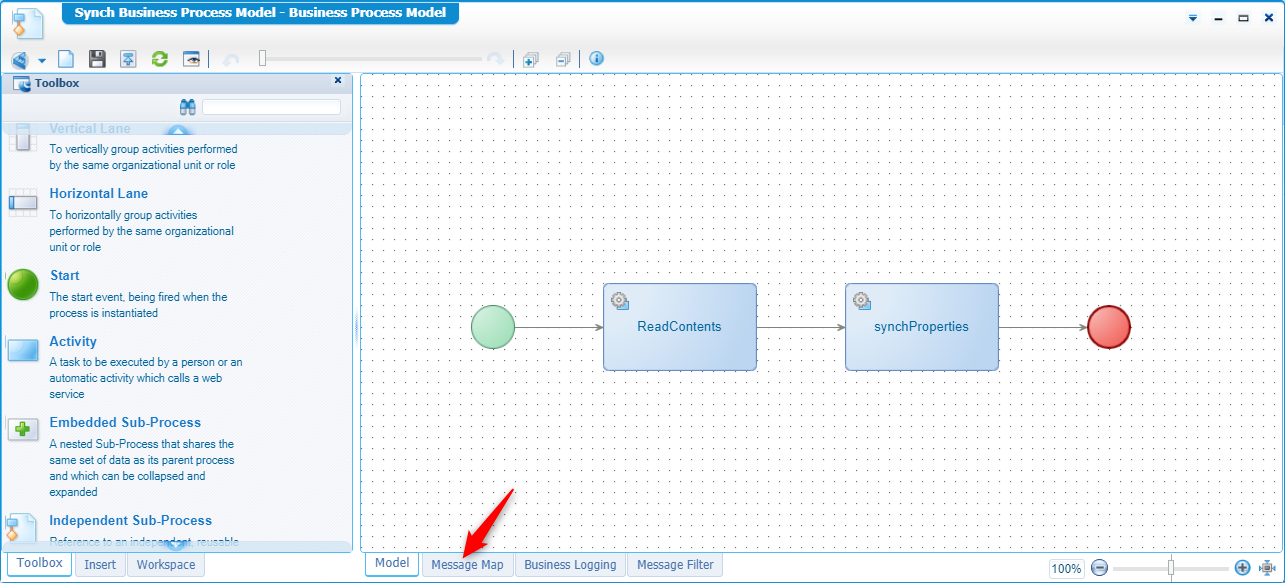
In this tab you need to click on the green ‘Start’ initialization step to get the focus on the correct item.
Now you can right-click the ‘Process Specific Messages’ ( = source side) where you add a new ‘Create Element’.
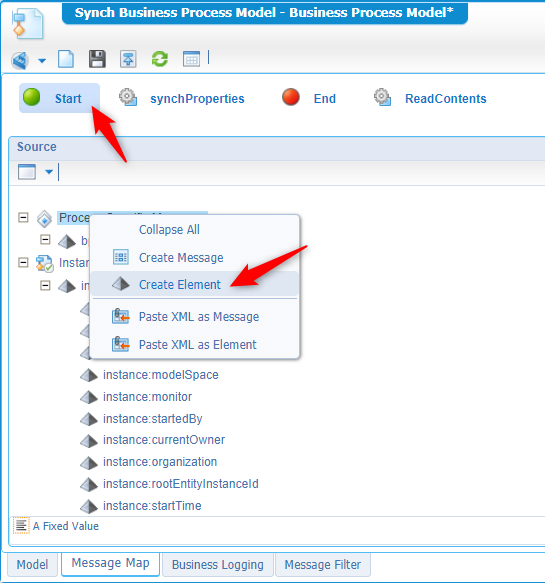
After this creation you will also see it pop-up on the right side (= target).
And…back to the source-side you can also expand the ‘Instance Properties’ where you can find one very appreciated property with the name ‘rootEntityInstanceId’.
Now just make a mapping between the two like this (with drag & drop)
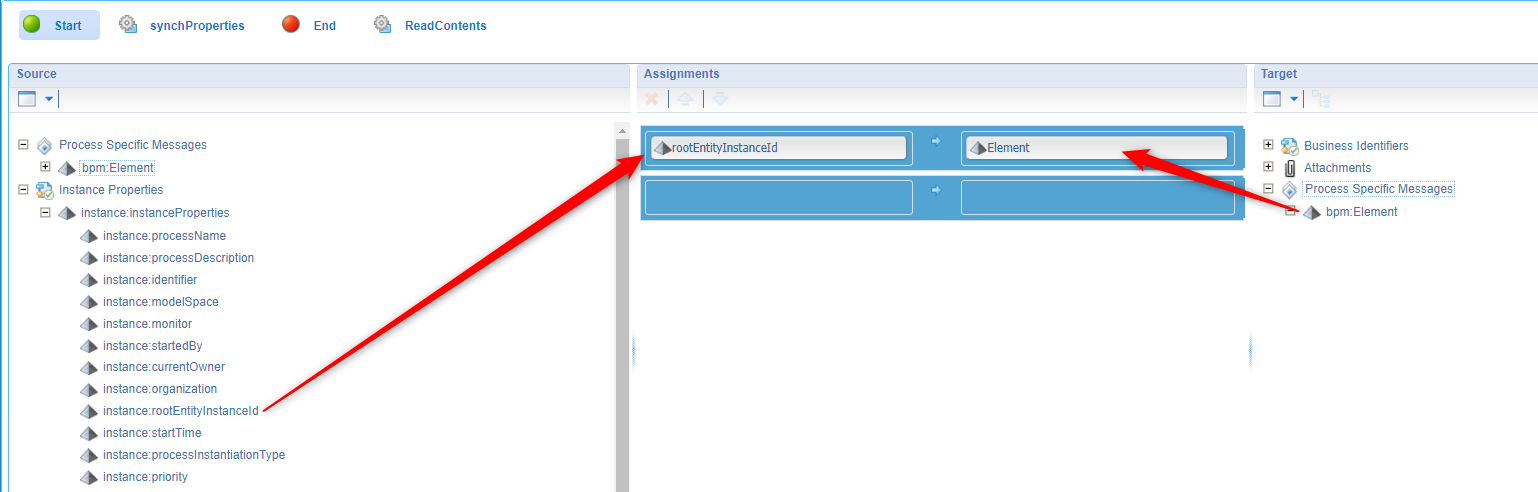
This new element can now be used as input for the next step…
In runtime-mode the element will be filled with in entity ID like this
0800270ce1bea1e9b6206dbebd11a9c7.655361.327682
Click on the ‘ReadContents’ step and make a same kind of mapping like we just did. In the end it should look like this
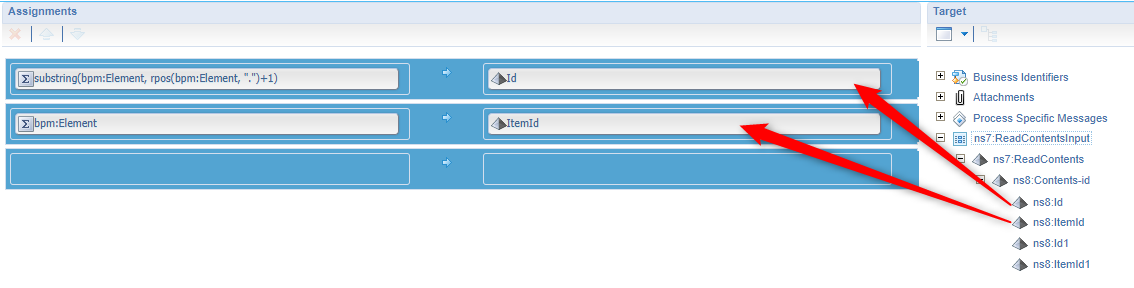
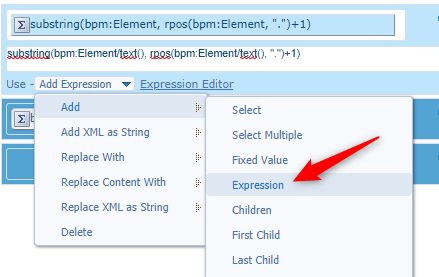
The first ‘expression’ looks like this substring(bpm:Element/text(), rpos(bpm:Element/text(), ".")+1)
Here we want to retrieve the last part of the entity ID behind the ‘.’ where we will get a result like this
327682that needs to be passed to the ‘Id’ element of the ‘ReadContent’ node.
Make sure you make use of the ‘Add Expression’ functionality
The second ‘expression’ looks like this bpm:Element/text()
Here we just ‘grep’ the whole text of the element to pass it to the ItemId
Next is the ‘synchProperies’ where we also need to pass some data through our 2 variables (the path of the object in Documentum and the key/value list of the updates)
For this we can use these 2 expressions (make sure also use the ‘Add Expression’ here)
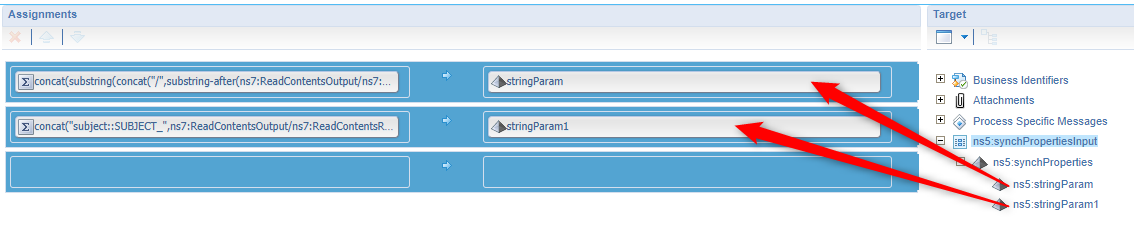
The first one looks like this:
concat(substring(concat("/",substring-after(ns7:ReadContentsOutput/ns7:ReadContentsResponse/ns8:Contents/ns9:File/ns9:StorageTicket/text(), "/")), 0, rpos(concat("/",substring-after(ns7:ReadContentsOutput/ns7:ReadContentsResponse/ns8:Contents/ns9:File/ns9:StorageTicket/text(), "/")), "/")), "/", ns7:ReadContentsOutput/ns7:ReadContentsResponse/ns8:Contents/ns9:File/ns9:FileName/text())
This expression will ‘grep’ the response of the ‘ReadContents’ from here we need 2 parts. The storageTicket that looks like this
{"documentURL":"/otadmin/appworks_tips/AppWorksTipsAppWorks/category/655361/Contents/Default/0912d59180005d25_Directory_Services_16.6.1_Release_Notes.pdf","documentName":"Directory_Services_16.6.1_Release_Notes.pdf","documentId":"0912d59180005d25","linked":false}where we extract only the path in Documentum (without the document name where we also can see the unneeded Documentum objectId in the name) and concatenate the filename that is retrieved from another node in the same response message.
The second one looks like this:
concat("subject::SUBJECT_",ns7:ReadContentsOutput/ns7:ReadContentsResponse/ns8:Contents/ns10:ContentTemplate/ns10:ContentType/text(),"||title::TITLE_/",ns7:ReadContentsOutput/ns7:ReadContentsResponse/ns8:Contents/ns9:File/ns9:MimeType/text())
The expression build up the key/value string that we will extract in our custom code (the JAR). The keys (before the ‘::’) are the property names on the object in Documentum where the value has a prefixed (So we always have a value applied when things are not retrieved) with concatenated the value from the content entity in AppWorks.
We don’t use the fanciest values from AppWorks now, but it works. And if this is working, your next step is off-course to drag-in the other exposed webservice with the name ‘ReadCategory’ and pass in the data from there…We can make it as advanced as we like…How nice…That my BPM!
As a last step we need to save the process and publish it to the organization and then…
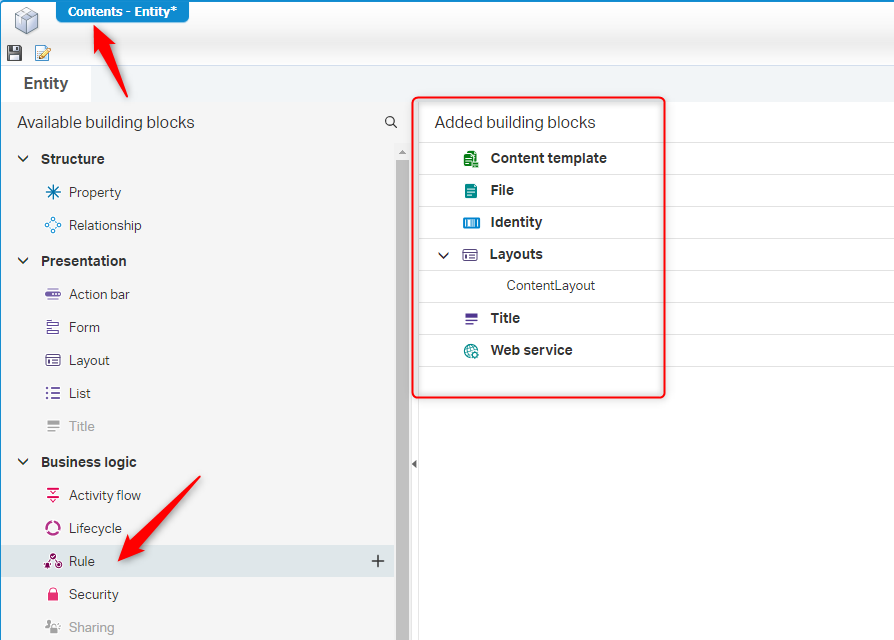
Call the process from the content rule building block
For this we need to go back to our ‘content’ building block of the ‘Category’ entity and there we create a new rule building block.
Give a proper name for the rule ‘onCreateStartBPMSynch’
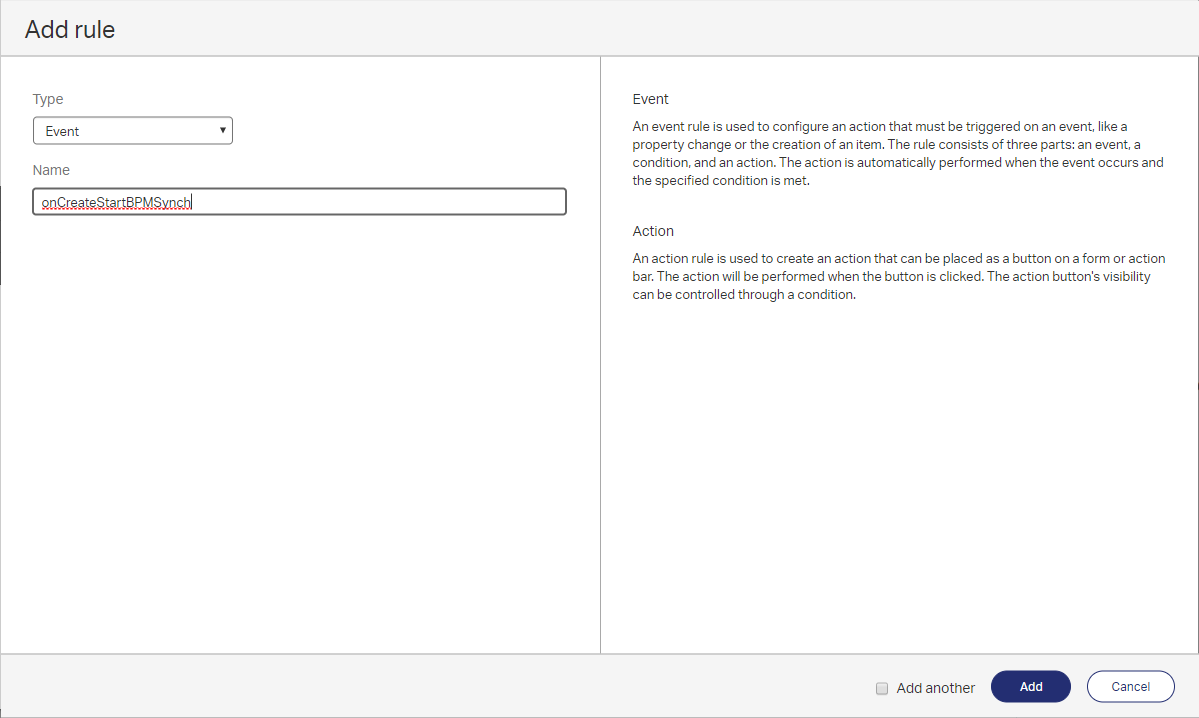
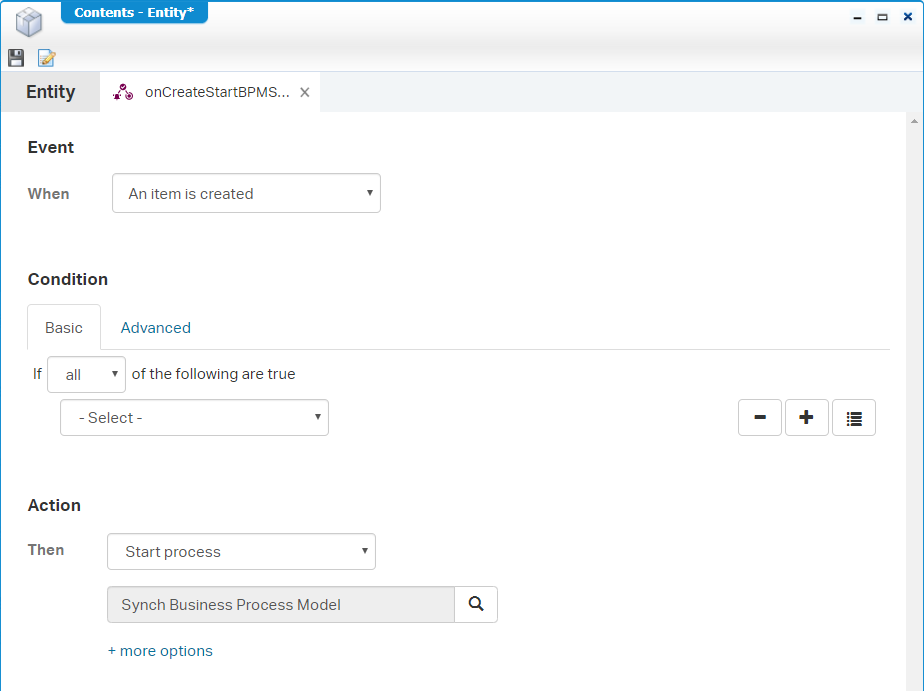
And click ‘Add’ and create the rule like this:
When finished, save the entity and you can also publish it.
During my testing I see that also the ‘Default’ template folder creation triggers this process, but the process will fail in the ‘synchProperties’ activity as it passes incorrect information. For this I made a small change in the process model that looks like this:
isFile
ns7:ReadContentsOutput/ns7:ReadContentsResponse/ns8:Contents/ns10:ContentTemplate/ns10:ContentType/text() = "FILE"isStaticFolder
ns7:ReadContentsOutput/ns7:ReadContentsResponse/ns8:Contents/ns10:ContentTemplate/ns10:ContentType/text() = "STATIC_FOLDER"
Time for the final test!
Go to the front-end of our AppWorks solution and create a new ‘Category’
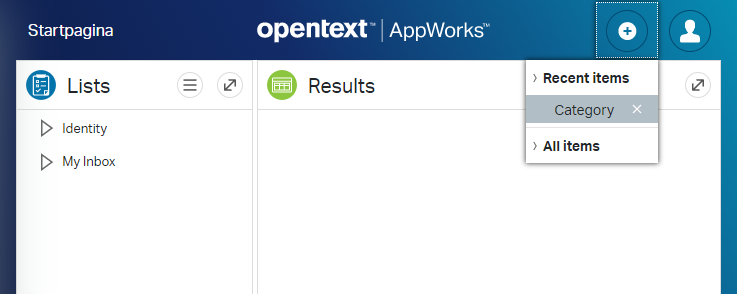
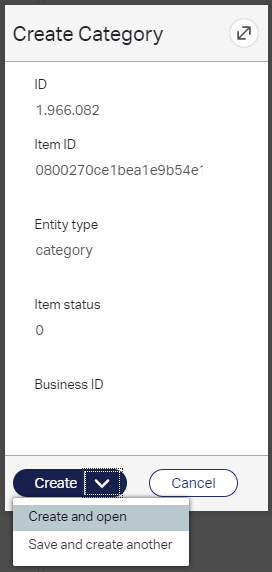
And click the ‘Create and open’ action
Now open de ‘Default’ folder
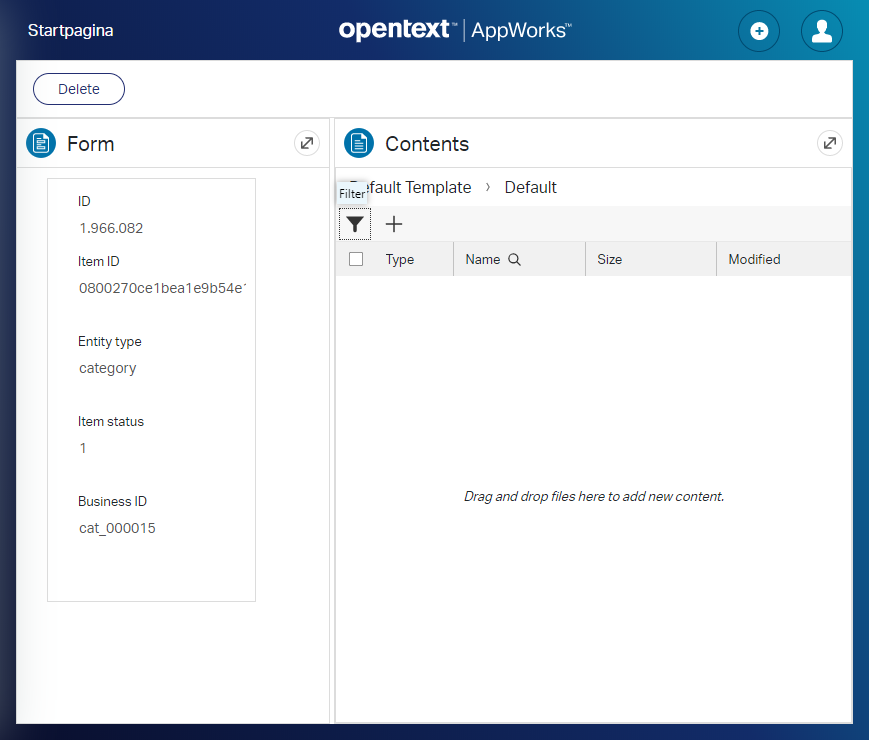
And click the ‘+’ sign to add new content/Document
Just select some document from your local machine and hit ‘OK’ to import.
It’s a good thing to monitor this action from you MobaXTerm console with
sudo tail -f /opt/tomee/latest/logs/catalina.outwhere you see this information passing by which gives us a nice feeling because custom method is triggered with the correct information…Hooray!
2
3
4
5
6
INFO [BPMEngine_LongLivedProcess_ThreadPool/WorkerThread-3] nl.bos.appworks.DocumentumServices.synchProperties setting.properies retrieval is done
INFO [BPMEngine_LongLivedProcess_ThreadPool/WorkerThread-3] nl.bos.appworks.dao.DocumentumDAO.makeConnection Making connection with: otadmin, admin, aw_repo
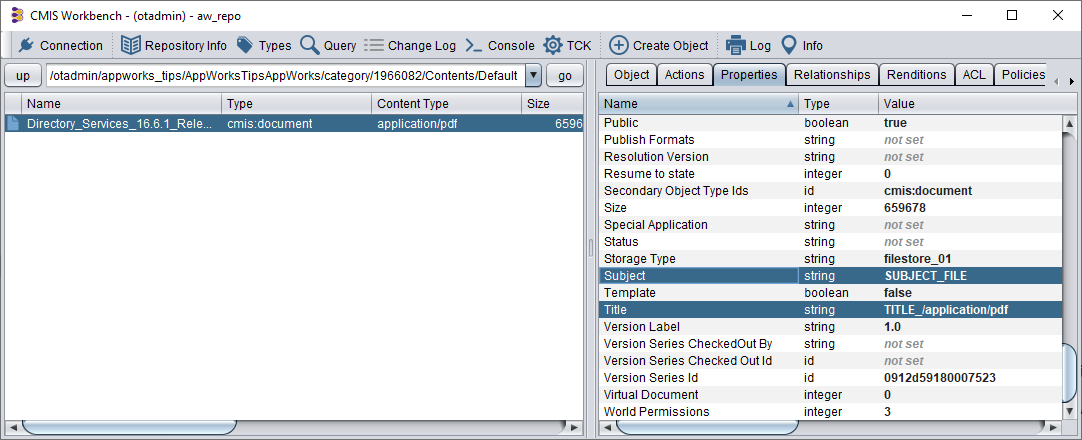
Now it’s time to check the Documentum side with our IDQL tool /opt/documentum/product/16.4/bin/idql aw_repo
Where we can execute this DQL statement select r_object_id, subject, title from dm_document where folder('/otadmin/appworks_tips/AppWorksTipsAppWorks/category/1966082/Contents/Default', descend)
With a result as we expected…How nice!
1 | r_object_id subject title ---------------- --------------------- ------------------------------ |
Or you can use the CMIS Workbench as described in one of the previous posts and view it like this
Where to look when D&^%D&^% hits the fan and other thoughts!
Logging:
sudo tail -f /opt/tomee/latest/logs/catalina.outtail -f /opt/opentext/AppWorksPlatform/defaultInst/Logs/appworks_tips#ws-appserver#ws-appserver.xmltail -f /opt/opentext/AppWorksPlatform/defaultInst/Logs/Application_Server.xml
Debugging (will be covered in a separate post):
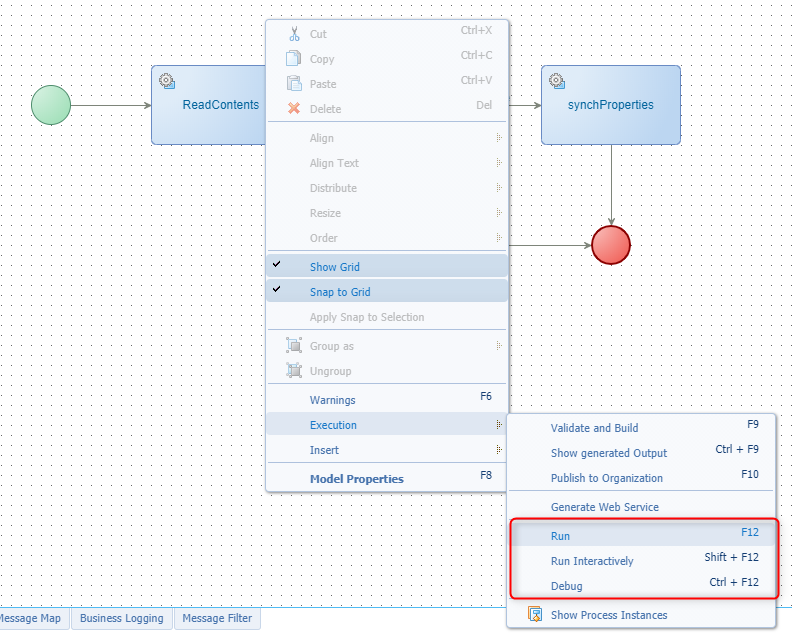
Maybe you already found this feature, but a process can also be run from within the ‘process model’ panel.
Right-click on an empty space and check out the ‘Execution’ menu where you can find these options:
- Run: Just run the process as is
- Run Interactively: Run activity by activity with also the possibility to test each activity (if it’s a service like)
- Debug: Run in debug mode everything can be stepped through in deepest details with all messages send over the line. This is where I found all the information that was needed to pass the correct data in this flow.
Monitoring (will also be covered in a separate post):
You can already see the action ‘Show Process Instances’ in the same menu from above that will directly start a specific part of the ‘Process Instance Manager’ artifact. This makes you dive deep into the process with all the calls and produces messages…best stuff ever (if you never saw better!) and a very strong feature for an Enterprise Service Bus back-end.
Errors
During my testing a saw my ‘awuser’ account did not have the correct permission on the process execution with this error in the logging:
Access is denied for the Web service operation 'ExecuteProcess'. You do not have permissions to access some of the resources required for your request. Contact the administrator.
The solution to this is to give the user the role of ‘Process Developer’.
Other last thoughts
You see we can update things on the Documentum side from the AppWorks platform, but there are as always some but’s:
This all happens with 1 user. In our case the ‘otadmin’ user. From Documentum perspective it would be better to make a connection with the user who executes the process. With OTDS as the authentication spider in the services web this would be a nice and best option to use. Both sides (AppWorks and Documentum) need their accounts created with equals credentials. OTDS can handle this!
We now just update a dm_document in Documentum and might have seen that the folder structure in Documentum is of type dm_folder. As these are default Documentum types we don’t have any custom properties (yet!) on these objects. For these we need to create (also!) on object models structure on the Documentum side that inherits from the dm_document and dm_folder types. This can be done with a tool called ‘Composer’, but that has nothing to do with AppWorks so we’ll skip it here.
Once we have our custom object model also in Documentum it is still not used in our custom code. What we could do is execute an ‘Alter object’ statement to change the document from type dm_document to your own created type that has all the custom properties where you can synch to!
The ‘Category’ entity created here is (on the Documentum side) of type dm_folder (see the AppWorks entity ID that is matching one of the folders in the Documentum folder structure). The same trick can be applied here. Alter the object type and synch the properties from the ‘ReadCategory’
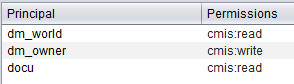
Last thought is about the Documentum security. You might have already seen it, but there is a default AccessControlList applied to the document and the folders in Documentum that looks like this:
![update_032]()
Here the ‘dm_owner’ (= ‘otadmin’) has WRITE permission, the ‘docu’ group (= admin group in Documentum) has READ permission and all other users have also READ permission. With this information you see it is not very secure as a ‘normal’ Documentum could change this with a Documentum client. Although you could do this, it is not recommended to do. Also, this way of working will make you data inconsistent as what you change on the Documentum side is not synched back to the AppWorks platform!! It is recommended only to use a read-only client to access data from the Documentum that is synched from AppWorks.
I know we use CMIS now to make this post work, but there is also a ‘real’ AppWorks to Documentum connector in development. Also, this connector is a one-way synch with the same kind restriction as described above. No information is (yet!) available if the synch back will also be a feature, but it will probably not be the case for some reason…we’ll see. What we did see is that this connector makes it possible to integrate Documentum properties into AppWorks. We’ll discuss this connector in another post…it’s placed on the backlog for this side.
Well, there we are…Our very well earned ‘DONE’ on this post. It’s been a pretty long post this time where we learned a lot of great new stuff. I hope you learned also a lot from it. Now we can update metadata on the Documentum side when we upload new content to our entity. You saw that we only used the ‘ReadContent’ service, but with all this information we are also able to use other services (like the exposed ‘ReadCategory) where we can retrieve our information from. Next time we’ll dive a bit deeper in the process monitoring and the debugging part of a process. I see you next time with another great post about AppWorks.
Don’t forget to subscribe to get updates on the activities happening on this site.
