
Hi there AppWorks fans,
Welcome to a new installment of AppWorks tips.
In this post we are going to use the OTDS instance that we made available in a previous post.
OTDS makes authentication possible from one single-point-of-view for all OpenText services. Like an authentication-spider in the services-web.
As we saw in other posts, this OTDS instance is optional for the AppWorks platform, but when you start to use more services and connectors OTDS is your way to go, but we will cover that once we start using new services and connectors!
Now…
Let’s get right into it…
Spin up out VM with the AppWorks platform and make sure the Tomcat service (not TomEE) is running so we can also connect to the OTDS instance on URL http://192.168.56.107:8181/otds-admin
Login credentials should be ‘otadmin@otds.admin’ with password ‘admin’ if you followed these posts.
Several steps are needed to make the OTDS authentication work…
Partitioning
Open the ‘Partitions’ section

And create a new ‘Non-synchronized User Partition’

Give it the name like for example ‘AppWorks Platform Partition’ and save it with the bright-shining button on the right side.
Now there is an ‘Actions’ link available. Hit it and select the option ‘Password Policy’ and make the settings like this screen:

Is it smart?…No, but for our try-out VM it’s fine and convenient. Save it by clicking on OK
Now click the same ‘Actions’ link to select the ‘View Members’ and continue to the next step…
User creation
In the ‘View Members’ section add a new user.

Give it the username ‘otdsadmin’ and hit Next.
Fill-in the form like this and provide it with the password ‘admin’ and click Next.

And again Next…and again Next…And now save it all with the blue Save button.
Now the user is manually created in OTDS (nothing done on the AppWorks platform yet!). It’s also possible to import these users to OTDS from an Active Directory service, but that is another post placed on the backlog.
Make an ‘OTDS Push’ user available in AppWorks for the system organization
Open the AppWorks Explorer from http://192.168.56.107:8080/home/system
Go to the ‘User Management’ artifact and find the ‘sysadmin’ user account. Now make sure the user is connected to the role ‘OTDS Push Service’ like this:

‘Resource’ for AppWorks
Go back to the OTDS URL and open the ‘Resources’ section

Add a new resource like this (with name ‘AppWorksPlatform’) and click Next.

Don’t use the ‘save’ button till I say to press it….it’s important…trust me on that one!
Fill in the next ‘Synchronization’ form like this and after that you can click Next (not save!).

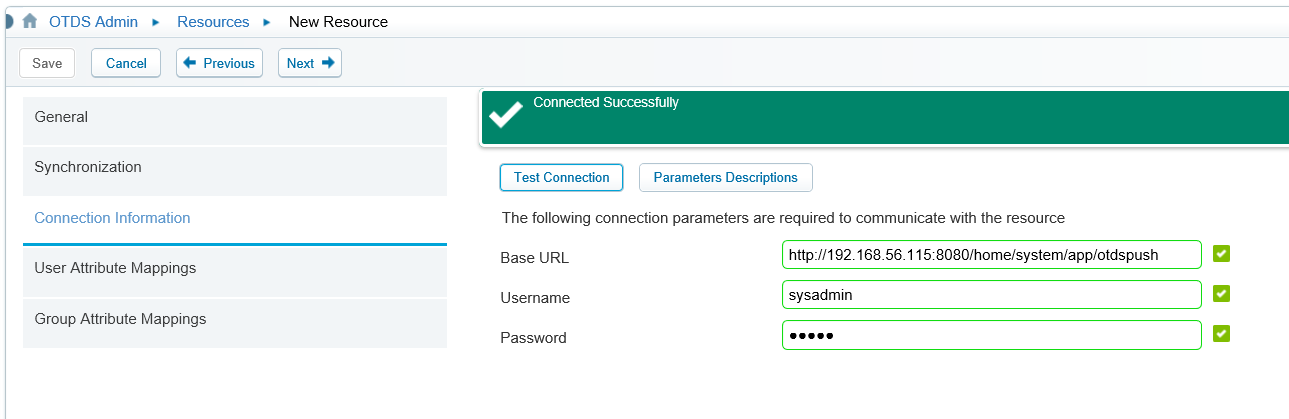
This screen appears where you can test you otdspush service url: http://192.168.56.107:8080/home/system/app/otdspush
Make sure you use the same organization as where your otdspush user is created!
Use the ‘sysadmin’ username with password ‘admin’ and click that test button to see that nice green bar on top for a ‘success’ notification!
Click next to continue to the ‘User/Group Attribute Mappings’ screens. You can use the ‘Previous’ button if things don’t load correctly. You can also click the ‘Reset to Default’ button. It should look like this:


Now it’s time to hit that blue ‘Save’ button!
A ‘Resource Activation’ popup is shows with an ID….
Copy it and save it somewhere
Do not click the ‘Verify Activation’ button!!! and just click Ok to save the resource.
Configure the OTDS authentication for AppWorks
Go back to the AppWorks Explorer and open the ‘Security Administration’ artifact.
Enter the ‘OTDS Resources’ tab and provide it with the correct URL for OTDS (I run my OTDS instance on another IP!) and provide it with the saved Resource ID. Then hit save, so the activate button will be enabled…

Click the Activate button and wait for the notification pop-up.
No go to the ‘Authenticators’ tab where you land on the ‘Organization’ tab by default.

Click the plus-sign button to add a new shared Authenticator like this:

Hit that save-disk on the top left corner to save it all.
Also, the artifact can be closed as we are done here…
You might have notices that we created it all for all the organizations (=shared) for now. It is also possible to add a specific ODTS authentication per organization! In that case you need to add all the information above in the organization specific panels/tabs…And make sure you configure it all in the correct organization URL!
Double check/verify the activation in OTDS (valid note from my dear commenter…thx!)
Go back again to the OTDS URL, open the ‘Resources’ category again and click the ‘Activation status’ action

You get this model panel and now it is finally the time the ‘Verify Activation‘ on the OTDS side.

With a shiny validation message…Nice!

Make the AppWorks URL a trusted site for OTDS
Now open the ‘Trusted Sited’ category in OTDS.

Click the ‘Add’ button and enter the addresses for our AppWorks platform.

I also added the FQDN for insurance, but probably not needed as we only IP addresses so far…
Now on the left site open the ‘Access Roles’ category and for the configured resource open the ‘View Access Role Details’

Now add the already created ‘User partition’ with your configured name and close the dialog.

And !!important!!…Do not forget to hit that ‘Save’ button also after the dialog closing!!
By adding the ‘User Partition’ (and saving it!) all the users (and groups) are pushed to the
AppWorks Platform. Users in OTDS are pushed as authenticated users and groups in OTDS are pushed as roles.
Now look again in the ‘User Management’ artifact from the AppWorks platform and see the magic happened. Now you only need to apply the correct ‘AppWorks’ role ‘Administrator’ to the user!

Now login to AppWorks with the OTDS authentication with an extra parameter in the URL like this:
http://192.168.56.107:8080/home/system/?authID=OTDS
The ‘OTDS’ value is equal to the ID of the shard authenticator we created in the ‘Security Administration’ artifact!
And…If you replace it with something like ?authID=XXX the OTDS authentication is by-passed and the platform credentials are used. This way you are always able to login with the ‘sysadmin’ account.
Make sure you login with the username ‘otdsadmin@AppWorks Platform Partition’ and the password you provided in OTDS and you will see the artifact belonging to your role.

You might have noticed that the login screen also looked a bit different with a ‘Forgot password’ option. This is the OTDS login screen for AppWorks with a changed URL to http://192.168.56.107:8181/otdsws/login

Disable athentication handler
The ‘http.negotiate’ handler is enabled by default, but is only used for Kerberos athentication, but we don’t use it.
For this to disable open the OTDS admin console again and open the ‘Athentication Handlers’ section.
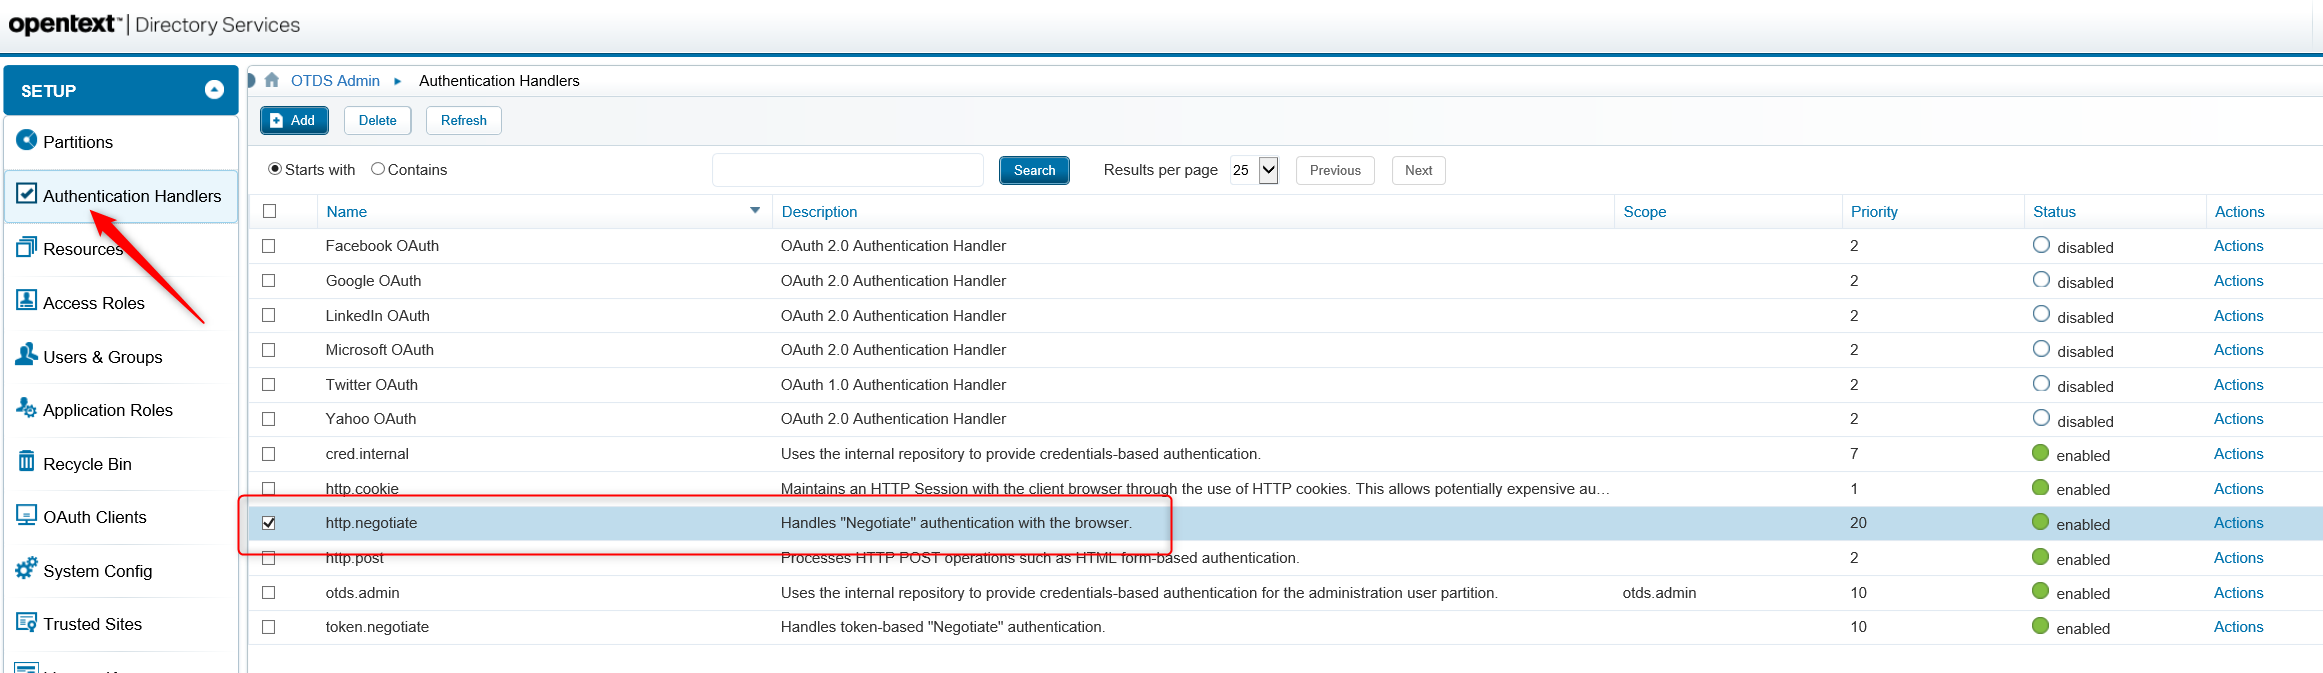
Here you can disable the ‘http.negotiate’ from the ‘Actions’ link on the right side…
When done hit the ‘Refresh’ button on top of the screen to make sure it’s OK
After restarting my VM with this last setting I also was removed from the annoying IE basic login pop-up that I needed to cancel. Not sure if this last setting helped me on that or the restart. Also, the logout-button in the AppWorks platform works more smoothly after a VM restart!

Add the ‘system’ OTDS user to specific organization
Now all our OTDS users are in the ‘System’ organization. But it would also be nice to have them available in the specific organization like our ‘AppWorks Tips’. So, go to there with the non-otds! sysadmin user.
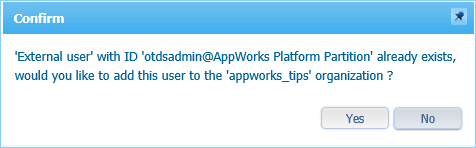
Open the ‘User Manager’ artifact and add the otdsadmin user like this:

Push the tab-key once you typed in the correct user with the OTDS partition name and you will be provided with a recognition pop-up where you want to click ‘Yes’
Now just save the user and you should be able to login with this user also for this organization!
With the ?authID=OTDS parameter like this: http://192.168.56.107:8080/home/appworks_tips/?authID=OTDS
?authID=XXX makes it possible to login like we always did with the old platform users.
As an exercise it’s good to have the following users also available in OTDS.
Create the users in OTDS in the ‘View Members’ action for the new created partition. After this you can apply them to the correct organization too.
This last step is needed as we made an OTDS resource connection with the ‘System’ organization. This can also be done directly to a specific organization.
You can use this table as an example.
| Username | User ID | Password | Organization | Role |
|---|---|---|---|---|
| otdsdev | otdsdev@AppWorks Platform Partition | admin | System | Developer |
| otdsuser | otdsuser@AppWorks Platform Partition | admin | System | Entity Runtime User |
And for this post I give it a proper validated ‘DONE’ where we learned again a lot of nice stuff on AppWorks authentication with OTDS. Now we have configured the authentication-spider in the services web of OpenText. This OTDS instance can now also be used for authentication with Content Server as also a Documentum Server (This last one will also be covered in another post when we have Documentum up and running!). I see you in one of the next posts. Leave an idea or update in the comments so we can help each other on the AppWorks journey. Have a good one…Cheers!
Don’t forget to subscribe to get updates on the activities happening on this site.
