
Hi there AppWorks fans,
Welcome to a new installment of AppWorks tips.
And this time we will make a mail service available on our VM. This mail service can be used for our AppWorks platform, but also for other OpenText services like for example Documentum that we will make available in another post.
Mail services is always a recommended thing in projects and solutions and this post makes it available for you.
Let’s get right into it…
Making a mail service available on centos is not hard to do and makes it extra easy with the steps that are described below.
Install packages
Let’s start with installing the required packages with the command sudo yum -y install postfix dovecot
- ‘postfix’ is an opensource mail server
- ‘dovecot’ is also opensource and handles the POP3 and IMAP protocols for our mail server
SSL certification
Now, we start generating some SSL certification that is not required, but best practice when you start with a mail server.
Let’s start to create a new folder sudo mkdir /etc/postfix/ssl
Go to that brand-new folder cd /etc/postfix/ssl
Let’s generate an RSA key with openssl sudo openssl genrsa -des3 -out server.key 2048
Give ‘admin’ for the pass-phrase (twice!)
And create a new private key sudo openssl rsa -in server.key -out server.key.insecure
Give ‘admin’ for the pass-phrase
Now save the original RSA key for (backup?) later sudo mv server.key server.key.secure
Replace the server.key with the new private key variant sudo mv server.key.insecure server.key
Now let’s generate a brand-new SSL certificate with the private key sudo openssl req -new -key server.key -out server.csr
Fill in like this and leave ‘challenge password’ and ‘optional company name’ empty.
1 | Country Name (2 letter code) [XX]:NL |
And sign the certificate sudo openssl x509 -req -days 365 -in server.csr -signkey server.key -out server.crt
1 | Signature ok |
Both the private key (/etc/postfix/ssl/server.key) and the certificate (/etc/postfix/ssl/server.crt) will be used in the below configuration
Configuration Postfix
Our mail server requires some configuration and we start by editing this file sudo vi /etc/postfix/main.cf
Line 116 can be changed like this: inet_interfaces = all
Line 164 can be changed like this: mydestination = $myhostname, localhost.$mydomain, localhost, $mydomain
Don’t forget the last $mydomain in this line…Otherwise sending a mail to @mydomain.com will be rejected!
Then we add some extra configuration at the end of the file (note the myhostname and mydomain. Get them with the hostname command)
1 | myhostname = WIN-5SKKMBURVO7.mydomain.com |
Now edit sudo vi /etc/postfix/master.cf
Add these lines after the line smtp inet n - n - - smtpd
1 | submission inet n - n - - smtpd |
Also here make note of the difference between ‘smtps’ and ‘smtp’
Then there is another file that we need to edit sudo vi /etc/dovecot/conf.d/10-master.conf
Add these lines below # Postfix smtp-auth
1 | unix_listener /var/spool/postfix/private/auth { |
The last file is sudo vi /etc/dovecot/conf.d/10-auth.conf
Modify this line and add the ‘login’ part
1 | auth_mechanisms = plain login |
‘Enable’ and ‘restart’ services
Make sure to run these commands before we start with testing…
systemctl restart postfixsystemctl enable postfixsystemctl restart dovecotsystemctl enable dovecot
As we disabled the firewall already on our VM we are not required to add new ports to it!
Configuration Dovecot
Start by editing this file: sudo vi /etc/dovecot/conf.d/10-mail.conf
Change the mail_location to mail_location = maildir:~/mail. Make sure it matches the home_mailbox location you used in the /etc/postfix/main.cf
Next edit this file: sudo vi /etc/dovecot/conf.d/20-pop3.conf
Uncomment this part: pop3_uidl_format = %08Xu%08Xv
And as configuration is changed we restart the service systemctl restart dovecot
Time for testing
A nice tool for testing port availability with a host is telnet. Let’s install it with sudo yum -y install telnet
- Try the SMTP service with
telnet WIN-5SKKMBURVO7.mydomain.com 25- SMTP (Secure) has also port 465 and 587 open for handling mail request in a secure way!
- Try the POP3 service with
telnet WIN-5SKKMBURVO7.mydomain.com 110 - Try the IMAP service with
telnet WIN-5SKKMBURVO7.mydomain.com 143
All port numbers should give a telnet session. You can exit telnet with quit
Another good test is making the same telnet calls from your local machine and see if they work. When these are fine you can start to use a nice UI tool for send/receive mail.
You probably need to us the IP address like in my case 192.168.56.107
Test with Thunderbird client
Make sure you have installed the Thunderbird client that can be downloaded from the Thunderbird website
And after the software is started you will see something like this where you can set-up a new email account.
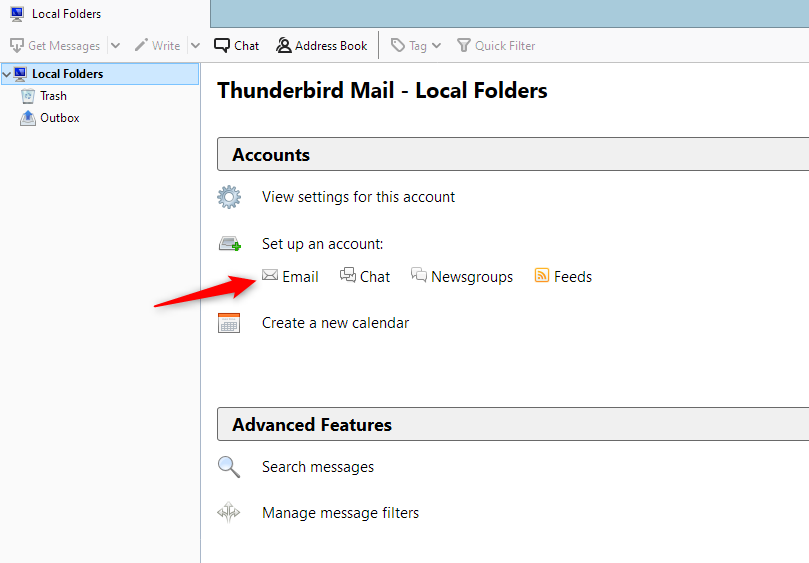
Use this information in the pop-up and click ‘Continue’; after that you can also click ‘Manual config’
1 | Your Name: sysadmin |
Fill-in the manual settings like this and hit the ‘Re-test’ for retrieving the correct values from the server
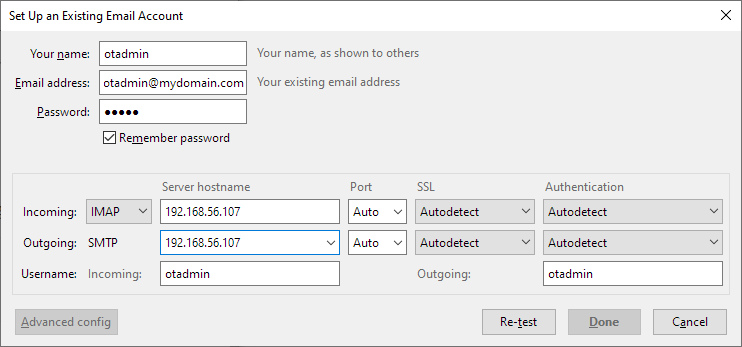
The IMAP and POP3 settings should be found and you can click ‘Done’
These are the settings that work for me at this moment of writing:
| Server hostname | Port | SSL | Authentication | ||
|---|---|---|---|---|---|
| Incoming | POP3 | 192.168.56.107 | 110 | STARTTLS | Normal password |
| Incoming | IMAP | 192.168.56.107 | 143 | STARTTLS | Normal password |
| Outgoing | SMTP | 192.168.56.107 | 587 | STARTTLS | Normal password |
As we work with certificates you’ll probably need to apply the exception on the certificate verification on the client side. This depends a bit on the client you are using!
In Thunderbird these certificates can be managed in Tools > Options > Advanced (tab) > ‘Manage Certificates’
Now see it you can send/receive a test mail…Looks good…right?

When !#$!@#$ hits the fan, you can find logging here sudo tail -f /var/log/maillog
There might be a dot in the file:
sudo tail -f /var/log/mail.log
Make the mail service available in AppWorks.
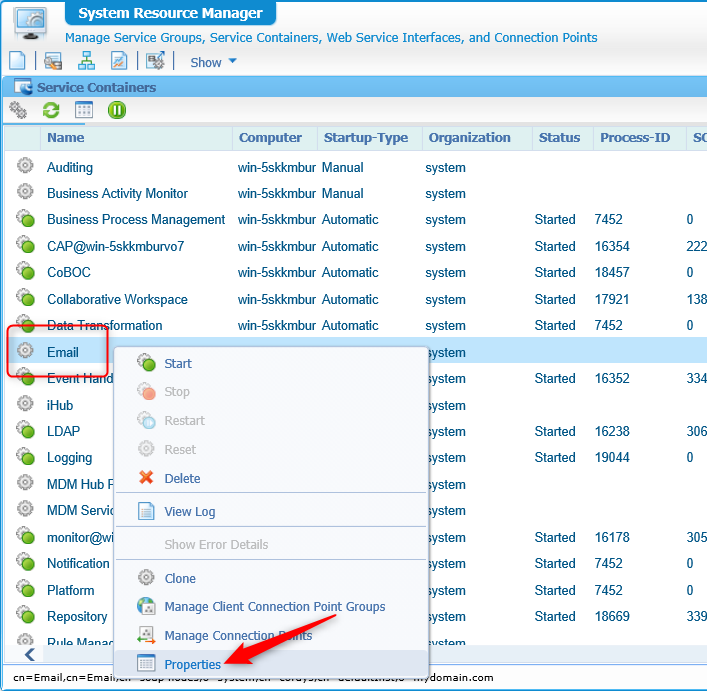
Let’s start by opening the ‘System’ organization http://192.168.56.107:8080/home/system/. Login with the ‘sysadmin’ account and open the ‘System Resource Manager’ artifact.
Get the properties of the ‘Email’ service container
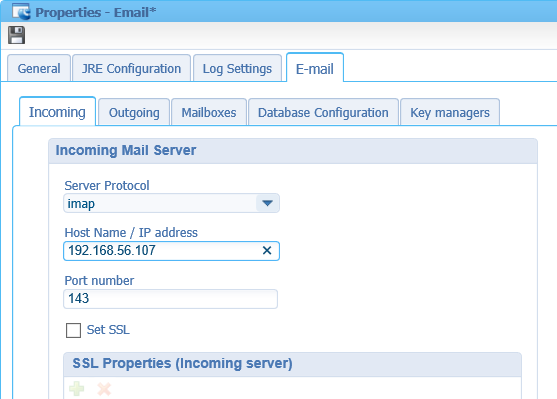
Go to the ‘E-mail’ tab and add the correct information in the tabs
Incoming tab
- POP3 -> 192.168.56.107:110
- Or via IMAP -> 192.168.56.107:143
![mail_005]()
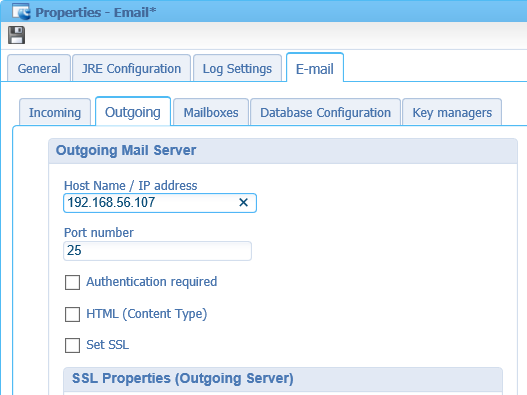
Outgoing tab
- SMTP -> 192.168.56.107:25 (No authentication is required here)
Not very secure, but for development it’s fine. Maybe in the future we still need to add information for SSL and authentication.
![mail_006]()
Mailboxes tab
- Add this XML part:
1
2
3
4
5
6
7
8
9
10<emailboxes xmlns="http://schemas.cordys.com/1.0/email/configuration">
<emailbox>
<name>Development</name>
<username>sysadmin</username>
<password>admin</password>
<folders>
<folder>INBOX</folder>
</folders>
</emailbox>
</emailboxes>Database Configuration tab
- Use the in memory (not for production) storage provider
Key managers tab
- Leave it as is
In the ‘Log Settings’ tab you can remove the mark for ‘Use System Policy’ so you are able to set the E-mail category to the ‘DEBUG’ level. It will help with configuration problems in the logging.
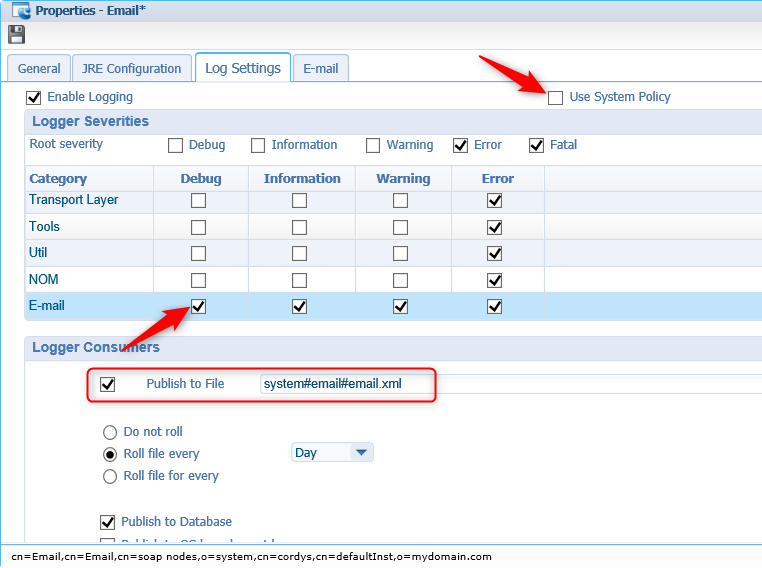
Now the debug logging can be found here sudo tail -f /opt/opentext/AppWorksPlatform/defaultInst/Logs/system#email#email.xml
Next to go to the ‘General’ tab where we select the ‘Automatic’ startup type and then we save the service
If all is fine you should be able to start the E-mail service container without problems. Right click the service and hit that ‘Start’ menu action!
Time for mail service testing
In AppWorks we can do this service testing in two ways:
The ‘Web Service Interface Explorer’ artifact
Start the artifact from the AppWorks Explorer (From the ‘System’ organization and the ‘sysadmin’ account)
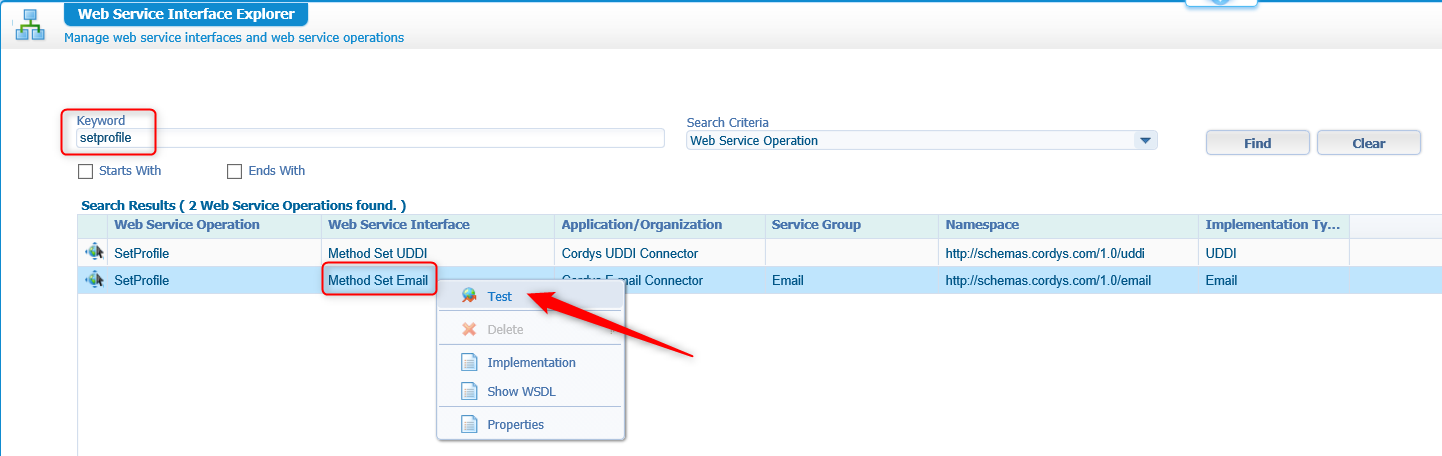
Search for the ‘setprofile’ keyword
Right-click the ‘Method Set Email’ interface and choose ‘Test’
![mail_008]()
Pass in the SOAP-request and Invoke the operation call and view the response.
1
2
3
4
5
6
7
8
9
10<SOAP:Envelope xmlns:SOAP="http://schemas.xmlsoap.org/soap/envelope/">
<SOAP:Body>
<SetProfile xmlns="http://schemas.cordys.com/1.0/email">
<displayName>Development</displayName>
<mailId>sysadmin@mydomain.com</mailId>
<password>admin</password>
<userId>sysadmin</userId>
</SetProfile>
</SOAP:Body>
</SOAP:Envelope>Nothing fancy on this call. The next step is to send out a mail
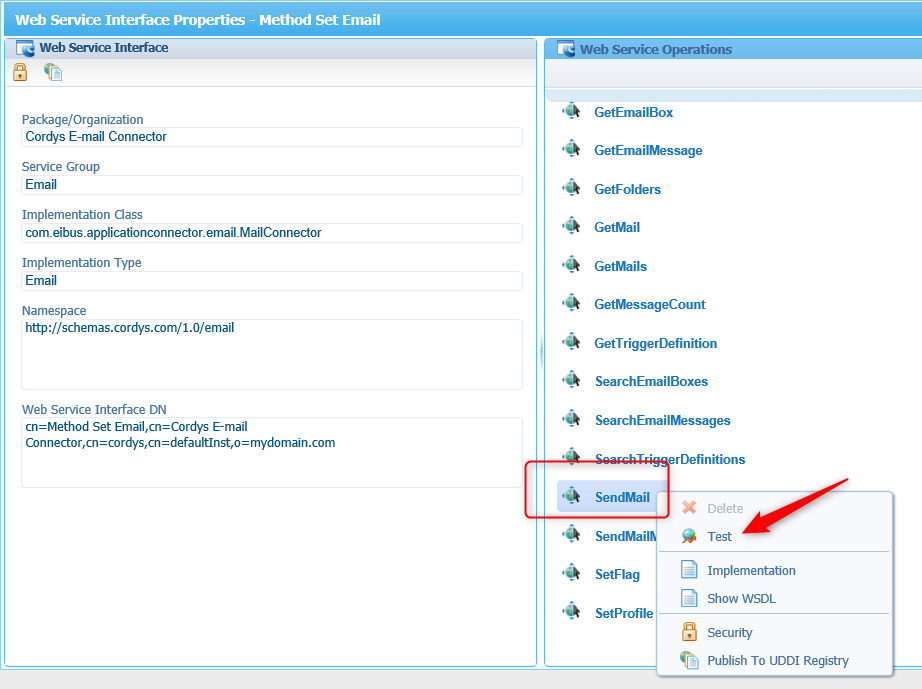
- Double-click the ‘Method Set Email’ interface and get access to all the service operations.
![mail_009]()
- Right-click the ‘SendMail’ operation and Test it with this message and view the result
1
2
3
4
5
6
7
8
9
10
11
12
13
14
15
16
17<SOAP:Envelope xmlns:SOAP="http://schemas.xmlsoap.org/soap/envelope/">
<SOAP:Body>
<SendMail xmlns="http://schemas.cordys.com/1.0/email">
<to>
<address>
<emailAddress>sysadmin@mydomain.com</emailAddress>
</address>
</to>
<subject>My subject</subject>
<body type="normal">My body</body>
<from>
<emailAddress>sysadmin@mydomain.com</emailAddress>
<replyTo>sysadmin@mydomain.com</replyTo>
</from>
</SendMail>
</SOAP:Body>
</SOAP:Envelope>
Also check the Thunderbird client as a mail should be dropped off in the mailbox of sysadmin@mydomain.com
- ‘Service Test Tool’ artifact
- Start the artifact from the AppWorks Explorer (From the ‘System’ organization and the ‘sysadmin’ account)
- Fill in the dropdown fields
- Service Group: Email
- Web Service Interface: Method Set Email
- Web Service Operations: SendMailoperation
- Pass in the same message as like above and this will send out a mail
Again….Check you mail!
Oh yeah…One last thing…Don’t forget to disable the DEBUG setting again in the ‘Email’ service!!
And there is our greatly earned ‘DONE’ again. Good work on this mail service delivery feature that we can use on our AppWorks platform, but also for other services. Like for example Documentum that we will install in the next post!
Have a great day, let me know your thoughts in the comment and don’t forget to subscribe to get updates on the activities happening on this site.
