
Hi there AppWorks fans,
Welcome to a new installment of AppWorks tips.
This post will bring you on the entity identification journey. We will see several options for identify entities. Also, this information will benefit you in the future if correctly used in you low-code design from the start.
Let’s get right into it…
First things first again…Let’s start up the VM, open the AppWorks CUSP and open our well-beloved workspace. The one where we low-coded all the entities from our ERD!
I suppose by now we know a lot of the used abbreviations…Am I correct?
Let’s start with our entity ‘category’…Open it up and hit the entity properties button.

Give the entity a proper display name: ‘Category’
Now move your eyes to the middle panel where the ‘Identity’ building block is available. No…You did not add this one before! It is a default building block for every new created entity. Now hit it and view the ‘Identity’ settings and mark the option ‘Add business ID’. Make sure to add a prefix ‘cat_’ and a minimal number of digits like this.

The prefixing in naming is always a good practice to do for later maintenance and finding the correct information based on your used naming convention in the application.
Another question might be what will happen when the number of entity instances exceed the longest number size!?…We will try that out in another post! 😇
Now on the left panel where all the building blocks can be found you will find the ‘Title’ block. Hit this one also and make sure you add a proper ‘Title specification’ like for example this: {item.Identity.EntityType + "_" + item.Identity.Id}
There is no need for typing this out as you can just select the needed properties from the ‘Expression editor’.


After hitting that ‘Insert Expression’ you will end up with this result:

As a last option for identification we can use a custom ID property with a nice rule!
From the building block list add a new ‘Property’ and give it the next information.

Also here don’t be a smart guy like me and give the name ‘id’ as it will resolve in database issues!
After adding the property, the property panel is open on the right side. Scroll a little bit down and make sure to make note of the dropdown ‘Allow participants to change the value’ option. We could set this one to ‘Never’, but then it’s not possible to use this property in the next step ‘adding a rule’!!
Next step is adding a rule. We will find out more about rules on other posts so for now just add the rule like this:

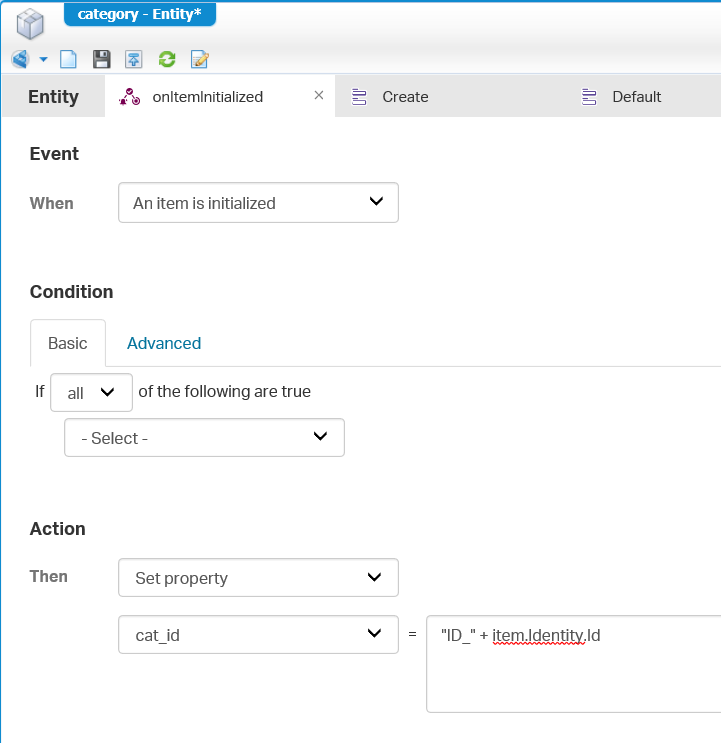
Being a smart guy is also punished here if you want to use
item.Identity.BusinessIdas this value is only available once the instance is saved for the first time!
Now it’s time to see some results for our low-coded craftmanship…Go ahead and start by editing the ‘Create’ form for the ‘category’ entity with the ‘Form designer’ link.

Now try to create something like this where we use a ‘Tab Container’ for the ‘Identity’ information:

This list of components it used for this form:
- Identity.ID
- Identity.Item ID
- Identity.Business ID
- Title.Title
- Properties.Category ID
Make sure you also edit the ‘Default’ form, so it still fits the ‘Create’ form!
Then there is the moment of publication for the entity and we have a nice quick button for that. So, hit it like a pro.

Now enter the front end (/aw_tips/app/start/) with the already user ‘awuser’ account and password ‘admin’ and create a new instance of the ‘Category’ entity. The first thing you might noticed is the label…remember where that came from!?

The creation screen will look like this where you see the rule is applied in our low-code development work!

After creation you can view the instance with this URL http://192.168.56.107:8080/home/{organization}/app/start/web/item/{id}
Or if you want to be ‘a smart guy’ this time hit the ‘Create and open’ functionality!

And here you see the importance of the ‘Title’ building block and the business ID that immediately identifies the entity type when properly configured like this.

Now as an assignment for you to learn proper entity identification. Make sure you implement the next table for the other entities.
| Entity | Display name | Business ID | Title | ID Property | onInitialized Rule |
|---|---|---|---|---|---|
| member | Member | mem_{6} | "TITLE_" +item.Identity.Id |
Member ID [mem_id] | "ID_" +item.Identity.Id |
| member_developer | Developer | {Inherited} | {Inherited} | {Inherited} | {Inherited} |
| member_reviewer | Reviewer | {Inherited} | {Inherited} | {Inherited} | {Inherited} |
| member_tester | Tester | {Inherited} | {Inherited} | {Inherited} | {Inherited} |
| project | Project | proj_{6} | "TITLE_" +item.Identity.Id |
Project ID [proj_id] | "ID_" +item.Identity.Id |
| project_secret | Secret project | {Inherited} | {Inherited} | {Inherited} | {Inherited} |
| todo | ToDo | todo_{9} | "TITLE_" +item.Identity.Id |
ToDo ID [todo_id] | "ID_" +item.Identity.Id |
| task (= child task) | Task | task_{12} | "TITLE_" +item.Identity.Id |
Task ID [task_id] | "ID_" +item.Identity.Id |
And as always…When you are ready save it all, validate it all and publish it all. Testing is not very useful as we didn’t change any other forms although you could change the forms on the ‘Member’ entity but is not required for now.
As a last step we will do a deeper dive on what is created on the backend of the AppWorks platform. For this we look in de database as well in the Corsys system with the CMC tool.
Cordys Management Console
For this we start a MobaXTerm console. Make sure you export your DISPLAY variable like this with the correct IP address: export DISPLAY=IP:0.0
Then you can start the CMC tool sudo /opt/opentext/AppWorksPlatform/defaultInst/bin/cmc.sh
Click on the ‘Repository Browser’ and connect to the ‘Cordys System’.

Once connected you should be able to browse to something that looks like this. You can click on anything and view all the information on the crafted identity information!

When DONE, just close the tool.
Database
For this deep dive we use a nice UI tool called HeidiSQL. After installation you can make a connection like this:

Enter the ‘public’ domain.

And if you scroll a bit down you should be able to see these tables passing by…

For the SQL query part, we can then do these kind of things SELECT * FROM o2appworkstipsappworkscategory; where we see all our information passing by also!
Note that some instances have (NULL) values. Why would that be?…Because these were created before we start playing with all the identity information. Also, here you see the importance of proper prefixing and numbering.

Or some other simple SQL statements
1 | SELECT * FROM o2appworkstipsappworkscategory; |
This give us nicely sunny (it’s 40 degrees outside were I am now!) ‘DONE’ for this installment. Lots to learn from and lots to discover and this is what we will continue to do. So, I will see you in the next post where we will discover what can be done on the AppWorks CUSP. Don’t know what CUSP is by know? The next one is then for you…And as always…have a good one!
Don’t forget to subscribe to get updates on the activities happening on this site.
